September 16, 2020 Lada.Online 93 031 24
Why do LADA owners care about the frequency of replacing the timing belt (gas distribution mechanism) on their cars? Mainly due to the consequences of a broken belt, in some cases the valve bends, which ends in expensive repairs. Let's figure out at what mileage the manufacturer recommends changing the timing belt and rollers, as well as what its actual service life is.
When to change the timing belt on a Lada Priora
New timing belt from Gates
Each car has a specific procedure for replacing certain spare parts.
AvtoVAZ has installed 105 thousand km to check the condition of the timing belt.
However, there are many factors that can lead to premature wear of drive parts. And this threatens, if not the capital of the entire engine, then serious repair costs. And that's why.
Why a timing belt may require replacement ahead of schedule
The owner replaced this belt ahead of schedule, although there are practically no signs of wear on it. So calmer!
Even if the belt is slightly damaged, and this can be not only a break, but also stretching, cutting off part of the teeth, contact of the valves with the piston heads is inevitable.
The result of contact can be the most unpredictable - from bending valves to destroying crankshafts or camshafts . Some engine models are free from this danger, since if the rotation angles of the crankshaft and both camshafts are mismatched, emergency niches for the valves are provided in the piston bottom.
The timing belt can be changed “to the heap” if play in the pump is noticed
Priora, unfortunately, cannot boast of this. That is why experts on Priorov engines strongly recommend checking the condition and, if necessary, replacing the timing belt after 40-50 thousand mileage .
Replacing the timing belt without special tools
The method can be used if there is no need to change the rollers.
- Cut off half of the old timing belt with a utility knife.
- Remove half of the old timing belt.
- We put a new timing belt on the crankshaft pulleys.
- We cut the second half of the old timing belt and remove it.
- Pull the new timing belt onto the crankshaft pulleys until the end.
By the way, according to the survey results, replacing the timing belt on an 8-valve engine is easier than on a 16-valve engine.
Russian-made cars of the VAZ-2170 or Lada Priora brand have received recognition from many motorists. This is due not only to the modern design of this car, but also to the fact that the vehicle is equipped with a type 21126 engine. This is a 16-cylinder engine with a volume of 1.6 liters and a power of 106 hp. Along with the advantages, the Priora has a disadvantage, which manifests itself when the timing belt breaks. If the timing belt is not replaced in a timely manner, then when it breaks, the valves will bend. To prevent this from happening, the timing belt on a Priora 16 valve must be replaced in a timely manner, which can be done with your own hands. This procedure is not complicated, and each owner will be able to perform it independently, having understood some of the nuances.
Checking the condition of the belt
Checking the timing mechanism
Any checks and adjustments of the drive belt are carried out only on a cold engine. Its maximum temperature should be no higher than 35 degrees.
If the car has an air conditioner, you should remove its drive belt, and only after that handle the timing belt. To remove the air conditioner belt, you need to unscrew the engine mount, and after removing the belt, install the motor on the mount, lightly tightening the screws that secure it.
Checking the timing belt is performed in the following order:
- Find and unscrew the five screws securing the plastic protective cover.
- Remove the cover from the engine.
- Jack up the front wheel on the right.
- We set the gearbox to fifth gear.
- Turn the wheel clockwise.
- The inner surface of the belt should not have cracks, abrasions, folds, or delamination of the rubber material.
- The outer surface should be free of marks, cracks, signs of heavy wear and protruding cord.
- If stains of operating materials (oil, coolant) are found on the belt, it must be replaced, but only after the causes of the leak have been eliminated.
How to check and adjust belt tension on a Priora
Timing belt in action
After inspecting the condition of the timing drive, be sure to check the belt tension and the condition of the tension and support rollers. This should be done in the following sequence:
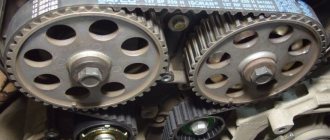
- We turn the crankshaft by the hanging wheel until the marks on the toothed pulleys of both camshafts align with the bosses on the rear drive casing.
- Pay attention to the tension roller: the cutout in its cage must clearly coincide with the boss of the sleeve inside the roller.
- If the belt is tensioned satisfactorily, the boss will coincide with the cutout, otherwise it is necessary to loosen the roller mounting bolt with a 15mm wrench.
- To adjust the belt tension, turn the roller itself - counterclockwise to tighten, clockwise to loosen.
- This can be done either with a special wrench, or a bicycle wrench of a suitable size with a grip, or pliers for removing the locking rings.
- The roller is rotated until the cutout and boss coincide, after which the roller mounting bolt is tightened with a force of about 40 Nm using a 15 wrench.
When adjusting, it is important not to overtighten the belt or loosen it, since in the first case it will quickly wear out and lead to failure of the pump bearing, and in the second case, teeth may slip and the valve timing may be disrupted.
Timing belt with signs of wear
As a result, the valves can strike the piston crowns, causing serious and costly failure.
Lada Priora, Kalina, Granta 16-valve engine, replacement of timing belt and rollers. Video instruction
After this, you need to set the timing mechanism according to the marks. The mark on the gear should coincide with the protrusion on the cover body. This can be done by turning the crankshaft pulley mounting bolt using a wrench. Or, jacking up the right side of the car, engage fifth gear and, turning the wheel, carefully set the marks. You should get a picture like this:
You can begin to unscrew the crankshaft pulley bolt:
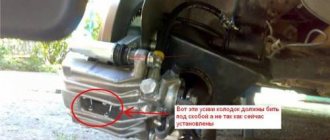
In order to do this with your own hands, without resorting to the help of others, insert a screwdriver into the caliper hole:
When we unscrew the bolt, the drive will not spin, the pulley will stand still. The gear on the box must be engaged.
While we were unscrewing the crankshaft pulley, all our marks were gone, so we will have to set them again. Therefore, we take out the screwdriver and repeat the procedure for setting marks again. The mark is on the crankshaft gear; there is a small protrusion on the pump body, and our mark should be aligned with it:
Next, unscrew the bolt securing the tension roller using a 15mm wrench. The belt is then loosened as much as possible and you can even pull it out without removing the roller, but the rollers must be removed in any case when replacing the timing belt in order to check their condition. We also check the pump for leaks, play and other defects. It is recommended to time its replacement together with the timing belt.
We install the timing belt in the reverse order, first install the support roller, tighten its fastening bolt with a torque of 34 to 41 Nm, using a torque wrench.
The tension roller on this engine has a built-in automatic tension adjustment mechanism, so it is enough to install it according to the instructions and the belt tension will occur automatically.
We need to align the protrusion on the roller with this slot:
Using a special key, rotate the roller counterclockwise. We install a new timing belt, it is more convenient to do this from below, we put it on the crankshaft gear, through the support roller and onto the camshaft sprocket. Let's look at what we have according to the marks; if they are gone, they can be corrected using the key to 17:
Next, we pass the belt through the roller and put it on the pump. We look at the marks again so that they don’t go away. Now you can start tensioning the timing belt using a tension roller. To do this you will need this special key:
We need to tighten the roller mounting bolt, for this we will need a torque wrench, the required torque should be from 34 to 41 N m, after that we remove the key and once again check that the marks of the Gas Distribution Mechanism match.
Video of replacing the timing belt and rollers in a 16-valve Lada Priora, Kalina, Granta engine:
Backup video on how to replace the timing belt in a 16 valve Lada Kalina, Priora, Granta engine:
To finally make sure that everything is aligned according to the marks, it is advisable to turn the crankshaft pulley using a key, making two turns. This can be done again by fixing the rotation of the wheels using our method, using a screwdriver inserted into the caliper hole.
Read times: 1,128; Today: 1
Source: https://remontautohelp.ru/lada-priora-kalina-granta-16-klapannyjj-dvigatel-zamena-remnya-grm-i-rolikov-video-instrukciya/
Replacing the timing belt on a Lada Priora - when to change it and should you focus on mileage?
Replacing the timing belt is carried out on DOHC engines, which are installed on Prioras, as a rule, performed after 60 thousand km. mileage Despite the fact that the manufacturer recommends changing the belt closer to 200 thousand.
There are those who don’t wait and change the belt every 40-50 thousand, but where is the truth and when should you actually replace it? Let's figure it out.
DOHC engines on Priors have four valves per cylinder (two for intake, two for intake). The valves are opened by the action of pushrods, which allows for an additional advantage when it comes to power.
Synchronization of the intake and exhaust processes is realized using a belt drive. The belt itself is a toothed, dense ring consisting of several layers of rubber and nylon. The specification and compatibility of the belt is indicated on its sidewall, in this case the width is 22 mm, the number of teeth is 137. When buying a timing belt, you should be attentive to the quality of the product; it should not have defects such as scuffing, roughness, cracks and irregularities.
The timing belt on a Priora combines many components, bending around drive rollers and pulleys. So this belt is related to the coolant pump pulley, the camshaft pulleys that lift the valves, has one guide roller, and the degree of tension is regulated by a special tension roller. To install the belt, you must follow certain rules and take into account special marks located on the belt, crankshaft pulley, oil pump, and camshafts. From the Priora factory, they receive sets of timing belts and rollers manufactured by Gates; there seem to be no questions about the belts, but the plastic rollers are considered the “Achilles heel” of these sets. Those who have had bitter experience of using such belts and rollers strongly recommend replacing them early and checking their condition regularly.
Manufacturer's terms
The vehicle operating instructions recommend replacing the timing belt, tension roller, and pump after 200 thousand kilometers.
How long it actually takes to replace it depends on many factors. If the car drives most of the time on country highways without traffic jams, sudden acceleration and braking, the belt can last 200 thousand kilometers. Aggressive driving style, traffic jams, poor-quality consumables and maintenance reduce the actual service life of the timing belt.
Experienced owners of this model and repairmen recommend replacing it after 50–60 thousand kilometers. You need to check the condition of the timing mechanism parts every 10–15 thousand km.
Particular attention should be paid not only to the tension of the timing belt in the timing drive, but also to the condition of its teeth. It is their cutting that causes breakdowns followed by expensive repairs.
Belt
This part in the timing mechanism drive transmits rotation from the crankshaft, two camshafts, and the coolant pump. The loads on the belt are large; high demands are placed on the quality of the material for its manufacture. It is quite difficult to break the body of the belt; most often its teeth are cut off.
Under ideal conditions, it runs for 150 thousand km. It is difficult to obtain such conditions on the roads of the CIS countries, especially in cities, so the service life of this part is reduced.
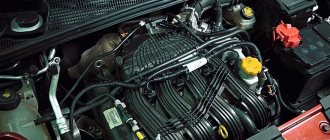
Gas distribution mechanism Lada Priora
The optimal mileage when you need to replace the timing belt will be in the range from 50 to 60 thousand km.
There is confirmed data on earlier dates for performing such an operation, but in these cases, malfunctions in the valve drive mechanism, engine oil leaks, and the appearance of defects on the toothed belt were noted. The lubricant softens the composition of the belt material, which makes it easier to destroy, so engine oil leaks should not be allowed to occur, and if they occur, immediately repair the detected malfunction.
Pump and rollers
Normal operation of the timing mechanism drive cannot be ensured without a tension mechanism for the drive device. Since two camshafts are installed in the cylinder head, the length of the drive increases, which also required the installation of a support roller. Both of them are sealed bearings, with the difference that the tension roller rotates on the axis, thereby setting the required belt tension. The support roller only guides the belt as it rotates. Since the bearings are filled with lubricant during assembly, and they themselves are sealed, the manufacturer guarantees their reliable operation for the entire service period.
Many experienced repairmen and drivers check the presence of lubricant before installing the roller and add it themselves. The malfunction of these parts is indicated by noise when they rotate and the presence of play. And the coolant pump also rotates with the timing belt. It is the pump that most often causes teeth to be cut off. This occurs when the pump jams while the engine is running. If the owner of a Priora does not want to incur additional costs for repairing the power unit of his car, he needs to change the rollers and pump at the same time as the toothed belt.
Why is this so important?
I think it’s no secret to anyone what happens when the timing belt breaks, but perhaps there are those who are not in the know. In the event of a break, the synchronization of the operation of the cylinder-piston group and valves is disrupted. The pistons begin to move towards the valves, which are no longer controlled by the belt; as a result, the pistons “meet” the valves. After such a “meeting,” the pistons are destroyed, the valves are bent, and in general you end up with a major engine overhaul. Could this have been avoided? It is possible, of course, if the manufacturer of this engine thought about this at the design stage, completely eliminating such a phenomenon. By the way, there are quite a few “plug-in” engines in the world that, after a broken belt, do not need to be “overhauled”; you just need to get to a service station and replace the timing belt. In such engines, when the valve belt breaks, the valves do not meet the pistons.
The belt and rollers must be replaced immediately if, during inspection, you find:
- Roughness on the belt (on the teeth or sides);
- Mechanical damage;
- Engine malfunctions;
- Problems starting the engine;
- Extraneous sounds indicating friction of the belt against the casing, rollers or pulleys.
Separately, I would like to note the appearance of vibration and black exhaust; such symptoms, of course, can occur under other circumstances, but this option should also be considered.
Consider exclusively mileage in the question: “Is it time to change the timing belt or not?” - this is mistake. Firstly, even with low mileage, problems can arise with the belt or rollers. And secondly, there are many situations when you practically or completely do not move, while the motor is running, therefore, the belt wears out. For example, if the car is used mainly in the city, the mileage may be low, but the life of the belt itself will be at its limit, since in traffic jams the engine is running, but there is practically no movement.
There are other factors that can cause a belt to fail prematurely. For example, if oil, fuel, dirt or sand gets on it. Small particles of sand eat into the surface of the belt, destroying its surface; oil and other petroleum products soften it, reducing its strength and shortening its service life.
Why install a belt or the advantages of the mechanism
This node has plenty of advantages, despite the “screams” of opponents, let’s list them:
- Silence of work. This is probably the biggest plus - with a belt drive, the engine runs quieter than an iron opponent. Maybe not by much, but the effect is, as they say, “noticeable”, or rather audible!
- Price. Belt drive is two to three times cheaper than a similar metal structure. This affects both initial production (in factories) and final consumption (the owner). Even if you change the belt every 70,000 kilometers, it will still be cheaper than changing the chain once every 250,000 kilometers.
- Space saving. It was a surprise to myself, but engines with a chain mechanism are about 10% larger than engines with a belt drive! Why? YES, everything is simple - the chain drive is inside in oil, and accordingly you need to make a valve cover, block, pan, etc. – more massive to close it inside. Here's to a larger engine! Of course, now they’ll say, “Didn’t you forget about the belt?” After all, it also has a casing in front? No, I didn’t forget, but the casing is usually smaller in size.
- Oil quality. Everyone knows that chain transmission is very demanding on the quality of engine oil; the service life due to poor quality lubrication can be reduced by 20 - 30%, which you know is significant! Therefore, it is advisable to change the oil every 10 - 12,000 kilometers. The timing belt in this regard is simpler; it doesn’t care about oil at all, it spins in the air and doesn’t come into contact with this lubricant in any way.
- Easy maintenance. Needless to say, the belt is much simpler and, let me emphasize again, cheaper to replace. There is no need to go into the engine and disassemble it, drain the oil, etc.
- Well, and probably the last thing - the belt is easier to tighten, you can at least tie it in a knot. You can’t do this to an opponent, that’s why the “tensioners” for the chain are unique.
Maybe I forgot something, but as you can see, there are quite a lot of advantages, despite the fact that many “dislike” it.
How to independently check the serviceability of the timing belt of a Priora car: Replacing the belt
Any auto mechanic will explain to the motorist that the timing belt must be changed regularly, otherwise its rupture during operation will damage the vehicle. All motorists will be able to replace the part if they carry out the preparatory stage correctly, remove interfering components for a while, and set the timing marks on the Priora.
Experts advise checking the condition of this component of the mechanism every 105 thousand kilometers traveled. It will be useful for motorists to learn how to disassemble the mechanism and check for damage to the belt.
What kind of belt is used?
On Priora cars with a 16-valve engine 21126, a toothed rubber belt with a number of teeth of 137 pcs is used. The width of the belt is 22 mm.
The article number of this element is 137-22 HNBR
This is what the timing belt used on Priors looks like
Also, many owners speak well of Gates belts.
What is a timing belt
This is the connecting part that ensures the synchronization of two vehicle components - the camshaft and crankshaft. However, the belt not only combines these two mechanisms, it is also connected to other parts, as a result of which a huge load is placed on it.
Due to this load, it is subject to wear and therefore must be replaced after the expiration date. If you neglect the recommendations specified in the Priora instructions regarding regular replacement, the belt will break and all the mechanisms associated with it will fail.
Untimely replacement will cost the car owner too much; it is advisable to constantly check the mechanism for damage and the first signs of wear.
Experienced auto mechanics advise not to believe the statements of official dealers that the timing belt on a Priora is replaced every hundred thousand kilometers traveled. Sometimes a rupture is possible after fifty thousand kilometers, but there are cases when the mechanism has traveled more than one hundred thousand kilometers. Therefore, schedule several checks, for example every 10,000 km, to ensure that the mechanics are functioning at the proper level.
It is made of high-quality and durable rubber, smooth on top and serrated on the inside. The teeth provide the strongest grip on the gears. If, due to a long period of use, parts of the teeth fall off, the car may not even start due to the fact that the automobile oil is untimely or incorrectly supplied to the cylinders located in the engine.
A simple rubber component plays an important role in the entire mechanism of the machine. Try not to forget about checking it, because a problem detected in time will save money spent on repairs.
When to change: consequences of untimely change
It is recommended to replace the timing belt on a Priora after different periods of time. The manufacturer claims that it can withstand one hundred thousand mileage, but experience shows that a change may be needed much earlier.
The optimal period is every fifty thousand kilometers. Some argue that over such a short service life, rubber is simply not capable of failure. However, no one takes into account the conditions - roads, fuel quality, etc.
Also, during the operation of the mechanisms, it wears out, the rubber stretches, and therefore does not provide the correct tension of the timing belt, and slippage is possible. The teeth can wear off - because of this, traction with the gears is not ensured.
There is no exact time for a change that would suit all motorists. Some take good care of their vehicles, drive carefully, and use only high-quality fuel. Others use a more extreme type of driving, foreign liquids get on the rubber, etc.
In order not to lose your car during the repair period and not to spend a fortune on restoring the mechanics, write down or remember the date of the last timing belt change on the Priora. Next, regularly check the condition of the rubber; if worn, replace it with a new device.
Signs of possible failure
There are several characteristic signs that should alert the driver:
- When the engine is turned on, extraneous noise occurs. Sometimes drivers confuse a timing belt malfunction with a poorly functioning tension pulley.
- If the color of the exhaust gas has changed.
- The engine doesn't start well.
- An unusual vibration is felt.
Pay attention to these “symptoms”, even if the Priora’s mileage with a new timing belt has not yet reached 50 thousand km. It may fail earlier if foreign liquid gets onto the drive - oil, coolant, as well as dust or dirt.
It’s worse if it’s the coolant that gets onto the drive. Firstly, this means that the gasket that ensures the pump is sealed has failed, or there is a problem with the pump. Then the rubber is damaged and service life is reduced tenfold.
Even if the belt is new, but coolant or antifreeze gets on it, it will fail even after operating for 10 thousand miles. You will have to replace the Priora timing belt and figure out why foreign substances get on it.
How to check the serviceability of the belt yourself
If you suspect that it is time to replace the Priora timing belt, it would not hurt to check the serviceability of this rubber product. Visual diagnostics will allow you to check the serviceability and absence of scuffs on the Priora timing belt.
You should have a choice of one of the tools at hand, or two at once - a 5-point hex key, or a T-30 sprocket bit. If one doesn't work, try the second.
- Open and lift the hood.
- You will see the front panel covering the mechanism and timing belt.
- Take the key and unscrew the five bolts that hold the front panel, remove it.
- In front of you you will see a mechanism, including a tension roller.
- Place a jack on the passenger side and place the wheel in a suspended position. Engage fifth gear while it is working, look at the surface of the belt for damage, even small defects.
- If you notice cracks of any size, mechanical cuts, or threads sticking out, be sure to replace it by contacting a specialist or yourself.
- Check the pump. If any traces of coolant leakage from the pump are noticeable, then the rubber will also have to be changed, even if there is no mechanical damage.
- Check the tension roller. Auto mechanics advise changing it less often than tires. The average lifespan is approximately one hundred thousand kilometers. Change it every other time you change the belt.
- Measure the belt tension. To do this, press on the stretched rubber in the area between the gears of the two camshafts. You need to press with a force of about ten kilograms. Correct tension of the timing belt should not bend more than seven millimeters.
- Check that the rubber is not too loose. Make sure that the Priora timing marks match the original condition. The first, similar to a recess, is located on the outer race of the tension roller. The next one is located at the base of the roller. The maximum deviation is four millimeters; if the tension does not meet the standards, the product will have to be changed.
Found a discrepancy with the standards? Change the product. A belt set with rollers for the Priora 126 engine costs only five thousand rubles. This is a much smaller amount than the cost of a major repair if a component ruptures.
Changing the belt yourself
Replacing the timing belt of a Lada Priora with 16 valves is not the most difficult procedure. Buy a kit that includes tension rollers, stock up on tools, and you’re good to go.
Instructions
- Lift the hood, use a hex wrench to unscrew the five bolts on the cover, and remove it. Unscrew the two bolts from the lower timing cover.
- Disconnect the crankshaft sensor.
- On the passenger side, place a jack under the wheel, lift the car with it, and place the wheel in a suspended position. This will make it easier to align the marks of the mechanism and camshafts - they should be parallel, opposite each other. Combine them with fifth gear engaged, turning the wheel to the correct position. Turn off gear transmission.
- Find the flywheel and remove the rubber plug with a regular screwdriver. Under the muffler you will see a flywheel with a mark, it should be located opposite the mark on the left side.
- You need to get to the crankshaft pulley; to do this, remove the wheel or turn it to the right, you need to turn it all the way. Unscrew the five bolts that secure the mudguard.
- Ask a friend to engage fifth gear and press the brake, at this time, using ratchet No. 17, unscrew the bolt that secures the crankshaft pulley. Rotate in the opposite direction clockwise.
- Remove the thrust washer
- Unscrew the bolts securing the tension and thrust rollers. Use key 15. Remove the rollers, remove the belt.
- Now install new rollers, do not tighten the tensioner type, they will be used for adjustment. Reinstall the camshaft pulleys, then the crankshaft pulley.
- Put on a new belt - pull it onto the crankshaft, then around the pump, then onto the camshaft pulleys.
The timing of replacing the timing belt on a Priora is often unpredictable and does not always depend on mileage!
The timing belt on a Priora is a mechanical connection that controls gas distribution in an internal combustion engine. It consists of camshafts, mechanical drives to them, transmission elements such as rods, pushers, rocker arms, valves that close and open the holes in the combustion chambers, adjusting elements, valve rotation systems, belts, etc. The camshaft drive allows it to rotate with angular velocity, which is defined as half the angular velocity of the crankshaft itself. Before deciding when to change the timing belt on a Priora, it is worth familiarizing yourself with how this mechanism works and what are the features of its operation.
Features of the Priora car
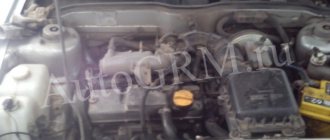
Motor of the new Lada
The engine on the Priora belongs to the class of so-called DOHC engines (Double overhead camshaft), which have two shafts, each for its own row of valves (two for exhaust, two for intake). The valves are driven by pushers, which gives an advantage in power delivery.
The timing belt on a Priora car is a rubber-mechanical product with teeth along the inner edge. Its rim indicates the type of engine for which the part is suitable, as well as markings indicating the number of teeth (137) and width (22 millimeters). When purchasing a timing belt, you should check its quality by pressing on a non-toothed surface. Obvious product defects include the appearance of longitudinal or transverse cracks, delamination, and excessive roughness on the teeth.
The timing belt goes through a tensioner pulley, a timing pulley on the crankshaft, a coolant pump pulley, a pulley (toothed) for the exhaust camshaft, a pulley for the intake camshaft, and an idler pulley. The system also has marks on the crankshaft pulley, oil pump, belt cover (rear), and on both camshafts.
In the factory configuration, the car is equipped with a Gates Kit timing belt with plastic rollers, which are not of good quality, so experienced “prior mechanics” prefer to change this part even before the recommended period expires.
What mileage should the car have to replace the belt?
Replacing the motor belt
It is necessary to change the belt, according to AvtoVAZ itself, when the Priora has a mileage of about 200,000 kilometers, however, it is believed that during short drives around the city this element wears out faster, therefore, according to surveys, some people change it already at 40,000 kilometers, while others only at 60 thousand mileage. This part needs to be inspected every 50 thousand kilometers. The first signs that the timing belt needs to be replaced are the following:
- extraneous noise when the engine is running;
- difficulties when starting a Priora car;
- the engine has very strong vibration (to the point of trembling throughout the entire body);
- exhaust fumes are blacker than usual.
A low mileage of a car cannot always guarantee that a situation has not arisen where the belt needs to be changed. Very often, the belt drive wears out prematurely due to the fact that oil penetrates through the seals; cracks in the casing allow dirt to penetrate. These components quickly destroy the rubber of the belt, because it peels off from the cord, and dust mixed with oil gives a destructive abrasive effect. Here you need to eliminate the causes of oil leakage and visually inspect the part itself. It is believed that minor dirt can be removed with wiping paper or a rag (if there are no breaks), and it will still be a long time before it is really necessary to change the belt.
The belt must be replaced in a timely manner, without waiting for it to break, since the latter is very fraught in terms of engine repair costs (from 10-12 thousand rubles). This is due to the fact that the pistons in Priora engines do not have recesses for the valves, as was the case on the VAZ 2110, therefore, if the timing belt breaks, there is a high probability that the pistons will “meet” the valves, with the latter bending.
At high speeds, problems with the strength of the belt on the Priora can cause the pistons themselves to break and even bend the connecting rods. It would be good if there were no accidents.
What are the consequences of untimely replacement?
Questionable savings on the purchase of consumables for the timing mechanism can lead to significant costs for the restoration of the power unit. On the Lada Priora, the cylinder head has 16 valves, 4 for each working cylinder. If for some reason there is a mismatch in the operation of the timing belt and the crank mechanism, there will inevitably be a “meeting” of pistons and valves. In the best case, you will have to replace the damaged valve, but there can be more significant damage to the engine.
Check and replace worn timing drive parts in a timely manner; the machine will delight you for a long time with the flawless operation of the power unit.
Visual inspection and work procedure
How to check a belt for rupture if the car “knocks” during a trip? To do this, some car enthusiasts just need to unscrew the timing cover and visually assess the condition of the part. And this is the easiest way for the Priora series, while some foreign cars are already equipped with detectors for such a breakdown, located right in the car’s interior. It is interesting to note that both domestic and foreign cars are susceptible to belt breaks on Russian roads, often regardless of their mileage.
How to install a new timing belt on a domestic Priora car? To do this, first of all you will need:
- Remove the fastening screws from the front top cover using a “5” hexagon;
- Remove the mudguard from the engine compartment;
- Using the socket at “17”, turn the crankshaft clockwise (by the bolt from the drive pulley leading to the generator). Inspect the timing belt for damage or contamination;
- Unscrew the pair of screws that secure the lower cover from the timing drive using a hexagon to “5”;
- Remove the cover and the generator drive belt;
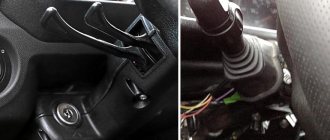
- How to avoid violation of the gas distribution order? To do this, you need to put both the crankshaft and the gas distribution shaft in the top dead center position for the compression stroke of the first cylinder (turn the crankshaft by the pulley mounting bolt clockwise until the marks on the pulleys align with the marks on the rear cover from the timing drive);
- To check the position of the crankshaft, you need to remove the rubber plug located in the upper part of the clutch housing (at the same time, the coolant temperature sensors, the wiring harness from the sensors, and the cooling system hose must be disconnected). After this, it’s worth looking at how the mark is located on the “one” flywheel. It must be placed so that it is opposite the second slot on the top cover of the clutch housing on the Priora.
- What action should be taken next so as not to disrupt the valve timing again when the bolt is unscrewed from the fastening on the pulley at the generator drive? In this case, you will need an assistant to fix the flywheel by placing a large-diameter slot-type screwdriver through the hole in the clutch housing and into the flywheel teeth.
- Next, you need to remove the generator drive pulley, having first loosened the fastening bolt and its support washer.
- Using a spanner or a 15mm socket, you need to loosen the fastening bolt from the tension roller of the belt itself (the roller turns - the tension weakens).
Return to contents
Replacing the timing belt and rollers on a Priora with 16-cl. motor
The Lada Priora engine is quite problematic in the sense that if the timing belt breaks, you will have to spend a considerable amount of money on repairing the internal combustion engine. If anyone doesn't know.
then if the belt breaks, a collision of pistons and valves occurs.
At this moment, in most cases, it not only bends the valves, but also breaks the pistons, so there is no point in delaying replacement if there are strong signs of wear or the mileage has exceeded 70,000 km.
If you decide to carry out this procedure yourself, then you should keep in mind that to carry out this Priora maintenance you will need a lot of tools, namely:
- Hexagon 5
- Socket heads for 17 and 15
- Spanners for 17 and 15
- Thick flathead screwdriver
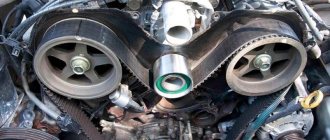
First you need to remove the protective plastic casing, under which the entire timing drive system is located. To do this, you need to unscrew several bolts of the upper and lower covers, after which we have the following picture:
After this, you need to turn the crankshaft and ensure that the marks on the camshaft sprockets align with the marks on the upper casing body, as shown in the photo below for greater clarity:
Many manuals talk about turning the crankshaft using a key, but you can do it differently. Raise one part of the car with a jack so that the front wheel is suspended and, with 4th speed engaged, turn the wheel by hand, thereby rotating the crankshaft and camshaft.
When the timing marks match, it is also worth looking at the flywheel mark so that everything is even there too. To do this, use a screwdriver to pry off the rubber plug in the gearbox housing and make sure that the marks in the window match. Visually it will look like this:
After everything is done, you can proceed further. The first step is to remove the belt from the generator, since in the future it will interfere with us. Next you will need an assistant.
You will need to unscrew the crankshaft drive pulley, and at this time an assistant will have to hold the flywheel from turning.
To do this, just insert a thick flat-head screwdriver between the teeth and hold it in one position to prevent the timing marks from moving,
When the pulley is free, you can remove it:
Also, do not forget about the support washer, which must be removed. Now you need to loosen the tension roller to loosen the belt:
After which you can remove the Priora timing belt, first from the camshaft gears, the water pump (pump), and from the crankshaft pulley:
If it is necessary to replace the tension and support rollers, then unscrew them with a 15mm wrench and install new ones. The price for them is about 1000 rubles. If you decide to buy a timing belt and roller assembly, the price will be approximately 2,000 rubles. This is for a GATES brand kit.
Now you can begin the procedure for installing and replacing the belt, and this procedure is performed in reverse order. The only thing worth noting is the belt tension. This is done using a tension roller. And we do the tensioning itself using a special wrench, or these pliers for removing the retaining rings:
Please note that over-tightening a belt is extremely dangerous and can lead to premature wear, but a weak belt is also dangerous. If you are not confident in your own abilities, then it is better to entrust this work to service station specialists.
Source: https://zarulemvaz.ru/zamena-remnya-grm-i-rolikov-na-priore-s-16-kl-motorom/
Adjust the tension to ensure maximum mileage
Normal belt tension
What is the best way to adjust the timing belt tension? To do this, take pliers to remove the locking rings and insert the ends into the grooves from the outer race of the roller (tensioner). The belt is tensioned, while using pliers you need to turn the tension roller counterclockwise so as to align the cutout of the outer race with the protrusion of the bushing (rectangular). The roller mounting bolt is tightened with a wrench. It is worth noting that the spare timing kit does not include anything other than a belt and rollers, so all keys and sockets must be purchased separately.
How to complete the installation of this element? After installing the pulley from the generator drive, you need to rotate the crankshaft by the mounting bolt 2 turns (clockwise) and check the alignment of all marks. If there is a discrepancy, then all operations must be carried out again, because no matter how high-quality the timing belt itself is, it will not be able to perform its functions if it is poorly installed. After all the operations and reassembly of the parts, you need to start the machine and let it run for about a quarter of an hour.
Next, you need to re-check the belt tension: when a force of 100N is applied to the middle of its long part, the “sag” should be in the range of 5.5 to 6 millimeters. If you are not confident in your experience in carrying out such work, it is better to contact a car service center that specializes in Priora, so that later you do not have to pay for the repair of the entire engine. But it’s worth having basic knowledge of how to tension a belt, because this part often fails on the highway, far from service stations, even if the car has low mileage.
Replacing the timing belt on a Lada Priora - when to change it and should you focus on mileage?
Replacing the timing belt is carried out on DOHC engines, which are installed on Prioras, as a rule, performed after 60 thousand km. mileage Despite the fact that the manufacturer recommends changing the belt closer to 200 thousand.
There are those who don’t wait and change the belt every 40-50 thousand, but where is the truth and when should you actually replace it? Let's figure it out.
DOHC engines on Priors have four valves per cylinder (two for intake, two for intake). The valves are opened by the action of pushrods, which allows for an additional advantage when it comes to power.
Synchronization of the intake and exhaust processes is realized using a belt drive. The belt itself is a toothed, dense ring consisting of several layers of rubber and nylon. The specification and compatibility of the belt is indicated on its sidewall, in this case the width is 22 mm, the number of teeth is 137. When buying a timing belt, you should be attentive to the quality of the product; it should not have defects such as scuffing, roughness, cracks and irregularities.
The timing belt on a Priora combines many components, bending around drive rollers and pulleys. So this belt is related to the coolant pump pulley, the camshaft pulleys that lift the valves, has one guide roller, and the degree of tension is regulated by a special tension roller. To install the belt, you must follow certain rules and take into account special marks located on the belt, crankshaft pulley, oil pump, and camshafts. From the Priora factory, they receive sets of timing belts and rollers manufactured by Gates; there seem to be no questions about the belts, but the plastic rollers are considered the “Achilles heel” of these sets. Those who have had bitter experience of using such belts and rollers strongly recommend replacing them early and checking their condition regularly.
How to replace the Priora timing belt and instructions for action
One of the latest developments by VAZ engineers of the last decade is the 21126 engine, which became the main power unit on the VAZ-2170.
Here, cylinder honing and new pistons were used, which contributed to an increase in power.
However, a banal break in the gas distribution mechanism drive will damage the components of even such a technologically advanced unit. Therefore, it is better to check and change this component of the system in advance.
When is it necessary to replace the timing belt on a Priora car?
If we take into account the factory maintenance regulations, then he recommends rotating the rubber-mechanical product after 200,000 km . But, as practice shows, motorists prefer to change this part earlier - some at 60,000, and some at 100,000 km. It is believed that during urban travel the element wears out faster.
In any case, the condition of the element must be monitored every 45 thousand km . The first signs that a timing belt replacement is already necessary on a Lada Priora are the following factors:
Low mileage does not always guarantee trouble-free operation of the car. Quite often in reviews from car enthusiasts you can come across a situation where the belt drive wears out ahead of schedule due to oil and dirt getting on it. These components enter through seals and cracks in the casing, so it is important to eliminate the causes of leaks and inspect the part.
It is important to understand that replacing the Priora timing belt must be done in a timely manner; in no case should the matter be delayed until it breaks. Otherwise, the cost of repairs may unpleasantly surprise the owner. This is largely due to the absence of recesses for the valves on the pistons, so a break in the part leads to their direct contact, after which the latter usually bend.
Problems with the strength of the belt drive at high speeds generally lead to catastrophic consequences, including breakage of the pistons and even deformation of the connecting rods. In order not to expose themselves to risk, experienced motorists are advised to periodically monitor the condition of the rubber transmission, as well as the degree of its tension.
How is a belt drive checked on a VAZ 2170?
The part is a rubber product with teeth located on its inner part. The outer rim shows:
- the type of motor for which the car part is intended;
- number indicating the number of teeth – 137;
- marking indicating the width of the product - 22 mm.
This data will be useful to the owner who does not yet know which belt to buy for the VAZ 2170. All that remains is to prepare the necessary tool for checking:
- inbus key (hexagon) to “5”;
- key to “10”;
- jack.
The drive status check is performed on a cold motor and consists of the following steps:
- Using a hexagon, unscrew the five bolts securing the front upper cover of the timing gear drive and remove it.
- Inspect the part and determine whether the Lada Priora needs to replace the timing belt . To do this, engage fifth gear, lift the right front wheel and rotate it clockwise. The product must be free of cracks, peelings and undercuts exposing the cord threads. If defects are found, the part must be replaced.
- Inspect the condition of the tension roller - there should be no damage to it.
- Check the belt tension by pressing a force of 10 kg on the belt between the camshaft gears and measuring its deflection - it should be no more than 5-7 mm . You can also carry out control by the position of mark 1 on the outer race of the self-tensioning roller, which ideally should be opposite the protrusion 2 . Deviations are permissible within 3-4 mm - they are adjustable, but exceeding these values means the need to replace the belt drive and rollers.
How to replace the timing belt on a Lada Priora on your own?
The process includes not only the rotation of the rubber transmission, but also the rollers - tension and support - change along with it. Repair kits are usually sold at auto dealerships. To work you will need the following tools:
- head at “17”;
- keys to “15”, “13”, “10”, “8”;
- inbus key (hexagon) to “5”;
- a special key for adjusting the roller or pliers for removing the locking ring.
Next, the process of changing the drive occurs in the following order:
- Unscrew 5 bolts with a hexagon on the upper plastic casing of the gas distribution mechanism and 2 on the lower one, remove them.
- Using the socket at “17”, turn the crankshaft clockwise and align both camshafts at TDC on the compression stroke of the first cylinder according to the marks. This moment is determined by aligning marks 1 on the camshaft pulleys with marks 2, which are located on the rear cover.
- Remove the rubber plug in the clutch housing and check the position of the crankshaft: the marks on the flywheel and the slot on the upper housing cover must match.
- Before replacing the timing belt on a Priora car , you need to remove the auxiliary drive pulley. To do this, the assistant must engage 5th gear and press the brake, and the car owner, using the “17” socket with a knob, unscrew the pulley mounting bolt and remove it.
- For the convenience of subsequent assembly, before dismantling the rubber part, experienced car enthusiasts recommend fixing the camshaft pulleys with a simple wooden wedge, which should be driven between them.
- Using a “15” wrench, loosen the tension roller bolt and remove the belt from the shafts. Next, remove the tension and support rollers.
- Apply fixing sealant to the threads of the bolts of the new rollers. Tighten the support roller to a torque of 35-41 Nm , but do not completely tighten the tension roller. Check the position of the crankshaft using the mark on the oil pump cover.
- Place the toothed rubber drive onto the crankshaft pulley. Pull both branches and put the front part on the support roller, and the back part on the pump pulley and place it behind the tension roller. If a wooden wedge was used, it must be removed.
How to adjust the drive tension on a VAZ 2170?
The final stage of replacing the timing belt on a Lada Priora car is performed according to the following scheme:
- Use a special wrench or pliers to turn the tension roller counterclockwise.
- Align cutout 1 with mark 2 on the inner roller bushing and tighten the fastening bolt to a torque of 20-15 Nm (see photo above).
- Install the auxiliary drive pulley in its original place.
- Turn the crankshaft 2 turns clockwise using the pulley bolt and check the alignment of the camshaft and crankshaft timing marks, as well as the belt tension. If necessary, repeat the operation.
The tension roller bolt is tightened to a torque of 35-41 Nm , and the auxiliary pulley is tightened to 105-110 Nm . Assembly is performed in the reverse order; we do not install only the upper plastic casing for visual control of the work performed.
Next, we start the engine and observe - indicators 1 and 2 on the roller should not deviate from the norm by more than 2 mm , after which they should take the working position. After checking the functionality of the units, the upper drive casing is installed in place.
The described process is similar and can be applied when repairing Lada Kalina and Lada Granta cars. The technique for replacing the gas distribution mechanism drive is available to any car enthusiast, but requires special care. The slightest displacement of the marks can result in expensive repairs.
Source: https://autobann.su/zamena-remnya-grm-lada-priora.html
Why is this so important?
I think it’s no secret to anyone what happens when the timing belt breaks, but perhaps there are those who are not in the know. In the event of a break, the synchronization of the operation of the cylinder-piston group and valves is disrupted. The pistons begin to move towards the valves, which are no longer controlled by the belt; as a result, the pistons “meet” the valves. After such a “meeting,” the pistons are destroyed, the valves are bent, and in general you end up with a major engine overhaul. Could this have been avoided? It is possible, of course, if the manufacturer of this engine thought about this at the design stage, completely eliminating such a phenomenon. By the way, there are quite a few “plug-in” engines in the world that, after a broken belt, do not need to be “overhauled”; you just need to get to a service station and replace the timing belt. In such engines, when the valve belt breaks, the valves do not meet the pistons.
The belt and rollers must be replaced immediately if, during inspection, you find:
- Roughness on the belt (on the teeth or sides);
- Mechanical damage;
- Engine malfunctions;
- Problems starting the engine;
- Extraneous sounds indicating friction of the belt against the casing, rollers or pulleys.
Separately, I would like to note the appearance of vibration and black exhaust; such symptoms, of course, can occur under other circumstances, but this option should also be considered.
Consider exclusively mileage in the question: “Is it time to change the timing belt or not?” - this is mistake. Firstly, even with low mileage, problems can arise with the belt or rollers. And secondly, there are many situations when you practically or completely do not move, while the motor is running, therefore, the belt wears out. For example, if the car is used mainly in the city, the mileage may be low, but the life of the belt itself will be at its limit, since in traffic jams the engine is running, but there is practically no movement.
There are other factors that can cause a belt to fail prematurely. For example, if oil, fuel, dirt or sand gets on it. Small particles of sand eat into the surface of the belt, destroying its surface; oil and other petroleum products soften it, reducing its strength and shortening its service life.
Finally.
To summarize the above, I would like to give some practical advice that will allow you to avoid timing belt rupture and, as a consequence, major repairs.
- Buy a quality replacement belt and rollers;
- Record the mileage and date of belt replacement;
- Every 10 thousand, perform a visual inspection of the rollers and belt;
- Change the belt earlier if you mainly drive the car in the city;
- If you buy a used car, it is better to replace the belt and rollers, since it is not known when it was changed.
That's all for me, write in the comments when you prefer to replace and how you monitor the condition of the above-mentioned elements.