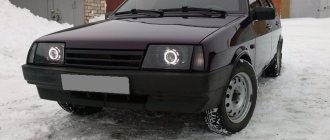
Fog lights are necessary in poor visibility conditions: fog, heavy rain. Their main feature is the distribution of light flux over the road and along the edges, which significantly improves visibility in bad weather.
The basic configuration of the Priora does not include fog lights. They should be installed to increase traffic safety on the road. Fog lights improve visibility not only for the driver on whose car they are installed, but also for all other road users.
How to choose fog lights?
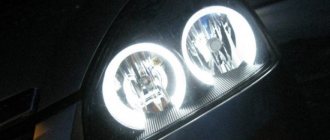
This is how this headlight shines
Installation of fog lights is preceded by purchasing them at the store. In this case, you must first look at the integrity of the glass of each light bulb, the matching of the headlights and mounting systems.
Compliance with the UNECE is confirmed by the presence of the “E” stamp on the diffuser; it is also desirable to have a GOST terminal, TU, date of manufacture and manufacturer. When we choose fog lights, Priora as a model allows us to purchase articles of predominantly round shape, while the latest fashion is considered to be slit headlights, which have small vertical angles (about 30-50 degrees) and are very well suited as fog equipment.
Fog lights can be produced in:
The first options almost always do not have certification data and have a lot of power, which only causes harm on the road (blinds oncoming drivers). Japanese and European models have moderate power, but are quite expensive. Therefore, when purchasing, it is better to focus on domestic models that comply with GOST standards and are relatively inexpensive.
The installation of fog lights begins for Priora owners by disconnecting the ground wire from the battery (needed to prevent a short circuit). Then the protection is removed from the engine crankcase. To do this, you need to take a key for “10” and two keys for “19”. The usual front crankcase protection has 5 “studs”, but the reinforced one can be attached to the front beam with two half-clamps. Removing the protection is a sequence of simple steps - first, use keys “19” to unscrew the nuts attaching the levers. (The second key is used to keep it from turning). Then use a 10mm wrench to unscrew the five nuts. Installation of protection is carried out in the reverse order.
Nuances of choosing kits
First, it is better to install a button in the interior of the Lada Priora - this is a completely ordinary button, installed next to the rear window heating button. The power is taken directly from the rear window heating button.
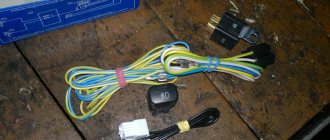
wiring diagram for PTF (fog lights) on Lada Priora
We take out the heated rear window button, carefully hook it with a flat screwdriver, take it out with the chip
button with a feature for heating the rear window of the Lada Priora
this is what the heating button looks like
According to the diagram, we connect the PTF button (fog lights) of the Lada Priora from the glass heating button. Now we need a multimeter
1. Find the wiring that goes to the backlight of the heated glass button, i.e. When the dimensions are turned on, a voltage of 12V goes to it, we throw the minus of the multimeter to ground (to bare metal), turn on the dimensions. The ignition must be turned off! We look for the terminal on the chip where the 12V voltage appeared, after we have found it, turn off the lights, if the voltage disappears, this is the wire we need, remove the insulation from it, but do not damage it and screw the PTF button wire to it, which is responsible for the backlight (according to the diagram above), it is listed as “white (yellow)”
2. We also look for the wire on which 12V appears when the ignition is ON, turn off the side lights, turn on the ignition, look for the required wire with a multimeter, check again to make sure it is there or not, open the insulation and screw the “red (pink)” wire from the PTF button to it ( tumanok) priors as in our diagram. 3. Connect ground. Everything is simple here - both here and there are black
4. The last wiring is blue, we run it into the engine compartment. I threaded this wire into the hole under the pedal assembly, there are several of them there. From the interior you need to peel back and lift the carpet to see them. 5. We install the relay from the PTF Priors kit somewhere in the engine compartment.
in the photo there is a place where it is possible to install the PTF relay on the Priora
We screw the PTF relay behind the ear and attach it to some kind of stud from the body. You can also attach it to the abs block.
The relay is standard. they all have 4 contacts, they are designated “30, 87, 85, 86”
PTF relay priors
We connect the blue wire from the button to pin 85. 86 contact is to ground
30 contact to battery 87, to fog lights.
connected PTF button on the Priora dashboard
To install fog lights you need to remove the front bumper
In general, it turned out to be not so difficult...
Lada Priora PTF kit in a box...
We pick out the plastic plugs from the bumper
install the fog lights and screw them on
Installed in the bumper of the PTF Lada Priora
If we want xenon in the fogs, a few more manipulations will be added
1) Remove the bumper again! Unscrew the top screws and carefully bend them.
We unscrew the crankcase protection from the bumper from the bottom, and the fastenings of the wheel arch liners and protective covers from the side.
We pull the side of the bumper towards us, sharply but carefully, on the other side everything is the same
I secured the xenon PTF ignition blocks in the place indicated by the cross on clamps, I didn’t drill anything. The place under the bumper is the most successful, from my point of view.
PTF switch on for the first time. It is better to apply sealant in the area of the lamp and apply silicone to the connections between the wires. Likewise, xenon bulbs and PTF priors ignition blocks will last longer.
We check everything before reinstalling the bumper...
xenon in PTF Priors - examples and photos
The Priora is equipped with a set of xenon H1 4300K and Morimoto H1 mini lenses
The light doesn't blind anyone! Also xenon in PTF 3000K, color green!
what kind of prior PTF are there?
When purchasing kits, you need to choose the right one very carefully. Due to their great popularity, the brothers from the Middle Kingdom began to produce ordinary halogen lamps under the guise of these bright lamps. Such optics will not give the expected effect.
If the lamps are installed for use in really foggy conditions, then it is better to do this at a car service center. There, competent specialists will perform installation and tincture. After these manipulations, such a headlight will not dazzle other drivers, and the car owner will be satisfied with the effect.
PTF Priora is not eternal, like other lights
Not only do you need to install the fog lights on the Priora in their standard places for longevity and correct light, and adjust them correctly, you also need to periodically ensure that the contacts do not come off and that there is still light. The lenses in the PTF for the Priora must comply with GOST standards, otherwise it will be another high beam, or cloudy daytime running gear. Correct installation of fog lights on a Priora will protect the glass from fogging, and the driver will not have to worry about the quality of the car's lighting devices.
Prices for headlights and work
Installing headlights in the showroom (where you buy a car) will cost 2,000 - 3,000 rubles, plus the price of fog lights is 2,600 rubles, which is much more expensive than in a store. Installation of fog lights in a car service center averages from 1,500 to 2,000 rubles. You can buy headlights yourself. It is not necessary to pay money for installation, because fog lights can be installed on your own.
The price of a set of fog lights varies from 1200 to 1800 rubles. For headlights you need to purchase a connection kit - 400 rubles.
Other models of fog lights for LADA Priora
Not only fog lights for Lada Priora from Bosch and Avtosvet can now be purchased in specialized stores. If for some reason these options do not suit you, there are models from other manufacturers, in particular: diode Orion-7, Ryazan Automotive Lighting, also produced by Ryazan and DAAZ.
Chinese-made fog lights should not be discounted either, especially since they produce both diode and lensed fog lights. You can also purchase special frames for the restyled Priora, which are installed instead of the plug and leave a hole for the old-style foglights installed on the 1st version of the Priora.
Installation of fog lights on Priora, connection diagram
The schematic diagram for connecting fog lights is as follows:
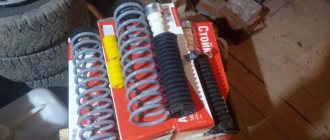
To install PTF, in addition to a set of headlights and an installation kit for connecting fog lights, you will need:
- insulating tape;
- heat shrink;
- corrugation (to insulate the wires);
- flat screwdriver;
- Phillips screwdriver;
- key number 10;
- key number 13;
- pliers.
The algorithm for working on installing headlights is as follows:
- Open the hood, remove the negative terminal of the battery. Remove the frill and wipers, dismantle the fastenings using a 13mm wrench. The expansion tank and its mounting bracket must be removed using a 10mm wrench - without this it will simply be inconvenient to work, but putting them back is not difficult.
- Unscrew the screws securing the front bumper. There are 10 of them in total.
- The screws that secure the plugs can be easily unscrewed with a Phillips screwdriver. Fog lights are installed in standard places and securely fastened with self-tapping screws (so that the fastenings do not become loose when driving on uneven roads - because of such a trifle, you will have to return to the garage and remove the bumper).
- Proceed to wiring. It is recommended that all wires be corrugated to prevent chafing, and then secured so that the contacts do not come off.
- In the set of wires, select the longest wire (it is blue). It is “divided” into two “ends”: one is attached to the right headlight, the second to the left. The wire is then pulled into the engine compartment, closer to the master cylinder.
- Pull off the interior trim (a flathead screwdriver will help) and insert the wire into the interior.
- Connect the wire to the safety block.
After work, adjust the fog lights, otherwise all the work will be done in vain!
What kind of light bulbs are on the LadaPriore fog lights?
Car : Lada Priora. Asked by : anonymous. The essence of the question : lamps in PTF on PRIORU at cost/property?
Hi all. The lamps in the PTF burned out, and my car was yellow. I will change it to regular ones, I’m afraid of sanctions from the traffic police. Tell:
- Which PTF lamps are better in terms of cost and quality?
- What type?
- Is it possible to install diodes, will there be any benefit?
Types of lamps in PTF on Priora
Types of lamps on Priora.
H11 type halogen bulbs installed here , the power of which is 55 W. Moreover, this applies to both the ordinary Priora and the restyled version, produced since 2013 .
Articles
- Osram H11 Original Line
- Philips H11 LongLife EcoVision
- Bosch H11 Pure Light
We did not talk to you about MAYAK lamps - because this is not a good substitute. Lottery . We installed two of these lamps on our bunker, but both burned out within two months. There was absolutely no rain!
Installation of fog lights
It is impossible to install any fog lamp without dismantling its predecessor. The scheme for replacing equipment is very simple:
- Remove all plugs from the bumper;
- Remove the previously installed headlights;
- Install new ones in their place;
- Carefully tighten all screws.
It may happen that the hole size of the old headlights is too small for the new fog counterparts. In such a situation, you should remove the bumper from the priors and widen the holes. If there are no places in the bumper itself for fog lights, then this problem can be quickly solved by cutting out these holes with a sharp knife.
After the replacement has been made, it is necessary to make a harness from the wires coming from the headlights and lay it along the cable under the hood. The wires are routed to the control panel mainly through the hole next to the fuses. After this, the negative wires must be connected to the body of the priors, and the bumper must be fixed in place.
Selection of lamp bases for VAZ cars
In the list we have given the most common models of the selected car brand. (Abbreviation PTF - fog lights)
| Brand | Lamp type | Base |
| 1113 Oka | Near | H4 |
| Further | H4 | |
| PTF | — | |
| 1117 Kalina | Near | H7 |
| Further | H1 | |
| PTF | H11 | |
| 1118 Kalina | Near | H7 |
| Further | H1 | |
| PTF | H11 | |
| 1119 Kalina | Near | H7 |
| Further | H1 | |
| PTF | H11 | |
| 2105 Zhiguli | Near | H4 |
| Further | H4 | |
| PTF | — | |
| 2106 Zhiguli | Near | H4 |
| Further | H4 | |
| PTF | — | |
| 2107 Zhiguli | Near | H4 |
| Further | H4 | |
| PTF | — | |
| 2108 Samara | Near | H4 |
| Further | H4 | |
| PTF | — | |
| 2109 Samara | Near | H4 |
| Further | H4 | |
| PTF | — | |
| 21099 Samara | Near | H4 |
| Further | H4 | |
| PTF | — | |
| 2110 | Near | H1 |
| Further | H1 | |
| PTF | H1/H3 | |
| 2111 | Near | H1 |
| Further | H1 | |
| PTF | H1/H3 | |
| 2112 | Near | H1 |
| Further | H1 | |
| PTF | H1/H3 | |
| 2113 Samara-2 | Near | H4 |
| Further | H4 | |
| PTF | H1/H3 | |
| 2114 Samara-2 | Near | H4 |
| Further | H4 | |
| PTF | H1/H3 | |
| 2115 Samara-2 | Near | H4 |
| Further | H4 | |
| PTF | H3 | |
| 21213 Niva | Near | H4 |
| Further | H4 | |
| PTF | — | |
| 21214 Niva | Near | H4 |
| Further | H4 | |
| PTF | — | |
| 2123 Chevrolet Niva in one low/high beam | Near | H4 |
| Further | H4 | |
| PTF | H3 | |
| 2123 Chevrolet Niva split low/high beam | Near | H7 |
| Further | H1 | |
| PTF | H3 | |
| 2131 Niva | Near | H4 |
| Further | H4 | |
| PTF | — | |
| 2170 Priora | Near | H7 |
| Further | H1 | |
| PTF | H11/H3 | |
| Granta | Near | H4 |
| Further | H4 | |
| PTF | H11 |
ATTENTION. This information is for informational purposes only. There may be differences between the installed lamps in your car and in the table. To more accurately determine the lamp base, we recommend that you check in more detail in the manual for your car, or look at the lamp markings by directly pulling it out of the headlight. Some types of headlights have a marking (or sticker) on the housing of the headlight itself.
Do-it-yourself PTF Priora installation
Do you want to install fog lights on a Priora instead of the standard front optics? Today, this can be done by every car enthusiast who has experience in servicing electrical systems. If the installation is carried out with your own hands, then the only cost can be attributed to the purchase of a PTF kit. After reading this material, the car enthusiast will learn how to dismantle old headlights and connect new fog optics. High-quality photographic materials and a diagram will help with this.
Fog lights allow you to move safely in poor visibility conditions. In fog and rain, the flow of light is distributed along the entire road, which also helps other road users. The “base” does not have fog lights. The scheme is quite simple if you have already installed additional equipment on the Lada Priora.
Installation of PTF
Priora needs to be driven into the inspection hole and checked whether all the necessary components for modernization are at hand:
- PTF and wiring kit.
- Pliers.
- Set of screwdrivers and keys.
Installing headlights
- We disconnect the negative terminal from the battery and move on to the front bumper fastenings - the screws are located on the top, bottom and side. Remove the Lada Priora bumper;
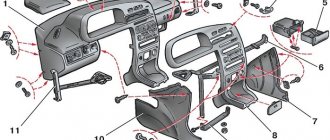
Electrical connections in the cabin
Under the steering column of the Lada, you need to remove the protective plastic - turn the three latches 90 degrees; Under the safety block you will see a self-tapping screw - unscrew it and pull out the block. The PTF kit includes instructions that contain a detailed connection diagram; Now let's move on to the central panel. Take out the plug and the button for turning on the heated rear window, you will find these elements to the left of the clock; Take the PTF button from the kit. The blue wire goes to the safety block, the rest need to be connected to the heating button - you can do this using the clamps that come in the kit. Here is the connection diagram: We need to install the PTF relay in the block
It is important here not to confuse: connect the wires coming from the hood to F18 and F17, also connect the yellow wire to these sockets, black and red go to A86 and A30, insert the fuses from F18, F17, connect the blue wire to A. Understand The diagram will help you with this
Installation of PTF on Lada Priora is completed. All that remains is to assemble the parts and connect the negative terminal to the battery. The fog lights only work when the ignition is on. You should only install the dashboard covers when you are sure that the optics are working properly. All that remains is to adjust the headlights; for this, a standard scheme is used.
Adjustment
You managed to install the PTFs, but in order for them to perform their task, they must be configured. Place the Lada Priora on a flat surface. There should be a wall opposite the front bumper; motorists usually use a garage for this. Check the tire pressure - it should be the same.
Now you need to measure the distance from the ground to the middle of the headlight. On the wall, draw an even strip corresponding to the distance from the coating to the middle of the PTF. Draw another strip 5 cm below, the top one can be erased. The fog lights need to be adjusted so that the upper limit of the light is located on the horizontal line that we drew on the surface. As you can see, the headlight adjustment scheme is quite simple.
We install the button in the cabin, power the circuit
Follow these steps on your LADA Priora to connect the fog light button in the cabin:
- The negative terminal is removed from the battery.
- The steering column is disassembled, which is secured with 3 special plastic latches; they should be rotated 90 degrees.
- We find the safety block. Unscrew the screw holding it in place.
- We disassemble the center console; for this purpose you need to unscrew the 4th screw. In place of the plug, we install a button on/off the fog lights and connect the blue wire directly to the mounting block, or via a relay.
- Using clamps, connect the remaining wires to the rear window heating button.