Which APs should be used for replacement?
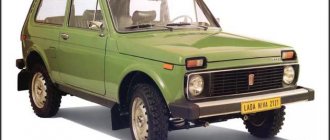
Now the time has come to change the TD, but the car owner does not have the money to go to a service center or he does not trust those who work in one service station for the entire small town. In this case, the car owner, if he is not too lazy, can replace the brake elements himself. The main thing is to buy original TDs.
Attention! If original brake discs are not available in auto stores in your city, then you can always order them from an online store, auto mechanics advise.
Article numbers of original brake discs on Niva Chevrolet:
- 21210-3501070-01;
- 21210350107001;
- 2121-3501070-01.
Knowing the TD article number, model and engine size of the Niva, you can select the necessary original brake elements.
Design features and purpose of Chevrolet Niva brake discs
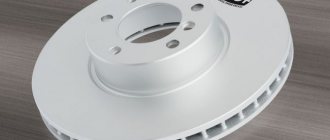
Every car owner knows that the braking process involves friction. It helps reduce the speed of the car and stops its movement. The primary role in the braking process involving friction is played by the brake disc, which stops the movement of the wheels. This part can be cast iron, carbon fiber or ceramic. Chevrolet Niva is equipped with cast iron discs.
The car we are considering has brake discs on each wheel, which is why they are divided into front and rear. Their purpose is the same, but their design features are different. The rear discs are called drums with a shape corresponding to the name.
The Niva's front discs resemble a flat support, which is affected by working system elements. During the braking process, these elements heat up and eventually wear out.
The stronger the heating, the more worn out the disc is, so sooner or later the brake disc on the Niva will need to be replaced, which you can do yourself after reading this manual.
TD malfunctions
In what cases should brake elements be changed even if the car obeys the car owner:
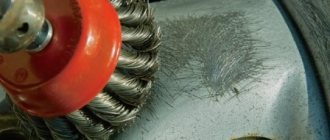
- scratches. They appear due to the operation of the brake pad without coating. In this case, you need to change the pads. And only then look at the serviceability of the TD;
- steering wheel vibration when braking Niva Chevrolet. It indicates that the TD is deformed and must be urgently replaced;
- appearance of cracks. In this case, replacement is also required.
After the faults and brake elements to be replaced are identified, they are purchased strictly according to the article numbers, the Chevrolet Niva is driven into the pit and the procedure for replacing the brake parts is carried out.
Replacing a Niva Chevrolet brake disc
If there are scuffs, deep scratches and other defects on the working surface of the disc that increase pad wear and reduce braking efficiency, as well as in the case of increased lateral runout of the disc, causing vibrations during braking, replace the disc
In specialized workshops, such a disk can be machined and ground on both sides to the same depth, but after processing, the thickness of the disk must be no less than the minimum permissible.
The minimum permissible brake disc thickness is 9.5 mm.
If the disk thickness is less, it must be replaced.
The axial runout of the brake disc surface should not exceed 0.15 mm.
You will need: keys “10”, “14”, “17”, “27” (preferably a head with a strong knob), pliers, drift, screwdriver, hammer.
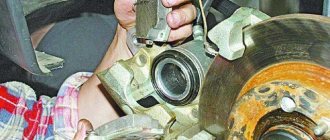
Remove the caliper (see “Removing and installing the front brake caliper”) without disconnecting the brake hose from it.
Hang the caliper on a rope or wire, making sure that the brake hose is not kinked or under too much tension.
Remove the brake pads (see “Replacing the front brake pads”).
Mark them so that they can be put back in the same place when reassembling.
Remove the casing bolt.
Use a screwdriver to bend the locking plate of the upper and lower bolts securing the pad guide to the steering knuckle.
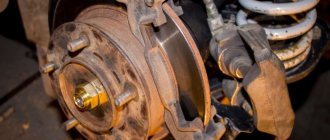
Unscrew the lower (shown in the photo) and upper bolts securing the pad guide
Removing the casing
Removing the pad guide
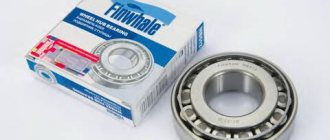
Unscrew the hub nut
remove the hub assembly with the brake disc
Screw the nuts onto the studs to avoid damaging the threads of the studs, and knock out the studs (one is shown in the photo).
Using a hammer, tap the edge of the hub to separate the hub and brake disc.
Install the new brake disc and the removed parts in the reverse order of removal.
At the same time, do not forget to lock the bolts securing the guide pads by bending the antennae of the locking plates.
To repress previously pressed out studs, you can use the wheel nuts.
Screw them onto the ends of the studs through spacers (larger nuts can be used as spacers) and tighten evenly in a cross pattern until the studs are completely pressed into the disk and hub.
Before installing the disc, thoroughly clean the mating surfaces of the hub and disc from rust and scale, since the slightest particle of them, sandwiched between the mating surfaces, will cause the disc to run out and vibrate during braking.
If you are installing an old disk, use a file to remove the beads on the working surfaces of the disk that have formed as a result of wear on both sides of the disk.
Front brake element replacement process
Tools you will need:
- jack;
- gloves;
- key;
- cleaner;
- screwdriver.
The process of replacing the front discs is as follows:
- Remove the wheel.
- Unscrew the screw at the lower brake flap.
- Bend the shield stoppers with a screwdriver.
- Remove the guide block bolts.
- Remove the shield and caliper.
- You hang the last one on a rope. This is necessary so that it does not interfere with you while installing a new disk.
- Remove the hub protection.
- Hold the last one and unscrew the nut.
- Remove the brake element.
- Install a new part and repeat the process in reverse order.
There are some nuances that need to be taken into account according to experienced mechanics. We'll tell you about them.
When replacing brake discs, it is recommended to replace the brake pads. Otherwise, the procedure will be incomplete and useless. Without new brake pads, the discs will quickly fail.
For your information! Experienced mechanics also recommend paying attention to the wear of the pads. If they are only slightly worn, then you can leave them alone and change only the TD.
In urban environments, brakes wear out faster than on highways. When changing disks, it is advisable to change all four APs. If testing shows that only two front or two rear ones are too worn out, then experienced mechanics recommend leaving a pair of discs that can still last twenty thousand kilometers.
What if the disk gets hot?
When operating a vehicle, it may occur that the disk becomes very hot. Of course, it will heat up during friction; this is a completely normal process. But sometimes it happens that the temperature just goes off scale. And many problems may appear - cracks, defects, severe wear. The problem of excessive heating can be solved quite simply if you take this issue seriously.
It is equipped with cast iron discs. Today you can find ventilated products on sale that have notches and holes on the working surface. It is with the help of such elements that a large amount of heat can be removed. And the brake disc will not heat up to critical temperatures.
Replacing rear TDs
All the tools that are needed to change the front brake parts are also suitable for replacing the rear brake elements. Changing disks is done as follows:
- Place the Niva Chevrolet vehicle on a jack.
- Lift one side of it and remove the wheel.
- Unscrew the bolts on the brake drum.
- Remove the drum completely.
- Using a screwdriver, try to carefully pry and remove the tie bar and spacer.
- Rotate the shank of the front pad strut.
- Move the front block to the side.
- Remove the rear tension spring.
- Remove the rear pad support post.
Install a new disc and reassemble the Niva Chevrolet brake system in the reverse order of disassembly.
Now you know how to remove and install new brake discs on a Niva Chevrolet. However, sometimes car owners who are starting to repair their car for the first time encounter problems such as difficulties in removing the disc. He just stops and the person doesn’t know what to do next.
Niva's wheels are heating up - what to do in this case?
It happens that during operation the car wheels begin to heat up. This may indicate either their poor quality or breakdown.
Were you confused by the price of disc brakes and decided to buy a cheaper part? Then the heating problem can be solved very simply - replace the parts with better ones. In this case, you need to forget about saving. It is best if these are ventilated brake discs that match your “iron horse”.
Niva ventilated discs are parts with special holes and notches through which air passes and additional cooling occurs, preventing the brake disc from overheating. Such discs are very reliable, which has long been proven in practice. Most often, tire drivers choose brake discs from Brembo, Zimmerman, Delphi, Bosch and other manufacturers that have proven the quality of their products.
Having taken into account all the tips given above, you can be confident that the Niva, or rather its braking system, will never let you down and will work for your benefit for many years. This concludes the article about how to replace the front brake discs of a Chevrolet Niva. We can only hope that the new Chevrolet Niva will have fewer shortcomings and shortcomings in the braking system and that the designers will take into account the operating experience of the previous model. Good luck to everyone on the roads and safe driving.
PS: Watch the video with a review of the front brake discs and their replacement on a Chevrolet Niva from experienced car enthusiast Sergei Zykov.
What to choose: ventilated or non-ventilated wheels
Car owners often ask mechanics which wheels are better. Recently, the production and installation of ventilated APs has increased. Because they dissipate heat better than regular ones. This increases the lifespan of the brake elements.
Ventilated discs are larger in diameter than regular ones. Therefore, they are able to cool faster and improve braking. Such TDs are effective during sudden braking. In this case, the conventional mechanism overheats, the brake fails, and the Chevrolet Niva begins to rattle.
Niva's wheels are heating up - what to do in this case?
It happens that during operation the car wheels begin to heat up. This may indicate either their poor quality or breakdown.
Were you confused by the price of disc brakes and decided to buy a cheaper part? Then the heating problem can be solved very simply - replace the parts with better ones. In this case, you need to forget about saving. It is best if these are ventilated brake discs that match your “iron horse”.
Niva ventilated discs are parts with special holes and notches through which air passes and additional cooling occurs, preventing the brake disc from overheating. Such discs are very reliable, which has long been proven in practice. Most often, tire drivers choose brake discs from Brembo, Zimmerman, Delphi, Bosch and other manufacturers that have proven the quality of their products.
Having taken into account all the tips given above, you can be confident that the Niva, or rather its braking system, will never let you down and will work for your benefit for many years. This concludes the article about how to replace the front brake discs of a Chevrolet Niva. We can only hope that the new Chevrolet Niva will have fewer shortcomings and shortcomings in the braking system and that the designers will take into account the operating experience of the previous model. Good luck to everyone on the roads and safe driving.