How to replace a bearing on a transfer case in a Niva
09/08/2019 mr.Podshipnik 0 Comment
HOME »
- Auto components
- »
- Replacing transfer case bearings
»
All drivers operating a NIVA car are well aware of the features of this car. Its distinctive feature is all-wheel drive. It has drive axles, two and three differentials. Also, this car has a transfer case, which differs from other VAZ models.
In this article you will learn how to replace the bearing on the transfer case in a VAZ NIVA car with your own hands.
How to detect a faulty transfer case on a VAZ NIVA
If you hear any external symptoms, you need to think about what the reason is. A significant part of Niva cars suffer from body vibration. It lies in the fact that the transfer case on the car is incorrectly centered. The reason may be wear of the transfer case bearing. To make sure of this, just in case, check the chassis of the car, it may be the cause of the vibration. The fixation of the cardan shafts may not be of good quality or the wheels may not be balanced. Rattling may occur if the fasteners for the transfer case mounting support are loose or the rubber band on it is torn. What needs to be done in order to diagnose this cause? Accelerate the car to 100 km/h and listen carefully to the noise in the area of the floor of the front seat of the car. If you hear rattling, immediately check how the car’s mechanisms are working, including the transfer case. Perhaps the reason lies in the violation of the distance of the intermediate shaft parts. Perhaps the elastic coupling has delaminated, or the constant velocity joint is installed incorrectly. Check if a complex of these problems occurs, then it is better to immediately replace the intermediate shaft assembly. If there is noise in the transfer case, then most likely the bearing in it has become unusable or the bolts and flanges of the elastic coupling are deformed.
How to dismantle the transfer case on a Niva
As a rule, the transfer case on a VAZ NIVA car can be disassembled without problems, but this will require considerable time. In order to “get” to the transfer case, it is necessary to dismantle some more parts of the car. You need to select a set of tools, including:
— keys No. 13, heads and ratchet possible; - you need to have different screwdrivers.
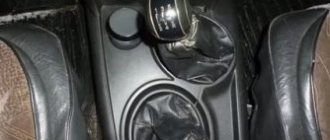
To remove the transfer case, you need to remove the plastic trim inside the car that covers the transfer case. Unscrew the four screws and then the three fastening elements. Unscrew all shift knobs and remove the cover together with the corrugated rubber bands.
Attention: do not forget to disconnect the electrical wires, there are two of them.
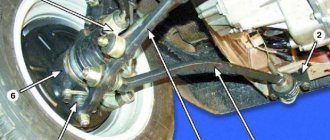
The work in the interior is over at this stage, move to the outside of the car. There are two options: either drive into a hole in the garage, or put the car on a jack. When you jack up the Niva, you need to disconnect two cardans and drive the gearbox. To disconnect the cardan shafts, you need to unscrew all the nuts with a No. 13 wrench. When turning bolted connections, secure them with a screwdriver. Next you need to remove the speedometer cable. In this case, you need to unscrew the fasteners and disconnect the cable and secure it with wire. Unscrew the transfer case bolts and disconnect it from the gearbox. At the final stage of dismantling, you need to substitute some kind of support so that the transfer case does not fall. Just do it very carefully so as not to drop the transfer case.
Removing the transfer case
If the transfer case needs repair or replacement, proceed as follows:
- Cover near the levers.
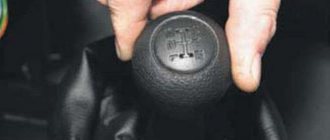
- The lever handles must be unscrewed.
- The cover with rubber bands from under the levers must be removed.
- After this manipulation, 2 wires will open, they should be disconnected.
- The two universal joints driven by the gearbox, which are located under the bottom, need to be disconnected.
- The locknut from the speedometer needs to be unscrewed and pulled out.
- The bolts for disconnecting the transfer case are unscrewed.
The box must be carefully removed from the fasteners, having first placed a support under it, otherwise it may fall from a height.
To make it more convenient to unscrew the hangers, you can use a special wrench - a ratchet. Once the transfer case has been lowered and the nuts have been removed, inspection and repairs can begin. Basically, do-it-yourself transfer case repairs involve cleaning all components and replacing certain spare parts.
If the part cannot be repaired, you will have to purchase a new one. A new transfer case will cost a lot of money, but its service life will also be long. If money is an issue, then you can look for a used transfer case that has been previously restored. You should know that this part is not so easy to purchase; you may have to go to another city to get it or order it individually through online stores.
Videos of how to repair a Niva 21213 transfer case with your own hands can be easily found and watched on the Internet.
And also interesting: Installing a kenguryatnik on Niva 2121
DIY transfer case repair on Niva 21213. This can be learned
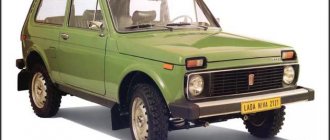
Where cool crossovers made by Nissan, Mitsubishi or Toyota will helplessly spin their wheels on their bellies, sliding along our barely outlined off-road directions, the Niva will confidently rake, albeit with vibrations and strained wheezing. And not because Russian designers are more technically savvy, but because they know the realities of the roads much better. Yes, the car cannot be called comfortable - however, the main thing in its use is not convenience, but cross-country ability.
A person who actively rides a nondescript but faithful iron horse can significantly improve his worldview if he carries out some tuning. In particular, it will center the transfer case. With active use, it will eventually need to be replaced - and this can also be done independently.
The good news is that the transfer case on the Niva is difficult to kill. You can use it almost any way you want, and it will last a long time and work efficiently. However, this unit will get tired over time and will require at least repairs. And since the Niva unit is not capricious, without intricacies and subtleties, all work is quite accessible for garage execution.
Repairing the transfer case on Niva 21213 with your own hands can pursue completely different goals. However, to improve ride quality you will need to center it and remove it for any other work. Let's focus our attention on these two points.
Entire generations of owners of Soviet (and later Russian) SUVs have proven through experience that centering the transfer case significantly reduces vehicle vibration, noise inside the cabin and fuel consumption. Therefore, it is worth addressing this issue immediately after purchase. Even if you bought a used car, and the previous owner assured you that the process has already been completed, checking is the key to a smooth ride.
- One participant in the process sits in the driver's seat. The car rises with him;
The lock must be turned off, the gear must be in high gear (4th or 5th);
The studs should be in the middle of the support holes. To do this, the dispensing supports are moved apart manually;
The comrade below loosens the nuts (4 of them) that secure the transfer case;
The driver picks up speed and signals this to his partner. The one, as they say, on the go, tightens the clamps to the required level. In this case, to determine the desired optimum, the transfer case is pushed a little by the mechanic from the side in any direction - but not forward/backward. That is, you can direct it there, but obliquely;
- At the service station, when centering, they accelerate to 60 km/h, and the speed is set in 4th gear. However, if you prefer a sharper ride, focus on 5th gear and 90-110 km/h.
How to disassemble and reassemble the Niva transfer case
How to perform this operation correctly? Start by cleaning the transfer case from oil, dust and dirt. Next, you need to drain all the oil and rinse the transfer case with diesel fuel. Then you need to fix it on the bench table and loosen all the fasteners. It is necessary to unscrew the front axle housing fasteners and remove it. Remove the speedometer drive and driven gear. Next, remove the lock washer and pull out the axle and remove the lever that locks the differential. Then you need to dismantle the crankcase cover and the front axle drive and remove the spring with the retainer ball. Next, you need to unscrew the bolt that locks the differential lock fork. Then you need to remove: the rod, the fork and the locking clutch. The rear cover, together with the rear axle drive shaft, must also be dismantled. We remove the drive shaft and the flanges on it together with the front axle drive. Next, you need to remove the front axle drive shaft from the crankcase. And finally you get to the bearing. Remove it together with the thrust ring and oil deflector. Remove the rear axle drive shaft from the rear cover. Then remove the cover that protects the front drive shaft bearing and the inspection hatch. Next, dismantle the lever bracket that changes gears and remove the lock washer. And then you can very easily remove the axle and lever. The next step is to remove each of the mounting rings and the rear bearing, which “sit” on the intermediate and drive shafts. We take them out of the distribution box. Then we remove the rear bearing and remove the thrust ring. Removing the bearing is done using a special puller. We take out the gear, which is located on the drive shaft of the low gear (together with the bushing). The gearshift clutch, hub, and gear also need to be dismantled. Next, disassemble the differential. To do this, you need to press out the oil seals that are located in the front axle drive housing. Pay attention to their condition. As a rule, they all need to be changed. When you have removed the bearings with pullers, install new ones that you previously purchased at a specialized auto store. We do not recommend buying bearings at the market or secondhand. You may purchase a defective, low-quality product. Then again you will waste time, money and mood, and they will not last you long. When installing the bearings, do not forget to lubricate the seats with lithol 24. Assemble all parts of the transfer case in the reverse order as you did during dismantling. After installing the transfer case, be sure to fill in high-quality oil and check for noise while driving. Do not use used oil even if it has not reached its service life.
The device of the VAZ Niva transfer case
The transfer case mechanism includes more than 60 independent parts, which is confirmed by the presented drawing. Therefore, it is quite prudent to name the main elements and their purpose.
- Frame
- Differential housing
- Shafts
- Couplings
- Oil seals
- Satellites
- Gears
- Flanges
- Levers
A pair of gears are tightly seated on the drive shaft, one of them (large) is intended for high gear, the second (small) is responsible for low gear. They have serrations with straight and oblique profiles. The first ones are in contact with the coupling, the second ones - with the intermediate shaft. The inclusion of one or another row causes the coupling to move along the hub in the horizontal direction, after which it is connected to the gear on the transfer case drive shaft.
The intermediate position turns off the gearbox (the gearbox is open), and the vehicle cannot be moved in this mode. The front helical gear on the intermediate shaft is used to control the differential. The locking is engaged, or the rigid coupling of the drive shafts of both axles, is carried out through a clutch. The design is typical for modifications 21213 and 21214, and the latter is additionally equipped with a speed sensor drive.
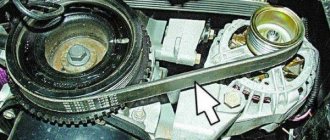
Photo No. 2
In the operating state (with the transfer case reduction gear connected), the gear ratio in the first stage changes from 4.4 to 7.83, the second - from 2.52 to 4.58, the third - from 1.63 to 2.9, in the fourth - from 1.2 to 2.14, fifth - from 0.98 to 1.75, which is expressed in an increase in traction on the wheels.
- Front - from yourself
- Rear - towards you
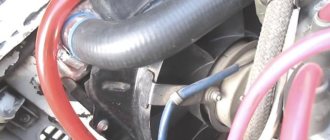
Photo No. 3
The special operating mode of the transmission is switched on not long before the car begins to overcome an obstacle (rut, mud, ford or rise). The transition to the lowest row must be done while stopping. Returning to top gear is allowed on the go, although it causes problems for beginners due to the lack of the usual synchronizer.
It is somewhat more difficult to properly handle the forced manual locking of the center differential. On the contrary, it turns on when the car moves slightly (up to 20 km/h) due to misalignment of the grooves on the locking clutch, satellites and ring gear. To simplify turning the lever into the desired position, taking into account the Niva 2121 transfer case, pick up a small speed, then, shaking the steering wheel, pull the handle towards you.
And also interesting: Tuning VAZ 2131 - tuning the interior, engine of the NIVA VAZ 2131
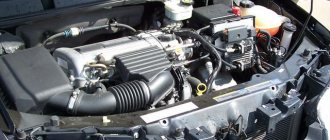
Photo No. 4
Problems can also arise when disengaging the lockout, as the clutch teeth literally catch on the ring gear. Engage reverse and, rocking the steering wheel, push the lever away from you. This action is performed immediately after overcoming a difficult section in order to avoid overloading the gearbox. It is most effective to disable the differential together with the transition to lower stages.
The transfer case is not present in all VAZ passenger cars, but only on cars with two drive axles. In the transmission, the transfer case (TC) is installed at the rear of the gearbox; a rear driveshaft is attached to its shank, which connects the transfer case to the rear axle. The front axle is also driven by the steering wheel; it is connected to the transfer case by a front driveshaft.
The reduction gear in the Republic of Kazakhstan is designed to obtain high torque, it is used to overcome difficult sections of the road, and helps to cope with off-road conditions. The VAZ Niva transfer case contains the following main parts:
- the body itself;
- front axle drive shaft;
- intermediate shaft;
- drive shaft;
- gears;
- bearings;
- differential housing;
- satellites;
- differential lock clutch;
- gear shift clutch;
- flanges (for connection to cardan shafts);
- oil seals;
- control levers.
Model VAZ-21213 is an all-terrain passenger car with permanent all-wheel drive and differential lock. Brand 21213 is a restyled version of the first VAZ SUV, VAZ-2121. RK Niva 21213 has three gears:
- the first - with a gear ratio of 1.2;
- the second, lowered – with the number 2.135;
- neutral
21213 is equipped with 4-speed and 5-speed gearboxes, and when the first speed of the transfer case is turned on, the car operates in standard mode, the gear ratios in the transmission are from 5-speed. The checkpoints are as follows:
- 1 – 4,4;
- 2 – 2,52;
- 3 – 1,63;
- 4 – 1,2;
- 5 – 0,98.
On ordinary roads, the transfer case is always in first gear, the transfer case control lever (reduction gear) is pushed forward. The neutral gear of the RK disconnects the transmission, and in this position the car does not drive; there is also a neutral in the gearbox.
Motorists often ask the question: why is neutral gear needed in a transfer case? The neutral is used when connecting additional units to the transmission, for example, a mechanical winch; in this case, a power take-off must also be installed.
On Niva cars (with the exception of Chevrolet Niva) two main types of transfer cases are used:
- 21213 (modifications 21213-1800020-01 and 21213-1800020-02):
- 21214 (modifications 21214-1800020-01, 21214-1800020-02, 21214-1800020-10).
The transfer cases have almost the same design among themselves - the RK 21214 additionally has a speed sensor drive.
The transfer case on the Niva is a fairly reliable unit; problems with repairs in the mechanism itself arise mainly due to insufficient oil level in the valve - if for some reason the oil leaks out, intensive wear of all parts occurs. Among the frequently occurring malfunctions are:
- vibration in the body at various speeds when the car is moving;
- vibration when the vehicle starts moving;
- noise in the transfer case when the car is slipping or turning;
- difficult upshift or downshift, difficult engagement of the lock.
A few more tips:
— when dismantling the transfer case, so that all parts can be unscrewed well and without problems, it is necessary to spray them with penetrating, lubricating liquid VD 40; — the drive and intermediate shaft must be installed in the transfer case in its entirety; - do not forget to lubricate the oil seals with Litol 24; — It is advisable to tighten all bolted connections with a torque wrench. However, if you don’t have one, then you can do this: tighten the bolts and nuts completely and then loosen them counterclockwise by turning the wrench twenty degrees.
If you follow the above instructions, you can easily carry out repairs and replace the bearings in the transfer case on your VAZ NIVA yourself without any problems. If you have any questions, you can always ask them in the comments on our website. I will be happy to give practical advice.