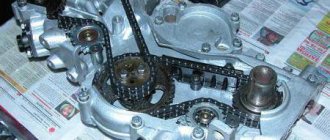
Recently they brought us a car with a broken cylinder head gasket, and since when replacing the gasket we would have to remove the timing chain, we decided to change it along with the sprockets. We’ll talk about replacing the gasket in another article, but here we’ll look at replacing the timing chain of a VAZ 2107, as well as sprockets and a tensioner with a damper, with your own hands in an ordinary garage. In principle, the procedure is applicable to all cars of this family, because all classics were equipped with one chain motor with a slight difference in volume.
This engine is equipped with a double-row chain, which lasts a very long time; 100 thousand kilometers is not the limit for it, provided that the original Lada parts are in place. It is very simple to diagnose a stretched chain by the characteristic sound from the front of the engine; at the end of the article we will look in detail at how to diagnose and tension the timing chain.
Replacing the timing chain
- We remove the throttle valve pipe, the vacuum brake booster and crankcase exhaust pipe, and the throttle cable. 10mm socket and Phillips screwdriver for clamps.
- We remove the radiator by disconnecting the two pipes from it and unscrewing the two bolts located in the upper right and left corners. The head is 10. The radiator from below is inserted into the grooves in which rubber gaskets are installed, do not lose them.
- Remove the valve cover by unscrewing the eight nuts by 10.
Valve cover fastening. - Loosen the nut of the tension element of the generator and move it towards the cylinder block. Remove the generator V-belt. The key is 17.
Alternator belt tension.
Set top dead center (TDC)
- Turn the crankshaft clockwise until the marks on the pulley and the marker on the front timing chain cover match. Key or socket 38.
Crankshaft pulley mark. - The marks on the sprocket and the marker on the camshaft bearing housing should also match.
Camshaft marks.
Removing the old timing chain
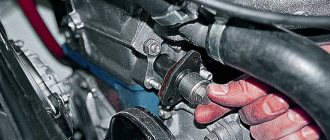
- We lock the crankshaft by tightening the handbrake, placing chocks under the wheels and engaging fifth gear, unscrew the pulley nut. Head 38.
- Unscrew the two nuts by 10 and remove the timing chain tensioner.
Timing chain tensioner. - We bend the stopper petal and unscrew the camshaft sprocket bolt.
Fastening the camshaft sprocket. - Remove the sprocket along with the chain. Please pay attention to the wear of the teeth if you suddenly decide to keep the old ones. If the teeth become sharp, replace the sprocket.
- Remember which hole on the sprocket the key on the camshaft is inserted into. There was once a case when his comrades mixed them up and it’s good that before starting it he manually turned the crankshaft, naturally the valves rested on the cylinders, after which he had to disassemble everything again.
- Having unscrewed three nuts and seven bolts, three of which are on the side of the pan, remove the front timing chain cover, you can immediately change the crankshaft oil seal. Head for 10. We loosen the adjacent bolts on the pallet so that it sinks down a little and when installing the cover back, the gasket does not interfere with us.
Fastening the front timing cover. - The mark on the crankshaft sprocket must match the mark on the block.
Crankshaft sprocket mark. - Unscrew the bolt securing the middle gear and tensioner shoe.
- We unscrew the limiting pin and remove all the sprockets and the old timing chain. The key is 17.
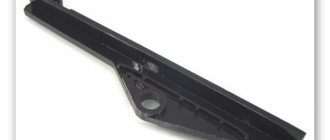
- In the bustle, we forgot to take a photo of the mounting location of the damper, but you can easily find it on the right side of the cylinder head, secured with two 10mm bolts.
Installing a new timing chain
- Be sure to lubricate the new timing chain with engine oil.
- We put it on the crankshaft sprocket and the middle sprocket, install them in place, be sure to tighten and lock them.
- We install the limit pin, tensioner shoe and damper in place. We stretch everything out.
- Check the crankshaft mark.
- We put the chain on the camshaft sprocket, but it is not the camshaft. The descending branch of the chain must be tensioned and the marks must all match. If during installation the mark on the camshaft does not match, simply move the chain the required number of links onto the sprockets, having first removed it.
- Tighten the camshaft bolt, lock it, and bend the tab on the washer.
Timing chain tension
- We install the new tensioner in place; automatic ones are available for sale; I recommend using them. It is better to lubricate the gasket with sealant, tighten the two nuts to 10.
- We remove the pin for automatic or unscrew the cap nut 13 for a regular semi-automatic, you will hear a characteristic click, this means that the tensioner has worked. The chain will be taut. Timing chain tensioner.
- If you are using an old tensioner, it must be cocked before installation. Unscrew the cap nut several turns until the plunger moves freely. Push it all the way into the tensioner body and tighten the nut. You'll have to get the hang of it because the spring is quite powerful.
- In the case of a semi-automatic tensioner, turn the crankshaft slightly clockwise and tighten the nut to 13.
Be sure to turn the crankshaft two turns and check that all marks match.
We install all the parts in the reverse order of removal, fill in antifreeze. We start the engine and enjoy. Everything is quite simple, replacing the timing chain on this car with your own hands is quite possible, the only condition is the presence of an inspection hole.
Replacing rocker arms on a VAZ 2107
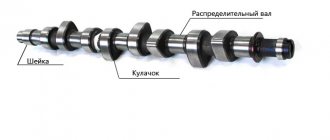
Rockers (rocker arms) are one of the elements of the valve timing mechanism of the VAZ 2107 engine. The purpose of the part is to transmit energy from the camshaft cam to the valve stem. Since the rocker is constantly exposed to mechanical and thermal stress, it wears out over time.
Rocker arms are designed to transfer energy from the camshaft lobe to the valve stem
Determining the suitability of rocker arms
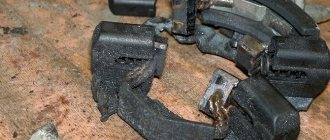
If during operation of the “Seven” there is a decrease in engine power or a characteristic knocking sound is heard in the cylinder head, then the likely cause is a broken rocker arm. During repair work, it is necessary to clean the rockers from dirt and carbon deposits and check them for wear and damage. If any defects in parts are found, they are replaced with new ones. If the rocker arms are in normal condition, install the products on the cylinder head.
If the rocker arm is heavily worn or there is visible damage, the part needs to be replaced
Is it possible to level the rocker arm?
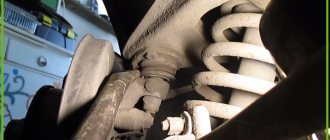
When adjusting valves or repairing the cylinder head, you may notice that the rocker arms are slightly at odds with respect to the camshaft, i.e., the distance between the rocker plane and the camshaft journal is not the same. To eliminate this nuance, some owners of “classics” align or change the springs that press the rocker arms, or replace the rocker itself, but the problem may still remain. In fact, on all classic Zhiguli models, including the VAZ 2107, misalignment is not as bad as incorrect valve clearance
Therefore, it is the gap that deserves attention. The main thing is that the parameter is adjusted properly and is 0.15 mm when cold
When the rocker arm is skewed, some motorists change the part itself, the springs, and sometimes the camshaft, but they do not achieve the desired effect
How to replace a rocker arm
If there is a need to replace the rocker arms on the “seven”, for example, 1 part in case of its breakdown, then it is not necessary to dismantle the camshaft. To do this, it will be enough to pry the spring with a screwdriver, remove it, and then remove the rocker itself. The new part is installed in the reverse order. If all the rocker arms are being replaced, then it is wiser to dismantle the camshaft.
Video: replacing the rocker on a “classic” without removing the camshaft
Equipping the VAZ 2107 engine with hydraulic compensators improves its operation and characteristics. Installing the mechanism will not take much time and effort, but will require material costs. Therefore, whether there is a need for such an engine modernization or not, each motorist decides for himself.
Diagnostics of timing chain VAZ 2107i
Over time, the timing chain stretches, resulting in lateral vibrations in the downstream section of the chain. These vibrations can break the damper, and in extremely advanced cases, lead to the chain jumping on the sprocket and, as a result, damage to the engine. When the chain is stretched, a characteristic metallic sound appears in the front part of the engine, increase the speed a little and if the sound becomes weaker or disappears altogether, this is a clear sign of wear on the timing chain. If you have a semi-automatic tensioner installed, try tensioning the chain. The procedure is described above. If this does not help, you will have to change all elements of the gas distribution mechanism.
It is recommended to carry out the tensioning procedure every 10 km.
How to choose a chain length
When purchasing a new spare part, you need to take into account one parameter - the length, determined by the number of links. The indicated value depends on the type of engine installed on a particular car. For engines with a working volume of 1.5 and 1.6 liters (modifications VAZ 21061 and 2106) the piston stroke is 80 mm, and in 1.3 liter power units (VAZ 21063) this figure is 66 mm. Accordingly, the 1.5 and 1.6 liter engine blocks are taller and the chain is longer:
- versions VAZ 21061 and 2106 - 116 sections;
- VAZ 21063 - 114 units.
Conscientious manufacturers indicate the number of chain links on the packaging
The number of sections of a new spare part can be found out without a grueling recalculation. Lay the chain on a flat surface so that adjacent links touch. If the outer sections look the same, there are 116 links in the chain. The 114-piece part reveals one last link, turned at an angle.
When replacing the drive chain, it is strongly recommended to install new sprockets - driving, driven and intermediate. Otherwise, the mechanism will not last long - the links will stretch again. Gears are sold in sets of 3 pieces.
Video: choosing a new chain for the Zhiguli
External signs of malfunction
When wear is critical, the chain begins to rattle; the noise does not disappear as the power unit warms up. With further lengthening of the chain, the beating of the branches increases, which leads to an increase in acoustic noise. Since the design does not have a hydraulic tensioner, attempts to compensate for chain wear by rotating the adjustment bolt do not lead to restoration of functionality. Further operation of the vehicle with a stretched chain is not recommended due to the risk of irreversible damage to the cylinder-piston group.