The main problem with the front seats of the VAZ 2107 is its breakdown when the backrest is not fixed in a vertical position, or the failure of the adjustment mechanism (on the slide). It is in these cases, or when replacing, that the front seats will need to be removed from the car.
To perform this repair on a VAZ “classic”, we will need the following tool:
- Head for 8
- Extension
- Ratchet handle
- Open-end wrench 13
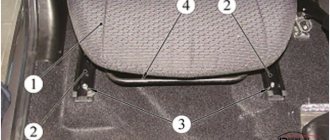
The front seat mounting bolts are located on both the front and rear sides, so first you need to move the seat all the way forward, as shown in the picture below:
Since the bolts are now accessible, you can unscrew them:
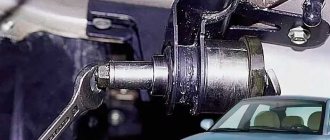
Once the back is free, move the chair all the way back to gain access to the front bolts. The one on the far right turns away in the same way as the back side, but on the left you need to unscrew the nut with a 13mm wrench, as is clearly shown in the photo below:
After this, you can remove the seat without any problems and remove it completely from the car.
If necessary, we repair it or completely replace it and install it in the reverse order. If you decide to buy new front seats for a VAZ 2107, then their price is approximately 3,500 rubles per one.
Repair of VAZ 2107 seats is carried out for two reasons:
- damage to seat trim;
- failure of the front seat adjustment mechanism.
Before repairing the mechanism or seat trim, they must be dismantled.
Removing the front seats of a VAZ 2107
To dismantle the seats you will need a pair of keys - 8 and 13 mm. The procedure is as follows:
- Move the seat forward as far as it will go.
- Unscrew a couple of bolts securing the slide.
- Move the seat back.
- Remove the two bolts securing the front seat.
- Repeat the steps for the second chair.
- Remove the VAZ 2107 seats from the interior.
Rear seats
Removing the rear seat back is very easy. It is attached to the car body using special hooks. It is enough to raise the back slightly up. After this, the clamps will disengage and it can be removed.
To dismantle the lower part, you need to take the seat from one side and sharply pull it up. This releases the spring clips. After this, do the same on the other side and remove the saddle.
Video: dismantling the rear seat
To a large extent, the comfort and convenience of the driver and passengers depend on the seats. That is why special attention must be paid to the choice of this interior element. You can always replace the standard seats of the VAZ 2107 with more comfortable and high-quality ones. Thus, not only the comfort and safety of people in the car improves, but also its appearance becomes more attractive.
Repair of front seat slides
VAZ front seat slides include the following parts:
| 1 — slide guides; 2 — slide sliders; 3 - roller; 4 — rubber roller ring; 5 - limiter; 6 — slide latch; 7 — retainer for the internal guide of the slide; 8 — back reinforcement; 9 - traction; 10 - spring; 11 — cotter pin; 12 — screw rod with the handle for the backrest tilt mechanism; 13 — latch handle for the slide movement mechanism; 14 — screw rod bracket |
Repair of seat mechanisms is carried out with the seats already removed. To restore the functionality of the mechanism, the following operations should be performed:
- clean from dirt;
- if necessary, replace worn or damaged parts;
- lubricate
Dismantling the slide is done as follows:
- Remove the spring.
- Remove the rod pin.
- Unscrew the bolts securing the slide to the seat.
- Remove the skids.
- Remove the screw rod from the bracket.
- Move the sliders along the guides.
- Remove sliders and rollers.
After disassembly, you can inspect the parts to determine the cause of the breakdown. The lack of fixation of the seat back of the VAZ 2107 can be eliminated by replacing it (or replacing the comb or clamp). To do this, you will have to cut off the broken part with a grinder and weld a new one in its place. The upholstery of the chair must be protected from welding by covering it with a wet cloth. If possible, it is better to leave one frame of the chair before welding. At the same time, you can wash the seat upholstery.
Reupholstery of the front seats of VAZ 2107
To reupholster the seats you need:
Rip out the old sheathing at the seams.- Moisten the places where the covering is glued to the cardboard elements with gasoline.
- Carefully remove the casing.
- Using the removed error as a template, mark and cut the workpiece from a suitable dense fabric.
- Renew foam elements and springs.
- Assemble the pieces of sheathing and secure them using heat welding, glue and thread.
Replacing seats
You can make the interior more comfortable by installing seats from another car model or special seats for auto tuning on the VAZ 2107. The latter are produced in various modifications, which allows you to choose a seat that suits the car owner.
You can install any car seats from foreign cars that are suitable in size in the VAZ interior. It should be noted that such a replacement requires welding to change the fastening design. During welding, it is necessary to protect the casing from sparks. If you don’t have a welding machine at your disposal, you will either have to be content with the available selection of car seats, or contact a specialist.
Which seats fit without modifications?
If there is a desire to change the seats in the cabin of the seven, then you need to install seats from a foreign car, which are characterized by increased comfort. In this case, a problem arises - the cost of seats from foreign cars is sometimes 2 times higher than the price of new seats for the seven. To reduce costs, you need to choose used models of chairs that will cost no more than new factory models.
To install new seats in the interior of the seven from a foreign car, the following factors must be taken into account:
- Dimensions or dimensions of devices, which should not be much larger than standard ones. There are no problems with this, since seats from foreign cars are not only comfortable, but also often have small dimensions, that is, they are compact.
- Mounting type. The brackets for the new seats, ideally, should fit the mountings in the cabin, so that they can be installed in the classic cabin without modifications. This factor plays an important role, since the fastening affects not only the possibility of placing seats in the VAZ 2107 interior, but also the safety of their operation. In most installation options, it is still necessary to make or select some spacers, washers or bushings in order to align the mounting points of the skid and the car body. But there is no need to weld or cut anything with a grinder.
- Shape and type of cladding. These are secondary factors that affect the comfort and appearance of the cabin. Most models of seats from foreign cars have a quite presentable appearance, and their installation does not require the use of covers.
By installing or replacing VAZ 2107 seats with analogues from a foreign car, you can simultaneously obtain benefits such as increased comfort, as well as changing the interior design for the better. No matter what model of foreign car the seats in the seven are installed on, they will still look better than the standard ones. Taking into account the factors described above, it is necessary to figure out which car the seats for the seven are suitable for. Preference should be given to the following brands:
- The 1993 Toyota Corolla E100 is an ideal option, since the interior of the LADA 2107 fits not only front seats without any special modifications, but also a rear sofa. In addition, devices from a car of this year of manufacture will not cost exorbitantly, so you can buy them very cheaply at a disassembly site.
- The 1996 Mercedes W210 is another good option. Reviews from car owners who have installed Mercedes seats indicate a number of advantages - no need for modifications, comfort, improved interior design.
- Toyota RAV4 - you also don’t need to make any modifications, you just buy, change and enjoy.
- Ford Scorpio - devices from the Ford brand are distinguished by their presentability. By installing such seats, you can enjoy long trips in a domestic car.
- Audi A80 - can be made without major modifications. The result of the replacement is a high quality of comfort, a large number of controls and settings, as well as a change in the interior of the cabin.
- Mazda 6 - fits perfectly under the standard brackets of the classics.
- Ford Recardo - you can completely install both the front and rear seats on the VAZ 2107.
Read, it may come in handy: Front and rear glass - replacement and tinting
You can also install devices from car brands such as Skoda and Fiat. However, there are some features that need to be taken into account - this is a shift in the center of gravity. Having installed such chairs, you will need minor processing in the form of making a couple of holes, performing additional fastening. This will increase the stability and reliability of structures.
If desired, you can put seats in the seven from almost any modern car. And now their choice is huge. Such chairs can have all kinds of electrical adjustments, separate heating of the back and cushion, leather chairs can have ventilation, as well as a massage option.
There are a sufficient number of options without modifications, and which one is better to choose - it all depends on the finances, availability and desire of the car enthusiast. If you choose devices from Volkswagen, Nissan and Peugeot cars, then you cannot do without modifications. If you are sure that these brands have the best chairs, then if you wish, you can insert them into 2107, but you will have to modify the fastenings.
Spacers for the slide to level the tilt of the pillow
How to remove seats on a VAZ 2107 (2106)
Repair and tuning of the Six's interior includes the dismantling of car seats. Before removing the seats on a VAZ 2106, you will need to buy a socket set to “8” and an open-end wrench to “13”. When carrying out installation work, the lack of connection between the front seats is taken into account. They are mounted on a skid fixed to the body using 4 brackets.
Step-by-step instruction
First, the front seats are moved all the way forward (to provide access to the rear brackets). Then the chairs are moved back. To unscrew the bolts you will need a “13” wrench. Disconnect the electrical connector from the front seat. The next stage is dismantling the seats.
The brackets are tightened to a torque of 20 N.m. The seats are moved forward, the rear brackets are tightened using the same method. The wires are connected to the battery. If the slides are installed, they are lubricated with Fiol-1 or Litol-24.
To tune the interior of the VAZ 2106, you will also need to remove the rear seat. First, experts advise studying the design of the rear seat. This sofa consists of a cushion and a backrest. The first element is fixed with two spikes welded to the body of the “six”. These spikes are installed in special holes located along the edges of the sofa.
To remove the seat, you will need to insert a screwdriver between the floor of the “six” and the edge of the part being removed. By pressing the screwdriver, they undermine the sofa from its seats. The next stage is dismantling the backrest. This element is fixed with two brackets welded to the vehicle body. If the seat cushion is removed, the backrest is removed by lifting it upward. Such movements must be sharp. First we pull one side, and then the other. Installation of the sofa is carried out in the reverse order.
Repair work
Standard six car seats can break during operation. More often the chair adjustment does not function, misalignment or bedsores have appeared. To repair the seat, you will need to remove special latches along the edges. To remove the plate, use a flat-head screwdriver.
After dismantling the slide mechanism, it is recommended to inspect the chair frame. If the seat is damaged, repair work is carried out using a grinder, welding and a hammer. Then the frame is painted. The structure is assembled in reverse order.
To repair the back, you will need to remove the standard cover.
To do this, bend the teeth using a screwdriver. The next stage is dismantling the canvas and decorative inserts. After removing the entire cape, the back is dismantled. The frame is inspected for defects.
If a crack appears in the back, repair work is carried out using a hammer and plywood. A crack may also appear in the fastening of the rotating mechanisms. In this case, it will need to be cut out with a grinder. We repair the mechanism by welding and hammering. The next stage is assembling the rotating mechanism and synchronizing it. You will first need to clean and lubricate the connecting rod.
If the mechanism in the repaired unit works well, the structure is assembled. Then the functionality of the node is re-checked. The component elements of the mechanism must work synchronously and in parallel. The structure is clamped with a clamp, welded, protected and painted.
If the headrest of the VAZ 2106 seat is loose, insert copper strips into the clamps. It is recommended to clean and lubricate rusty fasteners. The headrest pillars have straight bottom slots. To quickly dismantle the head restraints, it is recommended to install lower grooves. The back and headrest are assembled in the reverse order. Repair work on the “six” seats has been completed.
Covers or seats?
For many, buying new car seats is associated with the desire to transform the appearance of the interior of their car. That is, they care little about the issue of comfort or they have only recently started driving. That’s why they don’t think about the issue of convenience.
If you have ever driven modern cars from top manufacturers, you have probably felt the difference between the seats. But you can’t buy such a car for yourself yet. So why not bring your fourteenth to this level of comfort by purchasing new seats? Good idea.
The covers only create the appearance of a beautiful, cozy interior. The landing was uncomfortable and will remain so.
Set your priorities and think about what is more important to you - a healthy back or a beautiful picture. In addition, by replacing the seats, you can put very beautiful covers on them.
First, let's look at the types of seats that you can purchase for your VAZ 2114. There are three categories in total, the advantages and disadvantages of which are described in more detail in our table.
Seat type
pros
Minuses
Ideal for professional sports, designed for very high loads, made of high quality materials
The design is uniform and is not divided into a backrest and a chair. Very expensive, cause discomfort when boarding and disembarking, and quite hard. They are not intended for driving on regular roads or for long voyages.
The backrest is adjustable, they look great on the fourteenth, well-thought-out safety, clear fixation of the driver, they have excellent support for the hips and shoulders, long trips do not cause discomfort
Not suitable for cars with soft suspension, there are problems with the landing, which is quite uncomfortable, especially for large drivers and passengers
Luxury chairs that are ideal in terms of comfort and ergonomics. Externally attractive, perfectly secures the driver, withstands heavy loads, allows you to easily sit down and stand up, can have many built-in functions, ideal for professional drivers, wide range of position adjustments
They have practically no downsides. But the more features, the higher the cost
Don't chase fashion when purchasing sports or racing seats for regular city roads. But if you are adapting your VAZ for competitions, then it is categorically not recommended to go on the tracks on ordinary seats.
High comfort chairs
What to choose
We have decided on the types of seats, but there are a great variety of them depending on the manufacturer, size, functions, etc.
Since the VAZ 2114 is a car more likely for city roads, we will focus on the choice of anatomical seats.
Let's discuss several points for choosing them.
- Origin. Here the choice is between used and new seats. The new ones are more expensive, but they certainly have more advantages. A good place to look for used seat sets is car dismantling yards, where you can touch and inspect the product with your own hands. The choice depends on you and your financial capabilities.
- Equipment. The presence of armrests and headrests is strongly encouraged. Make sure that the chairs come with all the necessary components and fasteners. They are not always provided by the seller, so ask in advance about the installation details.
- Fastenings. Some seats from foreign cars fit perfectly under the standard VAZ holes for installation. For others, you have to do a little modification in the form of using adapters or creating additional holes. And there are also those, for the installation of which you will have to almost completely redo the seat on the body. This is far from the best option, since you will have to spend a lot of time and money.
- Manufacturer. A lot depends on who exactly made the seats you choose. If you are interested in kits from foreign cars, then seats from Ford have proven themselves to be quite good. But keep in mind that some may be too wide, which will complicate access to the handbrake and will not allow you to move the seat back and forth. Take measurements in advance. There is also a company called UNP. It specializes in the manufacture of both anatomical and sports seats for cars of the domestic manufacturer - AvtoVAZ. They have a higher quality finish and are offered with all the necessary accessories and fasteners. Working with them is more convenient and easier.
Disassembly and assembly of front seat adjustment mechanisms
- Repair manuals
- Repair manual for VAZ 2107 (Zhiguli) 1982+.
- Disassembly and assembly of front seat adjustment mechanisms
Disassemble and reassemble mechanisms on removed seats.
Rice. 9–22. Front seat adjustment mechanisms: 1 — slide guides; 2 — slide sliders; 3 - roller; 4 — rubber roller ring; 5 - limiter; 6 — slide latch; 7 — retainer for the internal guide of the slide; 8 — back reinforcement; 9 - traction; 10 - spring; 11 — cotter pin; 12 — screw rod with the handle for the backrest tilt mechanism; 13 — latch handle for the slide movement mechanism; 14 — screw rod bracket
Disconnect spring 10 (Fig. 9–22) and knock out rod pin 9. Unscrew the bolts securing the slide to the seat and remove them. Remove the cotter pin 11 and the screw rod 12 from the bracket 14. Sliding the sliders 2 along the guides 1, remove the rollers 3 and the limiter 5, remove the sliders from the guides.
Reassemble in reverse order.
Download information from the page
↓ Comments ↓
Please enable JavaScript to view the comments powered by Disqus.
1. Operation and maintenance of the vehicle 1.0 Operation and maintenance of the vehicle 1.1. Vehicle operation 1.2 Vehicle maintenance
2. General data 2.0 General data 2.1 Technical characteristics of vehicles 2.2 Controls and monitoring devices 2.3. Ventilation control and interior heating
3. Engine 3.0 Engine 3.1 Removal and installation of the engine 3.2 Disassembling the engine 3.3 Possible engine malfunctions, their causes and methods of elimination 3.4 Engine assembly 3.5 Bench tests of the engine 3.6 Checking the engine on a car 3.7. Cylinder block 3.8. Pistons and connecting rods 3.9. Crankshaft and flywheel 3.10. Cylinder head and valve mechanism 3.11. Camshaft and its drive 3.12. Cooling system 3.13. Lubrication system 3.14. Supply system
Repair of VAZ 2107 (Zhiguli): Seats
- Repair manuals
- Repair manual for VAZ 2107 (Zhiguli) 1982+.
- Seats
9.7.1 Seats Removal and installation Dismantling and assembling the front seat adjustment mechanisms
9.7.2 Removal and installation
Rice. 9–21. Front seat: 1 — pillow; 2 - back; 3 - base of the back; 4 - springs; 5 — pillow base frame; 6 — handle of the movement mechanism; 7 — handle for the backrest tilt mechanism Front seat. To remove the seat (Fig. 9–21), move it all the way back, c.
9.7.3 Dismantling and assembling the front seat adjustment mechanisms
Disassemble and reassemble mechanisms on removed seats. Rice. 9–22. Front seat adjustment mechanisms: 1 — slide guides; 2 — slide sliders; 3 - roller; 4 — rubber roller ring; 5 - limiter; 6 — slide latch; 7 — retainer for the internal slide guide.
↓ Comments ↓
Please enable JavaScript to view the comments powered by Disqus.
1. Operation and maintenance of the vehicle 1.0 Operation and maintenance of the vehicle 1.1. Vehicle operation 1.2 Vehicle maintenance
2. General data 2.0 General data 2.1 Technical characteristics of vehicles 2.2 Controls and monitoring devices 2.3. Ventilation control and interior heating
3. Engine 3.0 Engine 3.1 Removal and installation of the engine 3.2 Disassembling the engine 3.3 Possible engine malfunctions, their causes and methods of elimination 3.4 Engine assembly 3.5 Bench tests of the engine 3.6 Checking the engine on a car 3.7. Cylinder block 3.8. Pistons and connecting rods 3.9. Crankshaft and flywheel 3.10. Cylinder head and valve mechanism 3.11. Camshaft and its drive 3.12. Cooling system 3.13. Lubrication system 3.14. Supply system
4. Transmission 4.0 Transmission 4.1. Clutch 4.2. Gearbox 4.3. Cardan transmission 4.4. Rear axle
5. Chassis 5.0 Chassis 5.1. Front suspension 5.2. Rear suspension 5.3. Shock absorbers
6. Steering 6.0 Steering 6.1. Inspection, check and adjustment of steering 6.2. Steering mechanism 6.3. Steering rods and ball joints 6.4. Swing arm bracket
7. Brakes 7.0 Brakes 7.1. Checking and adjusting the brakes 7.2 Possible malfunctions of the brakes, their causes and methods of elimination 7.3 Bracket for the clutch and brake pedals 7.4. Vacuum booster 7.5. Brake master cylinder 7.6. Front brakes 7.7. Rear brakes 7.8. Rear brake pressure regulator 7.9. Parking brake
8. Electrical equipment 8.0 Electrical equipment 8.1 Electrical equipment diagram 8.2. Battery 8.3. Generator 8.4. Starter 8.5. Ignition system 8.6. Lighting and light signaling 8.7. Sound signals 8.8. Windshield cleaner 8.9 Headlight cleaner 8.10. Heater electric motor 8.12. Control devices
9. Body 9.0 Body 9.1. Doors 9.2 Possible body malfunctions, their causes and methods of elimination 9.3. Hood, trunk lid, bumpers 9.4. Body glazing 9.5. Windshield and headlight glass washers 9.6. Instrument panel 9.7. Seats 9.8. Heater and ventilation of the body interior 9.9. Body frame repair 9.10. Paint and varnish coatings 9.11. Anti-corrosion protection of the body
Novikov Maxim Glebovich – Repair of the seat back tilt regulator VAZ-2107.
This is probably completely funny, but today I am publishing another article about repairing broken parts of VAZ cars, which, as usual, cost pennies anyway. I was prompted to write this article by another breakdown of my car, namely the passenger seat backrest tilt adjuster. I don’t know who I drove so heavy (and I never bombed), but on the passenger seat the adjuster comb was completely cut off, and the backrest did not lock in any position at all, tipping over into the back seat when I tried to lean on it. Naturally, I was too lazy to go to the service center, and I decided to see for myself what was broken there, and whether it was possible to fix it myself.
In general, this breakdown happens on Zhiguli cars quite often. Usually, for repairs, the chair is removed, the welded comb is cut off, and a new one is welded. But at home, it would be possible to do without welding, simply by drilling out the spot welds, cutting off the weld with a chisel, and screwing the new comb into place through the drilled holes. But I didn’t have time to look for a comb, and I had already taken the drill from the dacha to Moscow (and I started doing repairs at the dacha). Therefore, I decided to simply fix the backrest in one position, since none of the potential passengers are particularly trying to adjust it.
So, the method for quickly fixing the tilt of the seat back of a VAZ-2107 car in case of a comb failure:
1. Remove the chair. To do this, move the chair all the way back, unscrew the two front bolts on its lower runners, then move the chair all the way forward and unscrew the two rear bolts on the same runners. We pull the chair out and turn it over, as if putting it on all fours. We study the lower part, in particular the latch itself.
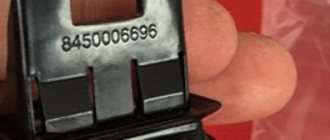
The picture shows a chair back tilt lock with broken comb teeth. Thanks to the teeth, part 1 should be fixed in part 2, but since the teeth of part 2 are broken, fixation does not occur.
However, as you know, all the parts in Lada cars have clever design features, which seem to be specially laid out so that we can repair or modify these parts. Let's pay attention to the grooves of part 2, marked with arrows in the figure. They are approximately the same width as the distances between the ribs in part 1 (actually a little wider). This allows us to easily fix these two parts by inserting the part shown in the next photo.
2. We make a retainer. It is easy to make from a fairly common metal strip, a fragment of which can always be found by rummaging thoroughly in your or your neighbors’ barn. I found such a strip, and its width turned out to be exactly equal to the distance between the extreme points of the grooves, and the thickness was exactly equal to the width of the grooves, which is important for eliminating backlash. All that remains is to cut out a notch in the center and use sandpaper to slightly narrow the thickness of the plate within the boundaries indicated by the red lines, since, as mentioned above, the distance between the edges of part 2 is slightly less than the width of the grooves themselves, and therefore the thickness of the part.
| Please note that the teeth of the clamp have different widths, corresponding to the depth of the grooves of part 2. |
3. Now let’s adjust the desired level of inclination and hammer the lock into place, paying attention to its orientation (narrow tooth in a shallow groove, wide tooth in a deep one):
Instead of a retainer plate, you can probably use large self-tapping screws, screwed either into the holes formed by the grooves and the ribs aligned with them, or between the ribs and broken comb teeth. But this fixation did not seem reliable enough to me.
4. After you have driven the latch into the grooves and it tightly clasps part 1 with its cutout, slightly bend one of the teeth on the opposite side with a thick screwdriver so that the latch cannot spontaneously fall out:
I made the clamp 50 mm high, but, as you can see, it can be made a couple of centimeters smaller. Its size doesn't matter.
5. That's it. Turn the chair over and put it back in the reverse order. Now you can drive until you are ready to go to a car service center or until you scrap the car.
Which is better to choose?
Let's now look at which of the listed seats is best suited for your car. It should be borne in mind that a lot depends on the availability of a particular seat option. It is not always possible to find a suitable option in good condition and for the best price. It is important to understand that worn-out seats from a foreign car will have worse characteristics than “Zhiguli” ones; take this into account when choosing.
READ How to start a car without a key VAZ 2107
If you have a junkyard nearby where old German cars constantly appear, then you are very lucky. Surely you can find seats from the Mercedes W210. They are not very popular among drivers of modern foreign cars, but for the VAZ 2107 are ideal. Moreover, at showdowns they usually don’t ask for much for them. At the same time, buying such seats secondhand can cost a significant amount.
If you live in Siberia or the Far East, then you better look for Toyota Corolla seats. Usually in the eastern regions there are no problems with searching, which cannot be said about the European part of Russia. In any case, if you can find such seats, purchase them. Not only do they fit perfectly, but they also look really good in the salon.
The remaining options listed in the previous part of the article make sense to use only if there are no more suitable options. As a rule, their installation requires additional modification of the fasteners.
PS They forgot to mention that they are also suitable for Mazda 6. There is an option to look for them at a disassembly site, chances are high that they will be there.