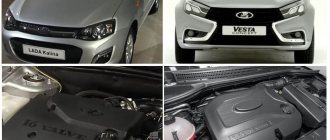
How to disassemble the dashboard of Lada Vesta
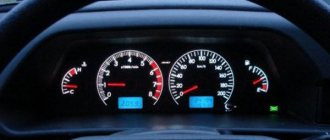
The instrument panel on Vesta has a modern design.
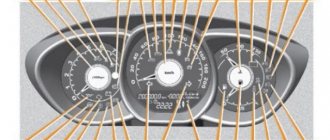
The main readings are located in three large wells and are illuminated using SMD diodes. If necessary, this backlight can be replaced, but to do this you will have to first disassemble the Vesta instrument cluster. We looked at how to remove the dashboard earlier. After this, you will no longer need tools, because... Absolutely everything is held on by latches and clamps. There is not a single fastening screw. To remove the glass you will have to unclip several fasteners around the perimeter of the instrument panel:
Next, we dismantle the mask (covering in the form of wells), freeing the latches from engagement:
Probably the most difficult thing in the whole process is to remove the arrows of the instrument cluster. They should be unscrewed counterclockwise, and with good force, towards yourself. Very carefully, you can easily break the gear stop!
Now you can remove the back cover. We unclip the latches shown in the photo. If necessary, you can remove the covers from the arrow control mechanisms:
Now you can remove the circuit board, which is held by clips, from the device body:
Remove the instrument panel trim by picking it up from one of the edges:
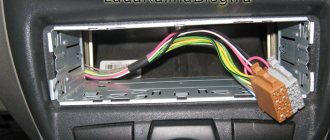
We dismantle the standard on-board computer after disconnecting its connector:
SMD LEDs are used to illuminate the speedometer scales, tachometer, arrows, BC and other indications. Some of them are shown in the photo:
The instrument panel is assembled in the reverse order. At the end, we check the work using an autotest. It is also recommended to glue the wells so that there are no squeaks in the future.
Source: https://xn--80aal0a.xn--80asehdb/do-my-self/repair/repair-lada-vesta/1574-kak-razobrat-panel-priborov-lada-vesta.html
Do-it-yourself firmware
You need to be aware that all actions are performed at your own peril and risk. No one can guarantee that after installing the firmware yourself, the device will work correctly. To prevent this outcome, it is recommended to update the panel either at an authorized dealer or at specialized service stations.
There is no need to confuse the panel firmware with the multimedia firmware - these are different devices.
The cost of such a service varies from 1,500 to 2,500 thousand rubles. This is much cheaper than buying a new shield to replace a damaged one yourself. For dismantling and reflashing, the warranty may be revoked if the procedure is not carried out by an authorized dealer. If you decide to update the software yourself, you will need to make a backup copy of the standard firmware, then prepare the necessary tools:
- A device for flashing Usbdm OSBDM V4.95 - can be ordered on AliExpress, the cost is approximately 600-700 rubles.
- Install drivers and software for Windows from the disk included with the programmer.
- Dismantle the instrument panel, peel off the factory seal, and remove the cover from the back.
- Open the programmer and move the checkbox to the 3.3V position - at this voltage you will not need an external power source.
- Connect to the dashboard and PC.
- On a computer or laptop, open the HCS12 Programmer program, select and click on the “Detected” item.
- Go to the “Target” item and select the folder with the location of the firmware, check the box next to the “Auto Reload” item, then click on “Detect Chip”. The programmer will determine the chip type automatically.
- Go to the “Security” tab and check the “Unsecure” box.
- In the “Advanced” tab, check the “Enable” box.
- In the “Device Operations” section on the “Target” tab, select the “Erase Selective” item - only the firmware will be replaced, the immobilizer data and mileage will be saved.
Now you can click on the “Program Flash” button - the firmware process will start. This will last a few seconds. After completion, when prompted by the program to connect the dashboard, click “No”. The flashing device can be turned off and the instrument panel replaced.
How to disassemble the dashboard of Lada Vesta
The instrument panel on Vesta has a modern design. The main readings are located in three large wells and are illuminated using SMD diodes. If necessary, this backlight can be replaced, but to do this you will have to first disassemble the Vesta instrument cluster.
We looked at how to remove the dashboard earlier. After this, you will no longer need tools, because... Absolutely everything is held on by latches and clamps. There is not a single fastening screw. To remove the glass you will have to unclip several fasteners around the perimeter of the instrument panel:
Next, we dismantle the mask (covering in the form of wells), freeing the latches from engagement:
Probably the most difficult thing in the whole process is to remove the arrows of the instrument cluster. They should be unscrewed counterclockwise, and with good force, towards yourself. Very carefully, you can easily break the gear stop!
Now you can remove the back cover. We unclip the latches shown in the photo. If necessary, you can remove the covers from the arrow control mechanisms:
Now you can remove the circuit board, which is held by clips, from the device body:
Remove the instrument panel trim by picking it up from one of the edges:
We dismantle the standard on-board computer after disconnecting its connector:
SMD LEDs are used to illuminate the speedometer scales, tachometer, arrows, BC and other indications. Some of them are shown in the photo:
The instrument panel is assembled in the reverse order. At the end, we check the work using an autotest. It is also recommended to glue the wells so that there are no squeaks in the future.
Source: https://xn--80aal0a.xn--80asehdb/do-my-self/repair/repair-lada-vesta/1574-kak-razobrat-panel-priborov-lada-vesta.html
Removal and installation of the Lada Vesta dashboard
Removing the instrument panel on a VAZ-2110
It is necessary to dismantle the dashboard in case of repair, subsequent tuning, or when disassembling the entire front panel of the car. The whole process will take you very little time.
- Disconnect the minus (-) terminal from the car battery;
- Unscrew the two screws securing the instrument panel (item 1 in Fig. 1) using a screwdriver and a T20 socket;
Pull the instrument panel (item 2, Fig. 1) towards you by the upper part until the latches snap off; We unscrew the two screws securing the instrument cluster (item 1, Fig. 2) using the same T20 nozzle;
Pull the dashboard towards you and disconnect the connector with the wires (pos. 3. Fig. 3).
Installation of the instrument panel is carried out in the reverse order. The whole process can be seen in the video below:
The Lada Vesta is equipped with an analog instrument panel with arrows from the factory, while many modern foreign cars already use electronic instrument panels. However, not everything is so bad; in the near future, Vesta owners will have the opportunity to buy an instrument cluster with an LCD screen as an accessory. Work on its creation is already underway in several companies.
We are monitoring the development of these projects and updating the news as new information becomes available.
1.
The Dop-shop company stated that their tuning center has developed an LCD instrument cluster for Vesta, which has two large virtual dial gauges showing the car’s speed and revolutions. At the same time, it retains all the necessary standard scales (fuel level, engine temperature, as well as all indicators of various vehicle systems). The new instrument panel, like a TV, will display all the indicators of your car, analyze consumption, mileage, etc.
It is noted that several skins have been developed for it, which can be changed depending on your mood. The combination is easily and simply installed in the car, in standard places; installation and connection takes about 20 minutes.
2.
CMG – Car Modifications Group also announced that they have begun work on creating an electronic panel for Vesta. Brief specification: 1920x720px screen in the size of a standard 1 in 1 device, data reception via CAN bus is certified.
The development or stop of this project depends only on the availability of demand. You can pre-order now at a reduced price of 25,000 rubles. It is noted that after release the electronic panel will cost more. It is also planned to release a dashboard with a 3D accelerator for 35,000 rubles.
https://youtube.com/watch?v=GwIi4hAZTDs
Perhaps the restyled Vesta will have an updated instrument panel, but for now only one panel is offered as an alternative to the standard one - Ferrum GF 940.
Update 03.07.19
: The DopShop company continues to work on creating an electronic instrument cluster. Recently, designers presented six different styles of this panel:
The company responded to the Lada.Online website about how the work on creating an electronic instrument panel for Vesta is progressing:
The company also named the approximate cost of such a panel; it will be approximately in the range of 15,000 – 30,000 rubles, depending on the modification.
Prerequisites
The car constantly throws up problems that have to be solved either using independent knowledge, ingenuity and tips from experienced car owners, or by contacting a service center. In the latter case, the result will be more expensive, but not always of better quality.
Even if you are not going to do this right now, it still doesn’t hurt to know how to properly disassemble the panel on a VAZ 2110, and even more so if you are one step away from this work.
Instrument panel VAZ 2110
When you need it
It should be noted that the instrument panel on the VAZ 2110 is not particularly durable, so it can simply be damaged. Or it has become worn, frayed, scratched.
But often the reason is different: I would like the design to be more beautiful, and not everyone is satisfied with the “standard” lighting. And there are more modern ones, LED, stylish. But in order to change anything or even replace it, you must first disassemble the old instrument panel.
This material will help you change the dashboard lighting on a VAZ 2110: https://vazweb.ru/desyatka/salon/podsvetka-paneli-priborov.html
Description of the new instrument panel
The dashboard of the Lada Vesta model has undergone unscheduled modifications; now it takes into account the most common wishes of real car owners.
What has changed compared to the old dashboard:
- The font of the numbers has become larger, the readings have become easier to read at any speed;
- Added daylight illumination of all scales so that readings can be read in any lighting conditions;
- The scales themselves now have an orange backlight;
- Voice guidance has been added about unfastened seat belts, activation of the GPS system and much more;
- The volume of sound signals, both warning and informational (unfastened seat belts, direction indicators, etc.), has increased;
- Time synchronization will now occur automatically via satellites of the ERA-GLONASS navigation system; now the driver only needs to select the time zone once;
- New indicators on the dashboard: about unfastened seat belts of passengers, including rear ones, as well as an indicator of low air pressure in the tires.
For now, the new instrument panel will be installed exclusively on export versions of cars. These models will be sold in Germany and Hungary, but during 2021 the new product should also appear on cars for domestic consumers.
Disassembly procedure
Many people are interested in whether it is possible to remove the dashboard of a VAZ 2110 without “demolishing” the floor of the cabin? It's probably possible, but it would be very inconvenient.
Therefore, we act according to this plan:
- Let's prepare a marker and self-adhesive labels (which are usually glued to the product). They can be bought at points where all sorts of small things are sold such as napkins, bags, etc., as well as in stationery stores;
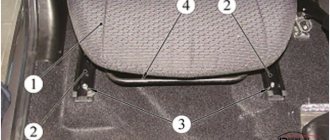
- We remove the front seats from the interior;
- We unscrew the screws on the sides, remove the tunnel (first its upper part, then the lower);
- We disassemble the steering column casing, remove it and the steering wheel. To do this, you need to unscrew 3 self-tapping screws and 4 screws. Please note that the VAZ 2110 steering wheel sits quite tightly on the splines, so you need to remove it by rocking and tugging, but being careful of a sharp blow to the face, if you suddenly overdo it and it will fly out;
- Next are the steering column switches. They also need to be removed;
- Don’t forget to mark everything and write down on a piece of paper what we are filming;
- We unscrew the glove compartment (in “understandable” language - the glove compartment) and also take it out;
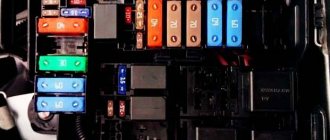
- Next comes the disassembly of the mounting block and its cover. To do this, disconnect all connectors and relays;
- Now we have almost opened the instrument panel on the VAZ 2110. All that remains is to remove the strut covers, unscrew the headlight hydraulic adjustment and push it inward;
- Now the main task is to unscrew the screws securing the instrument panel to the body. To remove it completely, you need to unscrew the two studs located under the covers of the tunnels for supplying air to the side windows.
After all these manipulations, the panel hangs, and is held in place only by the steering shaft and the lower air duct.
An article discussing the process of replacing the panel overlay is located here: https://vazweb.ru/desyatka/salon/nakladka-na-panel.html
What to do with the wires?
You will probably be amazed at the number of wires located in the panel space, intended to power various devices in your VAZ 2110. It would be more convenient to remove everything together with a lump of wires. But take your time. It is unlikely that you are going to change anything on a completely new car, so in the future you will spend a long time figuring out which wire comes from what, and how to connect it. So that it turns out that disassembly went quite smoothly, but reassembly led to a slight stupor.
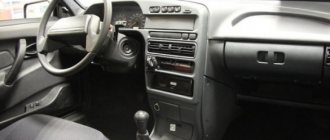
Disassembled instrument panel of VAZ 2110
So try to disconnect all the connectors and wires that you can. Now you can finally remove the panel and remove it from the car. For fresh traces, do not forget to separate (you can tie in a pile) the entire wiring harness that belongs directly to the instrument panel, and mark the rest with self-adhesives. This will help you a lot when you start installing new equipment.
Source: https://vazweb.ru/desyatka/salon/kak-razobrat-panel.html
What does the dashboard consist of?
The Priora instrument panel contains all the necessary parts that no modern car can do without:
- regulator of external lighting and internal panel lighting;
- switch for turning, side and headlights;
- signal regulator;
- car instrument cluster;
- windshield wiper and washer regulator.
This is how the dashboard works
In addition, the panel contains an ignition switch connected to the anti-theft system. It contains 3 positions. Among the secondary mechanisms, we can note the presence of regulators for the rear window heating system, alarm and interior cooling. It is also worth mentioning the glove compartment, built-in clock and radio input jack.
Sometimes a certain panel element becomes unusable and you have to look for ways to replace it. In this case, you will need to disassemble the interior. Below is how to disassemble the instrument panel.
New instrument panel
We read indicators and repair the dashboard on Volgas.
The AvtoVAZ company has improved the instrument panel combinations and took into account all the needs of Lada Vesta owners. This once again confirms the fact that the manufacturer cares about improving cars according to the wishes of customers.
Let's look at the distinctive features of the instrument panel for the new Lada Vesta.
- The instrument scale has acquired the original orange finish.
- There is a new daylight backlight for comfortable reading of readings on the screen.
- The numbers have become larger.
- Voice commands have become louder (a signal that the seat belts are not fastened, a signal about adjusting the direction indicators, a signal reminding of the external lights not turned off, a signal about a key forgotten in the ignition).
- New light signals have become available, for example, a sign showing tire pressure.
- Sound “accompaniment” appeared. Now the woman’s soft voice warns: “Fasten your seat belts” or “GPS system is active.”
- The GLONASS navigation satellite system appeared.
- Stepped display of coolant temperature.
You may be interested in: Updated gearbox on Lada Vesta
The Izhevsk Automobile Plant is currently going to produce a pre-production model of a car for export. They plan to introduce the Lada Vesta with a new panel format into the domestic market. The approximate price for an updated dashboard for Lada Vesta is 7500-8000 rubles. The driver can only independently enter adjustments in the settings. This can be done mainly by experienced and knowledgeable car owners.
Russian car enthusiasts will have the chance to conduct a test drive to evaluate all the advantages of the new Lada Vesta instrument panel.
How to disassemble the instrument panel?
It often becomes necessary to dismantle the car interior in order to replace a part, for example, backlight bulbs. To do this, first of all, you need to understand how to disassemble the instrument panel. Removing the panel is quite simple. Select the required screwdriver and carefully unscrew the attached hardware.
Disassembling the panel begins with removing the hands on the dial, which can be disconnected with a knife. The main thing is to be careful and not damage the speedometer parts. It is advisable to use cardboard as a holder for glass elements. Replacing the backlight is done by scraping out the cover of the gasket in the speedometer. If you do not need to change the backlight of the sensors, you can simply clean them and leave them brighter.
But in most cases, the driver wants to change the color of some elements in the speedometer and make it much more useful. For example, the backlight of the instrument panel will be able to display the maximum permissible speed or extremely high engine overheating with indicators of a different color. To do this you will need a thin multi-colored cellophane bag.
You need to use a small piece of brightly colored cellophane to cover the indicator you are interested in on the inside of the dial. Dashboard lighting is limited to more than just highlighting indicators. Many motorists try to ensure that the lighting of their devices is uniform.
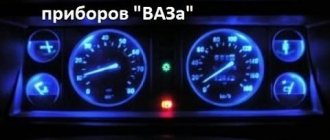
To achieve brighter and more even illumination, it is necessary to cover the panel with a special LED strip, which must be connected to the stock backlight wires in accordance with all the rules of current resistance. The set of instruments on the Priora can be easily supplemented with the latest method of illuminating the needles.
You can use CMD diodes, which can be easily fused into the glass panel using a soldering iron. To do this, we disassemble the dial and begin soldering directly under the base of the hands. The contact wires must be connected from the reverse side. If the instrument panel in Priora is broken, qualified assistance may be needed to repair it.
But you can easily do it yourself. To do this, you will need a panel pinout, that is, a diagram indicating the correspondence of the contacts with certain car devices. It looks like this:
- 1 — power steering;
- 4 - hand brake;
- 7 — external lighting regulator;
- 8 — right turn signal;
- 9 — left turn signal;
- 12,13 — immobilizer antenna sockets (A and B);
- 14 — mileage reset regulator;
- 15 — brake fluid regulator;
- 18 — instrument panel backlight control;
- 20 — battery terminal 30;
- 21 — battery terminal 15;
- 23,24 — forward and backward buttons on the steering column;
- 25,26 — outside temperature regulators (- / +);
- 27 — fuel tank regulator;
- 31 - panel diagnostic service.
Pinout numbers that were not specified are backup pins.
Electrics, sensors, battery Lada Vesta
Products from the Dustershop77 range on the topic of the article:
| Name | Manufacturer | Price | Availability | Add to cart |
| DC1250 | Set of small fuses (10 pcs) | Analogue | 200 / 150 rub. Discount: 100 rub. | 7 |
| DC954-8200719629 | Manifold absolute pressure sensor MAP sensor for 2.0 and 1.6 engines - F4R/K4M original 8200719629 | Original | 2500 / 1900 rub. Discount: 1700 rub. | 1 |
| DC1134-7700427640 | Door limit switch (switch) original 7700427640 | Original | 800 / 500 rub. Discount: 400 rub. | 3 |
| DC1143 | Renault mirror control button (joystick) original 255706283R | Original | 700 / 500 rub. Discount: 450 rub. | 6 |
| DC1195 | Fuse set 180pcs in a plastic box | China | 1000 / 800 rub. Discount: 700 rub. | 1 |
| DC990-8200060049 | Seat heating switch original 8200060049 | Original | 800 / 700 rub. Discount: 600 rub. | 5 |
| DC485-497612479R | Power steering fluid pressure sensor original Renault 497612479R | Original | 2000 / 1600 rub. Discount: 1300 rub. | 1 |
| DC997-255678753R | Steering column switch right article number 255678753R | Original | 2800 / 2700 rub. Discount: 2700 rub. | 1 |
| DC1754-104035756 | Door limit switch Lada Vesta HANS PRIES TOPRAN (1 piece) 104035756 | Analogue | 300 / 200 rub. Discount: 100 rub. | 2 |
| DC1949 | Fuel level sensor Duster, Largus, Logan, etc. | ASAM | 1900 / 1300 rub. Discount: 1000 rub. | 2 |
| DC1360-7711238598 | Rechargeable battery original Renault 7711238598 | Original | 15000 / 12000 rub. Discount: 10900 rub. | 1 |
| DC1027-8201167988 | Left steering column switch with PTF article number 8201167988 / 255400337R | Original | 6000 / 4700 rub. Discount: 4000 rub. | 1 |
| DC1833 | 6.3 series female tip with locking (without wire) | 10 / 7 r. Discount: 5 rub. | 5 | |
| DC1404 | Trunk lid and door lock activator (Asam/MANOVER analogue 7700712901) | Analogue | 1400 / 900 rub. Discount: 700 rub. | 1 |
| DC1950-172024388R | Fuel pump Largus, Logan, etc. (one fitting) 172024388R original | Original | 2500 / 2100 rub. Discount: 1800 rub. | 1 |
| DC1999 | Brushes for VALEO generator | Analogue | 300 / 150 rub. Discount: 100 rub. | 4 |
| DC1793 | Ignition coil connector Duster, Terrano, Captur | Original | 600 / 500 rub. Discount: 450 rub. | 7 |
| DC1828-35372203 | Pin fuse 15A 35.3722-03 (1 pc.) | Original | 10 / 7 r. Discount: 5 rub. | 3 |
| DC1830-35372205 | Pin fuse 25A 35.3722-05 (1 pc.) | Original | 10 / 7 r. Discount: 5 rub. | 3 |
| DC1881 | Headlight connector block H4 with wires Duster, Vesta, Terrano, Logan, etc. universal (1 pc.) | Analogue | 100 / 60 rub. Discount: 50 rub. | 6 |
| DC1913 | Seat heating connector (4-pin male connector analogue 98822-1045 Molex with wires) | Analogue | 110 / 100 rub. Discount: 80 rub. | 2 |
| DC1935-255404709R | Left steering column switch (without front PTF, horn on steering wheel 2015-) original 255404709R | Original | 8500 / 6500 rub. Discount: 4900 rub. | 1 |
| DC1945 | Lubricant for electrical contacts and battery terminals Liqui Moly | Analogue | 600 / 400 rub. Discount: 300 rub. | 1 |
| DC1998 | Contact rings for VALEO generator (1 piece) | Analogue | 800 / 600 rub. Discount: 400 rub. | 5 |
| DC634-601986892R | Speed sensor (plug) for cars with ABS original 601986892R | Original | 1900 / 1650 rub. Discount: 1450 rub. | 1 |
| DC996-255675128R | Steering column switch left article number 255675128R | Original | 4700 / 4300 rub. Discount: 3800 rub. | 2 |
| DC2067-7700712901 | Door lock activator (solenoid) Duster, Logan, Terrano, etc. original 7700712901 | Original | 3500 / 2600 rub. Discount: 2200 rub. | 2 |
| DC1520 | Solenoid relay 1.6 H4M analogue 233003999R | Analogue | 1900 / 1600 rub. Discount: 1400 rub. | 1 |
| DC2034-593546 | Voltage regulator Duster, Terrano, Logan, etc. VALEO 593546 (2 contacts analogue 7701055052) | Analogue | 4300 / 3200 rub. Discount: 2700 rub. | 2 |
| DC1812-6001547488 | Heater resistor Duster, Logan, Terrano, Sandero, Kaptur, etc. original 6001547488 | Original | 1500 / 1000 rub. Discount: 800 rub. | 1 |
| DC1827-35372202 | Pin fuse 10A 35.3722-02 (1 pc.) | Original | 10 / 7 r. Discount: 5 rub. | 4 |
| DC1829-35372204 | Pin fuse 20A 35.3722-04 (1 pc.) | Original | 10 / 7 r. Discount: 5 rub. | 4 |
| DC1841 | Ring lug 8.2mm (without wire for crimping) | 10 / 7 r. Discount: 5 rub. | 4 | |
| DC1867 | Seat back heater connection connector for Largus, Vesta, X-Ray | Analogue | 100 / 60 rub. Discount: 45 rub. | 1 |
| DC1900 | Seat heating connector Vesta, Largus, X-Ray, etc. Renault, Lada, Nissan | Analogue | 250 / 200 rub. Discount: 150 rub. | 6 |
| DC1914 | Seat heating button connector analogue 98172-1003 Molex with wires with wires | Analogue | 250 / 200 rub. Discount: 150 rub. | 2 |
| DC1919 | Door limit switch Lada Vesta, VAZ 2190, 1118, 2123 original | Original | 150 / 80 rub. Discount: 60 rub. | 4 |
| DC1933 | Flat fuse holder with cover and wire from 1 to 30A | Analogue | 190 / 120 rub. Discount: 90 rub. | 2 |
| DC1947 | Electrical contact cleaner aerosol 0.2L | Analogue | 500 / 300 rub. Discount: 200 rub. | 2 |
| DC1958-793710 | Glove box limit switch 1118,2170,2180 Vesta, Handbrake 2123 - 79.3710 original | Original | 200 / 120 rub. Discount: 80 rub. | 1 |
| DC2002-8200194414 | Windshield washer pump Duster, Logan, Sandero, Largus original 8200194414 | Original | 1700 / 1400 rub. Discount: 1100 rub. | 1 |
| DC2100-251451432R | ESP switch off button Duster, X-Ray, Renault, Lada 251451432R original | Original | 2500 / 1900 rub. Discount: 1600 rub. | 1 |
| DC2118-7700844253 | Yellow fan relay, fuel pump Duster, Logan, Sandero, Terrano, etc. original 7700844253 20240077 | Original | 1300 / 1000 rub. Discount: 800 rub. | 1 |
| DC2122-8200351489 | Relay gray 5 contacts 35A Renault original 8200351489 | Original | 900 / 600 rub. Discount: 400 rub. | 1 |
| DC2135-8200671275 | Oil pressure sensor Duster and others original 8200671275 | Original | 1800 / 1400 rub. Discount: 1200 rub. | 1 |
| DC2136-8200680689 | Knock sensor Duster and others original 8200680689 | Original | 3000 / 2200 rub. Discount: 1800 rub. | 1 |
| DC2167-172024388R | Fuel pump module assembly Largus, Logan and other analogue 172024388R | Analogue | 6100 / 5600 rub. Discount: 5000 rub. | 1 |
| DC623-8200547283 | Speed sensor original Renault 8200547283 / 6001548870 (without ABS) | Original | 1600 / 1100 rub. Discount: 900 rub. | 1 |
| DC2181-7701044743 | Throttle position sensor 7701044743 (original AvtoVAZ) | Original | 1600 / 1200 rub. Discount: 800 rub. | 1 |
| DC2219-407009322R | Tire pressure sensor Renault 407009322R original | Original | 2200 / 1900 rub. Discount: 1500 rub. | 4 |
| DC1665-21800141301000 | Manifold absolute pressure and temperature sensor MAP sensor 1.6l VAZ 21129 original 21800141301000 | Original | 2800 / 2200 rub. Discount: 1900 rub. | 1 |
| DC2033-8200671272 | Oil pressure sensor Duster, Terrano, Captur F4R, K9K, etc. original 8200671272 | Original | 2200 / 1800 rub. Discount: 1300 rub. | 1 |
| DC1816-284375765R | Parking sensor 284375765R original (1 piece) | Original | 1200 / 800 rub. Discount: 550 rub. | 1 |
| DC1825-353722 | Pin fuse 5A 35.3722 (1 pc.) | Original | 10 / 7 r. Discount: 5 rub. | 5 |
| DC1826-35372201 | Pin fuse 7.5A 35.3722-01 (1 pc.) | Original | 10 / 7 r. Discount: 5 rub. | 5 |
| DC1831-35372206 | Pin fuse 30A 35.3722-06 (1 pc.) | Original | 10 / 7 r. Discount: 5 rub. | 5 |
| DC1832 | 6.3 socket series tip with fixation (crimped with wire) | 15 / 10 rub. Discount: 8 rub. | >10 | |
| DC1844 | Pin lug series 6.3 with fixation (without wire for crimping) | 20 / 10 rub. Discount: 6 rub. | >10 | |
| DC1842 | Ring tip 8.2mm (with wire) | 45 / 30 rub. Discount: 20 rub. | 3 | |
| DC1843 | Pin lug series 6.3 with fixation (crimped with wire) | 45 / 30 rub. Discount: 15 rub. | >10 | |
| DC1847 | Split corrugation for cable with a diameter of 6.8 mm (corrugated tube with a cut) price per 1 meter | 50 / 30 rub. Discount: 25 rub. | >10 | |
| DC1848 | Split corrugation for cable with a diameter of 11.5 mm (corrugated tube with a cut) price per 1 meter | 50 / 30 rub. Discount: 25 rub. | >10 | |
| DC1850 | Corrugation for cable, cut with a diameter of 9.4-9.8 mm (corrugated tube with a cut) price per 1 meter | 50 / 30 rub. Discount: 25 rub. | >10 | |
| DC1892 | Connector for crankshaft sensor Vesta, compressor, turn signals Renault, Lada, Nissan | Analogue | 100 / 70 rub. Discount: 50 rub. | 2 |
| DC1907-12010996 | Connector for retractor relay Vesta 12010996 | Analogue | 110 / 80 rub. Discount: 70 rub. | 1 |
| DC1915 | Fuse holder connector with wires | Analogue | 110 / 80 rub. Discount: 60 rub. | 2 |
| DC1916 | 5-pin relay connection block with wires | Analogue | 110 / 80 rub. Discount: 60 rub. | 2 |
| DC1917 | Automotive wire PVAM 1.0 sq. mm, 5 m. | Analogue | 190 / 130 rub. Discount: 100 rub. | 1 |
| DC1918 | Connector for lambda probe, oxygen sensor, fuel pump | Analogue | 300 / 240 rub. Discount: 200 rub. | 1 |
| DC1927 | Connector socket for baseless lamp T10 W5W with wires | Analogue | 120 / 80 rub. Discount: 60 rub. | 3 |
| DC1943 | Quick-detachable positive battery terminal with clamp (1 pc.) | Analogue | 900 / 700 rub. Discount: 550 rub. | 1 |
| DC1944 | Quick-detachable negative battery terminal with clamp (1 pc.) | Analogue | 700 / 500 rub. Discount: 350 rub. | 1 |
| DC1946 | Lubricant protection of terminals and contacts 210 ml LAVR aerosol in a bottle | Analogue | 600 / 400 rub. Discount: 300 rub. | 1 |
| DC1959 | Cigarette lighter connector Largus, etc. | Analogue | 300 / 200 rub. Discount: 150 rub. | 1 |
| DC1960 | Tray for the battery (mat tray for the battery) Largus, Vesta, etc. | Original | 300 / 200 rub. Discount: 150 rub. | 1 |
| DC2034-0272220736 | Voltage regulator Duster, Terrano, Logan, etc. BOSCH 0272220736 | Original | 3100 / 2300 rub. Discount: 1900 rub. | 1 |
| DC2119-7700414484 | Relay black 5 pin 20A Renault original 7700414484 | Original | 900 / 600 rub. Discount: 500 rub. | 1 |
| DC2120-8200766093 | Relay blue 5 pin Renault original 8200766093 | Original | 900 / 600 rub. Discount: 400 rub. | 1 |
| DC2121-8200263342 | Brown relay 4 contacts 20A PTF, washer, etc. Renault original 8200263342 | Original | 900 / 600 rub. Discount: 400 rub. | 1 |
| DC2123-7700639864 | Turn signal relay Renault original 7700639864 | Original | 3000 / 2500 rub. Discount: 2200 rub. | 1 |
| DC2125-8200263345 | Relay brown 4 contacts 20A Renault original 8200263345 | Original | 1200 / 900 rub. Discount: 800 rub. | 1 |
| DC2126-8200766081 | Relay blue 4 pin 35A Renault original 8200766081 | Original | 700 / 400 rub. Discount: 250 rub. | 1 |
| DC2128-8200308271 | Relay pink 4 pin 40A Renault original 8200308271 | Original | 800 / 500 rub. Discount: 350 rub. | 1 |
| DC2129-7700844253 | Relay yellow 5 pin 40A Renault original 7700844253 | Original | 1500 / 1000 rub. Discount: 800 rub. | 1 |
| DC2130-8200351488 | Relay blue 4 pin 70A Renault original 8200351488 | Original | 600 / 400 rub. Discount: 250 rub. | 1 |
| DC2131-8200859243 | Relay control unit for glow plugs K9K Renault original 8200859243 | Original | 7000 / 6300 rub. Discount: 5900 rub. | 1 |
| DC2132-110678071R | Relay control unit for glow plugs K9K Renault original 110678071R | Original | 3200 / 2500 rub. Discount: 2100 rub. | 1 |
| DC2133-8201279378 | Side impact sensor for Duster airbags, etc. original 8201279378 | Original | 1100 / 800 rub. Discount: 600 rub. | 1 |
| DC2134-497610324R | Power steering pressure sensor Duster and others original 497610324R | Original | 1400 / 1100 rub. Discount: 800 rub. | 1 |
| DC2137-7700422630 | Reverse sensor Duster, etc. (2 contacts, oval connector) original 7700422630 | Original | 1500 / 1200 rub. Discount: 1000 rub. | 1 |
| DC2138-8200209496 | Reversing sensor Duster, etc. (2 contacts, rectangular connector) original 8200209496 | Original | 1400 / 1100 rub. Discount: 800 rub. | 1 |
| DC2139-8200177718 | Reversing sensor Duster, etc. (3 contacts, rectangular connector) original 8200177718 | Original | 1900 / 1400 rub. Discount: 1100 rub. | 1 |
| DC2127-8200841587 | Relay blue 4 pin 40A Renault original 8200841587 | Original | 1300 / 900 rub. Discount: 700 rub. | 0 |
| DC2221-438285 | Starter Vesta, Largus, X-ray, Granta, etc. VAZ-2190,1117,1118,1119,2170 (manual transmission with cable drive) VALEO 438285 | Analogue | 5200 / 4900 rub. Discount: 4500 rub. | 0 |