Oxygen sensor VAZ 2107 injector
A large number of cars heavily pollute the environment, so the requirements for new cars regarding the content of harmful impurities in exhaust gases are becoming more stringent. They are achieved in different ways, but the most effective is the installation of a catalyst in the exhaust system, as well as adjustment to the optimal composition of the combustible mixture in the engine cylinders. The car’s on-board computer receives a signal from the VAZ 2107 lambda probe, and then, at its command, the composition of the combustible mixture changes.
Replacing the oxygen sensor
This small guide will be useful not only to owners of VAZ 2107 cars, but also to more modern tens and fourteeners. Please note that all repair work is best carried out on a lift or inspection pit. Do not forget that the catalytic collector is located in the exhaust gas system. If necessary, dismantle the engine protection of the VAZ 2107. Next, look for all the wires that relate to the oxygen sensor.
All clamps should be cut using wire cutters and the connectors should be disconnected. Moreover, it is advisable to thoroughly clean the one that remains on the machine from accumulated dust and dirt, since it will be used in the future. If the exhaust tract is hot, allow it to cool. Then, using a key with size “22”, unscrew the lambda probe. Screw the new device into place of the old one, tighten the nuts and connect the connection connector. The pinout of the oxygen concentration sensor is shown in the photo.
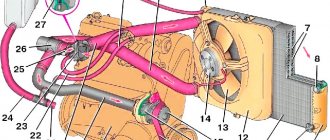
Do not lay wires too close to the exhaust pipe. They need to be secured with clamps to the elements of the cooling system. Finally, install engine protection on the VAZ 2107 and make a test drive to make sure the sensor is working. One of the problems that may arise during replacement is the sensor housing sticking to the exhaust pipe. In this case, penetrating lubricant can help (its price is about 70 rubles for a 200 ml container). If it does not help, then start the engine and warm it up. Try unscrewing the sensor while it is hot.
If this does not help, then let the system cool down, after which you heat only the sensor housing. You can even deliver several sharp but weak blows. And the very last method is to heat the body of the VAZ 2107 lambda probe to a high temperature and pour cold water over it. One of these methods should help to unscrew the oxygen sensor on the VAZ 2107. The price of a new device ranges from one to three thousand rubles.
What is a probe
The oxygen sensor VAZ 2107 injector among car enthusiasts is called a lambda probe (λ probe).
On the VAZ “classic” such devices began to be installed after the appearance of an injector on the engine. The lambda probe monitors the presence of oxygen residues in the exhaust gases. This is necessary to reduce the amount of carbon monoxide in the exhaust of a running engine, which is possible after adjusting the composition of the air-fuel mixture in the power supply system of the power unit.
Why do sensor failures occur?
Most often, the oxygen sensor in the VAZ 2107 fails after using low-quality fuel; leaded gasoline is especially harmful to it. Other reasons for probe failure may be:
- Presence of fluid in the exhaust system.
- Severely dirty fuel filter.
- Development of the device resource.
Lambda operates in an environment of hot gases, so the ingress of any liquid into its working area will lead to the appearance of cracks and subsequent failure of the device. The on-board computer will not be able to correctly determine the composition of the working mixture. High gasoline consumption will become noticeable, and interruptions in engine operation will occur. Impurities in the fuel do not burn and end up in the exhaust manifold, then on to the lambda, which leads to distortion of its readings.
It is also important to set the ignition correctly, otherwise overheating will damage the device, and pops in the exhaust system will destroy the oxygen sensor and its ceramics. There are cases when “skilled” mechanics break the sensor.
The main symptoms of a malfunctioning lambda probe
The main sign of a faulty lambda probe is a change in engine operation, since after its breakdown the quality of the fuel mixture supplied to the combustion chamber significantly deteriorates. The fuel mixture essentially remains uncontrolled, which is unacceptable.
The reason for the lambda probe to fail to operate may be the following:
- depressurization of the housing;
- penetration of external air and exhaust gases;
- overheating of the sensor due to poor-quality engine painting or improper operation of the ignition system;
- obsolescence;
- incorrect or interrupted power supply that leads to the main control unit;
- mechanical damage due to incorrect operation of the vehicle.
In all of the above cases, except the last one, failure occurs gradually. Therefore, those car owners who do not know how to check the lambda probe and where it is located will most likely not immediately notice the malfunction. However, for experienced drivers it will not be difficult to determine the reason for changes in engine performance.
The gradual failure of the lambda probe can be divided into several stages. At the initial stage, the sensor stops functioning normally, that is, at certain operating moments of the motor, the device stops generating a signal, subsequently destabilizing the idle speed.
In other words, they begin to fluctuate over a fairly wide range, which ultimately leads to a loss of quality of the fuel mixture. At the same time, the car begins to jerk for no reason, you can also hear popping noises that are uncharacteristic of the engine, and a warning light always lights up on the instrument panel. All these anomalous phenomena signal to the car owner that the lambda probe is not working properly.
At the second stage, the sensor stops working completely when the engine is not warmed up, while the car will signal the driver about the problem in every possible way. In particular, there will be a noticeable loss of power, a slow response when pressing the accelerator pedal and the same popping noises from under the hood, as well as unjustified jerking of the car. However, the most significant and extremely dangerous signal of a lambda probe failure is engine overheating.
If you completely ignore all previous signals indicating a deterioration in the condition of the lambda probe, its breakdown is inevitable, which will cause a large number of problems. First of all, the possibility of natural movement will suffer, fuel consumption will also increase significantly and an unpleasant, pungent odor with a pronounced hint of toxicity will appear from the exhaust pipe. In modern automated cars, in the event of a breakdown of the oxygen sensor, an emergency lock can simply be activated, as a result of which subsequent movement of the car becomes impossible. In such cases, only an emergency call to a tow truck can help.
However, the worst case scenario is depressurization of the sensor, since in this case the movement of the car becomes impossible due to the high probability of engine failure and subsequent expensive repairs. During depressurization, exhaust gases, instead of exiting through the exhaust pipe, enter the atmospheric reference air intake channel. During engine braking, the lambda probe begins to detect an excess of oxygen molecules and urgently sends a large number of negative signals, which completely disables the injection control system.
About symptoms of malfunctions
The lambda probe cannot last forever; there comes a time when it becomes unusable. The following signs of malfunction indicate this to the driver:
- Fuel consumption has increased.
- Interruptions in engine operation.
- The car begins to move jerkily.
- Idle speed changes
- The Check Engine light comes on on the dashboard.
The indicator appears when the sensor completely fails. The listed symptoms should alert the driver; they indicate that it is necessary to urgently diagnose the power unit.
Operating principle of a lambda probe
The main task of the lambda probe is to determine the chemical composition of exhaust gases and the level of oxygen molecules in them. This figure should range from 0.1 to 0.3 percent. Uncontrolled excess of this standard value can lead to unpleasant consequences.
During a standard car assembly, the lambda probe is mounted in the exhaust manifold in the area where the pipes connect, however, sometimes there are other variations in its installation. In principle, a different arrangement does not affect the operating performance of this device.
Today you can find several variations of the lambda probe: with a two-channel layout and a broadband type. The first type is most often found on older cars produced in the 80s, as well as on new economy class models. A broadband sensor is typical for modern mid- and high-class cars. Such a sensor is capable of not only accurately determining the deviation from the norm of a certain element, but also promptly balancing the correct ratio.
Thanks to the hard work of such sensors, the vehicle's operating life is significantly increased, fuel consumption is reduced and the stability of idle speed is increased.
From an electrical engineering point of view, it is worth noting that the oxygen sensor is not capable of creating a uniform signal, since this is prevented by its location in the collector zone, because a certain number of operating cycles may pass in the process of reaching the device with exhaust gases. Thus, we can say that the lambda probe reacts rather to destabilization of the engine, which it subsequently notifies the central unit about and takes appropriate measures.
About checking the oxygen sensor
Check the oxygen sensor with a multimeter. The test can be performed as follows: one probe is connected to a white wire, the other probe provides contact with the machine ground. With the ignition on, the multimeter should show a voltage of no more than 0.45 volts. If its readings are greater than this value, the oxygen probe is broken and needs to be replaced. You can also check the resistance of the sensor. To do this, the multimeter should be set to the “resistance measurement” position. Modern sensors have 4 wires for connection. Two white ones are the voltage supply to the heater, blue (may be gray in some models) and black are the signal circuit.
Measure the resistance between the white wires, which must be at least 10 ohms. When it is higher, this indicates a faulty oxygen probe. If you have the necessary equipment, look for the error code. P0131 indicates the presence of a low signal level from the lambda, this occurs due to a lean mixture. To check, you should inject gasoline into the intake tract; if the sensor is working, it will show an enriched mixture. If the error does not disappear, provide air suction. The lambda reaction indicates the serviceability of the device. Signs of malfunctions of the VAZ 2107 injector oxygen sensor have been discussed, now we should talk about replacing it.
Methods for diagnosing an oxygen sensor
Experts advise checking the correct operation of the lambda probe every 10,000 km, even if there are no problems with the operation of the device.
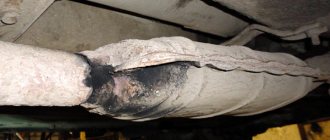
Diagnostics begins with checking the reliability of the connection between the terminal and the sensor and for the presence of mechanical damage. Next, unscrew the lambda probe from the manifold and inspect the protective casing. Small deposits are cleaned.
If, during a visual inspection, traces of soot, strong white, gray or shiny deposits were detected on the protective tube of the oxygen sensor, the lambda probe should be replaced
How to check a lambda probe with a multimeter (tester)
The sensor is checked for functionality using the following parameters:
- Heating circuit voltage;
- "Reference" voltage;
- Heater condition;
- Sensor signal.
Connection diagram to the lambda probe depending on its type
The presence of voltage in the heating circuit is determined with a multimeter or voltmeter in the following sequence:
- Without removing the connector from the sensor, turn on the ignition.
- The probes are connected to the heating circuit.
- The readings on the device must match the voltage on the battery - 12V.
“+” goes to the sensor from the battery through the fuse. In its absence, this circuit is called.
“—” comes from the control unit. If it is not detected, check the terminals of the lambda probe - ECU circuit.
The reference voltage measurements are carried out using the same devices. Sequencing:
- Turn on the ignition.
- Measure the voltage between the signal wire and ground.
- The device should show 0.45 V.
To check the heater, set the multimeter to ohmmeter mode. Diagnostic stages:
- Remove the connector from the device.
- Measure the resistance between the heater contacts.
- The readings on different oxygen pumps are different, but should not go beyond 2-10 ohms.
Important! The absence of resistance indicates a break in the heater circuit.
A voltmeter or multimeter is used to check the sensor signal. For this:
- They start the engine.
- Warm it up to operating temperature.
- The probes of the device are connected to the signal wire and the ground wire.
- Engine speed is increased to 3000 rpm.
- Monitor voltage measurements. Jumps should be observed in the range from 0.1 V to 0.9 V.
If during at least one of the checks the indicators differ from the norm, the sensor is faulty and needs to be replaced.
Video: checking the lambda probe with a tester
Checking with an oscilloscope
The main advantage of this lambda probe diagnostic over checking with a voltmeter and multimeter is the recording of the time between similar changes in the output voltage. It should not exceed 120 ms.
- The probe of the device is connected to the signal wire.
- The engine is warmed up to operating temperature.
- Engine speed is increased to 2000-2600 rpm.
- Based on the oscilloscope readings, the performance of the oxygen sensor is determined.
Diagnostics with an oscilloscope gives the most complete picture of the operation of the lambda probe
Exceeding the time indicator or crossing the voltage limits of the lower 0.1 V and upper 0.9 V indicates a faulty oxygen sensor.
Video: diagnosing an oxygen sensor with an oscilloscope
Other verification methods
If the car has an on-board system, then the “CHECK ENGINE” signal, which generates a certain error, can be used to diagnose the condition of the lambda probe.
List of lambda probe errors
In order for the lambda probe to work for a long time and efficiently, it is necessary to fill the car only with high-quality fuel. Scheduled and timely diagnostics of the oxygen sensor will help to detect its malfunction in time. This measure can extend the life of not only the sensor itself, but also the catalyst.
How to replace a faulty oxygen sensor
Vehicle diagnostics confirmed that the oxygen sensor is faulty and needs to be replaced. The driver can perform this operation independently. You should purchase a new spare part, prepare the tools, and the place where the faulty oxygen sensor will be replaced. In addition to the new spare part, the driver will need:
- Inspection hole in a garage, overpass or lift.
- Wheel chocks for vehicle wheels.
- Set of tools.
- Liquid WD40.
- Wire brush.
- Rags.
- Work gloves.
You can find out where the oxygen sensor is located on the VAZ 2107 from the vehicle’s operating instructions. It is installed at the bottom of the car on the exhaust pipe. You should only work with the probe on a cold engine, otherwise you can burn your hands or break the sensor itself. The vehicle is installed at the selected work site and the power unit is allowed to cool. The car is braked with a hand brake; for safety, wheel chocks are installed under the wheels.
Next, the process of replacing a faulty probe will be carried out as follows:
- If the bottom of the engine compartment is covered with protection, it must be removed.
- The installation site of the lambda and the sensor itself are cleaned of contamination with a metal brush. Afterwards, the installation site is treated with WD40 liquid.
- While the lead is “working,” cut off the clamps securing the probe wires and disconnect the connector.
- The next step is to dismantle the faulty part. The key is set to “22”, but it may be a different size (depending on the type of lambda), and is turned out of the muffler pipe. You will have to apply some force, since the probe “sticks” in the threaded connection. It is best to use a spanner wrench to avoid tearing off the edges.
- Install a new spare part, connect the connector, secure the sensor wires with clamps.
- Replace previously removed parts in their place.
At this point, the process of replacing the faulty part is completed, you can start the engine and check operation in all modes.
How to choose a new oxygen sensor
Retail chains offer a large selection of oxygen sensors, which can be of both domestic and foreign production. The VAZ 2107 has been discontinued, so finding an original spare part is problematic. Finding a replacement for this part will not be difficult, you just need to be careful about your choice, since there are many fakes on the market. First of all, pay attention to the packaging; for fakes it is usually not of very high quality. You should also be wary of the low cost of the part. Spare parts from DENSO, Bosch, Stellox have proven themselves well. Their cost can range from 1500 to 3500 rubles.