Installation of a new instrument panel and modernization of the existing one
The most popular way to change the interior of a car is to modernize the instrument panel. It is this element that is in the center of the driver’s attention throughout the entire time he drives the vehicle.
Conventionally, the following methods for upgrading the instrument panel can be distinguished:
- Installing a version from another car. In this case, the dashboard from Priora is suitable. At the same time, we note that there are two versions of this design; for the car in question, 2170-3801010-50 without a CAN bus is suitable. As a rule, a similar design was installed on Priora until 2012.
- You can also purchase an instrument panel, which is produced by companies that create components for tuning. In the modern world, tuning of domestic cars is carried out quite often, which has determined a large selection of such designs.
- It is possible to modify an already installed structure. This method of changing the instrument panel is quite popular, as it does not lead to high costs. At the same time, you can fully realize your fantasies.
Let's look at each method of changing the instrument panel in more detail.
Sidebar: Important: Recently, quite often the installation of a dashboard with navigation, called “Itelma”, has been carried out. It has a very attractive design and good functionality. It is worth paying attention to the fact that in order to ensure maximum functionality of the instrument panel in question, other elements should also be installed. These include:
1. Switch with joystick, which is located on the right side. A similar switch is used to control the installed navigator. The switch has several function keys 2. GPS antenna, which is installed on the roof. The correct installation of the antenna determines how well the signal from the satellite will be received in high-rise buildings.
Features of installing a new shield include:
1. If a new type of instrument cluster was installed in the car from the factory, then there will be no need to make changes or upgrades. The work consists of removing the old shield, and then installing a new one and connecting the antenna. Connecting the antenna can be done simply, in much the same way as with a walkie-talkie. 2. If the car has an old-style instrument panel, then the front panel will have to be significantly modified. The changes consist of cutting off the red and white blocks belonging to the 13-pin group, and then connecting them to the 32-pin according to the diagram. The next step is to upgrade the mounting and weight, since they do not fit the shape of this car. The process is quite complicated, but the result will not disappoint expectations.
The panel in question has a screen that displays a map with navigation. When creating this design element, the Windows CE 6.0 operating system was used. A fairly popular program called Navitel is installed as navigation software. It has detailed maps and a fairly high accuracy of display of all objects. If necessary, you can update maps from disk. The level of signal reception depends on the quality of the installed antenna. VAZ 2112 interior tuning using this method is quite expensive, but the result is not like any other.
Another way of tuning is to install previously manufactured dashboards. As a rule, during their manufacture the structure is adjusted to the landing area. When choosing, you should take into account the location of the main scale, as well as the backlight features.
| 2112 | 21122 | ||||
| Versions: | 01 norm | 02 lux | 00 standard | 01 norm | 02 lux |
| Body type | hatchback | ||||
| Number of doors | 4 | ||||
| Places | 5 | ||||
| Trunk volume, dm3 | 350/720 | ||||
| Overall dimensions, mm: | |||||
| length | 4170 | ||||
| width | 1676 | ||||
| height | 1435 | ||||
| own weight, kg | 1070 | 1040 | |||
| payload, kg | 475 | ||||
You can independently change an already installed dashboard quite quickly and easily. As an example, consider the following type of modernization:
- First you need to dismantle the old panel. To do this, just unscrew a few bolts, remove the clamps and plugs.
- It is recommended to pay special attention to removing chips and disconnecting wires. Everything should be numbered when dismantling.
- The next step is to remove the instrument panel and disassemble it. This is quite difficult to do; the protective glass is secured using plugs.
- Changes may look different. The most popular is changing the backlight or scale. As a rule, diodes are used for illumination.
Self-upgrading does not take much time. At the same time, cash costs will be kept to a minimum. It can be carried out within one day with careful preparation for the work.
Modernization of the trunk of a VAZ 2110
In this article, we will not modernize the trunk of a VAZ 2110 by installing a plastic trough in the body niche behind the wheel arches. This is not done because these troughs are very problematic to install in their places, and in this case we waste useful space. Without such troughs, a jack and a pump are placed in one niche at the same time, and when installing a trough you have to choose one or the other.
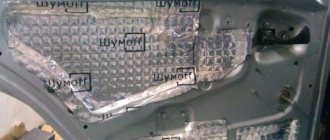
The goal of our work is to prevent the tools from rattling and chipping off the paint of the VAZ 2110 car. First of all, we generously lubricate the inner surface of the walls with an anti-corrosion substance. While it has not hardened, glue the “foam” directly onto the mastic; it is usually used for packaging household appliances. Next, we repeat the procedure of coating each layer with mastic once again. The result is an excellent layer that protects the metal from tool impacts and rust. Then we soundproof the entire luggage compartment of the car. To make noise insulation, we need to remove the trunk upholstery and, using a well-known technology, lubricate each layer with mastic; we apply “foam” to the area of the wheel arches, rear fenders, luggage compartment floor and the side niches of the spare wheel.
Be careful not to accidentally cover up the body identification number at the bottom of the niche. We glue tourist foam to the wood-fiber base of the canopy that covers the spare wheel. As a result, the car interior becomes noticeably quieter. If desired, you can make a special box for a first aid kit, emergency sign, container with technical fluids and other essential items so that they do not hang around the entire trunk. As for the fire extinguisher and bucket, they can be secured with rubber ties with special buckle clips at the ends. When we take things out of the luggage compartment, especially when it’s dirty outside, we get things dirty, at this moment we could use a work apron. This very apron can be immediately attached to the car and used at the right moments. Inside the trunk, we attach this apron to the edge of a plastic trough, which is laid on the floor of the trunk. When the apron is not needed, we roll it into a tube and put it on the far edge of the trunk. The space allocated for the spare wheel can be used more optimally. In the standard position, the spare wheel is placed in the middle. Please note that in the corners of the niche there is a lot of free space that simply needs to be adapted into something. Our task is to fasten the wheel not along the central hole of the disk, but along one of the holes attaching the wheel to the hub. In this case, the wheel moves forward, approximately 6-7 cm, thereby freeing up space that can be used to place various objects. This is where we put large tools. This modernization can be called not tuning, but the organization of the trunk space of the VAZ 2112. The compartment cannot boast of having free space anyway, so we are trying our best to increase the free space.
- Author: Soulless Robot
Rate this article: Share with friends! Related posts:
Removing and installing the trunk lid of a VAZ 21099 car
Adjusting the trunk lid lock of VAZ 2106
Eliminating "crickets"
Almost all owners of VAZ cars know what “crickets” are. When driving at a high enough speed, a hum, noise, creaking and many other sounds appear that are very annoying. This is why moving long distances will be quite painful. Let's look at the most common problems associated with car sound insulation, as well as ways to solve them.
A fairly common problem is squeaks. This is due to poor sound insulation of the interior, which does not improve even with each generation. Plastic rattling can, as a rule, be provoked by a regular blow; periodic rocking of some structural elements of the interior trim also causes quite a lot of problems. The creaking of plastic is quite unpleasant and can make even the calmest driver nervous, and this promises big problems. There is an opinion that such sounds prevent the driver from falling asleep while driving, but this is not the case. If the driver wants to sleep a lot, then even the loudest sound will become soothing music.
Solving the problem with squeaking, which is also a VAZ 2112 interior tuning, can be done quite simply and quickly. Features of car modernization include:
1. All joints are glued with a material that can dampen vibration. 2. If necessary, the structure can be strengthened. This can be done by using self-tapping screws. 3. The material used to dampen vibration is bitoplastic, madeline and many other materials. It is worth noting that the efficiency of the work can be significantly increased with an integrated approach, which involves the use of several types of materials. 4. Silicone spray is also quite effective in this case. It is applied quite quickly and easily.
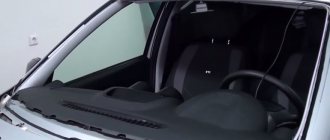
In most cases, strong noise causes vibration of internal panels made of plastic. However, aerodynamic noise can also cause discomfort. They appear at a fairly high speed and also cause significant discomfort. The causes of aerodynamic noise are as follows:
- Incorrect installation of deflectors on windows.
- Presence of through holes.
- Poorly installed antenna.
- Roof rack. In some cases, it is best to remove the trunk, as it creates additional resistance.
- Use of low-quality sealing material.
Eliminating the above problems allows us to solve the problem with aerodynamic noise insignificantly. Iron rattling also becomes a significant problem for the car in question. As a rule, steel noise can be heard when driving over bumps. The problem may lie in unreliable fastening of the door elements under the trim. The problem can be solved by tightening all the bolts and fasteners, after which the inside of the door is covered with insulating material.
A strong squeak when passing through a bumpy area may indicate door play. In order to check the condition of the doors, open them and then slightly lift them. If clicks are heard while lifting the door, you can lubricate the hinge. The most effective way to solve the problem in this case is to replace the loop. A plastic body kit can also cause squeaking. They are made using thin plastic. That is why, even with a minor impact, the attachment of the body kit can be seriously damaged. You can clearly feel the bumper rattling when driving at low speed with the windows open. Soft gaskets and increased rigidity of the fastening help reduce the noise emanating from plastic fastenings.
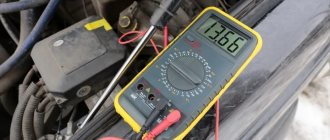
Unpleasant sounds quite often come from the installed suspension. There are many reasons why noise appears:
- Loose nut on the rod of the installed shock absorber. In this case, the knock is quite strong, but dull, it dries well and there is a possibility of vibration being transferred to the body. The problem can be solved by tightening the nut.
- A knocking sound from the shock absorber may be due to severe wear of the O-ring. Such a defect does not mean that the shock absorber has failed and should be noticed.
- If a very strong knock occurs and the car moves to the side on a straight section, the shock absorber should be replaced.
- The noise may come from a dead support bearing. This is because the rubber damper can wear out quite a bit over time. You can check this structural element quite simply and without special tools.
- A knocking sound from the steering tip indicates a fairly serious problem. The problem in question can be identified quite simply: the steering wheel should be turned from side to side, if there is play, then there is a problem with the steering system. The appearance of a squeak also indicates a problem.
Some problems can be eliminated by working on the interior insulation. In this case, it is necessary to completely dismantle the skin and multi-layer sizing of the body.
Modification of the trunk and external trunk opening button for VAZ 2110, 2111, 2112
The content of the article:
Modification of the trunk of VAZ 2110, 2111, 2112
After changing the trunk lid, it became too heavy and began to open poorly. There are many solutions to this problem, but a friend suggested the easiest and fastest way. It is necessary to tighten several turns of the spring with nylon ties. I pulled five turns on each. After this procedure, the trunk bounces like a young one.
The ties are not particularly noticeable; the spring is covered with a boot and looks neat. Certainly. It would be better to use black zip ties.
Since we're on the subject of the trunk, I'll show you another small life hack. If the trunk lid dangles when closed, and, in my opinion, it cannot help but dangle, you should wrap a little electrical tape around the lock bracket. The play disappears completely, the trunk will close more quietly.
If the electrical tape is of high quality, it lasts for a long time; I reapply it about once every six months.
External trunk opening button VAZ 2110, 2111, 2112
Installed an external trunk release button. Recently I had to remove the rear reflector and glue the reflector to the base substrate. At the same time, I installed a trunk lock control button. This need is long overdue after the seven-year operation of the 111 station wagon. The button is placed in the middle of the metal grab handle - it doesn’t interfere with your fingers, and it’s convenient to press.
Button in reflector
The button is a little exotic - a VK-2 piezo button (zaotexkom.ru/production/piezo/), it was possible to embed an ordinary (waterproof) one into the plastic bulkhead, but since the button had been waiting for its place and hour for a long time, it was installed. It has one remarkable property - the pulse duration is limited to 1 s when pressed and held for a long time. The wires were brought out through the rubber seal of the license plate illumination harness. Then through the left rubber corrugation of the trunk lid into the interior and along the pillar to the left rear lights. It was immediately decided that the wire from the button would go to the alarm module, i.e. to the console area. All the switching and blocking is there. Connection and blocking.
1. The power relay for opening the trunk lock is controlled by the negative alarm and nothing prevents it from being fully activated.
2. Blocking is perhaps the most important and responsible part of this idea. After some thought, I settled on the option of two-level blocking. The button is active if TWO
conditions are met - the car is disarmed
AND
the driver's door is unlocked.
In my opinion, this is enough, the functionality and ease of use of the button is not compromised. The criterion is this: if there is access to the salon, the button is active.
3. Implementation - just
ONE
additional low-current miniature (12V) relay and diode. All.
The button switches the relay winding to negative, +12 is applied to the winding when disarming. In my case, this is the radio control channel. The control “Minus” is taken from the microswitch (MS) of the driver’s door actuator; a diode is needed to decouple the circuits. If he drives. the door is unlocked (position “Open” MP) when the relay is activated, it passes minus to the winding of the lock power relay. The lock works. Over 10 days of operation, no mutual influences were detected. In principle, they should not have existed, because... I first thought through the circuit, then assembled and installed it.
Repair of the heater deflector scale of VAZ 2110, 2111, 2112
Recently the heater vent gauge light went out. I decided to fix it, and at the same time correct one omission in the plan
Before choosing Lada accessories, you should decide what exactly needs to be changed in the car:
- Appearance. External tuning of the VAZ allows the Russian car to stand out from the crowd of monotonous and boring vehicles. A big advantage is the affordable cost of spare parts for changing the design of the VAZ 2110-2112. Activities such as installing spoilers, halogen headlights and decorative trims, and lowering the suspension are popular. The car takes on a sporty and slightly aggressive look.
- Decoration and/or equipment of the salon. Internal tuning of the Lada can be done using a sports steering wheel (or a new braid on the steering wheel), armrests, window curtains, covers and seats. To make your trips not only convenient and comfortable, but also not boring, you can purchase audio and video systems for the cabin.
- Thresholds VAZ 2110-2112;
- EGR headlight protection;
- Tuning the interior of VAZ 2110-2112;
- Rubber mats VAZ 2110-2112 for the interior - AVTO-Gumm, GUZU / DOMA, LADA LOCKER - EXTRUZION, NORPLAST, STINGRAY;
- Textiles for the interior of VAZ 2110-2112 - AVTO-Gumm, Boratex, CIAK, Pro-Eco, Sotra - high-quality - premium models;
- Roof racks - Thule, Amos, Atera, Road Map, Desna Auto;
- Side steps for SUVs;
- Door sills, bumper Nataniko, AutoClover, AVTM
- Towbars for VAZ 2110-2112 - AutoHak;
- Seat covers - fabric to protect the interior as much as possible from wear and tear, and covers made of leather and leatherette - turn the interior into a premium class. We have the following brands of covers: Avto Mania, ELEGANT, MW BROTHERS, Prestige, VIRTUS, AV-Tex, Soyuz Avto.;
- Accessories from manufacturers AP, ARMSTER, Megaloker, NORPLAST, NOVLINE, Poligon, KOLCHUGA, Galia, Poligon, AVTM, LAVITA, WESEM, AMOS, TERRA DRIVE, THULE, Desna Auto, Road Map, Desna Auto, AMOS, Desna Auto, NataNiko, Junyan will provide your car with the necessary care;
- Mud flaps for Lada 2110-12: Novline, Avtm, Original;
- Engine protection - Chainmail, Novline;
- Specifications. If your car needs to take part in racing or you simply want to make it more powerful, engine spare parts will allow you to do this. Mechanisms and components for the transmission and engine, differential locks, levers and braces will not only make your car faster, but will also increase its handling and rigidity.
Some types of VAZ tuning accessories can not only improve the design of the car, but also protect the car from negative external influences. So, by installing curtains on the windows in the cabin, you will not only change the image of the car, but also protect the interior from fading in the sun.
Where to buy auto products for VAZ 2110-2112?
By contacting the Avtoshara online store, you can purchase any products for tuning VAZ of all models and modifications. Terms of purchase on the site:
Installing a torpedo from a foreign car
After a while, the interior of the purchased car becomes boring, and it needs to be updated. A significant change to the car's interior can be called the replacement of the central dashboard. On the Internet you can find many examples of such alterations. In most cases, a panel from old Opel or BMW models is installed. In most cases, the panel fits with virtually no modifications. It is possible to carry out work on installing a torpedo from a foreign car only if it is adjusted. To do this, you will have to change the position of the fastenings, as well as the shape of the torpedo.
The work of replacing a torpedo takes a lot of time. At the same time, dismantling work takes no more than one day, but work on adjusting the panel takes at least 2-5 days. The panel from older Volkswagen models is most suitable for installation, since fitting takes little time and the cost of the panel itself is relatively low.
In conclusion, we note that there are quite a few ways to modify the interior of a car. It is important to understand that even the smallest modification requires maximum care. Mistakes made can lead to serious problems and unexpected costs. Therefore, before performing work, you should study the recommendations.
Installation of additional lighting
The trunk lighting of the VAZ 2111 is the most common modification. The factory volume of the trunk is large and the installed lighting is not enough for comfortable use at night, and the interior lighting does not help either. In this regard, you can often find cars with additional lights installed.
It is also possible to use other sources to illuminate the trunk of a VAZ 2111. Often these are lamps for interior lighting from other cars, installed in the trunk. A more traditional look is a plus, but you may need to install additional power cables or a switch. Another disadvantage will be the need to cut a new hole for fastening in the trunk roof covering.
Read also: News f 1 2018
Installing additional boxes in the trunk
The standard trunk volume of the VAZ 2111 is very large, so it is possible to change its configuration. Typically, boxes of shallow depth are installed on the sides of the trunk. They have doors built into them, behind which you can conveniently hide cans, a fire extinguisher, a first aid kit and much more.
Simple trunk shapes make it easy to cut out the required shape and cover it with material that matches the interior. At the same time, the overall appearance of the car does not change in any way, but ergonomics increases significantly. It is also possible to install the box on the far wall, immediately behind the rear row seats, but in this format there will be difficulties with transporting large cargo, and it will be impossible to use the entire volume of the VAZ 2111 trunk with the seats folded down.