Exhaust system design of VAZ 2107
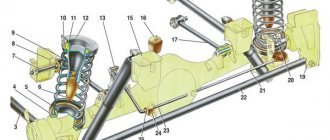
- a receiving pipe into which gases enter from the exhaust manifolds;
- VAZ 2107 resonator (additional muffler), where gases are directed from the exhaust pipe and where the exhaust sound is partially reduced;
- muffler, which absorbs most of the engine exhaust noise.
- muffler mounting pad;
- pillow bolt;
- muffler suspension belt;
- clamp bolt and clamp securing the muffler to the resonator;
- clamp bolt and clamp securing the resonator to the exhaust pipe;
- clamp bolt and clamp securing the exhaust pipe to the body;
- nuts securing the exhaust pipe to the manifold;
- pad;
- locking plate;
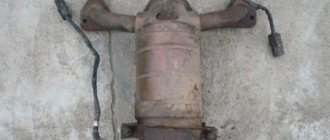
Installation of an injection system on a VAZ 2107 required modernization of the exhaust system. Two additional details were added to it:
In connection with the installation of the catalyst, the VAZ 2107 resonator (injector) was moved a little back.
Advantages and disadvantages of the injection modification of the VAZ 2107
- thanks to the injector, the engine operates more stable in all modes;
- the specific power and torque of the injection engine are higher;
- the exhaust of a VAZ 2107 with an injection system is cleaner than smoke from a carburetor engine;
- Driving a car with an injection engine is easier, it is not so demanding on the driver’s qualifications and “forgiving” mistakes when operating the gas and clutch pedals.
- the clearance of the injection "seven" decreased to 7 cm, which worsened its cross-country ability;
- due to the installation of the catalyst, the “survivability” of the exhaust system has decreased;
- the high temperature of the catalyst sometimes causes grass and dry leaves to ignite when the car is stopped.
Replacing the resonator, muffler with your own hands step by step
Without a pit, in “field” conditions it is very difficult to replace the resonator, so immediately decide on the place of repair. Any garage with a pit, overpass or service lift is suitable for this purpose. Dismantling the old burnt-out resonator must begin by removing the main muffler.
Burnt-out resonator (additional muffler)
Removing the muffler, resonator
Disconnect the muffler suspension straps by unbending the hooks using a screwdriver. Using a “7” key, unscrew the bolt securing the main muffler to the rubber cushion (“house”). To replace the exhaust pipe cushion itself, unscrew the second bolt securing it to the bottom of the trunk.
Main muffler suspension belt and cushion
Using two keys set to “13”, unscrew the nut of the coupling clamp at the junction of the pipes of the main and additional muffler, then slide the clamp from the joint and remove the main muffler.
Clamp at the junction of the main and additional muffler
To make removing nuts easier, apply WD-40 to the threaded part of the bolt and wait a few minutes. Then remove the clamp and, carefully turning the muffler left and right (along the axis of the joint), and also lightly tapping the upper part of the pipe with a hammer through the wooden spacer, disconnect the main muffler.
Disconnecting the main muffler from the additional one
Using the same principle, release the connection at the junction of the exhaust pipe with the additional muffler. In order to remove the resonator from the receiving pipe, you should ask an assistant to pull the entire section back, while simultaneously turning it along the axis of the joint.
You should also unscrew the two nuts of the handbrake cable mounting bracket and move the bracket down.
Handbrake cable bracket
This operation will allow you to easily remove the resonator from the car by inserting it between the underbody and the handbrake cable.
Installing a new resonator (additional muffler)
Before you begin installing a new resonator, clean the pipe seats using sandpaper (“sandpaper”).
Sanding the pipe joint
Then apply graphite lubricant to the joints.
Applying graphite lubricant to pipe joints
Insert the resonator into the exhaust pipe and the main muffler, making sure the connection is tight. Install new clamps and tighten them.
Installing new clamps on the connections: front pipe - resonator - main muffler
Advice: muffler clamps are usually sold without washers, so for better contact (large bearing surface area) and to prevent unscrewing, purchase regular and lock washers in advance.
The work of replacing the resonator (additional muffler) on a VAZ 2101-2107 classic car has been completed, congratulations!
Replacing the resonator (additional muffler) VAZ 2101-2107
After installing the new resonator in place and securing all parts of the exhaust system, start the car and check the operation of the mufflers. If necessary, tighten the clamps.
Replacing the muffler VAZ 2107
- loosen the clamp bolt and remove (move) the clamp;
- pull the flared muffler pipe off the resonator (if that doesn’t work, knock it down with a hammer and chisel);
- remove the muffler from the cushion and mounting straps;
- install a new muffler on the VAZ 2107;
- tighten the clamp.
The VAZ 2107 resonator does not have fastening parts to the car body, so it is necessary to hold it when replacing it. Otherwise the exhaust pipe will be bent.
- tap clamps and pipe connections with a hammer;
- loosen the bolts of the clamps and move the clamps fastening to the “pants” and the muffler;
- disconnect the resonator from the muffler by undocking the pipes;
- disconnect the resonator from the receiving pipe (“pants”);
- install the new resonator in the correct position;
- connect the parts and tighten the fastening clamps.
Location of the VAZ 2107 resonator
The exhaust system of carburetor VAZ 2107 consists of three sections:
A similar system was installed on the first seven with an injector that complied with Euro 0 standards. Later, injection modifications of the VAZ 2107 appeared, produced in accordance with the requirements of Euro 2 and Euro 3, in which the exhaust tract was supplemented with a fourth section - a catalytic converter located between the exhaust and resonator pipes .
VAZ 2107 injection models that meet Euro 2 and Euro 3 environmental requirements were equipped with a catalytic converter
The resonator, connected at the front to the exhaust pipe or catalyst, starts under the gearbox and ends in front of the rear axle beam. The resonator tank is located to the right (in the direction of travel) of the propeller shaft. The connecting pipe coming out of the body is bent upward and docked with the main muffler pipe that goes around the rear axle. The entire structure is supported by the engine exhaust manifold flange, a metal bracket and rubber hangers attached to the bottom of the car.
Replacing the exhaust pipe (“pants”) of a VAZ 2107
- loosen the clamp and disconnect the pants from the resonator;
- unscrew the four nuts securing the exhaust pipe to the manifold;
- remove the “pants” (reception pipe) and gasket;
- install a new gasket;
- install a new exhaust pipe;
- connect the exhaust pipe to the resonator, tighten the fastening clamp;
- tighten the nuts securing the “pants” to the manifold.
- the resonator or exhaust pipe is fixed at the wrong angles;
- engine mounts sagged.
Exhaust System Mounting Parts
A clear understanding of the algorithm of actions when carrying out such an event as replacing a VAZ 2107 muffler will help every car enthusiast carry out his plans quickly and without errors. On the one hand, removing the old muffler and installing a new one seems simple, but on the other hand, you need to be prepared for some difficulties.
Why and how often is it necessary to change the VAZ 2107 muffler?
The exhaust system of a car, despite its relatively simple design, performs many functions. The main ones are:
- removal of fuel combustion products;
- significant reduction in exhaust sound level;
- maintaining air balance with the intake system;
- ensuring effective cleaning and ventilation of cylinders.
The VAZ 2107 muffler experiences enormous loads like no other part of the car. First of all, constant temperature changes have a destructive effect on the metal, which actively destroys not only the protective paint and varnish coatings, but also the structure of the metal itself.
Gases heated to a high temperature literally “eat up” the internal filling of the muffler, mixing with water condensate and oils, dissolving the metal walls, forming through corrosion. Externally, the muffler elements are also adversely affected by moisture, road sand and gravel; salt solutions in winter intensify the decomposition process.
As a result, after some time the driver can observe under the bottom of the car the pitiful remains of what was once called a muffler. Whether we like it or not, the muffler of a VAZ 21074 or any other model will have to be changed periodically. To the question of how often you should change the muffler, every car enthusiast must find the answer himself.
The service life of an exhaust system, like many others, depends on factors such as:
- activity of vehicle operation;
- quality of fuel used;
- the car owner’s attitude towards the condition of the car;
- frequency of use of the machine in adverse weather conditions;
- quality of previously installed exhaust system parts.
Having come to terms with the fact that the VAZ 2107 muffler will not last forever, you need to buy a new one and start replacing it.
Replacing the VAZ 2107 muffler - procedure
An inherently simple procedure can take a lot of effort and time. Before installing a new muffler, you must remove the old one. To do this you should:
- install the car on an overpass or above an inspection hole;
- prepare a set of tools, ensure good lighting under the machine;
- The muffler is connected by a pipe to the resonator pipe in front of the rear axle. The ends of pipes with a slot and a male-female connection are tightened from the outside with a coupling;
- Corrosion under the influence of lubricant and temperature can solder the joints so much that it becomes very difficult to remove them. It is better to moisten the pipes at the junction and the coupling in advance with a solution that corrodes corrosion. For this purpose, as a last resort, brake fluid or used oil is suitable.
The procedure for replacing the muffler is as follows:
- the crimp coupling is untwisted or cut off using a cutting tool (grinder) (in this case, a new coupling should be on hand);
- use a thin chisel or screwdriver to bend the flared edges of the pipe;
- the muffler is disconnected from the resonator (if it comes out tight, you can help yourself with a hammer by tapping on the pipe);
- hanging pillows are detachable. By the way, when buying a muffler, it is advisable to buy three suspension rubber bands (two in the center and one at the rear).
After this, the old muffler is in your hands and you can install the new one in the reverse order.
How to replace the muffler of a VAZ 21074 and other modifications of classics
Very often, car enthusiasts, seeing in the title of the article that the make of the car does not exactly match what is indicated in the registration certificate, continue to search for instructions. VAZ cars are charming because they differ from each other for the most part only in appearance, but the internal structure is completely identical.
It doesn’t matter what kind of car is in the garage: 2105, 2104, 2107 or 21074 - their exhaust system is completely the same. Having studied the repair instructions for one car, you can safely begin repairing another classic model.
Removal process
In the process of removing an element of the exhaust system from a VAZ 2107 (injector) for its subsequent replacement. The following tools will be useful to you:
To figure out how to remove the muffler from your VAZ correctly and replace it. Please read the following instructions carefully:
After this, the product can be freely removed to be replaced with a new one, which is installed in the reverse order.
Please note that the connection between the muffler pipe and the resonator pipe is located in front of the rear axle. The ends of the pipe with slots and female-male fasteners are tightened using a coupling. Removal of the product can be complicated by corrosion, which develops under the influence of temperatures and lubrication.
For this reason, moisten corroded parts with an anti-corrosive agent in advance (motor oil or brake fluid will also work). If you are planning to install a new muffler, it would be a good idea to purchase new suspension rubber bands (1 for the rear and 2 for the center location).
When to change the resonator
The resonator of any car is an additional muffler that reduces the noise level of the engine. In addition to the main “can,” the resonator, or as it is also called, receiving pipe can be equipped with an additional one.
Ultimately, holes appear on the surface of the resonator, which disrupt its operation. Exhaust gases escape through these defects, creating an unpleasant sound of the engine, which is not only unpleasant to others, but will certainly not leave traffic inspectors indifferent. That is why a damaged resonator must be replaced immediately.
To change the resonator, you need to stock up on all the necessary keys, kerosene or WD-40, as well as a lot of patience and accuracy. The fact is that high temperatures cause the exhaust pipe fasteners to melt, which subsequently makes it difficult to remove. In addition, you will need an inspection hole or overpass, otherwise changing the resonator will be very inconvenient.
Many automotive technicians suggest applying sealant before installing the exhaust system. Whether to do it or not is up to you. In any case, the reliability of fastening and sealing the exhaust system is limited only by the force that the clamp allows you to make.
Features of replacing the rear muffler on a VAZ 2107-2105
Usually, if you bought a car from scratch, then the factory muffler and other parts of the exhaust system can easily last at least 70,000 km, which has been verified by personal experience in operating many domestic cars. And after installing another one, bought in a store, a constant problem with burnout begins, even after less than 20 thousand km. If this is your first time performing this procedure, then I think that the instructions I made will help you with this.
To make this repair as quick and convenient as possible, it is better to use all kinds of tools, including sockets and ratchet handles, a list of which I will list below:
- 13 open-end or socket wrench
- Deep head for 13
- Ratchet handle
- Pliers
- Hammer
- Flat head screwdriver
Since the bottom of the car and the exhaust system of the VAZ 2107 and 2105 are constantly exposed to environmental substances, water, snow, and all kinds of reagents, unscrewing the fastening nuts can be very problematic. Therefore, it is better to first spray the connections with a penetrating lubricant, such as WD-40. Personally, I use Ombra lubricant, just like the tools from this company, and I am completely satisfied. This is what a can of this thing looks like:
When the bolts have become slightly acidic, you can try to unscrew them, first using a regular wrench to rip them off at the junction of the muffler and the resonator:
And then it’s best to use a ratchet, since you can unscrew everything with it in half a minute:
When the nuts are unscrewed, it is necessary to move the clamp to the left so that it does not interfere with us during further work. Next, we try to slightly push the edges of the muffler with a flat screwdriver, approximately as shown in the photo below:
Then you can knock the muffler off the resonator with hammer blows:
After which you should get something like this:
Next, it remains to free the muffler from the hanging rubber bands, two of which are located in the center:
And one rubber band is located at the very back of the muffler; there you first need to pull out the cotter pin with pliers, or a nail, since for many owners it is this that performs the function of a cotter pin:
Now you can freely remove the muffler from the car, since nothing else holds it:
Replacement is carried out in reverse order. If you are interested in the price of a new muffler for the VAZ 2107 and other classic models, then it is approximately from 500 to 1000 rubles, depending on the place of purchase and the manufacturer. But I don’t recommend buying a cheap one, since it may not last even 15,000 km, and the noise from it will be simply terrible!
