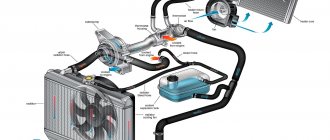
Interior heating systems on different vehicles have a similar design. In a VAZ-21124 car, the heater functions as follows:
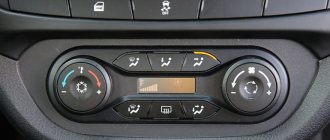
- the stove control unit controls the set air heating temperature with an acceptable error of about 2 degrees;
- Air heating for interior heating is carried out in the heater radiator. It has a standard design and is made of copper or aluminum alloys;
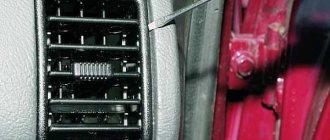
- To supply air into the cabin, special deflectors are provided that regulate the direction of its flow;
- On the heater control panel there are: a fan operating mode switch with sliders that control the heater dampers.
One of the most common problems with the heating system on the VAZ-2112 is its depressurization, which is characterized by leakage of coolant from under the central panel. One of the reasons for this is the failure of the radiator, in which case it needs to be replaced.
Aluminum VS Copper: which radiator to choose?
Many years of experience in operating radiators made of various materials on domestic cars (including the VAZ-2112), it was noticed that its performance is not affected by the material from which it is made. Both copper and aluminum devices heat equally well.
The only criterion when choosing a radiator is its originality, since only a serious manufacturer is capable of producing a quality product. Therefore, when purchasing a heater radiator, it is necessary to pay attention to this criterion.
So, where exactly is the radiator of the VAZ-2112 stove? In the design of the interior heating system, the radiator is located inside the heater housing, occupying a horizontal position in relation to the central panel.
Why does the stove blow cold air in a VAZ-2110?
Using the handle, the driver can regulate the temperature of the air that comes from the stove.
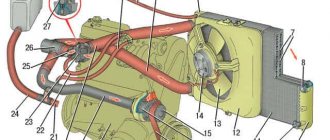
It consists of the following parts:
- an electric motor to which a fan is attached, designed to pump hot air;
- radiator.
- three dampers (for recirculating the air intake, blocking the heater duct and for controlling the heater);
Did you know? On new generation stoves, the radiator is installed without a tap, which is used to shut off the flow of antifreeze through it.
Auto repair school Articles, tips and tricks on do-it-yourself car repair and maintenance
The main reasons for replacing the heater radiator are:
a leak in the heater core and a decrease (or complete absence) of heat transfer from the radiator.
How to remove and replace the heater radiator on a VAZ-2112 (old model)?
A leak of cooling fluid in the cabin is a direct prerequisite for the need to change the heating radiator, since it is already out of order.
Note that models older than 2003 have an old-style stove installed. However, towards the end of this year, the cars were already equipped with a new heater. Accordingly, they have some structural differences, and therefore are removed and installed differently.
Replacing the radiator on the VAZ-2112 stove:
- We free the system from antifreeze by draining it through the hole in the power unit block or through the expansion tank. If you choose the second option, you must remove the ignition module. Next, remove the lid from the tank, and then uncork the drain plug. If there is no sediment in the coolant, that is, it is in a clean state, it can be reused.
- It is necessary to remove the hood seal, which is located next to the frill.
- The screw fixing the frill should be unscrewed, and then the screws securing its upper part should be unscrewed.
- Loosen the clamps and remove all wires and hoses from the frill.
- Disconnect the vehicle's power supply by removing the terminals from the power source.
- On the left side of the frill there are two screws that must be unscrewed to remove the element. There is no need to remove it.
- Remove the front cover.
- You will need to remove the terminal (if any) from the liquid level control sensor in the system, as well as the steam removal hose from the expansion tank.
- Remove the hose from the front windshield washer.
- After unscrewing the four screws, you need to remove the windshield wipers with the windshield trim.
- The stove fan is dismantled, as well as the mounting brackets for its housing.
- The mounting screws are removed from the protective casings of the air filter and fan.
- It is necessary to remove the front heater blower housing and the cabin filter housing.
- The rear part of the fan shroud is removed.
- The steam outlet line and the antifreeze supply hose must be disconnected, having first loosened their fastenings.
- The heater core can now be removed.
Before installing a new radiator, it is necessary to clean its seat in the stove body. When assembling the heater in reverse order, it is very important to control the tightness of all connections and the correct location of the parts. Otherwise, the heater may simply not function, and then the entire described sequence of work will have to be done again.
Dismantling procedure
To remove the VAZ 2110 heater, you must:
- Disconnect the minus on the battery;
- Free the windshield frame from the cladding, sound insulation upholstery, lining;
- Remove the stove fan;
- Disconnect the vacuum hose;
- It’s good if you get creative and remove the front air intake housing, which is not at all easy to do. If you can't get to its screws, you may have to remove the dashboard. After that, the screws securing the heater are unscrewed, it rises, and it becomes possible to remove the air intake housing;
- Separate the hoses from the fittings;
- Remove the rear heater casing;
- After unscrewing the heater mounting screws (you can easily find three of them, and the fourth is under the soundproofing upholstery on the left), remove the heater, moving it towards the engine.
This article will tell you what to do if the stove does not heat well:
Replacing the VAZ-2112 heater radiator (new model)
The procedure begins with dismantling the stove, which is attached to the car body with two nuts on the side of the intake manifold, a screw in the windshield area and a nut near the cabin filter. It is also necessary to remove the rear window washer barrel.
The sequence of actions is as follows:
- Remove the air filter.
- Unscrew the screws from the outside of the stove.
- The heater body, consisting of two halves (left and right), must be separated and the steam exhaust hose released.
- Remove the old radiator, clean its seat, and then install the new element.
- The right half of the heater should be disassembled, which also consists of two elements fastened with metal brackets. Now the stove damper is freely accessible, and if necessary, it can be cleaned or replaced.
- The new heater damper must be in a position where the heater radiator is closed.
- The temperature sensor is set to the minimum mode, after which the ignition is turned on. This is necessary in order to correctly install this sensor, since after this it must take its initial position.
- You can reassemble the heater in reverse order.
After replacing the heater radiator, you will need to replenish the coolant level in the system and test the performance of the heater. If everything is done correctly, all heater elements are in working order, and cold air begins to blow from the deflectors in the cabin, which means that the system has become airy. After eliminating it, the stove will work as before, and maybe even better.
Necessary tool for replacement on VAZ-2110
On dozens of older releases before 2003, replacement is a little more difficult than modernized 2110 releases after 2003, but be that as it may, to replace we will need the following tools and consumables:
- container for draining antifreeze (with a wide neck);
- set of sockets with angular cardan, extension and ratchet;
- Screwdriver Set;
- four new screw clamps;
- if you plan to replace antifreeze, use new antifreeze;
- stove radiator of the appropriate modification (they are not interchangeable).
Replacing the heater radiator of the tenth family of a new model
Before starting disassembly, pour the antifreeze into the prepared container - if we do not completely change the liquid, it will be enough to drain it only from the cylinder block by unscrewing the plug and placing the container under the engine. If we change it, we drain the antifreeze from the cooling radiator as well.
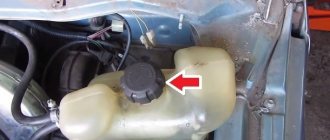
If you do not plan to completely replace the antifreeze, you can partially drain it using the method shown in the photo (the expansion tank cap must be closed).
Before draining, remove the expansion tank cap and begin work:
- The liquid has been drained, you can and should remove the expansion tank - loosen the screw clamps, remove the hoses, unfasten the tank fasteners.
- The hood seal will interfere, remove it.
- We remove the sound and thermal insulation from the engine shield. To do this, use a Phillips screwdriver to unscrew all the screws on the insulation on top. From below, the insulation is attached to the body with two bolts with 10mm heads. It is more convenient to unscrew them with a high head with a cardan and an extension.
Remove the hood seal and trim.
Which heater radiator should I install on a VAZ 2110?
Original number 2110-8101050, average price 630 rubles.
- Master-sport 2110-8101050-PCS-MS — 575 rub.
- Kraft KT 104006 — 715 rub.
- Weber RH 2110 — 625 rub.
We purchase everything necessary to replace the stove radiator.
Drain the antifreeze (about 4 liters) from the engine block. To do this, unscrew the cap on the expansion tank; to reduce the pressure, you then need to unscrew the drain plug (located behind the ignition module).
Or the antifreeze is drained in a slightly different way - through the expansion tank. After removing the hoses from the stove, drain about one liter of antifreeze
Remove the rubber L-shaped pipe.
It is necessary to remove the rubber seal of the wind lining, as well as the lining itself (jabot).
Under the GTZ, unscrew the screw securing the frill.
Next, you need to unscrew the 4th screws of the upper fastening of the right part of this frill
Remove 2 clamps from the frill for fastening hoses and wires
Next, you need to disconnect the “-” fan wire from the body and the “+” terminal.
Unscrew the two screws on the left side of the frill and move it forward a little.
You will also need to remove the windshield trim (2 nuts)
Disconnect the coolant level sensor terminal and remove the steam removal hose from the expansion tank
You will also need to disconnect the windshield washer hose.
Unscrew the four screws
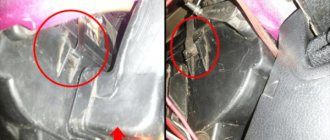
You need to remove the windshield wipers and remove the windshield trim. Remove the clamps of the heater and fan housing
This is what the heater housing clamps look like.
Unscrew the screws of the cabin filter housing and the front part of the fan housing
Together with the fan, we remove the front part of its housing.
Main malfunctions of the VAZ 2110 heater
Ten, although old, is a good and simple, repairable machine. At the same time, it is quite inexpensive. It has never gone beyond the sacred club of “everyone under 500” and will never come out again, therefore it is doomed to popularity on the secondary market. The car has a number of childhood diseases that have become chronic in nearly 18 years of production. But the clinical picture of each case has been studied in detail, therefore, in the case of the stove and its main components, each breakdown has a reliable and proven repair algorithm. The VAZ 2110 heater, in principle, was designed theoretically well and at the time when the car had just begun to come off the assembly line, it was not yet the most primitive in the world.
The heater had an air recirculation system, which was supposed to promote proper ventilation and air exchange, as well as a system that accelerates the heating of the cabin in the cold season. Not everything worked as it should have, but the handy owners of dozens of them found the most original ways to extract heat from the heater, even going as far as laying special air duct hoses. Homemade air ducts were installed to prevent warm air from escaping through the cracks, of which there are a great many in the interior panels. But perhaps the biggest problem for owners of cars of all generations was the question of how to remove the heater radiator on a VAZ 2110.
How to remove the heater radiator on a VAZ 2110, video
No sane car enthusiast from Australia, if there are car enthusiasts there, can understand the importance of a stove for a resident of the middle zone. Well, he won’t be able to understand why the drops on the pipes are so critical, why the owners of eights and tens so zealously monitor the condition of the heater.
Although in terms of the complexity of manufacturing, the VAZ stove is perhaps a hundred times simpler than the standard climate control in some Australian Holden, which no one would even think about modernizing or repairing. Our craftsmen would also not touch the stove if it worked normally. But it has to.
Today we will touch the stove, or rather, the heater radiator on the VAZ 2110. At least we will try to remove it.
:
Main malfunctions of the VAZ 2110 heater
Ten, although old, is a good and simple, repairable machine. At the same time, it is quite inexpensive. It has never gone beyond the sacred club of “everyone under 500” and will never come out again, therefore it is doomed to popularity on the secondary market.
The car has a number of childhood diseases that have become chronic in nearly 18 years of production. But the clinical picture of each case has been studied in detail, therefore, in the case of the stove and its main components, each breakdown has a reliable and proven repair algorithm.
The VAZ 2110 heater, in principle, was designed theoretically well and at the time when the car had just begun to come off the assembly line, it was not yet the most primitive in the world.
The heater had an air recirculation system, which was supposed to promote proper ventilation and air exchange, as well as a system that accelerates the heating of the cabin in the cold season.
Not everything worked as it should have, but the handy owners of dozens of them found the most original ways to extract heat from the heater, even going as far as laying special air duct hoses.
Homemade air ducts were installed to prevent warm air from escaping through the cracks, of which there are a great many in the interior panels. But perhaps the biggest problem for owners of cars of all generations was the question of how to remove the heater radiator on a VAZ 2110.
Heater radiator diseases
The heater radiator on the ten was hidden under a million panels, housings and partitions, so it was extremely difficult to get to it. And it was necessary to get there for several reasons:
- The heat exchanger was constantly clogged from the outside. The thin cabin filter did not catch small dust particles, which gradually settled in the radiator honeycombs. Some owners even abandoned such a cheap consumable item as a cabin filter, and then not only dust settled in the radiator, but also any debris that the car sucked up like a vacuum cleaner.
- The heater radiator was clogged from the inside. As a rule, this happened due to the desire to save on coolant. Then all sorts of “antifreeze” in quotation marks was poured into the cooling system, which was an incredibly useless and often downright harmful substance of a delicate blue color. At best, it was high-quality natural tap water, colored either blue, which is not so bad, or vitriol, which looks really disgusting. The result is scale, corrosion and cavitation.
- The quality of the radiators also left much to be desired. DAAZ radiators worked tolerably, because the company had been supplying spare parts to the assembly line for a thousand years, but new and unknown companies soldered and welded radiators extremely poorly and from poor materials. Hence the constant leaks of even new radiators, the places where the rubber pipes were attached were cracked.
Therefore, the radiator often required replacement.
Dismantling the heater and radiator of a new type
Unification and simplification of life for owners is not for VAZ cars. The stove radiator has survived two revisions. The most successful and easiest to dismantle is the last one. In order to remove the new type of heater core, you just had to follow the algorithm. There was no element of creativity, but the part was removed quickly and using technology:
- Drain the antifreeze.
- Unscrew the central bolt at the lower edge of the windshield under the hood, where the windshield washer hose passes.
- Unscrew the nut on the left near the filter.
- Remove the air filter.
Then the heater body will split into two halves, after which all that remains is to loosen the clamps, remove the leaking or clogged radiator and replace it with a new one.
How to remove an old-style heater, video
Everything is more complicated here. We had to disassemble half of the car under the hood and remove the front panel in the cabin. The operation could take several days if you don’t use your wits. The standard dismantling procedure looks like the video that shows how to remove the heater radiator on a VAZ 2110.
THIS IS INTERESTING: Volvo XC90 rack repair
Long and hard. There is another way, but it involves dismantling the front panel, and this is not any faster. But the main thing that needs to be learned, given the complexity of the work, is that antifreeze leakage may not necessarily be in the radiator honeycombs.
Heater hoses may crack due to material aging, but even to replace them, you will have to carry out a rather lengthy procedure for dismantling the casings and filters.
And also, if the radiator is copper, and it is definitely damaged, then you should not throw it away, since it is soldered perfectly and lasts longer than aluminum.
Good luck and patience in the fight against the stove radiator, don’t delay replacing it and don’t wait for frost. Warm and kind travels to everyone!
How to remove the cigarette lighter on a VAZ 2110
Source: https://ladamaster.com/kak-snyat-radiator-pechki-na-vaz-2110-video
How to remove an old-style heater, video
Everything is more complicated here. We had to disassemble half of the car under the hood and remove the front panel in the cabin. The operation could take several days if you don’t use your wits. The standard dismantling procedure looks like the video that shows how to remove the heater radiator on a VAZ 2110.
Long and hard. There is another way, but it involves dismantling the front panel, and this is not any faster. But the main thing that needs to be learned, given the complexity of the work, is that antifreeze leakage may not necessarily be in the radiator honeycombs. Heater hoses may crack due to material aging, but even to replace them, you will have to carry out a rather lengthy procedure for dismantling the casings and filters. And also, if the radiator is copper, and it is definitely damaged, then you should not throw it away, since it is soldered perfectly and lasts longer than aluminum.
Good luck and patience in the fight against the stove radiator, don’t delay replacing it and don’t wait for frost. Warm and kind travels to everyone!