The operation of the stove on the classic Niva traditionally causes complaints from most owners of this car. A frankly weak but noisy fan and poor design of the air ducts do not warm the interior properly. In addition, the operation of the heater is affected by the operation of the VAZ 2121, 2131 in difficult road conditions. The stove radiator, air ducts become clogged, and the pipes are destroyed. Therefore, understanding the operating principles of the heater and the ability to repair it with your own hands become an important task for the Niva driver.
Radiator of the Niva stove
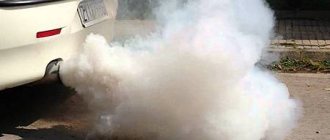
The heater radiator of VAZ 2121, 2131 is not a critical vehicle component. But in cold weather, driving a car with a faulty heater is unlikely to be a pleasure. In addition to the sheer coldness in the cabin, the windows may fog up, which leads to poor visibility, and this is a matter of safety for the driver, passengers and other road users.
Structurally, the radiator is a heat exchanger, or more simply put, a battery, whose task is to heat the air passing through its grille. Externally, it looks the same as a similar unit on other cars.
The same type of heater radiator is used for “Niva” and “classic” VAZs
The Chevrolet Niva radiator is not suitable for the VAZ-2121, 2131 family. This should be taken into account when selecting spare parts in the store.
Radiator location
The heater radiator on the Niva is located under the dashboard behind the center console between the driver and right passenger seats. This is the standard location for the heater in most cars. Compared to many other car models, access to the radiator in the Niva is quite simple. This will take about 10–15 minutes for a semi-skilled specialist.
Radiator design and functions
The stove radiator is a unit in which heat is transferred from the heated liquid to the surrounding air. It consists of two horizontal rows of tubes intersecting with vertical metal plates (ribs). On the sides, the structure is limited by panels that provide the functions of tanks. The incoming and outgoing pipes of the cooling circuit are connected to one of the tanks.
There are two unconnected cavities inside the tank. Antifreeze enters through the inlet pipe into the cavity connected to the upper row of tubes. On the other side of the radiator there is a return tank, through which antifreeze flows into the second row of tubes and moves in the opposite direction to the second cavity of the tank and the outgoing pipe. After leaving the radiator, the antifreeze enters the main cooling system of the car. Antifreeze circulating in the tubes ensures heating of the entire grille, thanks to which heat transfer from the radiator reaches maximum effect.
The radiator is installed in the instrument panel console in a plastic casing and sealed around the perimeter with foam tape. Air heating depends on the degree of opening of the valve that regulates the flow of liquid through the radiator. The valve is installed at the radiator inlet and is controlled by the upper lever on the center console.
Cold air comes from the external environment, passing through a hot radiator, heats up and enters the car interior
The main and only function of the heater radiator is to heat the air flow entering the cabin through the air ducts.
Radiators are made of aluminum or copper. The aluminum product does not hold temperature well. A copper radiator works more efficiently, but is more expensive. The advantages of a copper radiator include its maintainability: the ability to seal cracks in the tubes.
Fan replacement
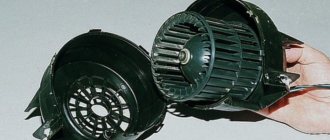
The main reason for the low temperature in the car is the poor performance of the heater fan, which forces warm air through it into the cabin. In addition, being directly inside the car, it operates quite loudly at high speeds and whistles unpleasantly, especially in winter. Therefore, it is replaced with a fan from a VAZ-2108 (“eight”) car, which together with the casing is often called a “snail”. Their sizes differ slightly, so installing a new one is quite simple, with minor design modifications. Place the fan in the engine compartment, inside the air intake. This significantly reduces the noise from it. The heater radiator shutter needs to be removed.
You can leave the standard two-speed airflow mode switch
or replace it with a three-position (and, if desired, four-position) installed on 2108, adding an additional resistor from the “eight” to the fan circuit.
They place it inside the air duct, since it needs airflow.
The cross-section of the wires suitable for it needs to be increased, since the new motor consumes more power.
The outer openings for air passage in the hood must be sealed to reduce the flow of cold air through them to the stove by half.
Typical radiator malfunctions
There are two main radiator malfunctions:
- Clogged grille and radiator tubes.
- Radiator leakage.
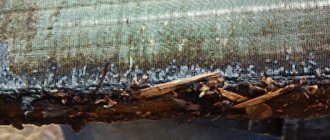
Since the Niva is often operated in difficult road conditions, the likelihood of contamination of the grille from dusty outside air is very high. Clogging of the cells reduces the heat transfer area of the radiator, and as a result leads to a decrease in the heat released from the air ducts into the passenger compartment. In such cases, the stove radiator is dismantled and washed under high pressure.
Clogged radiator tubes are also common. If the outlet pipe is barely warm or cold, then the radiator tubes are clogged. This happens for various reasons, including the entry of foreign objects into the cooling line during repair work. In such cases, the tubes themselves are also washed. To do this, it is not necessary to remove the heater radiator. It is enough to separate the radiator pipes from the cooling system and supply water under pressure into one of the radiator pipes.
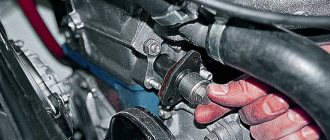
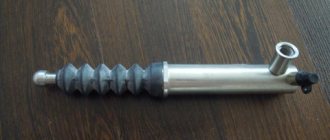
Replacing the heater tap
The standard heater tap on Niva 21213 does not do its job. Since it has a small cross-section, coolant flows quite slowly through the radiator. In addition, it often becomes a place for coolant to leak into the cabin. Therefore, car owners prefer to exchange it for similar models from other AvtoVAZ, Volkswagen, Toyota or Opel cars. For example, the ceramic faucet installed in 2108 has a large diameter passage opening, which increases the performance of the stove. It is better to install it in the pipe that supplies coolant to the stove, otherwise even if it is closed in the warm season, heated air will still flow into the cabin.
Removing the radiator of the VAZ-2121 stove
The procedure for removing the heater radiator on a VAZ Niva does not require any special skills or abilities. It is important to prepare the necessary materials and tools in advance. Most instructions for repairing car heaters contain a recommendation to drain the coolant before starting work. In practice, many car enthusiasts limit themselves to draining only that part of the antifreeze that is located in the radiator itself and the nearby pipes of the cooling system.
Preparing tools
To replace the radiator, you will need the following tools:
- pliers;
- slotted screwdriver;
- Phillips screwdriver;
- a set of markers for identifying wires;
- spanner set to “7”;
- socket wrench set to “10”;
- socket wrench set to “7”;
- socket wrench set to "10".
Procedure for dismantling the radiator
All operations must be performed in the following sequence:
- Unscrew the left self-tapping screw securing the storage shelf.
The self-tapping screw is unscrewed with a Phillips screwdriver
The right side of the shelf is attached to the upholstery
The central part of the shelf is unscrewed from the front panel
The right edge of the shelf moves down freely
There is a special spike on the left side of the shelf
The lower part of the panel is also fixed with a self-tapping screw
The process is shown on the right side, the left side is similar
The panel is moved to the side
The wire blocks are detached to remove the entire radio panel
After disconnecting the wires, the panel can be easily removed
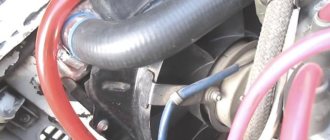
Loosening the clamp is shown using the example of the lower pipe; a similar operation is performed with the upper
The screws are unscrewed with a socket wrench with a “7” head
The removed seal allows you to remove the radiator pipes from the engine compartment
The fastening nut is unscrewed with a “7” key
The rod is removed from the crane lever
The rod is disconnected from the fan casing
The staples are pryed off with a slotted screwdriver
The casing with the fan is moved to the side
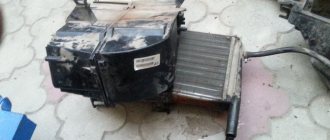
After removing the fan, the radiator is carefully removed from its compartment
The tap and pipes are turned off with a key to “10”
The removed tap is checked for leaks
The bottom nut often falls out and gets lost
Disconnect the outgoing pipe.
The two fastening nuts are unscrewed with a “10” wrench
After dismantling, you should carefully inspect the radiator for blockages in the grille and leaks from the tubes. Based on the results of the inspection, a decision is made on the possibility of repair or installation of a new radiator.
Video: installing a radiator
The process of replacing the heater radiator on a classic Niva has been studied far and wide by many car owners. In fact, the procedure is similar to the entire family of AvtoVAZ classics. However, caution and safety precautions should be observed when working. After completing the repair, before driving on public roads, you must make sure that all components and mechanisms of the vehicle are operating normally. Only then should you begin daily use of the machine.
When starting to tune a VAZ 2131 Niva, every SUV owner must choose one of two options. The first method is budget-friendly; it involves minor modifications to the engine and increased interior comfort. The second option is more expensive, it is aimed at upgrading the suspension of the Lada 2131 4x4 for off-road driving. Let's look at what both methods of improving the VAZ are, and what they give us in the end.
Other details
The standard heater radiator and thermostat are also replaced.
Preference is given to three-row copper radiators. They are more efficient in operation and leak less often. The thermostat is replaced with an analogue one or its thermal insert is modified. Do-it-yourself modification of the stove on Niva 21213 with your own hands is quite labor-intensive and takes a lot of time. To modify the heating system of this car, you can find ready-made kits on sale that make this work easier. The procedure is presented in the video “Remaking the stove on Niva 21213 with your own hands: video instructions.”
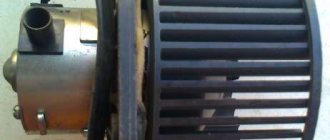
Features of a quiet Niva stove with a VAZ 2108 heater motor.
Updated:
The body of the stove for the Niva is made of sheet steel 2 mm thick.
Structurally, it consists of two elements: the base and the air intake. The body is painted with high-strength acrylic auto enamel in black or gray. The air intake is attached to the base using two M8 bolts. A rheostat and a VAZ 2108 heater motor in a casing are also installed on the base. Niva stove 2108 housing assembly The use of a heater motor from a VAZ 2108 instead of the standard VAZ 2121 stove motor made it possible to radically improve interior ventilation.
Niva stove 2108 with a cabin filter and a painted housing.
This is especially true for the VAZ 2131 (long Niva), since it has an increased interior volume. The standard fan operates in suction mode and has a capacity of about 70 cubic meters per hour. These two factors determine the low efficiency of the Niva factory stove. Considering that the factory fan is installed after the heater radiator and is constantly blown with hot air, as a result, we have a leakage of lubricant from the rubbing parts of the fan, which leads to its jamming. And if you are lucky and the fan does not jam, then you will have to constantly listen to the squealing and howling of its motor (even a motor with bearings on the axles will not save the situation). The use of the VAZ 2108 stove motor completely eliminates the above-mentioned disadvantages. The blades of the figure-eight motor have a centrifugal design. This allows you to achieve quiet operation and high productivity of 400 cubic meters per hour, which is several times higher than the productivity of the factory Niva stove motor, including Niva 2131. The 2108 stove motor is installed in front of the heater radiator and operates in pressure mode. This mode further improves interior ventilation and improves the performance of the entire system as a whole. Using a VAZ 2110 heater rheostat
Niva stove 2108 attachments rheostat heater speed switch relay.
and the VAZ 2108 heater switch allowed the use of three heater fan speeds.
The use of this stove design allows you to warm up the Niva’s interior in a short time in winter. And given the high performance of the fan, it is possible to avoid fogging and freezing of glass throughout the cabin. Many years of operation of this stove have confirmed its high efficiency. For example, in cold weather of -35 0C and a speed of 70 km/h on the highway, the windshield and side windows do not show signs of frost.
The stove is installed under the hood of the Niva instead of the standard air intake (popularly called the “boot”). The features of this stove include two more advantages: 1) the VAZ 2108 heater motor is fastened with two M8 bolts and, in case of prevention or replacement, allows these procedures to be completed in literally 5 minutes; 2) the air intake is also removable Niva-stove housing with fan motor 2108
in 5 minutes, thanks to the two-bolt fastening. And this allows you to conveniently remove the valve cover to adjust the valves (or any work related to removing the valve cover). The stove is equipped with a reinforced electrical harness
Niva stove 2108 REINFORCED HARNESS 3 - SPEED without backlight.
on detachable connections. This allows electrical installation to be carried out quickly and conveniently. The stove has a separate plug fuse. And when the ignition switch is turned off, the heater motor is completely de-energized.
Additional interior heater in VAZ-2131.
The material for this article was ready a long time ago, 2 years ago, but somehow everyone didn’t get around to posting it. This also had its advantages. Firstly, the stove passed the test during this time and proved to be a reliable and efficient device; the rear passengers were always warm. Secondly, the article did not get into the Niva FAK, otherwise it would have been just as brazenly stolen by the presenter of this FAK, like all my other 45 articles. The additional stove is very similar in design to the standard stove. It has a radiator, an electric motor with an impeller, and a three-position switch to turn on and change the rotation speed of the electric motor.
The stove is installed on the tunnel between the front and rear seats. For this:
Remove the decorative trim of the tunnel, the gearbox and gearbox trim, and the shelf under the glove box.
Screw the stove body to the tunnel with self-tapping screws.
Check that the impeller does not touch the edge of the housing during rotation. If necessary, adjust the entire structure in place.
In our case, it took a very long time to cut and file some places at the base of the stove.
Disconnect the hoses in the engine compartment and the upper pipe in the cabin from the standard stove
From the upper metal pipe, cut a piece of tube 6-7 cm long.
Change the gasket on the heater radiator and install the two pieces in place. Connect the hoses of the additional heater to them.
Lay both hoses along the floor and connect them to the additional stove.
Connect the electrical wiring according to the diagram as indicated in the instructions.
Using a funnel and any suitable piece of hose, pour antifreeze into the upper pipe until it flows from the lower pipe of the standard stove.
Connect the hose in the engine compartment to the lower pipe of the standard heater.
Install the casing of the additional stove and secure it with self-tapping screws