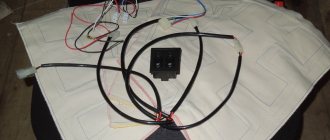
Every car owner, including the owner of a Lada Granta, knows what a door limit switch is, which has its full name as a door limit switch. This is a small device, which in its design is a simple switch.
The door end is located where the car door comes into contact with the body, and the main part of the device (the button) is located on the body, the so-called counter part is located on the door. The main task of this mechanism is to inform some car systems about the opening or closing of the door.
Characteristics of door limit switches Grants
Apart from the driver's side, there are no door limit switches on the Lada Granta in other opening structures. There aren't even any buttons or standard wiring. The operation of these mechanisms determines the activation of the door open lamp, which lights up on the dashboard. Moreover, the interior light and car alarm react to the actions of the driver or passenger. The average cost of limit switches starts from 150 to 200 rubles. Article 1118-3710199 is the original number and its price is lower than its analogues. The Lada Granta has this device, but it all depends on the modification:
- The “Norma” package implies the installation of this device in all door structures.
- The “Standard” package does not imply the presence of limit switches on the seats. There they are replaced with plugs.
- The “Lux” package will delight the buyer with a full set of sensors, even a rear one.
The activation sensor transmits information using light indicators.
Reviews
| № | Positive |
| 1. | Kirill: I knew about the problem of freezing tips initially when I bought the machine. I immediately bought silicone grease and lubricated it on the inside once a quarter. It's been a year now that I haven't had any problems. |
| 2. | Vasily: after the first winter the sensor jammed several times. I took the cap off, cleaned it, and lubed it. Works properly, no comments. What happened is also my fault, since I did not carry out preventive measures in a timely manner. |
| 3. | Konstantin: I bought Grant at a dealership six months ago, the activation sensor works properly, the light comes on without delay, and an indicator lights up on the dashboard. |
| 4. | Ignat: a year has passed since the purchase, I have not made any investments, there are no comments on the mechanisms. Once there was a malfunction of the sensor. Moisture got inside, after drying the defect was eliminated. |
| 5. | Sergey: I agree with the majority of positive reviews, the limit switch works properly, the workmanship is good. Every month I lubricate the rubber tip with silicone. |
| 6. | Vladimir: It’s been the second year since I bought the car, I haven’t made any investments other than scheduled maintenance. I heard about the “disease” of the sensors on Grant, but I can’t confirm it. |
| 7. | Ivan: once in the winter the limit switch jammed, I didn’t buy a new one, I cleaned the old one. It still works fine. |
| Negative | |
| 1. | Victor: I can’t speak positively about the activation sensor, since this is the second time in a year that I change it at a service station. The doors of the Lada Granta locked themselves twice. |
| 2. | Vyacheslav: after the winter the sensor jammed, the doors were locked, the keys remained in the cabin. I called a service station technician to open it. |
| 3. | Alexey: I can’t recommend factory door activation sensors, as their quality is poor. Comrades advised installing from Opel, they say that the diameter is identical. |
Conclusion Limit switches on a car should always be in good working order. Provided proper maintenance and lubrication, the service life is at least two years. It is necessary to regularly analyze the condition of the limit switches in order to notice and prevent malfunctions in time. You should also adhere to the operating instructions.
| Video – Granta Liftback – Refinement of door switches | Video - Lada Granta - door switches freeze? 3 solutions to the problem. |
Installation of limit switches on Lada Granta
An activation sensor in all doors will provide additional comfort. To carry out the installation procedure, you will need special equipment and available materials: lubricant, rubber tips, screwdriver, rag.
Step-by-step algorithm of actions:
- Remove the rubber tip.
- Open the housing and remove the limit switch.
- Remove the block with wires and disconnect.
- Install a new sensor.
- Reassemble.
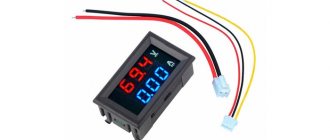
After the basic steps, you need to check the functionality of the device. To connect the limit switch to the power circuit, you will need to connect two terminals: first “+” and then “-”.
If you need to replace the trunk limit switch, then the instructions are identical, you just need to open the trunk lid.
Where is the trunk limit switch of the Lada Granta Liftback
The trunk lid activation sensor is located on the left side, closer to the lamp. However, it is installed only in the “Lux” configuration. Rubber plugs are inserted into “Standard” and “Norma”.
In order to prevent sudden activation of the central locking and door locking, owners optionally install sensors. Considering the simplicity of the procedure, you can do this either independently or by contacting a service station for help from specialists. After installing the trunk end switch into the seat, we lay and connect the electrical wiring. “Plus” is powered from the side lights of the lamp, “minus” can be from the body or on the block with wires. Black with a white stripe is “minus”, red is “plus”.
In the Luxury package, the sensor is built into the trunk lid lock by default. When the lid is closed, the sensor automatically turns off the power from the light.
Finalization of the scheme
The installation or modification scheme will require special equipment to test the electrical circuit. The first place on the list of accessories is a tester and a soldering iron. You will also need a screwdriver, additional wires, electrical tape and a new sensor. When connected, the driver can use the button in the threshold or the door lock contacts.
To do this, you first need to open the sensor housing with a screwdriver and remove the element, remove the block with wires using a screwdriver. Then replace the wire and solder. Insulate the ends and assemble the structure in reverse order. The process is carried out in parallel so that the process involves elements that go to the working positions of the door.
To measure the circuit resistance with a tester, you need to alternately press and release the spherical protrusion.
What is better than a limit switch in the door or threshold of a Lada Granta?
Many people wonder why and how to connect the Lada Grant door limit switches if there are standard terminals on the thresholds. The problem with threshold elements is their freezing. In winter, the lighting will not turn on until the car is completely warmed up. And in a busy vehicle, the lights may turn on when turning.
The solution is to redirect the wires to the door. The operation is simple: the wires are long enough to reconnect. Next, installation is carried out in the door itself and you need to understand how to remove the Lada Granta door limit switch for proper connection. Usually there is a plastic plug in place of the rubber button. It is easily replaced with a rubberized part.
The purchase and installation procedure does not require a significant expenditure of money and time. But the motorist needs a wiring diagram for the door switches on the Lada Granta in order to do the job correctly. You can receive it along with purchased spare parts. You can also use the car's operating book.
Design solution to the problem
When replacing or connecting, you only need to restore the originally designed circuit. If no modifications are carried out, then the need to disassemble the locking mechanism and use insulating materials is immediately eliminated. Step-by-step instruction:
- Open the hood.
- Loosen the bolt connections and disassemble the device.
- Unscrew the terminals.
- Connect the wires from the battery.
- Pull the limit switch out of the hole.
- Pull out the switch.
- Stretch the wires and connect them.
- Bring the ends out through the hole.
It is important that the wires are no shorter than ten centimeters.
- Strip the wires.
- Stretch the wires to the threshold to the installation site.
general information
The functioning of the car alarm, the light in the cabin and the operation of the door opening lamp on the instrument panel are closely related to the operation of the limit switches. The cost of the described devices is approximately 160-175 rubles. (for example, this is the cost of devices with a cap with article number 1118-3710199 and end switches with article number 104035756).
Let us also note a number of differences that exist in various Grant configurations:
- In the “Standard” configuration car, the buttons on the seats are replaced with plastic plugs. There is no wiring in machines of this configuration;
- On the Norma Grant, limit switches are installed not only on the driver’s door, but also on all other doors, however, all other seats (except the driver’s) are equipped with plugs. In vehicles of the specified configuration, wiring is installed;
- Luxury vehicles also have a full set of sensors installed on each of the car doors, but only the device installed on the driver's door is responsible for turning on the lighting lamp and the door closed indicator on the instrument panel. When the remaining doors are opened, only the light comes on.
The operation of limit switches is based on closing the circuit of an electromechanical device when the door is opened. It is at this moment that power is supplied to the lamp illuminating the car showroom and a parallel direction of the electrical pulse to the alarm system. When operating limit switches installed on Volzhsky Automobile Plant vehicles (including Grants), some problems are noted that the car owner himself will have to solve.
Troubleshooting
Drivers may encounter various types of malfunctions. Even though the sensor is protected, it is not as reliable as the manufacturers claim. In addition to silicone lubricant, other measures can be used:
- Install the spring under the rubber cover. If this element is elastic, it will protect the mechanism even at very low temperatures.
- Remove the protective caps for the winter, but there is a danger that the element will quickly become clogged with dust and dirt.
- Treat with protective liquid.
Often drivers replace their original limit switch with a part from another manufacturer or install a boot. In this case, the body of the new element is inserted into the standard connector and secured with a self-tapping screw.
Tell me, is the wiring done to the rest of the door switches or is it just there?
The equipment is standard plus, tell me, is there wiring to the rest of the door switches or are there just plugs there and that’s it?
Similar articles
- 20191021_
- Fourth oil change at 20052 km LADA GRANTA FL
- VID_20191020_
- I decided to get a Kalina cross 106l
- After turning off the gas the EUR light came on
- Which ones + which ones - and is it worth taking it
- Please share
- They are sold as a set
- The standard Granta Luxury casting has 185 tires installed.
- Tomorrow I will install technospring springs minus 50 on the original stoics
- We will find good shoes for your car for everyone
- Has anyone encountered this problem?
- Consequences of 1 liter of cheap antifreeze - clogged radiator
- Tell me, can the interior mirrors come off if you hang them on them?
- I have a Starline A93 signaling
17 comments on “Tell me, is the wiring done to the rest of the door switches or is it just there”
There are just no wire plugs
I ran the wires to the locks. The limit switch is in the lock.
If you have the plus standard, then there are wires, just buy limit switches. You can check by lifting the back seat and finding wires attached with electrical tape to the body under the carpet.
The end caps fit Hans Price, you can find the article number on the internet
Does the package include electrical wiring for limit switches?
Nikolay, I have a grant with a condo, is this the norm, plus?
Dima, the norm plus is a grant with air conditioning, cruise, heating, a second pillow and standard music. It also has a TsBKE, like in the luxury ones, and a standard signaling radio module
Nikolay, I have everything, but there is no cruise, the car was rented in July, it was released a month earlier
Dmitry, then look under the back seat, pull back the carpet and see if it’s there?
I have a norm+ 13 year old and limit switches on all doors
Nikolay, I'll take a look tomorrow! Car in the garage
Dmitry, I have the same elevator, all the limit switches are there. No cruise
How to extend service life
Craftsmen are constantly coming up with new ways to extend the service life of factory elements. Some people put coins under the rubber band, fasten the parts with tape, or insert washers. To prevent the switch from freezing or becoming deformed, there are several effective techniques to consider:
- Spring insert.
- Replacing standard caps with elements from foreign manufacturers.
- Silicone Grease.
You should not assume that these actions will grant immortality to the limit switch, but these measures will significantly increase its service life.
Preparing the car before connecting
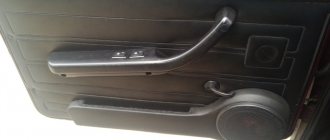
What controls the central locking? A special block to which the lock actuator wires fit. There are also two wires connected to it, connected to the driver's door microphone. More precisely, this wire is used alone in “Grant”, it has a brown sheath, and the second contact from the “micrik” is connected to ground.
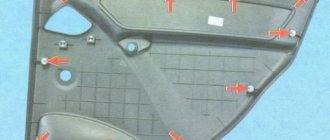
The “micric” itself is located inside the actuator. So, the first piece of advice: after removing the left front door trim, you need to find the cable going from the actuator to the 7-pin connector.
Depending on the configuration, under the trim you will see the following:
- There are 6 wires suitable for the connector (from 2 microphones and a drive);
- The cords from the electric drive (pins “2/7”) are not connected, but there is still a brown wire connected to pin “1”;
- Only those wires that, according to the diagram, should be connected to contacts “4/6” are missing.
Connecting the signaling means that the wires from contacts “2/7” are still connected to the central locking control unit. The cords coming from the three actuators are always connected to the standard unit. You need to connect a fourth one, if this is not done by the factory. You may have to lay a two-wire cable from the door to the central lock control unit:
Door switch
To search for circuits, try to use a voltmeter (especially in cars of recent years of production), since using a lamp probe may damage the car's auto electrics.
Limit switches are usually of 2 types. Positive (when the doors are opened, +12 Volts hang on them) and negative (when the doors are opened, they are shorted to ground). Positive limit switches are much less common (domestic GAZ-Volgas, bourgeois Fords, some BMWs, sometimes standard trunk limit switches of various cars) than negative ones. Some alarms do not even have a wire to connect the positive end switch.
So, we take a probe, sit on the “plus” with one end, and start poking at the wires with the other. If the probe light lights up, then press the door button or click the lock on the door, looking at where the limit switch is (all remaining doors must be closed) - if the light goes out, then it’s the negative limit switch. Now do the same with the other doors without changing the position of the probe. If the probe light in this case behaves the same way as with the first door, then you are lucky: all the door limit switches are tied, and you don’t have to worry anymore about finding the remaining limit switches.
It happens that the limit switch for each door runs on a separate wire. Then you have to look for every wire. In this case, the method of searching for limit switches is no different from the above. You just have to cut into these wires, drag the cut ends to one point (to the alarm) and there, using diodes, connect to the alarm wire (negative door trigger). We install the diodes so that the negatives from the door buttons go to the alarm wire, but do not go to the other buttons. Read more about the use of diodes in the article Diode and its use when installing car alarms.
It can be easier and more convenient to cut into the wire going to the interior lighting lamp. In this case, you need to look: the light goes out immediately after closing the doors or after a few seconds. If immediately, then you can safely cling to this wire. If not, then you need to program the alarm so that it will arm the doors not immediately after arming, but after some time (each alarm has its own values for this interval).
When installing a car alarm with auto start, pay attention - when starting and stopping the engine, the light in the cabin should not light up; if it does light up, then you cannot cling to such a light bulb (the alarm will assume that the doors have opened and the siren will turn on).
When searching for positive limit switches, we sit down on ground with one end of the probe, and start piercing the wires with the other. The technique is the same as described above.
At the end of this section I will tell you where it is better to look for the limit switch wires. The wires to the interior lighting lamp are most often located in the driver's or passenger's side pillar. You can ring the wires in the passenger and driver thresholds. You can very easily find the limit switch behind the instrument panel. You’ll be lucky if there are inscriptions for the tracks behind the panel (doors, for example, on a Nissan, this is DOOR) or you can easily trace the path from the light bulb where the open door is drawn to the connector where the wire from the door buttons goes. It happens that there is not a light bulb on the panel, but a diode. In this case, it can be said 100 percent that the limit switches are untied and each one will have to be looked for separately
Usually, the negatives from each button come to one point - the fuse box, radio-controlled central locking unit, original alarm system, etc. — then one common wire goes to the instrument panel, but on this wire there is already a different signal, and not 12 Volts. The most difficult way is to run wires into each door (for example, in Volkswagen they had to do this, since in each door there was a block into which the negative signals from the door locks entered, and modified signals went from the block into the cabin). It was not possible to connect to the interior lamp for the reason I mentioned above.
There are even more difficult cases when using a probe it is not possible to find limit switches. For example, Fords are the latest. When the doors are open, +12 Volts hang on the end wires from the doors, but these wires can only be found with a voltmeter. It also happens that the wires from the door limit switches have to be connected through resistors (resistance). Well, these are complex cases and, as a rule, the owners themselves do not install alarms on such cars.