Fastening diagrams
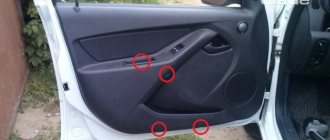
Lada Granta door cards are attached according to the standard pattern. The casing is plastic, fastenings are plastic latches and standard bolts. Place the fasteners around the perimeter of the insert. In this case, there will be 9 screws on the front door of the Grant, and the rear trim contains 10. To remove all bolted connections, use a screwdriver.
Proceed carefully, otherwise you risk breaking the bolted connections.
The final stage of dismantling the casing
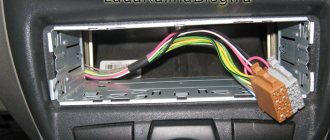
How to remove the trim carefully? Using a plastic spatula, pry up the casing and carefully remove it from its engagement with the latches. Next we see the switching harnesses with cables. They are necessary to connect door mechanisms:
- window regulator;
- mirror drive;
- loudspeaker, etc. (depending on the configuration version).
We disconnect their connectors.
Upon completion of work, you should make sure that there are no broken clips. If any are present, then we replace them with new analogues. We assemble the casing on the LADA Granta in the reverse order. Now you have become familiar with how to remove the trim on a domestic car on the front door and, accordingly, the rear door.
Instructions
To tune Grants of standard or luxury modifications, you must first disconnect the negative terminal from the battery. If the stern doors are not equipped with electric drives, then this step is skipped. Purchase new clips in advance, since when removing the trim and the trim itself, the old ones are often damaged.
Then you need:
- Remove the decorative panel plug - to remove it without damage, it is recommended to use a flat profile screwdriver. You need to work until you hear a click, and act carefully to prevent the fastener from breaking off.
- Use a Phillips screwdriver to tighten the fixing screw, and do the same with the bolt that goes inside the plastic socket.
- Disassemble the plugs from the handle - remove them to gain access to a pair of screws, unscrew them, put them in a prepared box or other container.
- To complete the disassembly of the casing, unscrew the last pair of bolt clamps installed at the bottom of the Grant door.
How to remove the front door trim on a Grant
So, before starting the repair, you need to open the car door and use a thin screwdriver to pry off the plug, under which there is a screw securing the trim. Clearly shown in the photo below.
Then unscrew the screw securing the inner door pocket, which is also the handle.
After this, it is worth unscrewing two more screws that are located at the bottom of the Granta upholstery - which secure the so-called pocket.
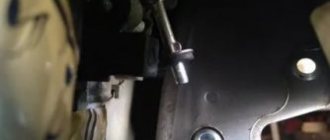
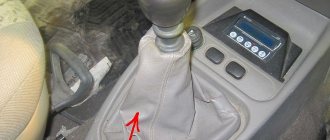
We unscrew the screw securing the door opening handle and then remove the protective rubber cover in the area of the rear view mirror control handle. This is clearly shown by the yellow arrow.
After this, you can carefully pry it from the bottom of the upholstery and with sharp, but at the same time careful jerks, pull it off the latches. It will not be possible to completely remove it right away, since the power wires to the window regulator unit will interfere, which must be disconnected. Also, if you have front speakers connected and they are installed on the trim, which is often the case, the wires from them must also be disconnected.
After which you can finally remove the door trim on the Grant and carry out the necessary work further, for which all this was even necessary! Installation of the casing occurs in the reverse order and will not be particularly difficult.
Front doors
How to remove the front door trim on a Grant in stages:
- Disconnect the negative terminal, prepare a Phillips screwdriver and a set of spare clips.
- Unscrew the locking part of the lock.
- Pry off the screw muffler.
- Remove the screw and the lock release button.
- Remove the screw from inside the armrest niches.
- Remove the pair of screws at the bottom of the upholstery fastener using a similar tool.
- To dismantle the entire car trim - in Grant they do this, starting from the front corner of the door from the bottom, inserting a screwdriver between the metal and the trim material. To remove the upholstery without damage, you need to carefully overcome the resistance of the pistons.
- Remove the screws from the armrest niche and lower upholstery fastenings.
- Continue removing the trim, moving from the corner in different directions, and move the lock rod outward.
- Remove the block with wires from the electric window, remove the upholstery.
➤ Remove the liftback grant door trim - detailed description
All Lada Granta models with a liftback are supplied with a factory PVC coating by default.
Often, door trim elements become the object of increased driver attention due to creaking and knocking on the door. Eliminating defects and sealing joints and joints is entirely acceptable on your own. The procedure is simple and there is no need to go to a service center.
Common reasons for removing door trim from Lada Granta Liftback
- creaking, creaking in the niche of the doorway;
- mechanical damage, shock and deformation;
- manufacturing defect;
- deformation of the door card due to systematic exposure to direct sunlight;
- natural wear and tear of plastic buttons and clips.
The front and rear door trims of the Lada Granta with liftback are attached to the body with screws and plastic plungers.
- 3 “10” bolts along the bottom circumference;
- 8 pistons around the perimeter of the door card.
Be especially careful when assembling and disassembling as the polymers are very fragile. Excessive pressure and deformation of the structure contribute to deformation and breakage of the gun. Replacing the polymer is easy, but it takes time to get it back into good working order.
Tools and materials for removing door trim
- flat screwdriver;
- rags, rubber gloves;
- spare pistons, new door card in case the old one is damaged.
Sequence of actions when removing the front door trim of the Lada Granta Liftback
- Place the machine on a flat platform or platform with easy access all around.
- Take the first precautions: turn on the handbrake, place wheel chocks under the wheels.
- Unscrew the latch tab.
- Remove the three screws that secure the bottom perimeter of the card.
- Pry up the plastic cover and remove the clips from their places.
- Disconnect the wiring harness from the music speaker.
- Replace the card with a new one and install it in reverse order.
The process of removing the rear door trim on a Lada Granta is a little complicated. There are additional hooks on the handle for closing the door. Attached to the car body with two “10” bolts.
- Carefully pry up the plastic door handle cover. It is better to do this with a plastic, plastic card. It is strictly forbidden to use metal objects, as the edge will be damaged.
- Using a Phillips screwdriver, remove the two screws securing the handle and remove the handle.
- Unscrew the fixing pin.
- Unfasten the plastic clips around the perimeter of the card.
- In the opening of the recess, disconnect the washers with the wires leading to the speaker.
- Replace the door card, carry out maintenance, connect electrical wires. Install new accessories if necessary.
- Reassembly of the structure is carried out in the reverse order.
Similarly, remove the trim from the rear door on the opposite side.
Reviews
| № | Positive |
| 1. | Vitaly: I don’t know about the rest, but there are no problems with the upholstery. The plastic fits tightly to the metal, does not creak or rattle. After buying the car it immediately became loud. |
| 2. | Mikhail: I’ve already removed the card several times and installed the wiring, no complaints. The timing belts are tight, the first time one piston broke, I installed a new one. No complaints. |
| 3. | Ignat: I recommend changing the upholstery in the Lada Granta liftback. Nothing complicated, just ten minutes and you're done. |
| 4. | Sergey: I heard that owners are complaining about cards being knocked out on the Lada Grant, I can’t confirm. Since there is no soundproofing option at the factory, I glued them on myself. |
| 5. | Semyon: Despite the budget class of the car, the build and build quality is good. There is no own garage, the car is in the cold all year round, the panel did not deform in the sun. |
| 6. | Vasily: two months ago I was in an accident and was hit in the side. I did a little retouching, the covering has not changed, it fits tightly as usual, there is no sagging, it does not squeeze. |
| 7. | Gennady: I’m happy with the upholstery, no comments. Recommendation: The manufacturer should strengthen the clamps as they are perishable and disposable. |
| Negative | |
| 1. | The device cannot complain about the quality, since after two months of using the machine the cards began to rattle. I had a car service and they stuck gaskets on me. I don’t know how long ago it was, but how well it was done. |
| 2. | Ivan: The car is not even six months old, but the cards have already been removed twice, the connections are sealed. There was a clicking, shaking sound on the sidewalk. Additionally laminated sound insulation. I can't recommend the quality. |
| 3. | Victor: A year later the upholstery started knocking. Deformation may occur due to cold, direct sunlight or manufacturing defects. |
Summary: Despite isolated negative reviews about the upholstery of the Lada Granta liftback, the door design is generally of high quality. The joints fit tightly to the metal body.
Most likely, the sounds of third parties are caused by a violation of the terms of use of the vehicle. For example, direct sunlight, negative temperatures.
Rear doors
Let's look at how to disassemble the rear door of a Lada Grant, since this work has its own characteristics. Actions:
- Disconnect the terminal with the minus sign and prepare replacement clips.
- Unscrew the lock button.
- Press out the socket on the window handle using a flat-head screwdriver.
- Remove the handle with the locking mechanism, having first pulled it out, remove the plug from the handle.
- Remove a pair of mounting screws with a Phillips screwdriver and remove the handle.
- Remove the door plugs of the Grants, begin to remove the trim one by one from the front from the bottom, inserting a screwdriver between it and the metal sheets. The upholstery must be moved away from the door panel towards the sides of the corners, overcoming the 10-piston resistance.
How to disassemble the rear door of LADA Granta
Removing the rear door trim
We prepare the car for the job. Disconnect the negative terminal of the battery.
Open the door and lower the glass to the down position.
Rear door trim fastening is shown in Figure 1
Unscrew the door lock button by hand
Use a screwdriver to press out the power window handle socket.
Remove the handle and socket from the window lift shaft
Use a flat-head screwdriver to pry off the outer door handle trim
Use a Phillips screwdriver to unscrew the two screws securing the handle.
Taking the corner, we press the upholstery away from the door panel, overcoming the resistance of 10 pistons
We continue to press the upholstery from the corner in both directions
After the upholstery has been pressed out, lift and remove the lock lock rod from the upholstery hole.
This is how the rear door trim pistons are located
Install the rear door trim in reverse order.
Removing the rear door interior handle
The inner handle must be removed when removing the door lock, as well as when replacing the handle itself.
Remove the rear door trim as described above.
Using a Phillips screwdriver, unscrew the two screws securing the base of the handle to the inner door panel
We remove the foot of the handle base from the hole in the inner panel of the door and remove the handle from the door
Remove the rubber clamp of the rod and remove its curved end from the handle lever
Install the handle in reverse order
Removing and installing rear door glass
We remove the upholstery as described in point 1.
Loosen the screw securing the outer corner decorative trim of the door
The screw that strengthens the trim immediately strengthens the glass guide
Pull the glass seal out of the rear guide.
Using a 8mm socket, unscrew the bolt securing the rear glass guide to the end of the door
Remove the glass guide groove from the top mounting screw and remove the rear guide from the door panel
Having overcome the resistance of the piston of the external glass seal, we remove the piston from the door hole
By pulling out the rear seal insert and prying the outer seal, remove it from the edge of the outer door panel.
Pull the edge of the inner glass seal upward and remove it from the door
Using the window lifter handle, we install the glass so that the mounting bolts to the window lifter are located opposite the hole in the door panel.
Using a 8mm socket, unscrew the two bolts securing the glass holder
If you have to change the glass and the new glass does not have a holder, then install the new glass in the holder using a strip of raw rubber soaked in gasoline.
We insert the glass holder at a distance of 160 mm from the front edge.
Leaning the glass on a soft base, carefully press the holder onto the glass with a hammer.
Install the glass in reverse order.
We bring the glass holder to the window lifter slider and tighten the bolts of its fastening without tightening it.
Raise the glass all the way, and then tighten the glass mounting bolts
Removing the rear door window lift mechanism
We remove the door trim as described in the first paragraph of the article.
Unscrew two bolts 1, sketch 1, holding the glass, set it in the upper position
You can fix the glass using 2 screwdrivers
Remove the foam gasket from the window lifter handle shaft
Using a 8mm socket, unscrew the three nuts securing the window lift mechanism.
Using a 10mm socket, unscrew the two nuts on the lower fastening of the window lift mechanism guide.
Unscrew the nut of the upper fastening of the window lift mechanism guide
We remove the window lift mechanism through the lower hole in the door panel.
Install the window lift mechanism in reverse order.
Removing the rear door outer handle
Set the glass to the top position.
How to properly remove and put on the Grant Door Trim and how to remove the Window Handle
Using a 8mm socket, unscrew the rear handle mounting bolt.
Using a 8-mm socket with an extension, unscrew the nut of the front handle fastening
Install the handle in reverse order.
Removing the rear door lock
Disconnect the negative terminal of the battery.
We remove the door trim as described in the first paragraph of the article.
Lift the lock rods and remove them from the plastic holders.
Using a Phillips screwdriver, unscrew the screw securing the intermediate lever of the lock lock rod
By sliding the base of the lever, we remove the locking tab from the rectangular hole in the inner surface of the door panel
We remove the lever together with the rods, removing the locking rod from the plastic holder
Using a Phillips screwdriver, unscrew the three screws securing the door lock to the end
We remove the electric lock through the hole in the inner door panel
Press the lock of the wire block, disconnect the block from the electric locking drive
replacing the rear outer door handle of a Lada Granta
READ Self-diagnosis Ford Focus 2 restyling
Install the lock in reverse order.
Advice from car enthusiasts and recommendations from experts
The process of removing the trim from the front and rear doors of LADA Granta is easy, so even an inexperienced motorist can cope with it. In order to deal with one door, it is enough to spend 10–20 minutes, everything depends on your qualifications.
- Polishchuk Ruslan
Withdrawal algorithm
Unscrew the bolt in the door closing handle.
Remove the plastic plug in the door card “in the middle”. Behind it we find the bolt and unscrew it.
Unscrew the two bolts from the bottom of the door. They are clearly visible.
We begin to pull the casing towards us. I start tugging at the bottom where the pocket is. Later I go upstairs.
- Once the casing has been removed from the pistons, pull the casing up and remove it from the lock mechanism.
- Next, disconnect the power window chips. Remember their location for the upcoming assembly of the structure.
- If you have audio system speakers in the doors, then disconnect the male and female connectors from the speakers.
- Use a screwdriver to pry up the screw cap that secures the trim to the door.
- Using a cross tool, remove the screw itself.
- Do the same function with the screw placed in the armrest niche, also with its 2 screws at the bottom of the card.
- Pry the upper part of the handle with a flat tool so that you can remove it.
- Unscrew the two screws inside the handle that are found under the top trim.
- Once the trim is no longer attached to the door, it must be removed from the lower front edge. To gain access to it, use a fairly flat tool to pry off the edge that fits tightly to the metal of the door.
- As you remove the upholstery material, you must disconnect the pins holding it. At such moments, you should be as careful as possible and not destroy them. In total, there are 8-9 pistons (clips) on the Lada Granta door, and they are located around the perimeter of the upholstery fabric, but closer to the edges.
- From the corner, move in both directions while removing the card.
- Remove the lock lock rod from the hole.
- Disconnect the exposed block with the power window wires by squeezing the locking element. In cars that do not have power windows, remove the lever seal from the handle hinge.
- Only then can you completely remove the door trim.
- Removing the lock button. This is done in the same way as on the front door.
- Removing the window lifter handle. First, press out and remove the socket, and then pull out the latch and remove the handle. First, press out and remove the socket, and then pull out the latch and remove the handle
- Removing the handle. First, pry off the plugs, then unscrew two screws and dismantle the handle. Pry off the plugs, then unscrew two screws and dismantle the handle
- Evacuation of the screws located at the bottom of the panel.
- Removing the panel. You need to remove it from the 10 clamps, start from the corner and move to the sides.
Because I did it in the cold, it didn’t work out without losses. One landing spot broke off from the door trim card; the piston remained in the door.
How to adjust the gap: step-by-step instructions
First, we carry out a visual diagnosis of the body element and evaluate the areas of increased (decreased) gap. For objectivity, we use a plastic insert, as an ideal industrial standard, 3.0 mm wide.
After diagnostics, loosen the upper and lower hinge bolts and lower (raise) it a few mm. If the back door , adjust the gap again.
From time to time it happens that the adjusting loop cannot fully adjust the gap. As a rule, this happens after a tragedy, blow, or collision. Then unscrew the support hinges and complete the gap adjustment.
Step-by-step removal of the front door card
To replace the casing, you will need a set of screwdrivers, but you should also stock up on spare clips that are needed to fasten the casing.
First, for safety reasons, you need to remove the negative terminal from the battery.
Unscrew the door lock button until you can remove it completely.
Removing the rear door trim
The process of removing the panel from the tailgate is actually no different from how it was done in the previous case, but there are still certain aspects.
Installation of the trim on the front and rear doors is carried out in the reverse order of the removal process. Be prepared for the fact that during dismantling, some of the latches almost always break, so before work you must definitely purchase a set of new clips.
How to remove the rear door trim on a Granta
For most drivers, standard acoustics are sufficient, as are speakers. But lovers of high-quality sound practice installing podiums and spacers.
The installation process on the rear doors is similar to the installation on the front doors. We carry out the work without the help of others, the mechanism of work is intuitive.
Removing the rear door lock
Disconnect the negative terminal of the battery.
We remove the door trim as described in the first paragraph of the article.
Lift the lock rods and remove them from the plastic holders.
How to properly remove Grant door trim
Using a Phillips screwdriver, unscrew the screw securing the intermediate lever of the lock lock rod
By sliding the base of the lever, we remove the locking tab from the rectangular hole in the inner surface of the door panel
We remove the lever together with the rods, removing the locking rod from the plastic holder
Using a Phillips screwdriver, unscrew the three screws securing the door lock to the end
READ Error codes LADA Granta 8 valve
We remove the electric lock through the hole in the inner door panel
Press the lock of the wire block, disconnect the block from the electric locking drive
Install the lock in reverse order.
How to remove door trim on a Lada Granta Liftback: advice from experts
All Lada Granta Liftback models by default have pre-installed casing made of polyvinyl chloride polymer material.
Often the door card becomes the object of increased attention from the driver due to the occurrence of creaks and knocks inside the door. Eliminating defects, sealing joints and joints is quite acceptable on your own. The procedure is not complicated; it is not necessary to contact a service center.