On the Lada Vesta, the design of the front suspension is not much different from previous VAZ models. Main components:
- Stabilizer's pole;
- Oil shock absorbers;
- Springs;
- Silent blocks;
- Suspension arms;
- Stretcher;
- Rubber boots, bushings.
During the operation of the machine, parts wear out, become deformed, and break into pieces. The simplicity of the suspension design allows you to carry out repairs yourself. We contact the service station in case of major repairs of the unit.
Originals, analogues, article number, price of stabilizer struts for Lada Vesta
Technical data: length 275 x width 30 mm x diameter 10 mm.
Stand structure: tip, metal base, rubber boot, retaining ring. The nuts are supplied complete with the original stands.
| vendor code | Cost, rub.) | vendor code | Cost, rub.) |
| Original front | |||
| LADA Vesta AvtoVAZ front left/right 8450006750 from 550 - 600 | |||
| Front analogues | |||
| CTR CLT50 | From 400 / unit | PATRON PS4035 | From 400 / unit |
| Kroner K303118 | —/— | JP Group 1140401100 | —/— |
| TRW JTS393 | —/— | Ruville 917814 | —/— |
| LEMFORDER 5459874 | —/— | SWAG365565 | —/— |
| VAG 6R0411315 | —/— | Renault 82006-69065 (new model) | —/— |
| SASIC 4005146 | —/— | LEMFORDER 2833401 | —/— |
| SIDEM 5666 | —/— | LEMFORDER 2600401 | —/— |
To the surprise of most Lada Vesta car owners, the model can be equipped with stabilizer bars from RAV 4 (TOYOTA RAV4), article number 48820-42020. The diameter is identical, completely matches. The same cannot be said about the length of the rod - 285 mm. In fact, 10.0 mm longer than standard size. However, this does not prevent the front suspension from working properly.
Before purchasing spare parts, do not forget to check the catalog number against the data in the operating instructions. Manufacturer's warranty is 80,000 km.
Do-it-yourself replacement of stabilizer struts for Lada Vesta
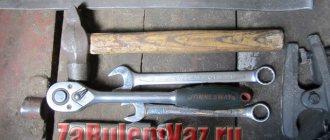
To change struts on Vesta, as on most modern cars, you do not need to have any special knowledge or skills. The work will go quickly and without problems if you apply a penetrating lubricant, for example, WD-40, to the threaded connections ahead of time, after first cleaning the threads and the nut itself from dirt and dust. The only tools you will need are a 16 mm spanner and a Torx T30 bit, as well as new stands.
Mounting the anti-roll bar strut for Lada Vesta: 1-Shock absorber strut; 2-Upper and lower hinges for attaching the stabilizer link; 3-Stabilizer link; 4-Anti-roll bar.
Replacement is carried out according to the following algorithm:
- We put the car on the handbrake on a level surface, loosen the wheel bolts.
- Raise the car, remove the wheel and place a stand under the steering knuckle.
- We do the same on the other side, and the height of the stand should be the same on one side and the other. This is necessary in order to relieve the load on the anti-roll bar.
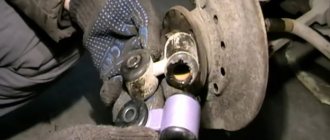
- Holding the ball pin with a T30 wrench, unscrew the nut with a 16 wrench. We do the same at the other mounting point of the strut and on the other side of the car.
- Remove the old stand and clean the mounting holes for the fingers.
- Installation of the racks is carried out in the reverse order. At the same time, the racks on Vesta have neither a right nor a left side, neither a top nor a bottom. Tighten the new nuts with a force of 40-50 Nm.
After installing the correct racks, they are guaranteed to last 40-50 thousand km. Good luck to everyone!
Lada Vesta suspension diagnostics
Before starting repairs, be sure to carry out diagnostics. This is necessary to assess the condition of the machine, identify breakdowns, and correctly calculate spare parts and consumables.
The process is not at all complicated, you can do it on your own. If you encounter any difficulties with installation, please read the instructions and watch video tutorials on the Internet.
- We drive the car into the inspection hole, fix the rear row of wheels with boots to avoid any arbitrary rollback;
- Jack up the side and remove the wheel;
- From under the bottom we press on the stabilizer bar, check for play, deformation, cracks;
- Additionally, we inspect the condition of adjacent parts, levers, and mechanisms.
To check the tightness of the fit, we use a metal pry bar. We summarize, analyze the received data, and calculate the number of necessary spare parts.
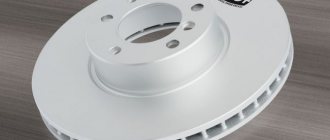
Finally, we check the brake pads, disc, and cylinder. If the actual thickness of the pads is less than 17.0 mm, they must be replaced with new ones. Subsequent operation of the vehicle is unsafe.
Causes of wear on Lada Vesta suspension
- Saving on maintenance of technical equipment;
- Purchase and installation of low-quality parts;
- Violation of the rules for operating the vehicle by the driver;
- Manufacturing defect;
- Natural wear and tear of components due to prolonged use without intermediate preventive maintenance;
- Rupture of the boot, water entering the metal structure;
- Excessive wear of subframe silent blocks.
Replacing stabilizer struts on Lada Vesta
We replace suspension elements in pairs; it is unsafe to leave worn parts in their original places. Repeated repairs will be required soon.
- We drive the Lada Vesta into the inspection channel and ensure safety measures during the work;
- Jack up the side, unscrew the bolts, remove the wheel;
- Alternately unscrew the upper and lower mounts of the stabilizer bar;
- We carry out troubleshooting of the mounting socket, if there are no defects, we install a new stand and screw the nuts.
If the silent blocks need to be replaced, additionally unscrew the fastening of the ball joint and remove the suspension arm. We fix it in a stationary vice and press out the worn silent blocks. We troubleshoot the lugs, clean the surface of rubber residues, and press in new polyurethane bushings. We assemble the structure in reverse order.
Motorists claim that polyurethane bushings are interchangeable with Lada Kalina. It is not yet known what they are suitable for.
Sometimes the source of the knock is worn out cross member bushings. To replace consumables, additionally unscrew the beam mount, remove the rubber bushings, and install new ones. We screw the mechanisms back on.
Installation of stabilizer struts
Installation of the new kit is carried out in the reverse order.
When tightening, you do not need to exert high physical effort. 44 Nm is enough. If you are installing the original, you need to know the product catalog number: 8450006748.
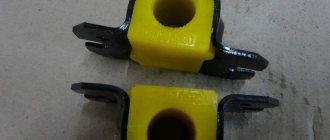
Sometimes you can only get by by replacing the stabilizer bushings. Stub bushings are suitable in dimensions d/h/w: 40/45/38 mm. hole diameter 22 mm.
Of particular interest are products made from polyurethane in the following dimensions: L/W/H: 39/42/43.5 mm. similar dimensions to Chevrolet Niva.
Also suitable are consumables, which according to the catalog go under No. 2123-2906046. If we talk about KIA, this is the catalog number KSBSJULF-21.5 mm (54813-2K 100). This option uses brackets 54814-G000.
Please note that the installation of other spare parts may change the driving performance of the vehicle. This will affect the stiffness when driving straight and cornering.
For complete clarity, we present the average prices of assembly bushings:
- The stub will cost 450-700 rubles.
- Niva costs from 150 to 300 rubles per pair.
- KIA option 150-600 rubles per unit (piece).
Please note that the part in question is symmetrical. Therefore the installation does not matter. There are no "up" or "down" designations on the stabilizer bushings. This greatly simplifies installation and reduces work time.
In addition, the fastening nuts are disposable. When assembling a new kit, you need to use new fasteners.
What you need to know about the rear suspension elements of the Lada Vesta
In the rear part, the suspension function is performed by a torsion beam, shock absorbers, springs, silent blocks pressed into the beam.
As the machine is used, parts wear out, backlash is formed, and free play increases. To eliminate the defect, it is necessary to replace the rear suspension elements.
- After removing the wheel, unscrew the upper and lower fastenings of the shock absorber strut assembly with the spring. Next, we unscrew the beam fastening, press out the silent blocks, inspect the mounting socket, and press in new bushings.
- Sometimes sagging rear springs make a metallic knock. Inexperienced motorists mistake this for a knocking sound from the stabilizer bar. To replace the spring, first remove the rear shock absorber and spring assembly.
- Using a crab-shaped puller, we compress several turns of the spring and disassemble the module. We install a new spring and assemble the structure.
- At the same time, we carry out troubleshooting of the brake circuit, pads, disc, and working cylinder. If the actual thickness of the pads is less than 19.0 mm, replace them with new ones. Subsequent operation of the machine is unsafe.
Replacing stabilizer struts for Lada Vesta
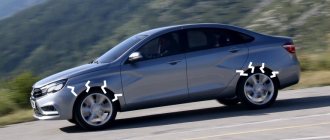
Stabilizer struts are quite important parts of the car. They are responsible for the connection between the car body and its suspension. For example, if you remove these racks, you can even drive a car. But it’s very uncomfortable and even dangerous. Handling will suffer greatly. Noticeable body roll will appear, both longitudinally and transversely. If the stabilizer links are faulty, knocking noises may occur. Usually, play appears in the hinges of the struts - hence the knocking. It is also possible for the joint to become sour. That is, the post finger loses mobility relative to the post itself, resulting in a rigid mount. Extra knocks in the suspension and impacts transmitted to the body are also possible. Well, the worst option is that the stabilizer link breaks. Here, in addition to incomprehensible sounds, control disturbances are possible.
In general, it’s better not to delay replacing the stabilizer struts on the Lada Vesta. They can become unusable for many reasons: fast driving over potholes, bad roads, speed bumps. Defective, low-quality struts, lack of lubrication, lack of boots on the struts - everything leads to damage to these same struts.
On the Lada Vesta, the struts connect the anti-roll bar and the shock absorber strut, which is assembled with a spring.
If you suspect knocking noises from the racks, it is advisable to have them diagnosed. If the stabilizer struts are condemned, it is worth replacing them with a factory original or an analogue that matches the parameters. Preferably in pairs if the racks are made by a different manufacturer. Different lengths are possible, for example. In our case, the already unusable factory stabilizer struts will be replaced with an analogue from the Toyota RAV4. These racks from the Korean manufacturer CTR have catalog number CLT-50 . They are slightly longer than the original ones. But this is not a hindrance; many Wests have already “tested” such racks. There are many analogues with a huge range of prices - from a thousand rubles to several thousand per pair (original Toyota). There are also racks from Renault.
It takes about an hour to replace the timing racks if all the keys are present.
So, we will need: 1. New stabilizer struts 2. Two jacks 3. Two stumps (or bricks for hanging the front of the car) 4. Inspection hole 5. WD-40 6. Balloon wrench 7. 16-socket wrench (standard stand) 8. Torx T30 (standard rack) 9. Key 14 (new rack) 10. Key 15 (new rack)
Keys 14 and 15 are needed for the new CLT-50 racks. If you have different stabilizer links, then you may need different keys.
First of all, we put wheel chocks under the rear wheels and remove the decorative caps from the alloy wheels (if any) from the front wheels. To do this, take a screwdriver and pry them off; there is a special groove.
Then loosen the wheel bolts. This is easier to do on the ground.
Well, we lift the car. Vesta has special marks on the threshold for installing a jack. You can use a standard one, but for such purposes a rolling hydraulic jack is preferable and more reliable.
We hang up the front of the car. This is necessary in order to relieve the stability stabilizer. The stabilizer struts are changed in this position. We put stops under the car - hemp, bricks or whatever is at hand. This is to prevent it from falling on your head.
Remove the front wheel. We see the stabilizer link. First we will unscrew the upper hinge. If necessary, spray with WD-40. We take a 30mm Torx and a 16mm wrench. Using the wrench, unscrew the nut securing the strut to the shock absorber, holding the hinge rod with the Torx. This is not very easy, as corrosion is possible in this place.
We pull out the hinge pin from the mounting hole. We take the lower hinge. It's a little more difficult here due to inaccessibility. It is advisable to have a hole, although you can unscrew it from above. It’s definitely more convenient from the pit. Also, holding the rod with a torx, unscrew the nut with a 16mm wrench (preferably a socket wrench, it’s more convenient for them).
We pull out the hinge pin and remove the old stabilizer link.
Now you can check the operation of the rack. The difference in the operation of the old and new racks in comparison is especially noticeable. On the old rack there may be extraneous sounds and play. On the new stand, the hinge rotates tightly, without unnecessary noise, without play, and evenly.
Thanks for subscribing!
In this case, we have CLT-50, they are a little longer, but this does not matter. On Vesta the racks are the same - left and right. It doesn't matter how you put it. And there is no difference between up and down. There is no need to lubricate anything - the grease is packed under the boot. We put the new rack in place. Insert the lower hinge pin into the mounting hole.
We screw it on. Here we have a slightly different system: the rod is held with a 15 wrench, and the new nut is tightened with a 14 wrench. The sizes of the keys depend on the chosen stabilizer link model. Nuts usually come with the stands; new nuts are definitely needed. Self-locking.
Tighten the lower fastener. Let's move on to the top one. Since the stabilizer link is longer than the standard one, the hole may not coincide with the rod. Therefore, you need to put a little pressure on the anti-roll bar.
Align the rod and the hole, insert the hinge pin and tighten the nut.
Everything is ready, the stabilizer link is in place. We put on the wheel, tighten the bolts and repeat everything on the other side/ After installing the second stabilizer link, put on the second wheel, tighten the bolts, lower the car and tighten the bolts. We put the decorative caps in place. Remove the chocks from under the rear wheels. Let's put the tool away and go check it out!
Tips for caring for Lada Vesta suspension
- We adhere to the manufacturer’s recommendations regarding the interval of scheduled technical inspection - every 15,000 km;
- The average service life of the suspension is 60 – 65 thousand km. Mandatory preventive maintenance after 15,000 km;
- Purchase components from official points, representative offices, dealers;
- Order paid car repair services only from those service stations that provide a quality guarantee for the work performed;
- Always check the compatibility of parts according to the catalog numbers specified in the operating instructions;
- After carrying out repair work at the service center, check that the technicians have entered maintenance data into the service book.
Driver, remember that a moderate driving style and original parts increase the service life of Lada Vesta parts by 7 - 10%.
Which stabilizer struts are best to install? Obviously, new ones and with factory catalog numbers. Installing parts from other models is a temporary solution to the problem, not always effective or correct.
Lada Vesta stabilizer bushings - 9 lifehack points
There is a problem on the Lada Vesta car: the stabilizer bushings (struts) make a squeaking noise. Needless to say, on modern cars, besides the Lada Vesta, even on expensive ones, the problem of rubber bands is noticeable. The Lada Vesta stabilizer bushings begin to creak well and the struts quickly make themselves known. Creaking, knocking, non-functioning stabilizer bars appear so often on the Lada Vesta car - that AvtoVAZ even answered the question: why Vesta creaks so early. The price for such stabilizer struts and bushings is not high, but the sensations are not pleasant. By the way, the dealer changes the bushings under warranty. What to replace with: as an analogue, stabilizer bars from Kia Rio and Avensis are suitable for Lada Vesta - but this is after warranty. Polyurethane stabilizer bushings have proven themselves better - you can install them. Replacing components with your own hands takes 14 steps, more on them later in the article. The maximum weight of the Lada Vesta is 1670 kg. The Vesta is equipped with MacPherson strut suspension, a suspension that has been tested over years of operation on different types of vehicles. There is an opinion that the car is simply too heavy; for such stabilizers, they should be more powerful. On the Lada Vesta suspension, the stabilizer bushings are simply not slightly modified to accommodate the weight of the car. To understand the problem, let’s understand the principle of operation of the stabilization system of modern cars. There is nothing complicated about this. Everything works on the principle of a lever, which was invented by Archimedes at the beginning of the last millennium, read the article and find out about it
- Principle of operation
- Why do you still need to replace?
- Alternatives to standard bushings, which ones to replace with
- Replacing stabilizer bushings on Lada Vesta
- Dismantling sequence
- Assembling the unit bushings
- Problem with stabilizer links
- AvtoVAZ official opinion
- How to change stabilizer links yourself in 5 simple steps