Heated rear-view mirrors are a necessary option in winter to improve driving safety and provide the driver with adequate visibility.
This feature is present in most modern cars, but owners of older vehicles should not be upset. You can make heated side mirrors yourself!
Types of heating
The need for this function became clear quite a long time ago. Just a few decades ago, some cars were equipped with simple devices designed to defrost viewing structures.
Installation involved installing incandescent lamps inside, which heated the part from the inside and the ice melted. In modern devices, the heating method has changed, but the function remains the same.
The existing types of defrosters should be considered separately:
- Wire - how heated mirrors on a wire base works is explained by its very name. Tungsten filaments are used as a heating element, placed on an insulating and heat-resistant base. When an electric current passes through them, they heat up, which leads to melting of the ice.
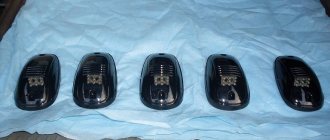
- Printed conductors – heated car mirrors using printed conductors are the most modern. You can buy boards at the car market or at a spare parts store. They are not made independently.
- A film heater is a film-based product with heating elements included in it.
- Lamp heater - this type of heating element is a low-power (10 watt) incandescent lamp. This technology is best suited for making heated mirrors with your own hands and is often used by owners of outdated models of domestic cars.
Technical characteristics of mirrors
Automotive industry employees are developing models of car mirrors with improved reflective elements, heating systems and electric drive. These characteristics greatly simplify life for motorists, increase driving comfort and safety. Modern car mirrors are characterized by:
- increased visibility;
- anti-glare coating;
- clearer image;
- convenient and simple position adjustment system.
A sufficient level of visibility in mirrors is achieved through a combination of characteristics such as the shape, size and curvature of the optical element, and its position relative to the driver’s eyes. The higher the inspection, the more reliable the driver’s information about the road situation.
Glare in the dark creates additional strain on the eyes and also reduces reaction speed. Modern developments have made it possible to introduce a liquid crystal layer into electric mirrors, which, in case of blindness, can reduce the intensity of reflected light and protect the driver’s eyes from overload.
The clarity and purity of contours when viewed through electric mirrors is ensured by the application of a reflective layer. Previously, it was applied to the inner surface of the product, which, even with slight contamination, gave the effect of double and distorted images. In modern rear view models, the reflective layer is located on the outside.
Checking the presence of standard heating
The presence of a heated rear view mirror cannot always be detected at first glance. The fact is that there is often no separate button to turn it on, and many car owners wonder how the heated exterior mirrors are turned on. The function is activated automatically when the rear window heating is turned on. To check if the mirror heater is present:
- Start the engine;
- Turn on the rear window heating;
- Spray the mirrors with water or blow on them;
- Touch it with your hand.
When the heating is running, the water drops dry within 1-2 minutes; when you breathe, the mirror does not fog up, and it is warm to the touch. In the cold season, you can verify the presence of heating by simply observing how long it takes for the mirror to thaw after being parked overnight. If a heating element is located underneath, the defrosting process takes only a few minutes.
Internal
Let's start with the rearview mirror installed inside your car.
Interior rear view element
There are several reasons why the driver will want or have to dismantle this element:
- The desire to replace with a more advanced, new model;
- Installation of electronics, parking sensors;
- The glass or plastic case is damaged, broken and does not allow further use of the component;
- There is a need to install sensors that are not included in the standard equipment of your car.
Replacement
Do not rush to remove the old mirror if you have not yet purchased a new product. Sometimes you have to wait for weeks because of the speed of delivery, and sometimes it’s enough to go to the market or store, where you will immediately find the desired product.
VAZ 2114 were produced until 2009, which requires the use of a standard type of fastening consisting of two bolts. This method of fixation has been used since 1976.
The downside of bolt-on mounting is the impossibility of installing an interior mirror from a foreign car. It’s good that there are many domestic products on the market that perfectly match the VAZ 2114.
You can start working.
- Remove the plug from the bolts. Although it is not always present.
- Holding the mirror body with one hand, begin to unscrew the mounting bolts with the other.
- Remove the old mirror.
- Check the condition of the seat and clean it.
- If the old bolts are covered with rust, it is better to replace them with similar new ones.
- Screw in the new mirror using the bolts.
- Insert decorative plugs so that the bolt heads do not spoil the appearance of the interior.
The simplest fastener
The bolts should be fixed as tightly as possible to avoid damage to the glass as a result of shaking and vibration.
Adjustment
The interior rear view mirror is tilt adjustable.
- The ideal setting is when, when you look into it, you can see everything that is happening behind your car;
- Some cars have high seats, which means you can see part of your ear and headrest in the reflection. This is a normal phenomenon, so there is no need to change the settings;
- A panoramic product with backlighting is best suited for the role of a rear mirror, since the glass used is flat and there is no image distortion, which has a positive effect on safety.
Instructions for installing ready-made components
Installing commercial heated mirrors is a relatively simple operation. To carry it out, it is necessary to remove the part from the car and disassemble it. Glued products are heated with a hair dryer or by soaking in boiling water, after which the reflective overlay is easily removed. Products fastened with bolts are disassembled using the appropriate tool. Do-it-yourself installation of heated rear-view mirrors purchased in a store is permissible only on clean and dry surfaces.
Before starting the procedure, it is necessary to evaluate the dimensions of the heating element and housing. If printed circuit boards are used, it is possible to remove the stiffeners. The film is cut to size while retaining the heating strips.
The boards are glued to the inside of the case with glue, the films are fixed directly to the reverse side. In both cases, wires are soldered to the contacts of the thermoelement, which go to the power source.
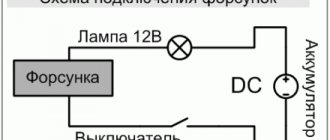
The connection diagram for heated exterior mirrors may vary on different cars. Usually the wires are brought out and connected to the line that supplies the heated rear window. It is possible to install separate wiring using a relay and a fuse. In some models, auto wiring for the devices in question is provided with src=»https://znanieavto.ru/wp-content/uploads/2018/02/skhema-podklyucheniya-obogreva.jpg» class=»aligncenter» width=»500″ height ="600″[/img]
Installation information.
Before you change the side reflectors, it is worth learning about the methods that you can use.
You can purchase ready-made parts that have a heating function, but you can also create reflectors with your own hands. Since the price of ready-made spare parts may hit your pocket a little. You can choose to purchase spare parts separately and then assemble them into a finished one-piece part. But the cheapest way, of course, is to assemble the tuning device yourself. Here the price will be reduced to a minimum, and work efficiency, on the contrary, will be at its best. Moreover, by carrying out all the installation work yourself, you will be able to optimize the relay and all operating principles as much as possible. You can also consider installing reflectors from a VAZ 2110 to a VAZ 2114, since the standard mounts in this model are ideally suited and positioned for such an operation. In addition, they will be ideally installed on the VAZ 2109.
How to make heated mirrors with your own hands
It’s not difficult to make heated mirrors with your own hands. Most often, incandescent lamps or a wire-based heating element system are used for this. The cost of materials is minimal, but the work will take time.
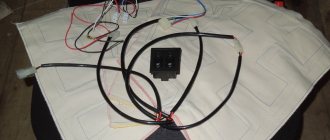
What you will need
To make heated mirrors with your own hands, you will need a set of tools and materials. The list of consumables depends on what type of device the car owner wants to see.
| Lamp | Wire |
| lamp 10 watt | the basis |
| foil | tungsten filaments |
| heat resistant material | Double-sided tape |
| cartridge | wires |
| wires | soldering iron |
| soldering iron | sealant |
| sealant | |
| disassembly tools |
Cost of materials
Do-it-yourself heated rear-view mirrors require extremely low financial costs. So, an incandescent lamp costs about 20 rubles, a cartridge - 30 rubles, wires - 25 rubles / meter, sealant - 100 rubles, adhesive tape 40 rubles. Tungsten filaments can be removed for free from an old kettle, and a soldering iron and screwdriver for disassembling a mirror can be borrowed from friends.
Procedure
As in the case when ready-made components for heating are used, installation of the heater begins with disassembling, washing and drying the mirror. After this, the inside of the housing is lined with a heat-resistant coating and aluminum foil.
The cartridge is mounted in such a way that after installation it does not touch the structural elements.
A lamp is inserted into the socket, the wires are soldered to the contacts and insulated with sealant. Also, using sealant, insulate the holes through which the wiring comes out. The heating filaments are glued to the base, after which it is covered on both sides with heat-resistant material. The resulting structure is glued to the inner surface of the mirror, soldered to the contacts of the wires, which are brought out through specially made holes. All open heating elements are insulated with sealant.
An important question is how to turn on homemade heated mirrors. The best option is to have a separate button for this.
Connection to the rear window defrost system is not recommended, since the design should not operate for a long time. Both the lamp and the filaments become hot enough to cause overheating and damage to the housing during prolonged use.
Malfunctions of standard heating
Possible malfunctions and repairs of standard mirror heating are in the table below:
| Possible malfunction | How to repair heating |
| Heating element burnt out | Disassemble the mirror and replace the part |
| The integrity of the wiring is broken | Check the wiring with a multitester, clean, connect and insulate the wires at the damage site |
| The power button combined with the rear window heating is faulty | Check if the rear window heating works. If not, replace the button |
| Heating relay is faulty | “Ring” and replace the faulty relay |
| Fuse burned out | Replace fuse, check wiring for short circuit |
It’s not difficult to make heated mirrors with your own hands today. Heating components are sold in stores, so all the work comes down to assembling a simple structure and connecting it to the car's electrical network. An assembled and well-functioning device will significantly increase driving comfort in winter and make life easier for owners of any type of car.