Additional lighting is a fairly popular tuning option. Moreover, you can do this yourself, using a standard set of tools and available consumables.
Illumination is mainly done purely for aesthetic reasons. But there is also some practicality here. The only question is how exactly the system will be implemented.
To implement the idea with your own hands, you will need basic skills in working with electricity. If you follow the instructions and recommendations, very soon your car will sparkle with new colors. And in the literal sense of the word.
To install or not
Before you buy a backlight kit for your car, think about whether you really need it. Think about what goals you set for yourself and how well the lanterns can satisfy them.
The presence of additional lighting in the doors makes travel more comfortable and somewhat safer. Suppose that on the way you needed to find some object lying in a door pocket. But I can’t find it at all. And here it will be useful to have additional lighting, which is not provided standard in the car. Although you should be objective, since many foreign cars, such as Toyota, Mercedes, Volkswagen and the same new Hyundai Grandeur already have lighting as standard, which cannot be said about domestic cars or old foreign cars.
So it turns out that the backlight acts as a tuning element, but at the same time performs some useful functions. Depending on the design and installation method, the door light can work when the door is closed or open.
Whether to install such equipment with your own hands or not, everyone decides for themselves.
Technology and features of installing lighting in a vehicle interior with your own hands
Interior lighting is not only a practical solution for illuminating a car at night, but also a modern type of tuning and decoration of a vehicle. Initially, you need to set the right tasks for yourself so that the result meets your expectations. The set of tools and the specifics of the work depend on exactly which areas of the interior you want to tune - these could be the car's sills, handles, dashboard, driver's foot lighting, and how the lighting should work - when you open the door, when you turn on the ignition, or on a special button. .
And also decide which lighting devices you want to use to illuminate the car interior. Most often, LEDs or neon glow elements are used for these purposes.
Car door illumination using LEDs
You can decorate the interior of a vehicle using LED strip. The tape is easier to install with your own hands, as it has a special self-adhesive coating and therefore does not require additional fasteners. It is also shock-resistant and can withstand different weather conditions well.
Purchasing special LED strips for car lighting can greatly facilitate the work of installing them, but their price category is much higher than LEDs per meter. It is necessary to improve and adapt the meter tape to the vehicle using a soldering iron.
To work, you will need to purchase heat-shrinkable pipe, LED strip and electrical wires. First, we try on the LED strip to the threshold of the car and cut off the required piece, it is better to take it with a small gap. To one end of the LED strip you need to solder two wires, minus and plus. For convenience, you can install female terminals on their ends. Separately, it is necessary to prepare four electrical wires with male terminals.
We insulate the soldering areas using heat-shrinkable tubing. The modules are ready to use. Next, you need to remove the trim from the doors and sills of the vehicle and install the developed blanks.
Two wires with male terminals on each door must be routed through the hinge, so they will stick out from it. We tighten the negative wires to the ends of the right and left doors, respectively. This will ensure that the threshold is illuminated exactly from the side where the car opens.
We connect the negative electrical wires to the diode modules, and connect the positive wires to any permanent positive in the vehicle. This could be a car's standard light source, a cigarette lighter, or a battery plus
It is important here not to confuse the polarity of the electrical wires. Checking the operation of the installed LEDs
If everything is done correctly, they will light up every time the car is opened. We put the casing in place and enjoy the result.
Similarly, you can illuminate the dashboard of a vehicle, the driver’s feet or door handles. And also the negative ends of the wires can be brought out to a separate button. In this case, the backlight will only work when you turn it on yourself.
Installing neon lighting in the car interior
Neon lighting fixtures have a diffused glow, which greatly attracts the attention of car enthusiasts. Although, on the other hand, if we compare LED and neon devices in terms of service life, the former are distinguished by a long period of operation
If you want neon lighting for the car interior, then the easiest way to work is with a neon cord. It is sold similarly to LED strips by the meter and is installed according to the same principle. For installation, it is necessary to remove the threshold covers and lay out neon cords of the required length along the outer edge. Ideally, when installing the casing in its place, it should be flush with the neon cable. Similarly to the previous method, we bring out the electrical wires to the ends of the doors and to the power supply.
Neon lamps are a more difficult lighting material to install, as they are prone to mechanical damage and are demanding in terms of operating conditions. To install neon lamps, you will need clamps, screws and aluminum corners. The aluminum corner is cut to the size of the neon light sources and attached in places above the dashboard using self-tapping screws. The same is done in the rear passenger seats. Neon light sources are attached to the installed corners with clamps. Wires are supplied to the door opening sensor and power supply to ensure that the lighting devices are turned on when the door is opened.
Installation procedure
Before installing diode footlights in a car with your own hands, you need to choose a place for convenient and correct placement of the lighting strip.
The following areas can potentially be used for this:
- perimeter at the bottom of the front seat;
- under the car dashboard;
- under the glove compartment (glove compartment), etc.
Here you should build on your own imagination and the design features of a particular car.
According to the rules and for reasons of comfort, the lighting should be directed strictly to the floor.
Some car enthusiasts do not take this point into account and install the tape on the side, on the floor covering itself. But in this case, the lighting can interfere, dazzle the eyes, etc. Remember, this is lighting specifically for the feet, and therefore it should be located in the cabin so as to illuminate this particular area, and not direct streams of light into the eyes.
Installing LED footwell lights in your car yourself is not at all difficult. Here you need to perform the following procedures:
- clearly define the places where the tape will be located;
- cut the LED strip into the required lengths;
- a wire is soldered to the edges of the tape;
- Next, the tape is tested by connecting to a power source;
- if the light comes on, you can continue working;
- the soldering area is insulated using heat-shrinkable tubing for this purpose;
- In order for the tube to fit well into place, it should be heated with a soldering iron or just a lighter;
- Having finished with the insulation, the prepared tape is mounted at selected points in the cabin;
- double-sided tape, glue or silicone ties are suitable for fixation;
- By analogy, the tape is installed in all parts of the cabin where it needs to be done.
The LED strip can only be cut in certain places where appropriate marks are provided.
Objectively, the most questions arise regarding how to make the connection correctly.
Types of color music
The installation location for color music is limited by almost nothing except your imagination. A graphic equalizer or a thematic inscription looks quite interesting on the rear window of the car. The underbody lighting, flashing to the beat of the music, will attract a lot of attention on the city streets. Color music in the cabin of a minivan, limousine or large SUV will allow a vacationing group to feel like they are in a small VIP club that works only for them.
You can install powerful LEDs in the trunk lid from the inside, and then, by opening the trunk in nature, you can turn an entire forest clearing into an open-air dance floor. And by making the ceiling of the car in the shape of a starry sky, any evening walk with your beloved girl in the car will be filled with romance and comfort.
Independent backlight
With this connection, the rug lighting will turn on only from the side of the open door. This is convenient when boarding a passenger and when you need to illuminate a specific side. For this connection you will need a minimum amount of wire. It is enough to connect the strip with a plus to the cigarette lighter on each side, and a minus to the door switch. You can connect the negative wire through the hole in the body through which all the wires leading to the door are passed. On some models you will have to disassemble the panel to do this. This is done on both sides. This allows you to make lighting as economical as possible.
From the dimensions. In this case, the light under your feet will remain on as long as you have the external lights on. To prevent this from interfering with movement, it is best to make the lighting not very bright. Connecting here is also quite simple. The minus is thrown onto the body of the car. The positive wire is connected to the most convenient dashboard light.
As a result, you will have the backlight turn on at the same time as the outdoor lighting turns on. For greater convenience, it is advisable to provide a way to quickly turn off the tape. This could be a male-female connector or a small toggle switch located in a place convenient for you.
Conclusion
. Many drivers make various interior tunings. Many people modernize their “native” lighting system. Therefore, the question of how to make footwell lighting in a car with your own hands is not uncommon. In principle, this work is quite simple, it is enough to put your hands and head into this process. The most difficult thing is to connect the backlight to the power supply; for this you will have to partially disassemble the casing in order to run the wires.
Backlight options
Motorists perceive the concept of footwell lighting in a car somewhat differently.
Basically we are talking about the following options:
- Turn on the car lights when the door is opened. That is, the system is mounted at the bottom of the door, and the light is directed to the ground. The practicality of such a solution is minimal. Although some automakers install such lighting from the factory, displaying the logo of the car brand.
- Lighting in the feet. There is no need to open or close the door anymore. The light is directed towards the pedal assembly area. Looks impressive. This way you can see what is happening under your feet. This helps a beginner to better navigate the pedals in the dark.
Objectively, it is the second option that is more practical and preferable than illumination when opening a car door. But no one is stopping you from making sure that when you open the doors in the car, the asphalt lighting turns on, displaying the car company logo or some other image there. But the lighting of the legs is not only visually impressive, but also practical in certain situations.
The lighting system is implemented in different ways. You can choose a different color, even provide a color music effect. But when moving, it will certainly be distracting. Therefore, it is more correct to make the necessary lighting so that it helps during trips and makes it easier to change the position of your feet on the pedals.
Installation of lighting based on neon lamps
Neon has been used in advertising as an inexpensive and economical light source for a very long time. Today it is being actively replaced by LED technologies, but motorists like the diffused glow that characterizes neon lamps. In terms of service life, they are noticeably inferior to LED prototypes, but this does not stop decoration lovers.
If you intend to use neon lighting when opening a car door, then the easiest way to implement your plan is to use a neon cord. It resembles LED strips in appearance and is mounted according to the same principle.
First, you need to dismantle the sill trims, and then carefully lay out the neon cords of the required length along the outer edge. It is advisable that after installing the casing in place, it should be positioned close to the backlight cable. In exactly the same way we install neon electrical wiring on the car door limit switches.
To secure the edges of the tape, we will need fastening elements such as self-tapping screws, tie clamps and aluminum corners. The corners are cut exactly to the size of the neon tracks, they are mounted under the dashboard using self-tapping screws. Clamps are needed to attach neon lamps to the corners. One end of the tape is connected to the door opening sensor, the other to the power source.
With this method of installing car door lights with your own hands, the illumination will light up automatically when the doors are opened.
Car lighting
Car interior lighting
Among the ways to distinguish a car from the crowd of the same ones and make it more impressive, car interior lighting occupies a special place. Modernization of this kind is ideal for both foreign and domestic cars. Which lighting means are better and how to do the tuning yourself?
Price for backlight installation
- Foot area lighting (2 seats) for 2500 RUR
- Illumination of the foot area (4 seats) for 4500 RUR
- Trunk light RUB 500
- Door lighting RUB 2000
- Setting up logo projection 1600
- Underbody lighting 6500 RUR
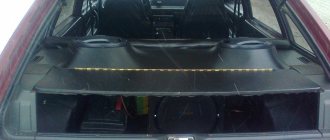
Interior contour lighting
The cost of installing contour lighting on 4 doors and a dashboard is calculated individually depending on the car.
- The average cost of a B, C class car is 13,000 rubles.
- The average cost of a D class car and crossovers is 15,000 rubles.
- The average cost of an E class car is from 20,000 rubles.
You can find out more about the service here
We will make interior lighting in Podolsk
What kind of interior lighting is there? The devices can be turned on when the doors are opened or controlled by the driver using a special remote control. But the best option is a combination of devices. If we do the work wisely, we will get neon floor lighting that turns on when the door is opened and diode lighting for the rest of the interior, powered by a switch unit.
Car interior lighting with LED strips
The LED backlight can be customized depending on your preferences. For example, you can make it turn on simultaneously with the standard lighting when you open the doors, or you can control it using an electronic unit... The installation locations for additional light sources are quite varied. Most often, tuners prefer to highlight the feet, as well as the instrument panel. Do-it-yourself interior lighting is done especially carefully and painstakingly. To begin with, you can replace all standard backlight lamps with colored LEDs. For ethical reasons, the color scheme of the instrument panel, buttons and footwell lights should be the same. But this is not a rule, especially for people who like to show their imagination.
Car interior lighting can be:
- LED. The main advantage of this option is ease of installation. In this case, the emitters do not require a fixing device. Individual LEDs are miniature, so they can even be installed in sockets for standard lamps. The LED strip is shockproof and sealed.
- Neon. The light from neon lights is bright and saturated. The lighting is difficult to install, and the lamps in the installation are quite capricious. They are afraid of mechanical damage...
Car underbody lighting
Underbody lighting is probably the most common lighting tuning option. Of course, this is a very expensive way to stand out, but the result can make a person forget about all the costs of such improvements. If the light sources are installed correctly and the vehicle's ground clearance is not too high, then the underbody lighting creates the effect of a flying car. An optical illusion is created; a person does not see the wheels of the car, since all attention is focused on the scattered light under the bottom. The most important thing when installing such lighting is to hide the light sources, since if they are visible, the entire effect will be lost.
Illumination of rims and wheel arches
This type of lighting is not so common, but still has a right to exist. The illumination of the wheel arches looks especially impressive together with the underbody illumination, but as an independent tuning element, it copes with its task quite well. Automatic arch lighting and Borbet LV5 wheels - this combination will be liked and remembered by many. Implementing such a modification is not difficult, and it does not cost much.
How to properly install an LED strip for car interior LED lighting?
Installation of a car with LED strip is carried out according to the standard scheme. First of all, you need to purchase a set of wires, heat shrink tubing, and tape.
It, like individual diodes, is purchased at automobile markets and/or in specialized automobile stores. You should not skimp on the quality and length of the tape; experts advise stocking up on good LEDs. It’s better to buy more diode strip than to realize at the last moment that you don’t have enough.
In addition to interior design, diode strips are actively used to illuminate car wheels.
Step-by-step instructions for diode connection of car interior lighting
Arrangement of lighting in the car, with your own hands, should begin with the instrument panel of the vehicle. To do this, standard equipment is removed: instruments, panel lighting, and diodes are installed. The installation process is very simple, since the diodes have bases similar to factory equipment.
Then you need to determine the installation locations. Many people prefer to mount diodes along the entire perimeter of the ceiling, parallel to the car body pillars. The summer is laid gradually, and the remains can be cut off.
The cut points are clearly visible: they are marked with special membranes. After the procedure, do not forget to clean the ends of the cut and solder them together. We close the connections with bushings and heat them with a hairdryer. In this case, it is better not to use an industrial hair dryer, since there is a high risk of overheating; an alternative is a regular household appliance.
Switching on is carried out similarly to the circuit of neon lamps. You need to be especially careful at this moment and not confuse the polarity points that are indicated on the tapes at the cut points.
Essentially, this is where the workflow ends. There is nothing complicated. Only the installation must be carried out sequentially and be careful about small elements when connecting them.
An important aspect when working is the combination of lighting aesthetics and its functionality, which will be discussed below.
Preparing and connecting wires
The next step is to dismantle the door trim. It is not practical to describe the procedure; it differs for different machine models and is described in detail in the relevant sections of the instructions. The wires are connected either to the power window unit or to the door card. It all depends on the vehicle’s equipment - it’s easiest with luxury models that have electrical devices on all doors.
On economy class cars you will have to pull the wires from the instrument panel. Here they act according to the situation, as is most convenient. Typically, a red rein is a plus, a blue (or black) is a plus, although there can be any variations. It is recommended to first study this issue in the instructions for the car so that you do not have to redo the work twice.
All connections should be insulated with heat shrink or electrical tape; it is recommended to fix the wires on the surface of the door with pieces of adhesive tape so that they do not dangle and create unnecessary load on the LED.
DIY LED lighting installation
In order to get the job done, we will need:
- heat shrink pipe;
- electric wires;
- LED strip and LED lights.
Installation is carried out, as a rule, on the dashboard, in places where lamps and standard lighting elements are located. They can be simply replaced with LEDs if desired. The base of the diode lamp is the same as that of a standard lamp, so replacement is carried out without any difficulties.
Next, you need to install the tape at the bottom in the foot area and around the perimeter of the top of the car. After the necessary measurements, cut off the amount of tape that is needed. Cuts should be made in areas where solder contacts are located.
When measuring, you need to provide some excess wires for reserve. After cutting and soldering to the contacts of the tape, you need to put on the heat-shrinkable tube and heat it with a hair dryer until there is no shrinkage. We process the following fragments in a similar way.
The connection must be made through an RGB block container or in the same way as neon lights. This will ensure that the lights turn on when the car doors are opened.
It is very important to maintain the correct polarity here - this was discussed above
After connecting it yourself, the car door lights will be ready for use - check its operation. If everything is in order, you can be congratulated on your success.
Installation of LED strip
Before installing footwell lights in a car with your own hands, you should decide where you will attach the tape itself.
To illuminate the footwell area, it can be installed below the seats, along the perimeter of the lower part of the front seats, under the instrument panel and under the glove compartment. It all depends on your imagination. Remember, when choosing a place for installation, you should take into account that the installed lighting should be directed towards the floor.
After choosing a location, measure and cut a piece of tape of the required size. Do not forget that it may not be cut in all places. Cut only in areas where solder contacts are located. Therefore, having measured what length you need, it is better to take a little less than vice versa, so that later there is no sagging during fastening.
After cutting, solder a wire to the edges of the tape and try to connect it to a power source. If it works, isolate the solder joints. To do this, put a heat-shrinkable tube over the joint, heat it with a soldering iron or even with a lighter. After insulation, attach the tape to the selected location using an adhesive layer, glue, or even regular silicone ties.
What do you need to know about car interior lighting with cold neon?
You can add individuality to your car and make it stand out from the general flow of traffic using cold neon, which looks original and is very effective. Today, neon lighting is one of the most common methods of interior tuning. This option has the following advantages:
- minimal energy consumption. Neon is considered a practical option due to its long service life. Transparent material does not lose its original characteristics and does not fade. Despite its strength, it bends easily and cuts well when creating different light combinations;
- neon thread can be mounted in different parts of the car interior: on pedals, dashboard, door handles and/or glove compartment;
- cold neon does not distract the driver from monitoring the road situation and is considered a safe material for our vision;
- the light of flexible cold neon is distributed, evenly saturating the interior, which is very convenient in the dark and at night;
- When operating, do not turn on additional lighting devices, including standard equipment.
Do-it-yourself car interior lighting using cold neon is not only beautiful, but also practical. Such tuning allows you to protect you and your passengers, and provides a huge field for imagination. By making lighting in the car interior with your own hands, you can get a single-color light, or in different colors, using different patterns, colors and combining their quantities. Installation with neon material is a minimum cost and minor interference in the electrical system of the car, which does not affect the stable operation of other (standard) vehicle systems.
We make car interior lighting with our own hands. The beauty of interior tuning
Is it possible to realize such an idea - illuminating the interior of a car with your own hands?
Previously, we could see beautiful and original lighting of car interiors either in movies or in expensive showrooms. But now ordinary city residents are increasingly interested in such tuning for their cars. Of course, you can turn to specialists in this field, but independent work will also be appropriate here. Just imagine the end result - how beautiful and convenient it will be, and the most important thing is that you will do it exclusively with your own hands! Lighting the interior of a car with your own hands is, of course, an interesting idea, but the lighting can be installed not only in the interior. For example, there is external neon lighting, but it’s just more difficult to make, but not all of them are allowed and you simply won’t pass the technical inspection in the end. Lighting the interior of a car is much simpler and will not bring any problems. The decision to add light to the interior sooner or later comes to every driver (with rare exceptions). In addition, such lighting adds uniqueness and originality to your car. All this can be easily implemented. There are several types of car interior lighting - neon and LED. Choosing what to make the backlight from The LED is distinguished by its flexible design; it cannot be broken or torn off. They are also quite easy to solder and there are no problems with the length of the lamps. You can place individual diodes anywhere in the cabin, and in some categories of such lamps it is possible to change their color. However, they are somewhat more expensive than others - neon lamps. In addition, it is noted that neon can last much longer. Before you start working, you should understand for yourself whether you can do it yourself. If you feel even the slightest bit of self-doubt, it is better to turn to specialists. Because it will be much cheaper to pay strangers once than to change something that was done incorrectly. If you decide to do everything yourself, then you should know some subtleties. When buying diodes on the market, you must be prepared that you will have to solder them. Therefore, it is recommended to buy ready-made products, although they will cost a little more. The process of mounting the backlight You should also stock up on the necessary tools. You will need a switch as you may be fined for using additional lights on the road. In addition, a fuse, a set of the necessary screwdrivers, and a tube for cable insulation are required. You should also have the wrenches and sockets, as well as those tools that came with the light. Be sure to disconnect the battery before starting work, since the light is connected to electricity. Attach a neon tube or ribbon to the place where you plan to install the backlight. Also consider the place where the switch will be located. You can install the backlight using several methods - under the dashboard or glove compartment, as well as under the seat or in the luggage compartment. The fuse is installed after the switch has been connected to the battery. Pass the wire through the plate between the engine and the passenger compartment. Connect the second wire to the battery. It can be extended in the same way as the first one or directly to the car body. Be sure to make sure that there are no traces of rust, dirt or paint on the metal. After this, you can check the operation of the backlight and enjoy it. Do-it-yourself car interior lighting, as it turns out, is not a difficult task. And now you have good experience in such an interesting job as car tuning. You can now take your practice further by starting to explore other possibilities for improving your car. And the main thing is that you will be truly happy that you made such beauty yourself! AutoFlit.ru
Machine contour lighting
Contour lighting is one of the most expensive options when purchasing a new car. This type of lighting has a purely decorative effect. The appearance of the front panel, instrument panel and other interior elements, illuminated along the lines of the ribs and plane transitions, is very attractive and favorably emphasizes the interior trim. Luminous lines divide the interior into zones, separating sections of the dashboard, door trim, gearshift unit and other departments.
There are kits that can be installed in any brand of car. They are produced in the countries of Southeast Asia, so their price is affordable for any car owner. The standard kit consists of the following components:
- powerful LED;
- power driver;
- set of connecting wires;
- light guide
The LED is inserted into the end of the light guide, which fits into the joint lines of the dashboard panels or other interior trim elements. The driver power is connected to the side lights. Installation is not particularly difficult. In addition, you can choose the most preferred color of the LEDs, there are about 10 options in total. The cost of the kit depends on the length of the light guide (2-5 m), the presence of a wireless remote control and other design features. In any case, independent tuning will cost several times less than the standard option with which the car is equipped at the factory.
Preparation
The simplest and most inexpensive option for car interior lighting is LED strips. Most often, the lighting turns on when the doors are opened, but you can choose another option. Now the automotive market offers a large number of lighting kits for car interiors. It is not difficult to find the most suitable option for a particular car.
To install such illumination you will need the following materials:
- LED strip of the required length;
- capacitor 3300 mF;
- heat-shrink tubing;
- insulating tape;
- a wire of a certain length, which depends on the connection method;
- lampshade;
- power supply for testing at home;
- controller for adjusting brightness (optional);
- male and female terminals;
- glue sealant.
In addition to the materials listed, to install lighting you will need the following tools:
- pliers;
- soldering iron with solder;
- Screwdriver Set;
- lighter;
- knife;
- tweezers.
Armed with the listed materials and tools, you can begin installing the LED strip inside the cabin. The location can be chosen as desired. For example, to install lighting under the feet, you can use a universal scheme that is suitable for almost any car.
What is required for work
To make your own footlights in your car, you will need to first prepare a certain set of tools and some consumables.
To implement the simplest, but at the same time original project, it is enough to assemble a set consisting of:
- light source;
- wires about 5 meters long;
- heat shrink tube;
- glue;
- pliers;
- soldering iron;
- screwdrivers;
- sharp knife, etc.
That is, you need a standard set of tools.
You can complicate your task somewhat, but make the glow more universal. For this purpose, a brightness control controller, a control panel, and a switch are additionally used. This will allow you to adjust the settings, turn on the backlight as needed and at the brightness that suits you.
As for the light source, the footlights installed in the car interior can be made of 2 types of tapes:
- Neon ribbons. They look very impressive, beautiful and expensive. The light is objectively more pleasant. But for most motorists this is not a fundamental difference. Neon strips are much more expensive. To install them you will need to use an ignition unit. And this involves interfering with the vehicle’s electrical system.
- LED strips. The most practical and versatile option. There are no installation difficulties. The ribbons themselves are affordable and come in a wide range of colors.
How to choose lighting for a car interior?
Before starting work, you need to choose a place to place the interior lighting, its type, and also take care of the activation mechanism. For example, appliances and/or door opening mechanisms can be controlled by remote control. The best option is a combination of devices.
Today the market offers us two modernization options:
- Purchase of LED strip.
- Installation of neon lamps.
There is a clear advantage to first lighting a car's interior. This is the ease of installation of the tape. There is no need to purchase additional mounting hardware for installation. The LED strip included in the kit is simply attached to double-sided tape. A standard size lamp can be powered by a cigarette lighter and illuminate other small parts of the interior.
The positive properties of diodes include shock/strength and high tightness, as well as long-term operation in comparison with other interior lighting devices
It is important that the car's LED lighting turns on instantly. This allows you to create different lighting effects
You can also create neon lighting for the car interior yourself. This will be a bright light, with the help of which a large space will be illuminated. Unfortunately, neon-based lamps are technically complex devices, and also very capricious in their operation. Neon lighting often burns out when constantly turned on/off, and is highly fragile.
Neon lights
Let's look at the advantages and features of the neon footlights in a car:
- This lamp option has rich and bright light.
- The backlight design is difficult to install.
- Lamps are demanding to use.
- Neon is “afraid” of frequent switching off and on, so it will be very difficult to organize light and music from them.
- This backlight option does not withstand significant mechanical stress.
Additional LED lighting options
In addition to interior design, illumination of the underbody of the car has become widely popular. An LED or neon strip installed under the body creates a “floating” effect and turns an ordinary car into a brutal and stylish car. In addition to illuminating the underbody, many car enthusiasts decorate other areas:
- wheel arches;
- headlights, taillights;
- trunk;
- radiator.
Different lighting options are used - the backlight blinks, changes color, creates the effect of running or multi-colored lights
At the same time, you should not overload the car with lighting effects, otherwise it will look ridiculous, irritate spectators and attract the attention of traffic police officers.
Neon lighting consists of linear lamps. They are fragile, have low brightness, and are quite expensive. The only advantage is the possibility of directional illumination, the formation of a focused light strip. Unlike neon, LED lighting is resistant to mechanical stress, durable, unpretentious and produces bright light in different shades. Installation of LED strip is much easier and faster, and the price is noticeably lower. All these benefits determine the demand and preference of users.
LED lights
Before using LED footwell lighting in a car, it is important to study all its features and advantages:
- The first thing worth noting is the speed and ease of installation work.
- To attach the emitters, you do not need to buy any special devices. In most cases, the surface of the tape is coated with a sticky solution, which makes it easy to attach to any surface.
- Since individual LEDs are small in size, they can even be attached to sockets for standard standard light bulbs.
- This lighting option is often used to create light music or original lighting effects due to instant lighting.
- The sealed LED strip is resistant to mechanical damage. Due to their long service life, diodes almost never burn out, unless their polarity is reversed during installation work.
Installation on small parts
For tuning small parts, it is more convenient to use single diodes.
We prepare the diode for installation and connection. We take a diode, solder a resistor to one of its legs, then solder the wires and insulate the exposed wires with regular electrical tape. Somewhere at a distance of about 20 cm you need to make a terminal connection. So, the LEDs are ready for installation. Next, prepare the installation site. Let's consider, for example, how the lighting of the interior handles is installed. To do this, make holes near the handle in the place where you want to install the diode. They must be small so that the diode fits tightly into it. You can additionally secure it with glue. Next, stretch the wiring under the trim into the interior so that it can be connected later. In the same way, single diodes are installed anywhere in the cabin.
Car interior lighting – a bright inner world
The use of LED lighting in car tuning is developing in two directions - exterior and interior. There is no consensus among car enthusiasts about the need and appropriateness of using lighting to decorate the exterior. However, most agree that this is an excellent tool for creating an interesting and original car interior. This is largely due to the ease of installation and secrecy from prying eyes, which allows you to redo the lighting to its ideal state without attracting the mocking glances of others.
Almost any car can be transformed without compromising its style with the help of unique interior lighting. The widespread use of LEDs in vehicle modifications is associated with both their visual appeal (wide range of light tones) and efficiency (high brightness and reliability). So, even without planning to create special lighting in the interior, every car owner can think about replacing standard lighting with LED lighting. This is a simple procedure that will increase the overall illumination and comfort of the interior.
At the same time, the use of neon light in the interior of a car is of course not associated with increasing interior lighting, but has the goal of highlighting special areas of space. But neon will probably fit harmoniously only into sports cars, and in ordinary cars it will be an overly pretentious solution. From a technical point of view, installing interior neon lighting does not seem difficult, but if you have no experience working with car wiring or poor knowledge of electrical engineering, it is not worth the risk. A professional auto repair shop will help create the desired image of the interior, while guaranteeing the safety and performance of the system.
Underbody lighting – flight effect
Among all the options for additional external lighting of a car, the most common is underbody lighting using LEDs. It’s worth saying right away that this is a very expensive pleasure, but on the other hand, this is exactly the case when money is spent on creating a car that is recognizable from afar. Thoughtful placement of LEDs on the bottom can create the effect of a car flying above the road surface, and this is very impressive and beautiful.
The work of creating underbody lighting involves a number of difficulties that are associated with the constant mechanical impact of the environment (sand, stones, debris, chemicals, water) on this area of the machine
So it is necessary to pay increased attention to the quality and professionalism of installation. The condition of the entire car depends on this, because damaged wiring can lead to a fire.
Connection
Depending on how and when the backlight will light up and work, choose the method of connecting it.
To interior lighting
Most often, the footwell lighting in the car is connected to the interior lighting. It will only work when the doors are open or the lights are on.
In order to connect the backlight to the interior lighting, you need to remove the lampshade (most often it is on clips, although you may need a screwdriver to remove it). Next you need to connect the wires. Connect the plus to the white and the minus to the red. You are hiding reasons. The easiest way is to stretch them along the side rack. After this, connect the wiring of the LED strips at the feet of the driver and passenger and connect everything to power. Then you check the lighting operation again, and only after that insulate all contacts and install the lampshade back. If you wish, you can additionally install a controller, then the light will fade out smoothly rather than go out abruptly.
From the cigarette lighter
If the lighting is connected from the cigarette lighter, the footwell lighting will light up exclusively from the side of the open door. This is very convenient, because often lighting is only needed when getting a passenger into a car. The plus of the diode must be connected to the cigarette lighter, and the minus to the door limit switch. The wiring on the door can be routed through the same passage through which all wiring to the door goes. However, in most cases, to do this, you will have to dismantle the panel.
From dimensions
When connected to external lighting, the light in the cabin will always be on when the dimensions are on, that is, during trips in the dark. In order to be able to turn it off, you should immediately provide for this possibility and add a switch to the backlight.
In order to connect, you power the positive wire from any light bulb on the instrument panel, and throw the negative wire onto the body of the car.
How to install and connect footwell lights in a car
Additional lighting is a fairly popular tuning option. Moreover, you can do this yourself, using a standard set of tools and available consumables.
Illumination is mainly done purely for aesthetic reasons. But there is also some practicality here. The only question is how exactly the system will be implemented.
To implement the idea with your own hands, you will need basic skills in working with electricity. If you follow the instructions and recommendations, very soon your car will sparkle with new colors. And in the literal sense of the word.
Backlight options
Motorists perceive the concept of footwell lighting in a car somewhat differently.
Basically we are talking about the following options:
- Turn on the car lights when the door is opened. That is, the system is mounted at the bottom of the door, and the light is directed to the ground. The practicality of such a solution is minimal. Although some automakers install such lighting from the factory, displaying the logo of the car brand.
- Lighting in the feet. There is no need to open or close the door anymore. The light is directed towards the pedal assembly area. Looks impressive. This way you can see what is happening under your feet. This helps a beginner to better navigate the pedals in the dark.
Objectively, it is the second option that is more practical and preferable than illumination when opening a car door. But no one is stopping you from making sure that when you open the doors in the car, the asphalt lighting turns on, displaying the car company logo or some other image there. But the lighting of the legs is not only visually impressive, but also practical in certain situations.
The lighting system is implemented in different ways. You can choose a different color, even provide a color music effect. But when moving, it will certainly be distracting. Therefore, it is more correct to make the necessary lighting so that it helps during trips and makes it easier to change the position of your feet on the pedals.
What is required for work
To make your own footlights in your car, you will need to first prepare a certain set of tools and some consumables.
To implement the simplest, but at the same time original project, it is enough to assemble a set consisting of:
- light source;
- wires about 5 meters long;
- heat shrink tube;
- glue;
- pliers;
- soldering iron;
- screwdrivers;
- sharp knife, etc.
That is, you need a standard set of tools.
You can complicate your task somewhat, but make the glow more universal. For this purpose, a brightness control controller, a control panel, and a switch are additionally used. This will allow you to adjust the settings, turn on the backlight as needed and at the brightness that suits you.
As for the light source, the footlights installed in the car interior can be made of 2 types of tapes:
- Neon ribbons. They look very impressive, beautiful and expensive. The light is objectively more pleasant. But for most motorists this is not a fundamental difference. Neon strips are much more expensive. To install them you will need to use an ignition unit. And this involves interfering with the vehicle’s electrical system.
- LED strips. The most practical and versatile option. There are no installation difficulties. The ribbons themselves are affordable and come in a wide range of colors.
Having chosen a light source, you should decide in advance where exactly the backlight will be located. Some install it only in the driver's feet. Others prefer to provide illumination on the driver and front passenger sides for balance. And there are even those who like to illuminate the entire cabin, also affecting the legroom of the rear row passengers.
This determines exactly how much tape you need to purchase.
Installation procedure
Before installing diode footlights in a car with your own hands, you need to choose a place for convenient and correct placement of the lighting strip.
The following areas can potentially be used for this:
- perimeter at the bottom of the front seat;
- under the car dashboard;
- under the glove compartment (glove compartment), etc.
Here you should build on your own imagination and the design features of a particular car.
According to the rules and for reasons of comfort, the lighting should be directed strictly to the floor.
Some car enthusiasts do not take this point into account and install the tape on the side, on the floor covering itself. But in this case, the lighting can interfere, dazzle the eyes, etc. Remember, this is lighting specifically for the feet, and therefore it should be located in the cabin so as to illuminate this particular area, and not direct streams of light into the eyes.
Installing LED footwell lights in your car yourself is not at all difficult. Here you need to perform the following procedures:
- clearly define the places where the tape will be located;
- cut the LED strip into the required lengths;
- a wire is soldered to the edges of the tape;
- Next, the tape is tested by connecting to a power source;
- if the light comes on, you can continue working;
- the soldering area is insulated using heat-shrinkable tubing for this purpose;
- In order for the tube to fit well into place, it should be heated with a soldering iron or just a lighter;
- Having finished with the insulation, the prepared tape is mounted at selected points in the cabin;
- double-sided tape, glue or silicone ties are suitable for fixation;
- By analogy, the tape is installed in all parts of the cabin where it needs to be done.
The LED strip can only be cut in certain places where appropriate marks are provided.
Objectively, the most questions arise regarding how to make the connection correctly.
Connection
There are several suitable options for how to make the lighting in your car yourself to ensure an original glow in your legs.
Each motorist will decide for himself how it will be more convenient and easier for him to connect the LED footlights in the car. But there are 3 main options:
- to the lighting of the interior itself;
- through the cigarette lighter;
- from dimensions.
The choice depends on the format in which the driver wants to see the backlight. After all, each scheme provides its own version of when and how the glow will be activated.
Through interior lighting
Some motorists prefer to install footwell lighting in their car by connecting to the main lighting system of the vehicle interior.
This connection method ensures that the backlight will always turn on exactly when the doors are opened or when the car interior lighting is turned on.
If you connect LED lighting for the footwell area in a car through interior lighting, then the light source will need to be connected according to the following algorithm:
- remove the interior lamp;
- connect the wires, observing polarity;
- the white wire usually goes to the plus;
- the negative wire is connected to the red wire;
- the wires are hidden under the interior trim;
- It’s most convenient to stretch them directly along the side post;
- Next, connect the wires of the installed LED strips to each other;
- connect them to a power source;
- check the system for functionality;
- if everything is functioning, perform high-quality insulation;
- return the lampshade to its place.
If you install an additional controller, the light will gradually dim rather than suddenly turn off.
If you are not sure about the polarity of the wiring, use a tester or multimeter. This will make it clear where is the plus and where is the minus. However, the wires may differ in color, depending on the car.
In this way you can connect to functioning interior lighting, but this is not the only option.
Through the cigarette lighter
You can also activate the LED strip from the cigarette lighter, which is done quite often.
By connecting the strip to the cigarette lighter, the light will turn on when the doors are opened.
Not the worst option, since most drivers do not need backlighting while driving. They use it for comfortable getting in and out of the car.
The connection itself is performed according to the following algorithm:
- plus the LED strip connects to the cigarette lighter;
- the minus must be connected to the limit switch on the door;
- the tape wiring is brought out together with the rest of the wires, connecting into a single bundle;
- All contacts are insulated and secured with a tie if necessary.
How exactly to remove and hide the wires depends on the specific car and the driver’s ideas.
Through dimensions
If you connect from the dimensions, then the backlight will function constantly, in parallel with the operation of the dimensions. That is, this is the most relevant option for many, since the system will turn on at night while traveling.
You can connect the plus from any backlight bulb. For example, the glove compartment or dashboard. The minus is thrown onto the body.
If you connect the minus to the door limit switch, then the backlight will turn on provided that the door is open and the lights are on.
Here, each motorist decides for himself how and in what situations he needs the LED strip in his legs to work. Therefore, you can choose different connection options.
By installing the tape in the legs, you can achieve the original appearance of the interior, as well as get some practicality from such a solution. Having chosen the appropriate work option, all that remains is to implement the scheme. Moreover, you can do this yourself, without having a wealth of experience and special specialized education.
DIY installation of LEDs and logo lighting
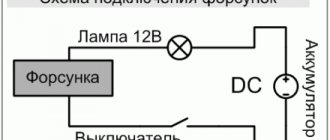
So, it has already been said above that it is quite possible to install door lighting in a car with your own hands - be it laser with an attractive logo or a simpler one. Let us consider in this paragraph what is necessary for this, and, of course, what the sequence of actions should be. Let's start by selecting the right tools and materials. We will need four LED bulbs, a special lamp used to illuminate license plates (also 4 pieces), electrical wires, corrugation and a utility knife. Having prepared all the tools, you can get down to business.
First, it’s worth taking care of the wires, because they are entrusted with a very important mission - supplying power to lighting devices. In order to avoid incidents that may arise with electricians, all wires should be laid to the door in a special corrugation. In general, if you want simple lighting, then connect one cable with the plus to the car’s lighting system, and the minus to the door limit switch. It is a button, when pressed, some signal action occurs. So, for example, it is thanks to this element that a symbol lights up on the instrument panel, notifying us that the doors are not closed well enough or are completely open.
The simplest lighting method was presented above; now let’s look at a more interesting option for organizing lighting in the form of a logo for car doors. To do this, you need a special laser lamp, which is also very easy to buy. Next, you should dismantle the door trim and choose the most suitable place where it will be installed. Then we drill a hole with a special drill; it should have the same diameter as the lens, and install the above-mentioned laser illumination with the logo in a strictly vertical position.
The laser comes with instructions that describe in detail how to connect this item to the car wiring with your own hands. Having fixed all the elements that the laser illumination kit contains, we return the door trim to its original place. The new option will not only add comfort to the owner’s life, but will also emphasize the style and individuality of your car.
Home →
Device → Body →
Instrument panel lighting
The instrument panel is also very often the subject of design in a car. Some people are not satisfied with the standard backlight color, others think the brightness of certain icons is insufficient, others want to make the dashboard multi-colored, for example making the speedometer area above a certain speed red. Upgrading the instrument panel has now become much easier. To do this, just order a set consisting of 40 LEDs of different colors, and the instrument cluster of your car will sparkle with new colors.
The LEDs already have a corresponding base, so you don’t need a soldering iron to install them in the instrument panel. You will only need to remove the corresponding light bulb and insert a new light source in its place. However, it should be borne in mind that before putting the instrument panel in place, you need to make sure that the LEDs are lit.
If they are inserted incorrectly, that is, the polarity is not observed, they will not burn. Although they are light-emitting, they are still diodes, and a diode only passes current in one direction. The set costs about 500 rubles.
The editors recommend:
What kind of antifreeze can be added if the class of the fill is unknown
Isuzu will bring the Japanese UAZ to Russia
The Russian car market has hit the bottom, but dealers do not want to reduce prices
The new GOST has given the traffic police a free hand: there is now no escape from cameras
News Media2
Discussion Cancel
Installation of LED lighting
Now let’s look at how to illuminate car doors using LED strip. This lighting source, although more expensive than neon analogues, is much more durable, reliable and easier to install. Since the commercially available tape is equipped with a self-adhesive coating, no additional fastening elements are required when installing it.
There are ready-made products on sale that are designed specifically for installation on car doors, but the cost of such products is much higher than conventional tapes of the same footage. So if you want to save money, you will have to complicate your task - you will have to use a soldering iron for installation.
So, for work we need the actual LED strip, heat shrink tube and electrical wiring. We start by dismantling the linings, installing tape in their place, measuring the required length with a small margin and cutting off the required piece.
We solder two wires to one end of the tape, positive and negative, to make it convenient to replace if necessary, solder a female terminal. Then we prepare four wires, insulate their ends with heat-shrink tubing, and solder a male terminal.
For each door, we bring out the electrical wire with the male connector through the door hinge, then we pull the negative electrical wires to the end of the door so that exactly the side of the threshold from which the door opens is illuminated. We perform exactly the same operation with the second door.
All that remains is to connect the negative wires to the LED strip, and the positive wires to any positive power source (for example, to lighting wiring, the positive terminal of the battery or the cigarette lighter). The main thing is not to “mess up” the polarity. Although in this case there will be no serious consequences, you will have to resolder it.
Now you can check the results of your work. The LEDs should light up when the doors are opened. If this happens, we install the casing in its original place and are proud of our workmanship.
In the same way, you can make your own illumination of car door handles, the area at the driver’s feet or the dashboard. If desired, the negative wires can be connected to a free button, and then the backlight will turn on at your request.
Recently, laser illumination of a car door with a car logo has been gaining popularity. Such kits are commercially available and consist of a laser projector and a miniature sensor.
Installation is very simple and does not require any drilling: use double-sided tape to glue a laser projector to the bottom of the door (you need to purchase it with your brand logo), attach an internal sensor to the threshold trim, which will trigger when the door is opened and turn off the projector when the door is closed.
Main components
All flashing lighting is assembled from individual LEDs and LED strips and control units for them. A microphone is installed in the control unit, which picks up the sounds of music and transmits them through an amplifier to a signal level stabilizer. A stabilizer is needed for equally smooth operation of color music, despite the volume level. The signal then passes through frequency filters (usually three, high, medium and low) and is fed to groups of LEDs, divided by color or line, and causes the LEDs to flash to the rhythm of the music.
Put the soldering iron aside, control units for LED strips are sold in the same place as the strips, so you don’t have to assemble the printed circuit boards yourself. LED strips are available in different colors, sizes, glow intensity, ask for a catalog in the store and select the desired characteristics.