Basic clutch elements
To replace the clutch, you should accurately understand its structure. In the VAZ-2107, this unit is controlled using a pedal located under the steering wheel. Pressing it disconnects the clutch from the gearbox, and releasing it reattaches it. The unit in question is easy to adjust and easy to change.
The VAZ-2107 model is equipped with a single-disc clutch equipped with a central spring. This scheme has a number of advantages:
- reliability;
- low cost;
- ease of care.
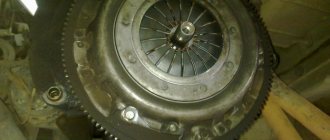
The clutch itself consists of a release bearing and a pair of discs. The first of them is the leading one, mounted on the flywheel. The slave is in the basket. It is connected to the gearbox (its input shaft) using splines.
It is not difficult to replace the “original” wheels with those that are installed on other VAZ models. Fully matched parts for:
- 2103 (engine capacity up to 1.5 liters);
- 2121 (up to 1.7 l).
The VAZ clutch driven disc is called the “drum”. It has pads and special slots on both sides that increase elasticity. There are also 8 springs that reduce dynamic load.
The gearbox is attached to the driven disk, and the basket is attached to the power unit. When moving, both parts are pressed tightly against each other and rotate synchronously.
For model 2107, driven discs from 2106 or 2103 can be used. Some craftsmen replace the drum with a part from 2121 (Niva).
The next clutch element is the release bearing. Usually it is he who fails most often. The element is attached to the pedal using a fork. Any pressure significantly increases the load on the part, and therefore it breaks relatively quickly.
To change the bearing, in any case, you will need to disassemble the disks. Instead of the standard element (designated 2101), many take the one intended for the VAZ-2121.
Such a bearing is more reliable, but it will be necessary to change the basket, otherwise the pedal will become too hard.
The next part of the clutch is the fork. With its help, the release bearing moves and the clutch is retracted. Failure of this part makes it impossible to turn off the entire unit. It is recommended to change the fork, even if the clutch continues to work, albeit unstable, because otherwise it will soon completely fail.
Clutch replacement
When replacing a basket or disk, you cannot do without removing the gearbox. That is, the box itself can remain almost in the same place; it will only need to be moved a distance sufficient for the gearbox input shaft to exit the clutch basket. However, for more convenient work, and for the purpose of visual inspection and possible replacement of elements such as the clutch housing, gearbox input shaft oil seal and rear crankshaft oil seal, it is better to remove the gearbox.
The price of VAZ 2107 spare parts, which may have to be replaced in this case, is not that high, and the time required to re-disassemble them to replace them will cost much more. The work is carried out on an inspection pit, overpass or lift. In general, first things first.
To dismantle the clutch, it is necessary to perform the following preparatory work:
- Removing the starter.
- Disconnecting the gearshift lever from the gearbox.
- Removing the cardan shaft.
- Disconnecting the clutch slave cylinder and the speedometer drive (flexible shaft) from the gearbox.
- Removing the terminals (chips) from the sensor responsible for turning on the reversing lights.
- Removing the exhaust system mounting from the gearbox.
- Unscrewing the bolts that attach the gearbox to the engine.
- Disconnecting the rear cushion (traverse) securing the gearbox to the body.
Next, you need to move the gearbox away from the engine to a distance sufficient for the input shaft to exit the clutch basket and rest it on the exhaust pipe of the car's exhaust system. To completely remove the gearbox, before unscrewing the bolts attaching the gearbox to the engine, it is necessary to additionally disconnect the exhaust pipe (pants) from the exhaust manifold.
All work on replacing the VAZ 2107 clutch in the same or slightly modified order was filmed long ago and posted on the Internet. So, if you wish, you can always familiarize yourself with it.
Once access to the VAZ 2107 clutch basket is gained, you can remove and replace it. We unscrew the bolts securing the basket to the flywheel and remove the clutch.
When performing the list of works, you need to pay attention to the following points:
- When removing the starter, you don’t have to disconnect the electrical wires from it, but you need to stop the power supply from the battery;
- before dismantling the propeller shaft, it is necessary to mark on it the location of the hinge fork in relation to the flange of the main gear;
- When disconnecting the flexible speedometer drive shaft, do not allow it to bend excessively;
- in the case of installing the same clutch basket, before removing it, it is necessary to note (with chalk, paint, a chisel or a center punch) its position relative to the flywheel in order to install it in the same way;
- To avoid deformation of the clutch casing during dismantling, evenly unscrewing the fastening bolts, 1-2 turns at a time, will help;
- if the flywheel rotates when unscrewing the basket mounting bolts, you can use a pry bar as a lever to hold it in place;
- During subsequent assembly, it is important to correctly install the clutch disc. Its larger protrusion should face the basket.
We recommend: How to check the functionality of a car thermostat?
How to change the clutch
A slipping clutch indicates that it needs to be replaced. It is convenient to carry out all stages on an overpass. If this is not possible, use a jack, but be sure to place protective supports under the car.
To replace the unit in question, prepare:
- pliers;
- rags;
- mount;
- mandrel;
- set of keys and screwdrivers.
It is not at all necessary to completely remove the gearbox; changing the clutch is not difficult without this. It is enough to move it to the side so that the shaft moves out of the basket. Nevertheless, for your own convenience, it is better to dismantle the gearbox. This, by the way, will allow you to inspect the seals and crankcase along the way.
Self-diagnosis of the clutch disc
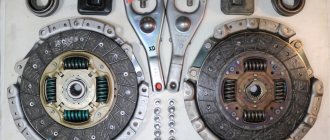
The main disadvantage of the clutch is that this mechanism does not have a specific service life. That is, its condition depends only on the driver and driving style. No manufacturer gives any guarantees or exact deadlines after which it needs to be replaced. Experienced technicians recommend diagnosing this mechanism every 80,000 km. Statistics show that the most vulnerable parts are the slave and master disks. The most common defects in the driven disk may be mechanical deformations, breakage of damper springs, wear or damage to hub splines, and abrasion of friction linings. Most of the breakdowns described above cannot be repaired. In these cases, as a rule, the VAZ-2107 clutch disc assembly is replaced.
Removing the gearbox and clutch
The procedure is as follows:
- remove the starter;
- disconnect the speed switch;
- remove the muffler fasteners and underbody crossmembers.
Next you need to pull out the basket and disk. For this:
- use a pry bar to secure the flywheel;
- unscrew the bolts holding the basket;
- slide it and take out the disk;
- Lightly press the basket inward, level it and pull it out.
Now comes the turn to dismantle the release bearing:
- press the plug with a screwdriver so that it comes out of the grooves;
- guide the bearing towards you along the input shaft;
- Unclip the locking ring on its hub and remove the element.
Signs of a broken clutch
Clutch not disengaging.
The occurrence of vibration and extraneous sounds when the clutch is disengaged.
The clutch pedal fails (does not return).
Disk diagnostics can be performed in two ways. The first involves the presence of a special device with which you can measure the thickness of the part. To do this, you will need lifts and a gauge that is attached to the mechanism being measured. Read the instructions for how to use the tool.
Clutch installation
After dismantling the gearbox and the clutch itself, it is advisable to check all components and carry out their maintenance. So, in particular:
- the surfaces of the flywheel and discs are degreased;
- the shaft (or rather, its splines), on the contrary, is lubricated.
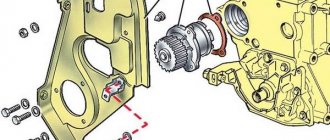
Next, the installation of the basket begins. It is important here during installation to accurately align its centering holes with the pins located on the flywheel. It is necessary to tighten all the bolts correctly - they are evenly tightened one turn at a time. If everything is mounted as it should, the mandrel will come off very easily. The disc should be inserted into the basket with the protruding side.
Replacing the clutch on a VAZ 2101-VAZ 2107
Welcome! The clutch is one of the important parts of the car, because with its help we change gears. The main job of this unit is to disconnect it from the flywheel while squeezing the clutch and for further switching the box. This unit looks like two disks on top of one of which there is a clutch housing, and the clutch also includes a release bearing and clutch assembly. But over time, one of the disks or the release bearing itself becomes unusable, which is why they will need to be replaced.
When should you change the clutch? During operation, the clutch of any car wears out over time, and the first signs of a worn clutch that a car will show are:
1. Increased noise which begins to appear very clearly when changing gears in the car.
2. Jerks can also occur when starting off in a car, and they can also occur while driving when you depress the clutch pedal, then engage a gear, and then when you release the pedal, your car jerks forward a little.
Note! This mainly happens due to the damper springs that are installed on the driven disk, and in the photo below they are shown by arrows. These springs are needed so that the clutch disengages smoothly and thus does not cause discomfort when driving, and when these springs become unusable, when the clutch is disengaged, as mentioned earlier, a jerk occurs, which often has a very negative effect on the comfort of driving a car!
3. In addition to all this, if the clutch malfunctions, the effect that the clutch “slips” may occur. This is when you are driving a car and at the same time you press the gas pedal, let’s say to the floor, and your car does not accelerate, but the engine speed increases sharply and even reaches the red zone, this effect is popularly called the clutch “Slipping”.
We recommend: Replacing the front engine mount of a VAZ 2114
4. And in conclusion, let’s note another effect called the “Leads” clutch. The first signs of this effect are as follows: let’s say you engage first gear and at this time the clutch pedal is still fully depressed, but even despite this the car starts to roll. This effect is called the “Leads” clutch.
How to replace the clutch on a VAZ 2101-VAZ 2107?
Note! Before you start replacing, be sure to make sure that the clutch malfunction is not caused by any other reasons, because replacing this unit itself is very labor-intensive and time-consuming compared to replacing the same clutch slave cylinder, due to which the same problem may occur. the effect that the clutch “Drives”! (If you want to take a closer look at the malfunctions of a particular unit of the entire clutch system, then use the “Search” form, which is located in the upper right corner of the site, and enter into the search the malfunction that you specifically need, for example: “Clutch is slipping” and you will get all results in which this combination of words was found)
Removal: 1) First, to get to the clutch itself, you will need to remove the box for this. (For information on how to remove the box, see the article entitled “Replacing the gearbox on a VAZ”)
2) Next, after the box is removed, pick up the purchased mandrel for centering the clutch disc, and then install it in the central hole as shown in the photo.
Note! The mandrel must be installed all the way until it rests on the crankshaft bearing!
3) Then, to prevent the flywheel from turning, screw one thick bolt, which is indicated under the letter “B,” into the lower left side of the block, and then using a screwdriver to secure the flywheel from turning “A,” unscrew all the bolts that secure the housing and the clutch pressure plate itself.
Note! When unscrewing the bolts securing the casing and the clutch pressure plate itself, hold this same disc by its casing so that it does not turn! (Please note that you only need to hold the disk by the casing, because if you, for example, grab the thrust flange of the pressure spring with your hand, you can easily damage it, so hold only the casing with your hands)
4) Next, remove the clutch pressure plate together with the casing, but when removing it, hold it with both hands by its casing.
5) After removing the clutch pressure plate along with its casing, proceed to removing the driven disc, to do this, take the installed disc in your hands and then remove it together with the mandrel from the place where it is installed.
Note! By the way! If you didn’t understand where you needed to insert the mandrel earlier, then we indicated this place for you with a blue arrow in the photo just above!
Installation: 1) Installation of a new clutch occurs in the reverse order of removal.
Note! Install a new clutch carefully and be sure to center the position of the drive plate using a mandrel when installing the pressure plate!
promzapchast › Blog › How to replace the release bearing on a VAZ 2107
The release bearing can be characterized. As the “weakest link” in the clutch design. It provides the ability to enable/disable the rotation transmission mechanism.
A distinctive feature is the ability to install a release bearing of both the 2101 model and the product installed on the VAZ 2121
. The latter has an increased resource and is designed to withstand more significant loads. But its installation requires parallel replacement of the basket.
Causes of bearing failure and preliminary diagnostic options
The serviceability of the bearing is influenced by a significant number of external factors, among which road conditions, driving style, and timely maintenance should be noted.
External manifestations of a malfunction are
:
Clutch slipping at high engine speeds; If the cable is working properly, the clutch pedal begins to fail; When moving (while squeezing the pedal), a grinding noise is heard; It is almost impossible to engage first gear, so you have to start driving from second and higher; When the car is moving, extraneous noises arise that disappear when the clutch is depressed (pressing the pedal). You can change a faulty bearing at a service station, or you can do it yourself (if you have the necessary skills).
We replace the bearing ourselves
To complete the work, you will need a new release bearing (VPS), a wide bayonet screwdriver, a set of keys, a jack, and lubricant (the best choice is Litol-24).
The replacement work algorithm is as follows.
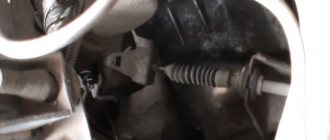
Initially, access to the bearing is provided. To do this you will have to remove the gearbox. Please note that complete dismantling is not necessary. You can simply move it to the desired distance from the clutch. Disconnect the driveshaft from the box (three-bolt fastening).
After removing the mounting bolts, the gearbox (together with the clutch housing) is disconnected from the cylinder block. Then the transverse element of the engine mount is unscrewed from the car body. Next, the unit is removed. As a result of performing all these manipulations, you get a box hanging on the muffler pipe (on one side), and on the other, resting on pre-installed supports (you can use bricks or a jack).
Removing the box allows access to the basket. The 6 bolts that secure the flywheel to the flywheel are unscrewed. After this, it can be moved to the side with a screwdriver (make sure that the flywheel remains in the same position). It became possible to work with a bearing secured by springs to the fork. They should be separated with a screwdriver. Then the installed release bearing should be pulled towards itself (along the driven shaft). This is required for subsequent removal of the element. After dismantling the faulty VPS, it is recommended to release the ends of the retaining ring that presses the bearing to the box fork. After the retaining ring is removed, its actual condition should be checked. If there is damage. It needs to be replaced along with the bearing. If the condition is satisfactory. It can then be reused.
It will be useful: Video of replacing the timing belt on a VAZ 2114
Installing a new bearing is done in reverse order. Before installing a new product, it is necessary to clean the splined part of the primary shaft and re-lubricate it. This will eliminate the possibility of a malfunction in the future. (the part is not sufficiently lubricated during operation, which increases friction and reduces the service life of the parts).
What's the best way to change?
It is best to replace the device by placing the car on a lift, overpass or inspection groove. If this is not possible, then you can raise the car using a jack to get to the unit from below. For safety, you need to fix the wheels so that the car does not roll or put on the hand brake.
Tools
To carry out repairs, you need to prepare the appropriate tools:
- set of keys;
- screwdrivers;
- pliers;
- clean rags;
- jack;
- new consumables.
When choosing a new replacement kit, you need to buy original parts, preferably assembled.
Stages
The replacement procedure consists of the following steps:
- Having opened the hood, first of all you need to turn off the power to the car. To do this, you need to remove the negative terminal from the battery.
Engine compartment of VAZ 2107
Removing disks from a node
Installing a new drive
After the repair is completed, the vehicle system should be checked for functionality.
Clutch replacement and repair
Our company carries out clutch replacement in Krasnoyarsk at a professional level. Modern tools and diagnostic methods are used to accurately determine the nature of the malfunction.
| Repair | Foreign cars, rub. | VAZ, rub. |
| Clutch replacement | from 3500 | from 1500 |
| Replacing the release bearing | from 3500 | from 2000 |
| Replacing the clutch cylinder | from 550 | from 450 |
| Replacing the clutch cable with adjustment | from 500 | from 500 |
| Replacing clutch brake fluid | from 650 | from 550 |
| Replacing the clutch fork | from 3000 | from 2000 |
| Bleeding the clutch | from 250 | from 150 |
Finding and eliminating defects during clutch repairs
If such defects are observed, then you need to contact the service to carry out diagnostics to identify the following malfunctions:
If a disc distortion with the threat of partial or total destruction is detected, then another unit is installed and the units are debugged. Very often you have to replace the clutch cylinder.
It is possible to replace the entire clutch kit, which includes the following components:
- basket;
- disk;
- release bearing.
Our experts recommend installing the rear oil seal of the engine crankshaft at the same time as installing the new system. The entire process of replacing a clutch in Krasnoyarsk does not take very much time.
Symptoms of malfunction
There are several main defects that indicate the need to contact Service Motors:
- slippage – lack of disk clamping, which causes slipping during the torque process;
- driving – complete relaxation of the disk by the basket is not ensured, preventing gear shifting;
- breakdown of the release bearing - characterized by a high noise level and the ability to switch.
Clutch replacement
When a new system is installed, activities are carried out in a strictly defined sequence:
- dismantling elements in the cabin - the box handle, center console are removed, wires, thermal insulation, air duct and pistons are disconnected. The plate is disassembled, the cover is unscrewed and the switching mechanism is eliminated;
- dismantling components under the car body - the cylinder fastenings are disconnected, the cardan is unscrewed, the muffler fastenings and the transfer mechanism with the crankcase are unscrewed;
- elimination of the cross member with the transfer case;
- Troubleshooting and replacement of the set or individual elements is carried out. In particular, the clutch disc is being replaced.
Call the manager of our company from whom you can find out the estimated price for replacing the clutch and place an order, indicating the time of arrival. Our specialists will quickly replace the clutch in Krasnoyarsk on any car.
Basic faults
The slave cylinder has several rubber seals, which often become unusable or become oily, causing the car’s clutch to “slip.” Replacing old seals with new ones will require using a lift or inspection hole, since the main cylinder is located in an inconvenient place.
When replacing seals, do not forget that there is brake fluid in the system; it must first be drained.
It is advisable not to touch the flare nut, otherwise additional adjustment will be required later. In order to replace the gaskets without removing the master cylinder, certain skills and experience are required.
Another cause of clutch malfunction may be wear of the release bearing.
To replace it, you will have to dismantle the gearbox. Brake disc linings wear out just as often, which is easy to notice by the characteristic noise when the pedal is released. And the most common problem with a clutch malfunction is air getting into the system. Air can be removed by bleeding.
Clutch “leads” - signs, causes and how to fix
If the clutch is slipping, the reason may be:
- Increased clearance between the support part of the pressure bearing and the fifth basket. It must be set within 4–5 mm by changing the length of the adjusting rod of the working cylinder.
- The spring sectors of the driven disk were deformed (warped) from overheating. The disk needs to be replaced with a new one.
- The driven disk is stuck on the splines of the drive shaft of the front gearbox. Both elements are defective and new ones are installed if necessary.
- There is not enough brake fluid in the main cylinder reservoir or an accumulation of air bubbles in the hydraulic drive system. The working fluid is replenished to the required level, and the hydraulic clutch system is pumped.
If the clutch starts to disengage at the beginning, it means there is no free play. This malfunction can be corrected by adjustment. On the contrary, with increased free play, the clutch begins to disengage at the end of pressing the pedal. In this case, it is necessary to increase the length of the RCS rod. Reduced free play indicates a decrease in the thickness of the driven disk linings, which means a new one needs to be installed.