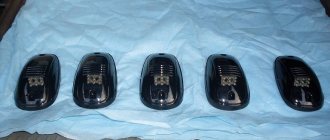
Advantages of acoustic podiums
VAZ 2114 acoustic podium
Podiums allow you to qualitatively improve acoustics, raising the sound to a new level. In this case, you can not be limited to the standard landing dimensions of 13 cm, as provided by the manufacturer of the VAZ 2114.
Among the many advantages of podiums, I would like to highlight the following:
- Podiums allow you to install speakers in car doors. Thus, rear passengers no longer feel discomfort from strong sound, as was the case before. The sound will be evenly distributed throughout the cabin.
Podiums in the doors of VAZ 2114
- Podiums make it possible to create the correct direction of sound. As you know, sounds have a clearly defined direction. In other words, the higher the frequency of a sound, the more directional it becomes. This can explain the fact that the midrange and high-frequency speakers must be correctly directed.
- Podiums are always easy to install. Attaching them is quite simple and it is not necessary to cut through the metal of the door. Often acoustic podiums are firmly fixed to the skin.
Installing podiums is easy and simple
Note. You can evaluate the effect of “podium” sound immediately after fixing this element. Previously disturbing overtones will disappear, the transparency of the sound will improve, low bass will be added and the sound will seem to “get rid of” the speakers.
- Another advantage of the podium is the spaciousness of the “pocket” where a larger speaker can be inserted.
- Leather-wrapped podiums make it easy to remove dirt and dust.
- The podiums have petals on the base. This is also considered an advantage, since it will allow the element to be firmly fixed to the door.
- The podium will fit perfectly into the interior of the VAZ 2114, making the interior richer and more beautiful.
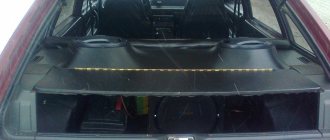
Making your own shelves for acoustics
To make the rear shelf you will need.
- A sheet of plywood 10 mm thick (MDF or chipboard).
- Carpet (non-woven, highly stretchable material). 0.5 m with dimensions 150x80 cm is enough.
- Glue for plywood and carpet (special for this fabric or universal glue 88).
- Self-tapping screws up to 25 mm long.
- Drill.
- Jigsaw.
- Cardboard for making a template and drawing tools (compasses, pencils, rulers).
- Sanding machine or sandpaper.
- Construction or furniture stapler, staples for it.
The template is applied to a sheet of cardboard and then tried on in the machine. A piece of 133x57.5 cm is cut out (with a margin for adjustment). We transfer the drawing to plywood. After cutting down the two outer pieces, we carry out another fitting. Next, we make another template from plywood to accurately determine all the angles. They may interfere with closing the trunk. Let's see if the shelf interferes with locking the luggage compartment.
We measure the radius of the speakers and transfer the resulting dimensions to the layout. Let's start cutting out the shelf, cover and holes for the speakers with an electric jigsaw. The edges of the slots must be carefully sanded. Where the trunk lid opens, sanding is done on both sides. Then we measure the carpet along the entire length of the folding part with a margin of about 5-6 cm.
Apply glue to the bottom part, attach the carpet, and so on along all edges. It is better to apply the glue in parts so that other areas do not dry out. There is no need to apply a thick layer, as the fabric may become saturated. We secure the edges with a construction stapler, placing the staples as close to each other as possible. The carpet is elastic, but you don’t need to stretch it much. After finishing with carpet, the acoustic shelf should dry within 24 hours.
The next stage is fastening the hinges for the moving part. Self-tapping screws should not interfere with the operation of the hinges. We try on the speakers and cover the remaining part of the acoustic shelf with carpet. We install the hinges, try on the shelf and install the speakers. The considered option does not require dismantling the standard sidewalls; the acoustic shelf is installed on them using self-tapping screws.
A home-made acoustic shelf for a VAZ will cost 1.5 times less than a purchased one and can be compared with the factory version in terms of quality.
Making podiums for acoustics
VAZ 2114 acoustic podium and its production
Let's look at how to make podiums for doors. As a rule, the standard places on the doors of a VAZ 2114 car are designed to install speakers measuring 13 cm. What should we do if we want to install larger speakers? The most suitable material from which to make good podiums is plywood. And to start the process, you need to cut out circles of a certain size from plywood for the speakers you intend to install.
Advice. When cutting, we recommend using an electric jigsaw. It will save both time and nerves. In extreme cases, you can use a drill.
To adjust the podium to the desired shape, the following materials are used:
- Polyurethane foam.
- Epoxy resin.
- Compoplast.
And now everything is in order.
Frame making
Note. To make the frame, it is recommended to use plywood, the thickness of which does not exceed 5-6 mm.
Let's get started:
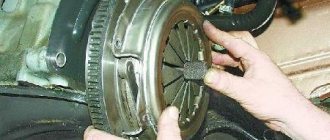
- We cut out the rings with a jigsaw so that the purchased speaker sits tightly in it.
- Using spacers from bars or self-tapping screws, we create a suitable frame where the speaker will be placed.
DIY podium
Advice . If we want to get a slope of the podium, then we use spacers of different heights, as in the photo below. Be sure to use self-tapping screws to prevent the plywood from cracking.
Spacers with different heights
Note. You can make not one, but two frames for one door. Here everything will depend on creativity and individual preferences.
Creating a Form
Acoustic podium VAZ 2114 and creating the form
Once the frame is ready, it's time to start creating the mold. The simplest solution is polyurethane foam. Creating a mold from polyurethane foam:
- We take the frame and foam it.
- We wait a certain time until the foam hardens. It may take more than one hour.
- After the foam has cooled sufficiently, we begin work that makes you feel like a sculpture. In other words, we cut out everything unnecessary.
Advice. The sharper the knife we use to cut out the extra pieces of foam, the better. Therefore, you need to prepare such a tool in advance. It is advisable that the knife has a wide blade.
- Apply a layer of putty to the foam and wait until it dries.
- Take sandpaper and sand the entire part.
- The acoustic podium is ready.
Creating a mold from compoplast:
Acoustic podiums on the VAZ 2114
The mold can also be created from compoplast. This is a two-component composite plasticine designed for almost any purpose. It has many useful functions: good adhesion, no shrinkage and toxicity, etc. So:
- Mix two equal parts of white and gray matter.
- Apply the resulting mixture to the frame.
Note. Working with compoplast is similar to a modeling lesson, when different things are made from plasticine, for example, the same podiums. Only plasticine is more similar to cold welding, hardening after a certain time.
- We wait until everything dries and the form can be considered ready.
The final stage of work
So:
- We stretch old and unnecessary nylon tights onto the workpiece so that there is no sagging.
- We dilute the baksu separately and cover the resulting form with it.
Note. According to the advice of experienced people, the buck should be placed every 12 hours. The last coating should be the third and after that you need to wait a day for the glue to dry completely.
- We cover the product with anti-gravel, using one can for two podiums.
- The inner rings and foam walls can be coated with black spray paint.
Podiums for acoustics VAZ 2114
Note. The paint and aerosol will dry quickly.
- We fix the acoustic shelves to the door trim with self-tapping screws, doing this from the inside along the plywood.
- Next we hang up the original trim.
- We put the pockets in place.
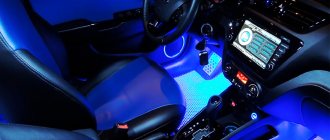
- Install the speakers and enjoy high-quality sound.
Podiums for acoustics in VAZ 2114
Making acoustic podiums with your own hands makes sense if you need to get a unique shape. In normal cases, you can use ready-made options.
When working, be sure to use step-by-step instructions, useful photos and video materials. Thus, the price of purchasing and installing an acoustic podium is significantly reduced, because you only have to buy consumables: glue, screws, etc.
Making your own podium
If you have decided on the type and location of installation, you can start working. Making podiums for speakers with your own hands is not difficult.
Homemade speakers
Arm yourself with the following materials:
- plywood (for ring elements);
- fiberglass (for complex parts);
- epoxy resin;
- nylon or other synthetic fabric;
- leather or paint (for decorative work);
- putty;
- mounting tape;
- sandpaper;
- polyurethane foam.
Homemade speakers
In addition to materials, you will also need tools:
The template should be transferred to the material from which the part is being prepared. Cut the workpiece and drill the mounting holes. Place the blank in place and try it on. Also mark holes on the door and drill them. The parts are fastened with stainless steel bolts and washers.
DIY podiums for VAZ 2114 useful tips
I have long wanted to buy podiums for 16″ speakers for the front doors, but I couldn’t find a suitable option. And it was decided to do it myself. And so, let's go.
Making a frame
We fasten with 2 screws and another one from below
This is the most important thing. In order for the foam to take on the shape of the door trim, you need to wrap the door card in a garbage bag so as not to stain the newspaper on top. We press the podium against the door card from above and foam it.
(VERY IMPORTANT! “MAKE SURE TO PLACE THE NEWSPAPER BETWEEN THE CELLOPHANE AND THE PODIUM!”) Newspaper breathes, but cellophane does not. As a result, the foam does not harden exactly to the shape of the door card. That’s how it was for me, after which I picked out the snot (uncured foam with glue) and foamed it with new foam, then adjusted it with sandpaper. And we foam.)
Rough processing and fitting. Trimming.
Afterwards we sand it to perfect condition and glue the fiberglass. Glue it with epoxy glue. It dries for a day, then another layer.
Glue leather vinyl 88 glue
Result
DIY podiums for VAZ 2114 in pictures
Today I will talk about how to make acoustic podiums in a car. Let's take the VAZ 2114 as an example. Manufacturing for other cars has no fundamental differences, the meaning is the same.
To make podiums in the VAZ 2114 we will need:
- plywood 8-10 mm;
- leatherette, or any material you like best;
- fiberglass putty;
- polyurethane foam;
- jigsaw, set of spatulas and sandpaper;
- Titan glue, epoxy glue;
- speakers for which we make podiums.
First of all, we cut out the rings for the speakers and the base:
Let's try the speaker on the podium.
We wrap the door trim and the podium with cellafane.
We wrap the door trim and the podium with cellophane.
We cover everything with polyurethane foam and wait until it hardens.
Using a sharp knife, we cut off all excess, giving the shape to the podium, and carefully sand it. If voids appear, foam them again.
We glue the wasps with fiberglass with epoxy glue and sand them.
We putty the uneven surfaces and sand them again, this time it’s smooth.
Applying glue and heating with a hairdryer, we cover the structure with leatherette. Very carefully, the process is really complicated.
This is what the finished podium looks like. The material can be used by anyone who likes it.
How to make podiums for speakers with your own hands VAZ 2114
Nowadays, stores offer a fairly wide selection of acoustic podiums from different manufacturers, but it is much better and cheaper to make podiums for the VAZ 2114 with your own hands. Moreover, it is not at all difficult.
Experts recommend first creating a life-size drawing or diagram of the future podium. This will allow you to monitor whether you are doing everything correctly during the work.
To work, you need to prepare the following tools and materials:
- plywood;
- electric drill (or jigsaw);
- polyurethane foam sealant;
- epoxy resin;
- sharp knife;
- set of self-tapping screws;
- wood spacers;
- putty;
- nylon (you can take regular stockings or tights);
- bucks;
- black paint in an aerosol can;
- material for covering the podium. It can be genuine leather, dermantin, etc.
- sandpaper;
- anti-gravel aerosol.
Advice! The ideal frame in terms of rigidity is made of plywood, no more than 0.6 cm thick.
Stages of work execution
- Using a jigsaw, cut holes precisely to fit the diameter of the speakers.
If you don’t have polyurethane foam, but want to feel like a sculptor, you can use Comoplast. This is a synthetic material consisting of resins and dye. Compoplast is very plastic, safe for health, and odorless. Once hardened, this material resembles plastic. Compoplast is excellent for making an acoustic podium, as well as for minor repairs of various car elements.
To prepare a composite, you need to take 2 identical parts of the compoplast components and mix them thoroughly with your hands like plasticine. You need to knead for at least 3-5 minutes until the material acquires a dark gray color. It is important to take exactly equal parts, otherwise you risk having to redo the whole job again, since the compoplast may not harden.
Remember that compoplast at room temperature (from +18 to +25) remains plastic for about 30 minutes.