Ignition systems of the 8-valve injection VAZ-2114
You can determine the type of ignition by looking under the hood:
- If you find a breaker near the “heart” of your car (analogous to a distributor installed on contact systems), then your car belongs to the first series, and the ignition of the VAZ 2114 injector on it is non-contact, based on the breaker-distributor assembly. The ignition in such systems is set by turning the distributor degree by degree, and the results of the work depend on the experience of the performer and the availability of special equipment. So, with the help of a strobe light, the system can be debugged exactly as desired by the car owner.
- If this part is not present, then your car belongs to the representatives of the tenth family, equipped with an electronic ignition system. It is impossible to set this manually, and its operation is completely controlled by the ECU. At the same time, it is not completely unadjustable, because by connecting to an on-board computer, some of its parameters can be reconfigured to your taste, but there are only a few specialists capable of doing this correctly.
IMPORTANT! The electronic system in the VAZ 2114 is designed so that the owner does not have to maintain it, so if you do not plan to participate in racing competitions with your car, it is better not to mess with the software.
Causes of ignition problems
As mentioned earlier, in order to set the ignition in the electronic system you will have to go into the “brains”, there you can also check the functionality of the sensors, so they greatly influence the operation of the system, regardless of the type of ignition.
On the electronic type, the main causes of failures are:
- Incorrect information transmitted from sensors to the ECU. If the connection to the brain and diagnostics showed strange data coming from one or more control devices, it is necessary to use a “substitution”. The easiest way is to find a car with known good sensors, install them and double-check the results. Here you need to understand that you do not need a new one, but a working sensor, because factory defects are not excluded even on a new mechanism.
- The incoming voltage - correct from a technical point of view is 5V, but if due to a violation of the mechanical integrity of the wires or another problem with the car’s electronics, this voltage changes, the sensor readings will also change after it. If this happens, the ECU begins to adjust engine operation based on incorrect data, which leads to incorrect operation of the entire mechanism as a whole. To check this breakdown, you will need a known-good system of wires leading to the sensor or a donor car into which you can install your sensor and test the system for functionality.
- Broken ECU - if the previous two options did not give a visible result, and installing your sensor and wiring in a working machine does not change its performance, only this option remains. You can try to reflash the “brain” of the car, but due to its low cost, it is better to immediately buy a new ECU and install it on the car.
Before moving on to the radical measures proposed in the third option, it is worth additionally checking the correct location of the labels. In cars with contactless ignition, this is the ignition installation of the VAZ 2114, and for cars with an electronic system, debugging is important to check the synchronization of the injection system with the gas distribution mechanism.
Ignition control
Electronic ignition control
How to set the ignition angle? On systems with electronic ignition control systems, this can be done using computer diagnostics that connect to the Electronic Control Unit (ECU) or the “brains” of the car. And there you can see how the engine operates in real time - what signals are received from the sensors, what engine speed, fuel consumption, injection timing, ignition timing and other input and output data.
Basically, you don’t need to change anything during operation unless you change the firmware. That is, if the machine somehow began to work incorrectly, then most likely there could be several reasons:
- An incorrect signal is received from the sensors; in this case, you can replace the supposed faulty sensor with a replacement one that is known to be working, and see if the result changes.
- The voltage in the network is incorrect and, accordingly, the sensors give the wrong signal. The input signal to the sensor is 5V, if this indicator is different, the ECU will receive incorrect input data and the engine will not be able to operate normally.
- The ECU is faulty. Quite often it happens that after going through everything possible, it turns out that your brains have flown. But don’t worry, they are inexpensive at VAZ.
Therefore, as such, the ignition is not set on injection machines, it is already built into the system, but it is worth checking whether the marks are set correctly.
Adjusting the ignition marks on the VAZ-2110 injector
When the engine is running, there are some phases that must work synchronously, the camshaft must coincide with the crankshaft, and the timing of fuel injection and ignition must correlate with them. Let's look at all this using the example of the VAZ-2110.
Getting ready to adjust the ignition
In order to correctly set the ignition timing of the VAZ 2114 and carry out debugging, you need to prepare. The method described below does not require acrobatic agility from the owner and is quite feasible both in the uncomfortable and cramped environment of a garage and if the car enthusiast has a tummy.
IMPORTANT! Thorough preparation always speeds up the process of technical work significantly, regardless of what exactly needs to be repaired.
Preparation for debugging ignition marks is carried out as follows:
- The car is placed on a flat surface and placed on the handbrake.
- The second step is to remove the front right wheel, which will subsequently allow you to gain access to the gas distribution mechanism itself, which will speed up the work, make it convenient and easy, for this: a. unscrew the fastenings of our wheel and place a wheel chock under the diagonally opposite wheel (rear left); b. We lift the car with a jack, twist the wheel mounts completely and remove it.
- Finally, we need to remove the timing belt splash guard (if there is one, of course). By the way, you can not remove it entirely, but just unscrew the two lower fasteners, then it can be moved away without damaging it.
Typical malfunctions of the ignition system on a VAZ fourteenth model
Before setting the ignition on the VAZ, let's look at the reasons why multiple misfires occur:
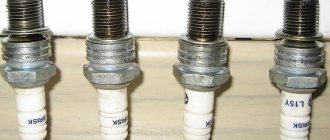
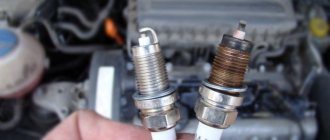
- Problems with spark plugs. Spark plugs will not be able to work normally and transmit a spark if there is carbon deposits on their electrodes, or if the gap in them has increased or decreased. As a rule, on a VAZ 2114 with an engine, the injector spark plugs fail as a result of the fact that low-quality parts were initially installed.
- Malfunctions in the electrical circuit. As a rule, we are talking about wear and tear on the wiring, chafing, and mechanical damage. In some cases, this problem can be solved by replacing the wires.
- Poor contact. During the operation of the car, the contact itself may oxidize, become covered with traces of motor fluid, or burn out. If possible, the functionality of the contact can be restored by cleaning or replacing. The last option is preferable, as it is practical.
- Incorrect operation or damage to the coil. If your car is equipped with a 1.6 liter injector, then it uses a coil. If this element breaks or does not work correctly, it can lead to the formation of gaps. It should be noted right away that there is no point in repairing the coils, since you cannot be sure of their performance. Therefore, if this part breaks, it will need to be replaced.
- Quite often, problems with the ignition system in injectors are caused by the use of low-quality fuel. Of course, if the cost of fuel is too low, this should be alarming, since such gas stations usually offer low-quality fuel. Due to the use of such fuel, the quality of the combustible mixture will also be low, in addition, cheap gasoline clogs filters and can clog injector nozzles. Accordingly, over time this can lead to the formation of gaps. The best option in this case would be to completely eliminate the malfunction and then use only high-quality fuel. Although its cost will be higher, you can be sure of the real quality of gasoline. Moreover, the money saved from using cheap fuel will in any case be used to repair the car, but it is quite possible that you will have to pay much more for this.
- Poor compression in the cylinders of the power unit. Compression should be checked first, as it can tell a lot of things. You can learn more about how to measure compression in a car from this material.
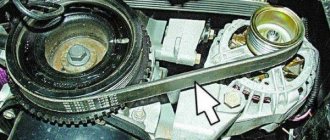
- Incorrect adjustment of the gas distribution mechanism is also one of the main causes of malfunction. If setting the timing belt does not cause big problems and does not take much time, this task can be accomplished on your own.
- Excess air entering the fuel system. This problem usually manifests itself as a result of existing damage to the intake manifold. In addition, it can be caused by wear on the elbows on the injectors and many other defects. In this case, we would recommend first diagnosing the tightness of the system in order to find possible places through which air can enter it.
- Another reason is that the gap between the cylinder and the piston has decreased significantly. In this case, there can be many reasons for the malfunction, however, you will have to check them in any case. First of all, you need to take into account that during engine operation, the piston ring grooves, special holes for the pin, etc. may wear out. In addition, the reason may lie in regular overheating of the engine, incorrectly adjusted rubbing and moving elements. In some cases, the malfunction is due to misalignment of the power unit, the use of low-quality motor fluid, and antifreeze getting into the oil. The latter problem is usually the result of a blown head gasket. In any case, all these malfunctions can lead to the appearance of a gap that does not meet the standards (the author of the video is the KV Avtoservis channel).
Question: how is the ignition set on injection engines? The spark plugs are turning black, the service center said that the ignition is delayed, and they have no basis for solving this problem, but it seems like it could be on a theoretical level.
How to realize they are turning black. 1. Screwed in new ones and started them. 5 min, turned Dark. 4. Passed 20,000, turned it out. dark. The ignition timing is set automatically once per second, and it (the timing) depends on many characteristics: engine speed, engine load (air mass flow or throttle position), coolant temperature. water, presence of detonation. So here are the results: 1. Describe carefully under what circumstances the candles turn black? 2. Change the gas station (try it) 3. How much mileage per day. 4. Of course, go to the service center and look at the coincidence of marks for installing the timing belt, maybe it was installed incorrectly, or in other words, it slipped (occasionally, alas, it happens). Take it to another service, where they said about the ignition “late”, they themselves.
Marks and direct adjustment
When the preparation is completed and the car is ready to work with it, you can begin to set the ignition marks of the VAZ 2114. The task of the procedure is to check the synchronism of the system (correlation of the camshaft, crankshaft and injection timing), with some nuances for the electronic system.
For electronic ignition systems, there is a small nuance - the need to check the distance from the master disk to the sensor. Normally, this distance should not exceed 0.7 mm, but should not be less than 0.5 mm. You can use a valve feeler gauge to check.
The further procedure for the electronic ignition system is as follows:
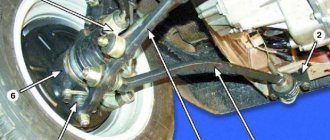
- We look into the mark hatch and align the gearbox housing mark with the flywheel mark by turning the crankshaft.
- We find the mark on the oil pump pulley and make sure it matches the tide of the cylinder block.
- Align the camshaft pulley mark with the head boss.
- The work is completed, to check the correct setting, check that the gap on the disk coincides with the tide of the cylinder block, and the twentieth tooth with the crankshaft position sensor. If everything matches, you have successfully completed the task.
On a car with contactless ignition, everything is even easier; you don’t have to remove the wheels, but you will need an assistant. It is necessary to find the compression stroke of the fourth cylinder. To do this, insert a rubber cone into the spark plug hole and turn the ratchet. Pushing out the cone will mean that the compression stroke has been found.
Having illuminated the spark plug hole, we align the longest mark of the cover with the mark of the pulley. We set the breaker to the appropriate clock and check the operation of the system according to the fourth point described above.
Ignition system sensors and marks
For the ignition system to operate correctly, the computer needs to read the correct information from the sensors. Subsequently, this information will be processed in accordance with the fuel maps hardwired into the injector.
The main signal comes from the crankshaft sensor. This sensor shows what position the crankshaft is in at a given time and, based on it, calculates at what moment it is necessary to inject fuel, and at what moment this same fuel should be ignited, depending on the engine speed, which is also determined by this sensor.
1 – crankshaft drive disc; 2 – crankshaft position sensor; 3 – angle of rotation of the crankshaft; 4 – output signal of the crankshaft position sensor
And this is what a typical signal received by a computer from the crankshaft sensor looks like. Pay attention to 270° - this is like the zero point, showing the computer that the engine has completed a revolution and a new cycle begins. This is achieved due to the absence of a tooth on the crankshaft drive sprocket.
How to set the ignition on a VAZ using marks
Almost all modifications of the VAZ-2114 and 2115 are equipped with engines with BSZ (non-contact electronic ignition). To make the setup, you need to:
- Unscrew the timing case fasteners and remove it.
Removing the timing case
- Adjust the gap from the crankshaft sensor (located near the generator pulley) to the gear disk. The permissible value is up to 0.7 mm.
Adjusting the gap from the crankshaft sensor to the gear disk
- If the distance is normal, check that the crankshaft pulley is not misaligned.
- To ensure that the marks on the flywheel align with those on the gearbox housing (can be seen on the hatch), the crankshaft must be rotated. It is convenient to do this by grasping the pulley mounting bolt.
Note! It is prohibited to turn the camshaft pulley itself.
Rotating the crankshaft pulley
- The mark on the cylinder block must align with that on the oil pump pulley. They should be adjusted.
- The last mark (on the camshaft pulley) should coincide with the other mark on the cylinder head.
Checking the marks on the camshaft and block
Having placed the marks on the VAZ model, you can see that the pistons of cylinders 1 and 4 are located at the dead center at the top, if everything is done correctly. In this case, the power unit operates correctly because the crankshaft sensor sends correct data to the ECU.
Setting the ignition on an injection engine
As can be seen from the above diagram, which is implemented in eight-valve injection engines, for the correct operation of the ignition system, the electronic engine control unit must be supplied with the necessary information from the sensors. The main sensor for system operation is the crankshaft position sensor . It is located on the ebb of the cylinder block next to the generator drive pulley, to the left of it, when looking at the end of the crankshaft.
Crankshaft position sensor
A timing gear disk is installed on the crankshaft pulley, which generates electromagnetic oscillations, and the sensor converts them into a pulse, this pulse is supplied to the computer. The control unit, based on the position of the crankshaft, sends a signal to the ignition module, which distributes the spark between the spark plugs.
In addition, the crankshaft position sensor sets the timing of fuel injection, so first of all we will check its condition.
- Remove the protective casing from the gas distribution mechanism drive.
Removing the timing belt protective cover - We control the gap between the sensor and the drive toothed disk.
It should not be more than 0.5-0.7 mm, otherwise the impulse from the sensor to the ECU will be too weak, and this can lead to misfires. Scheme of signal receipt from the crankshaft sensor: 1 – crankshaft master disk; 2 – crankshaft position sensor; 3 – angle of rotation of the crankshaft; 4 – output signal of the crankshaft position sensor - If the gap between the sensor and the disk is normal, check the correspondence of the marks. This is to ensure that the pulley on the crankshaft has not moved on the key. In this case, the sensor will give incorrect readings and the fuel supply and ignition systems will not be able to work correctly.
- Align the mark on the flywheel with the mark on the gearbox housing.
To do this, there is a hatch in which both marks are visible. By turning the crankshaft, we achieve complete alignment of the two marks. Align the mark on the flywheel with the mark on the gearbox housing - The second mark is located on the oil pump pulley; at this moment it should coincide with the tide on the cylinder block.
We check the coincidence of the marks on the oil pump pulley and the tide on the cylinder block - The third mark is located on the camshaft drive timing pulley.
It should coincide with the tide on the cylinder head (timing belt cover). Read more about timing belt tension here. We check the coincidence of the marks on the camshaft drive toothed pulley and the timing belt cover
If the three marks coincide, it means that at this moment the pistons of the first and fourth cylinders are at top dead center. It is at this moment that the gap between the teeth on the drive disk should coincide with the tide on the cylinder block, and the 20th tooth from the gap should coincide with the crankshaft position sensor. It is at this moment that the sensor sends an impulse to the engine control unit, indicating to it that the piston of the first cylinder is at the top dead center of the compression stroke.
We check the completed work. Step-by-step instruction
As can be seen from the diagram above, the ignition system consists of high-voltage and low-voltage circuits. In this regard, there are several points that you need to know when checking the system.
High-voltage wires operate at a voltage of about forty thousand volts. In our case, such a voltage is not dangerous for life, but receiving a discharge even with a low current strength and such a voltage is unlikely to be beneficial for health and mood. Therefore, it is advisable to work in rubberized gloves and use tools with insulated handles.
To check the condition of the system, you will need pliers with insulated handles, a standard set of tools and a multimeter. Please note that we only check the operation of the circuits, and not the operation of the microprocessor part. This requires computer equipment and special training.
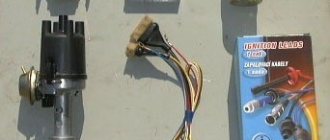
- With the ignition off, we check the contacts on all connectors in the system. First of all, the tightness of fit and contact of high-voltage wires in the ignition module.
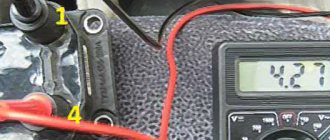
- Remove the block from the module and check the voltage at the terminals WITH And IN. The multimeter is set to low AC current control mode. For more details, see “checking the ignition module“.
Check the voltage at terminals C and B of the ignition moduleChecking ignition coil contacts 2 and 4 with a multimeter
- Checking the high voltage wires .
To do this, insert a known working spark plug into the cap and apply it tightly to the cylinder block or head. We crank the engine with the starter; if the wire is working properly, a spark should jump out. This is how all four high voltage wires are checked. Checking high voltage wires - If there is no spark on any wire, the ignition module undergoes a detailed check and, most often, replacement.
- If, after checking the circuits and knowingly good spark plugs and set tags, the engine does not start or does not operate correctly, the reason should be sought in the power system.
This way you can check and set the ignition on a VAZ-2114 with an injection 8-valve engine with your own hands. Good luck to everyone!
Checking the set ignition
To check the ignition on an 8-valve engine, an injector, you should prepare:
- Multimeter.
- Set of keys and screwdrivers.
- Pliers (necessarily with insulated handles).
Attention! Due to the lack of special equipment, the described method can only test the operation of the circuits. Diagnostics of the microprocessor part will not be available.
The process is:
- When the ignition is turned off, check how tightly the high voltage wires are seated and what contact is in the module.
- Remove the connector from the module, connect a multimeter (monitoring mode should be low AC) to pins C and B, make sure there is voltage. Check the coil (2nd and 4th contacts).
Checking the presence of power on the ignition module
- Check the functionality of high-voltage wires. Install a working spark plug in each cap in turn, attach one end to the block and crank the engine with the starter. The presence of a spark signals that everything is normal. Its absence on each wire means the module is faulty.
Checking high voltage wires
If you managed to set the ignition correctly on the VAZ model and this was confirmed by the test, but problems are still observed, you need to check the power system.
Consequences of incorrectly setting timing marks
If the ignition is set incorrectly, the following negative aspects are possible:
- If the engine has 16 valves, then they become deformed or bent during operation, accumulating damage.
- The previous problem causes damage to the cylinder head.
- The guide bushings may also become unusable.
- Cracks may appear in other engine components.
Crack in the cylinder block
- The motor overheats.
- The engine piston mechanism can burn out.
- Oil residue may appear on the spark plugs.
Oil deposits on spark plugs
- The fuel mixture loses its ignition moment.
Note! If the engine has 8 valves, then the consequences are not so critical - traction disappears, the belt quickly wears out and breaks.
After repairs, the following factors most often indicate an incorrectly set ignition:
- The car accelerates worse.
- Frequent overheating of the motor.
- The craving became much worse.
Photo of timing marks on VAZ 2114
The gas distribution mechanism controls the gas distribution phases of the engine. For proper operation of the engine, there are marks by which the timing belt must be set. They can get lost when the belt breaks or is replaced. The engine is an injector, 8 valves on 2114 and does not bend the valve if the marks are set incorrectly. But a broken belt can lead to other unpleasant consequences. The alignment process is difficult for novice DIYers. Step-by-step instructions and photographs will help make it clearer and easier. There are only two marks that must match. This is the mark on the camshaft that the camshaft pulley has. It should match the mark on the block. A photo of the timing marks is presented below. You also need to ensure that the marks on the camshaft and flywheel match the marks placed on the block. A photo of the timing mark on the VAZ 2114 flywheel is shown here: