Print this article Font size 16
The design of starters on the VAZ 2109 has fairly good reliability indicators. But with use and over time, they still fail.
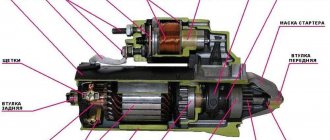
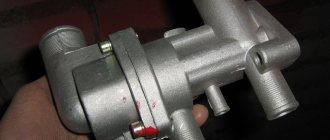
Appearance of the device
Design and operating principle
To understand the features of the repair, you must first study the design of the starter and understand how it works for the benefit of your car.
Let's start with the design. It includes four main nodes.
| Knot | Peculiarities |
| Electric motor | It transmits direct current through four brushes |
| Freewheel with gear | A clutch or bendix drives the flywheel of your car's engine. |
| Traction relay | Serves to extend the bendix with gear when turning on the electrical appliance |
| Bushings | Ensure easy rotation of the clutch, rotor, and gear. One bushing is located inside the starter, and the second is in the clutch housing. |
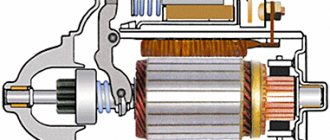
Device diagram
Having familiarized yourself with the starter diagram, you can discuss the principle of its operation.
The operating principle is to convert an electrical signal into the rotational movement of a drive gear. Current is transmitted through the brushes to the poles of the electric motor. At the same time, the clutch extends and the gear is connected to the flywheel ring. To start the engine you need a quick but easy rotation of the starter. When the engine starts, the clutch returns to its original position.
Disassembling the starter of VAZ 2108, 2109, 21099 cars: 1 comment
I looked through a bunch of sites, but it was on this starter that your information turned out to be the most useful. Many thanks to the author of this guide
The design of starters on the VAZ 2109 has fairly good reliability indicators. But with use and over time, they still fail.
Appearance of the device
Typical faults
It is better to start diagnosing the starter even before you remove it.
After dismantling, some signs of failure, by which the source of the problems can be determined, can no longer be determined.
Signs of a faulty element include:
- An unusual noise occurs when the engine starts;
- Complete absence or slow rotation of the starter;
- Rotation occurs, but there is no gear engagement with the Bendix ring;
- The unit rotates with the bendix, but then the clutch breaks;
- Turning the key in the ignition, there is silence.
Checking the dismantled unit
Before blaming the starter for everything, take the time to look under the hood and check the condition of the terminal contacts and connectors. Also pay attention to whether everything is ok with the battery. Only after this can you start working on the starter.
Do-it-yourself VAZ 2109 starter repair - an opportunity to save a lot of money
As you know, the starter is one of the most important parts of a car. The malfunction of this element is easily detected, even by inexperienced drivers. Such repairs can be done on your own, you just have to have the instructions at hand, which will be given below. In this article, we will look at the starter of the popular car of the golden youth of the 90s, VAZ 2109.
This car became the ancestor of a large number of cars.
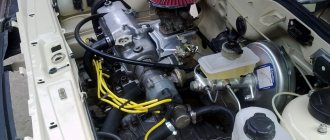
VAZ 2109 starter before repair
But as a result of use, this model began to crumble just like the previous Lada. Parts began to fail again, just like on the previous Zhiguli. The starter, which was the main part of the starting system, suffered especially, and was often subjected to heavy loads, especially in the winter.
Diagnostics
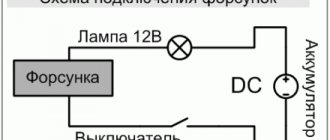
To carry out diagnostics, arm yourself with a conventional tester with voltmeter mode.
- Connect the battery terminals to the poles of your measuring device. You will need an assistant to drive.
- After connecting the terminals to the voltmeter, look at the readings of the device. If the battery is working properly, the data will be 11-13 V.
- Turn the ignition key and at this moment measure the voltage. If the losses are only 1-2 Volts, then the starter works normally and does not show resistance.
- If the voltmeter parameters decrease by 2 times or more, the reason is in the starter. Or rather its bushings or brushes.
- Remove the starter and check the relay. Connect the battery terminals to its terminals on the body and transfer it to 12 V. If the overrunning clutch moves in the front cover, then the relay works perfectly. If not, replace it.
The most common starter failures
It is recommended to carry out troubleshooting while it is running on the car, because after dismantling the starter, it will be quite difficult to identify some breakdowns. The main symptoms are expressed in the following situations:
- Uncharacteristic noise when starting the engine.
- slow rotation or no rotation at all.
- The device rotates, but the gear does not engage with the flywheel.
- The starter rotates with the flywheel, but subsequently there is a gap in the engagement.
- When you turn the key, there is no sign of the device being “working.”
In each of the above cases, it is necessary to look at the engine compartment. It is likely that the problem may be hidden in poor contact connections and electrical connectors. Additionally, check the condition of the battery; it may be discharged.
Removal
Well, the check showed that the starter needs to be repaired. Therefore, the first thing we do is dismantle it.
- Secure the car stationary by turning on the handbrake and placing stoppers under the wheels.
- Move the negative terminal from the battery to the side. This will deprive your car of power.
- Disconnect the wire connector from the starter solenoid relay terminal.
- Unscrew the fastening nut from the relay contact bolt and remove the wire.
- If there is a crankcase guard, remove it. Here all the bolts are simply unscrewed.
- The 2 starter fixing nuts are unscrewed from the bottom of the engine compartment. But the third one is more conveniently removed from inside the engine compartment.
- Having removed the fasteners and disconnected the wiring, you can safely remove your starter from the clutch housing.
Before starting work, be sure to clean the device from accumulated dirt so that it does not get inside the structure and reduce all repair efforts to nothing.
How to repair a starter yourself
Repairing the VAZ 2109 starter is not particularly difficult for an experienced driver who has become familiar with this part in old models of classic Zhiguli cars. This part is quite simple in its design, like most cars of this family. The part consists of:
Starter malfunctions
Malfunctions of this part are easy to distinguish. The overall design of the “nine” starter has not undergone absolutely any changes, although the developers have modernized some elements. So:
Otherwise, defects associated with the VAZ 2109 modification starter are as follows:
If you notice one of the above malfunctions, you must immediately proceed to repair. If you do not do this work right away, then you risk permanently damaging the part and being unable to repair it.
Dismantling
Before troubleshooting, you should look at the battery's performance. Symptoms of a weak battery are often similar to starter motor problems. You should also check the following type of communication: battery / ignition switch / starter / traction relay. Removing the starter is not so difficult. To do this you need:
Attention: During the dismantling process, it is necessary to pay special attention to such parts of the starter as the armature, the condition of the winding, gear defects, cleanliness of contacts and much more.
Repair
Next, you have to check the condition one by one and take appropriate measures to eliminate problems with the following components of the starter:
- Brushes;
- Anchor;
- Overrunning clutch;
- Traction relay;
- Bushings.
Now let's talk about everything one by one.
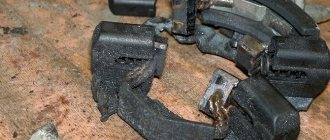
Brushes
First, assess the current condition of the brushes. In most cases, they are the source of problems with the starter.
- Remove the pair of screws that hold the protective cover in place. The cover is now easy to remove.
- Use a screwdriver to remove the retaining ring from the shaft, and don’t forget about the adjusting washers.
- Unscrew 2 more tie rod nuts. Remove the manifold side cover.
- Use a screwdriver to press out the springs and remove the brushes from the holder.
- Measure the brushes with a caliper or ruler. If the height is less than 12 millimeters, the brushes must be replaced.
- It is also better to replace elements if there are chips, cracks and other defects on the surface.
Brushes
Anchor
If all is well with the brushes, the next suspect is the anchor.
- Remove the housing with the starter.
- At the anchor, look at the condition of the commutator, check whether the winding is intact.
- If there is carbon deposits on the collector or signs of breakdown, clean these areas with fine sandpaper.
- Check the armature and stator windings using a multimeter in ohmmeter mode.
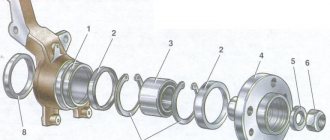
Overrunning clutch
Parallel checking of the overrunning clutch with the armature will allow you to replace the latter at the same time.
To gain access to the clutch you will have to remove the armature from the front cover. At the same time, change it if necessary.
- Remove the retaining ring located near the overrunning clutch.
- Remove the restrictor ring.
- Remove the plastic lever stop, which will allow you to reach the anchor.
- Remove the intermediate support from the shaft.
- Check the condition of the gear teeth. If there are defects, the unit is replaced with a new one.
Bendix or overrunning clutch
Traction relay
Replacing the traction relay is necessary if, when voltage is applied to its terminals, the overrunning clutch does not extend. Sometimes the VAZ 2109 is equipped with collapsible relays. But it’s still better not to repair it, but to replace it with a new relay.
- To remove the relay, unscrew the two screws located on the front;
- Lift the relay, disconnect the armature from the lever;
- Remove the relay from the housing, grabbing the spring and armature. All elements are changed if necessary.
Relay
Starter circuit and purpose
On all cars, without exception, and therefore on the VAZ 2109, the starter is responsible for starting the engine, or rather, spinning the crankshaft. Essentially, it is a small electric motor. The VAZ 2109 starter device includes a movable rotor, two windings, and a bendix with a set of brushes. How does it all work? Magnetic fields of opposite values are created around the starter and rotor windings, which drives the moving element into dynamics. It is quite easy to apply voltage to the starter, but for the rotor you need an intermediary - brushes consisting of graphite and copper.
What about the Bendix starter of the VAZ 2109, this element transmits movement to the flywheel. The part consists of the following parts: a fork connecting the mechanism to the retractor relay, an overrunning clutch that ensures movement in one direction, and a gear. Many motorists are familiar with the situation when this part is erased. The slipping of the Bendix is clearly audible and indicates that the installation of a new kit is inevitable. And although the cause is often contamination of the mechanism, cleaning it is not recommended. Due to dust and soot, Bendix is subject to wear, often unevenly, and even after washing it will no longer perform its function at the proper level.
There is a gear starter and a simple one. The scheme for transmitting torque to the flywheel is excellent. The gear starter has an additional element between the armature and the bendix. Many consider this design to be more productive and less voracious. True, the gear unit is more difficult to repair.
A few words about the nine starter
Before we learn how to use the repair kit for the starter we are interested in, let's figure out what this mechanism is. It is a simple electric motor with four poles and brushes, which is attached to the flywheel ring gear. The following starter models were installed on “nines” of different years of production: 29.3708; 5712.3708; 423.3708.
Any of them operates on a mixed excitation principle and has a traction relay with two windings. The differences between these starters lie in the design of the commutator device and the drive. Thus, the model 423 mechanism has a cylindrical type commutator, the 29 model has an end-mounted one, and the 5712 starter has a planetary gearbox installed in the drive. Their repair kit is absolutely identical, as well as their malfunctions.