Correct removal of the VAZ 2109 engine is necessary for scheduled and routine repairs. In most cases, temporary dismantling occurs along with the gearbox. The procedure is carried out in a specialized garage with a lift. Moreover, if a person knows how to remove a VAZ engine, everything can be done with his own hands in a few hours.
It is advisable that this procedure be carried out by a car owner with some experience. Even minor errors will lead to possible damage to individual elements of the VAZ 2109 vehicle system.
Preparatory stage
Before starting work, it is strongly recommended that you familiarize yourself with the structure of the “heart” of the iron horse. This will help avoid many problems associated with incorrect connection of individual system elements, such as:
- right front support;
- generator;
- engine;
- gearbox - it is necessary to remove the gearbox only if the engine is overhauled or replaced;
- starter;
- system for turning on the lights for reversing marks VAZ 2109;
- stretching;
- left front support;
- a plug that secures the hole for draining oil from the engine;
- front wheel drives on the right side;
- rear support-fix;
- hole for draining oil from the gearbox;
- left-hand front wheel drive;
- gearbox shift drive rod.
Beginners are advised to take photographs of the listed parts in assembled form. In order to successfully dismantle the VAZ engine, it is necessary to use the tools recommended by the manufacturer. A list of these can be found in the vehicle operating instructions. Regardless of the reason that prompted the need to carry out removal and diagnostics, you must adhere to the following scheme:
A carefully removed car ignition module will help you remove the engine correctly. Due to the fragile nature of the device, do not use excessive physical force. After this, the plug located on the block is dismantled. Only after all the liquid has been drained is the next element removed.
All plugs from the drive are disconnected in random order. The same thing happens with the throttle and hose cables. Before starting this stage, it is better to use a camera to record the initial position. The photo will be useful when the installation of the VAZ engine begins.
Literally, pinpoint precision is required when it comes to removing the hose leading to the gas line. To do this, you need a key set to “17”, which will not break the rather fragile system. Here, as in the case described above, it is necessary to carry out recording using a photo.
When returning the VAZ engine to its rightful place, the photograph will help to correctly connect all the elements. There is no room for error here. Only after you have completed removing all the tubes on the “head” can you move on to those parts that are directly attached to it.
What to put?
Indeed, the most important issue among VAZ 2109 owners is the range of engines that may be under the hood of their car.
Let's look at several popular solutions that are most often found among those who decide to change the engine on their VAZ 2109.
Option
Peculiarities
Gas is a cheaper alternative to gasoline, which will allow you to save big in the future at gas stations. This replacement is called the easiest. But you should take into account the fact that such a replacement will pay off only if the car is used frequently, and you will have a gas cylinder in the trunk. Such work can only be done by specialists with appropriate qualifications and permits.
VAZ injector 1.5 liters
A good alternative that will allow you to extract more power from your improved car. The injector is more powerful, it requires less fuel, and provides better dynamics. But in practice, changing engines from VAZ to VAZ is not the best solution, since there are many options among more reliable, powerful imported cars
Engines from Priora and VAZ 2112
Not bad domestic options that will easily fit into the space for the engine of your nine. Good output, excellent opportunity to transfer not only the engine, but also the gearbox itself
1.5 liter engine from Honda Civic
Here we are talking about 1.5-liter engines with a capacity of 92 horsepower of the 1991-1995 model. Injection engines of that generation perfectly fit the dimensions of the engine compartment of the VAZ 2109 and have good technical characteristics. A kind of improved variation of the previous version
Vectra engines of 1.4, 1.6 and 1.8 liters have proven themselves well. The engines, although old, are playful, quite powerful, and relatively economical. Their main advantage is their affordable price with good build quality. If you find a decent German engine of any of the presented volumes, your VAZ 2109 will perform significantly better compared to the factory engine
Motors from Mitsubishi Lancer
1.5-liter injection engines with a power of up to 100 horsepower are to the taste of many. Good dynamics, good assembly, pleasant economy. Finding such a motor is not very easy, but there shouldn’t be any big problems either.
An attractive replacement option that allows you to get a high-spirited, interesting, reliable Korean engine. The only important nuance is that the box from the nine does not match the features of the engine from the Korean, so you will have to change everything together
VW Passat or Golf
Excellent reliability, amazing engine life, despite their age. You won’t be able to install engines from the latest versions of these German cars, because then you’ll have to redo literally everything. But engines from the 90s will take your VAZ 2109 on board very well
Another example of the excellent German quality of the engine that can be installed on the nine. In many ways it is similar to engines from Volkswagen and Opel in terms of characteristics, dynamics, and efficiency. It’s not difficult to find, but try to choose a motor with minimal mileage. This way you will ensure a long and carefree life for your car.
You should choose engines up to 2.0 liters. The best option is a 1.6-liter engine with 16 valves and a power of 90 horsepower. You will find such engines on the Doblo model. There are quite a lot of them at car wrecking yards, so there shouldn’t be any problems finding them.
Torquey, quite powerful, dynamic engine with a good margin of safety. A good solution for our roads. Japanese quality is not much inferior to the presented analogues from Germany. At one time, engines for the 626 model received many positive reviews, which is why their installation on the VAZ 2109 is recommended by many experts
Actions requiring increased caution
Remove the muffler and camshaft pulley last. Further actions are taken taking into account the actual situation. If the star bolts are covered with a layer of dirt and oil, then there is no need to unscrew them. Remove everything together with the camshaft. It is better to unscrew them if the motor has been used recently.
The front crankshaft pulley will help you remove the engine correctly. To do this, it is recommended to use a folding key. It is installed through the top, not through the bottom. Before using it, it is recommended to switch to speed 4-5. After this, the VAZ engine is more easily subject to normalized physical impact. If the above recommendations do not help ease the movement of the key, you must use the services of an assistant.
One of the assistants gets into the car and presses the brake pedal. In this case, it is easier to remove the front crankshaft pulley. After this, the pipe and the generator bolts located on top are dismantled.
If the transmission bolts show signs of physical wear or significant contamination, it is better to replace them.
In this case, removing the engine will reduce the likelihood of failure in the future. After all, no one knows when the next time a car owner will look under the hood.
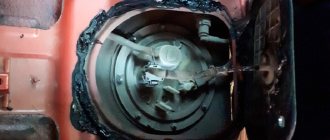
When removing the wires from the generator, it is necessary to gradually loosen the fastening of the device itself. The more accurately your hand moves, the less likely it is to get damaged. After this, the “crab” is removed with no less care. It is secured with two bolts, which we remove using a wrench. Before unscrewing the last bolt, the device is slowly moved to the side.
Removing the injector head VAZ 21083. Video
Photo. The head is removed from the motor
Next, unscrew the pipe, the upper bolts of the generator and the bolts of the box (three bolts and one nut), they are indicated by arrows in the photo.
Read also: How to Remove Wipers on Ix35
Photo. Engine, bottom view
Unscrew the wires from the generator and the generator mount itself is indicated by an arrow in the photo, and remove the generator.
Unscrew the crab, it is shown in the photo, I almost unscrewed it, there is only one bolt left, and loosen the rear link bolt.
Photo. Unscrewed crab
Place the unscrewed crab to the side as shown in the photo.
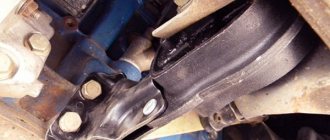
Photo. Fixed engine
Next, fix the engine as shown in the photo, use the timing belt and, to avoid scratching the car under the brick, place a rag, as shown in the photo. Loosen the motor mount and unscrew the mount from the motor itself, grab the belt and remove the pipe that fixed the engine, lower the engine.
Photo. Lowered engine
When the engine is lowered, it 50/50 comes off the box on its own, if it doesn’t come off, pry it with a pry bar and it will come off.
Photo. Removed engine
In the photo you can see the engine has been removed one hundred percent, all that remains is to put it on its side and pull it out, also to make it easier to stretch the engine, of course, slip a sweaty rag under it in advance or pull out a tarpaulin on it. Using this method, there is an option to install the engine, but in reverse order, that’s what I do. However, when installing the motor, I pass a large belt or rope under the engine and pull it from the bottom onto the box with an assistant.
Preparing for the reverse process
The process is completed by fixing the VAZ engine using a timing belt. It would be a good idea to use 1-2 bricks to help prevent the engine from falling. After making sure that the massive unit is fixed in space, the cushion is loosened and the engine is directly removed. Having secured the belt with your hand, you need to slowly remove the pipe.
If by this time the engine has not come off on its own, it is recommended to use a pry bar. After this, the unit is transferred to a temporary storage location for subsequent work with it. You need to remember - install everything in exactly the reverse order. If some elements have reached the end of their service life, it is better to replace them in advance.
The process of removing the “heart” of a car is complex and multi-stage. Accuracy and precision of actions is the key to successful repairs on your own. After removal, it is recommended to carry out a mandatory inspection of all engine components.
Removing the engine from a VAZ 2108, VAZ 2109, VAZ 21099 car
Removing the engine from a VAZ 2108, VAZ 2109, VAZ 21099 car 1. Remove the battery. 2. Drain the oil from the engine crankcase and coolant from the cooling system.
NOTE Remove the engine from the VAZ 2108, VAZ 2109, VAZ 21099 vehicle assembled with the gearbox. When removing the engine, lower the engine down from the engine compartment. It is more convenient to remove the engine by placing the VAZ 2108, VAZ 2109, VAZ 21099 on a lift.
3. Unscrew the mounting bolts and remove the engine crankcase protection.
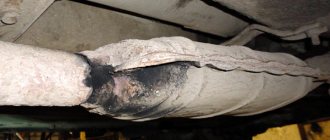
4. Remove the exhaust pipe from the muffler (see “Exhaust system”).
5. Remove the air filter.
6. Loosen the clamp and disconnect the brake booster vacuum hose from the engine inlet pipe.
7. Unscrew the bolt and disconnect the ground wire from the clutch housing.
8. Loosen the clamps and disconnect the hoses from the thermostat.
9. Disconnect the high-voltage wire from the central contact of the distributor cover.
10. Use a screwdriver to press out the spring clip and disconnect the block with low-voltage wires from the contact socket of the distributor.
11. Loosen the clamp and disconnect the fuel supply hose from the fuel pump.
12. Loosen the nuts on the end of the clutch release cable.
13. Remove the cable end from the clutch release lever.
14. Disconnect the block with the wire from the terminal of the starter traction relay.
15. Unscrew the fastening nut and disconnect the wire from the contact bolt of the starter traction relay.
16. Disconnect the block with the wire from the generator output.
17. Unscrew the nut and disconnect the wires from the generator terminal.
18. Disconnect the block with the wire from the carburetor shut-off solenoid valve terminal.
19. Loosen the clamp and disconnect the fuel return hose from the carburetor. Remove the hose from the plastic clamp.
20. Loosen the bolt securing the choke rod to the choke control lever.
21. Loosen the bolt securing the air damper drive rod shell to the bracket and disconnect the cable.
22. Remove the spring clamp of the accelerator drive cable from the throttle valve drive sector.
23. Remove the throttle valve return spring.
24. Remove the accelerator drive cable from the throttle valve drive sector.
25. Unscrew the fastening nut and remove the accelerator cable bracket from the valve cover.
26. Disconnect the block with the wire from the limit switch of the forced idle economizer (EFH).
27. Disconnect the wire from the coolant temperature sensor (DTOZH).
28. Disconnect the wire from the oil pressure sensor.
29. Loosen the clamp and disconnect the heater supply hose.
30. Loosen the clamp and disconnect the heater outlet hose.
31. Loosen the clamp and disconnect the gear shift rod from the joint tip.
32. Unscrew the fastening nut and disconnect the cable from the speedometer drive.
33. Disconnect the block with the wire from the reverse light switch on the gearbox.
34. Loosen the nuts securing the left and right braces to the suspension arms.
35. Unscrew the three bolts securing the brace bracket to the body and move the left and right braces to a position so that they do not interfere with removing the engine from the VAZ 2108, VAZ 2109, VAZ 21099.
36. Remove the cotter pin from the tie rod ball joint nut to the swing arm.
37. Unscrew the nut securing the steering rod ball joint.
38. Press the steering rod ball joint pin out of the strut swing arm using a special puller.
39. Remove the two bolts and disconnect the ball joint of the suspension arm from the steering knuckle.
40. Using a pry bar, press the shank of one of the inner CV joints of the drive shafts out of the gearbox and move it to the side.
41. Insert a technological mandrel (for example, an old internal CV joint) instead of the hinge so that the side gear does not turn. After this, disconnect the second CV joint in the same way as the first.
42. Hook the engine onto the eyelets and tighten the hoist cables.
43. Unscrew the two nuts securing the rear support of the power unit to the body.
44. Unscrew the nut, slightly lift the engine and remove the bolt of the right front power unit support.
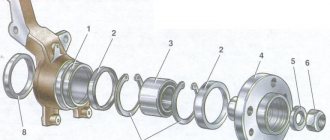
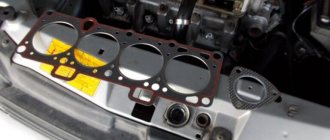
Dismantling the cylinder head on a VAZ 2109. Algorithm for replacing the cylinder head gasket yourself
It is necessary to remove the cylinder head (cylinder head) when replacing the gasket, block, as well as when repairing the piston group mechanism and its valves or when repairing the head itself. In addition, when tuning the engine or completely disassembling it, you also need to dismantle the cylinder head.
Before starting work, it is necessary that the car is installed on an overpass or inspection hole.