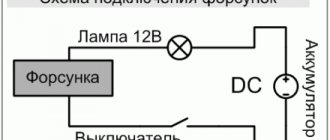
When and why do you need to adjust the rack?
To check the unit at service stations, backlash meters are used. But a person can independently determine the correctness of work without equipment.
Signs that the adjusting screw needs to be tightened:
- The presence of extraneous noise in the front suspension when driving on uneven surfaces.
- Deterioration in controllability. It is difficult for the driver to hold the car when moving in a straight line.
- Impacts to the steering wheel when overcoming uneven road surfaces.
- Steering wheel play.
Wedging of the steering wheel when driving indicates wear of the steering rack components. It will not be possible to tighten the adjusting element. It is necessary to identify and replace failed parts.
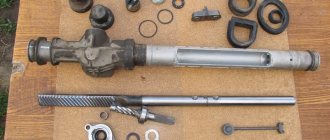
How to make adjustments
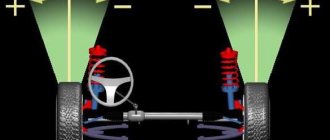
The principle of operation of the unit is based on the displacement of the bar using a gear. Steering rods are mounted at the edges of the bar. They are connected to wheel mechanisms. When the steering wheel rotates, the gear located on the shaft moves the bar with teeth in the desired direction.
To eliminate play in the rack, the elements of the gear pair are pressed tightly against each other. In this case, the steering wheel rotates freely without applying much physical effort. Surface wear leads to incorrect operation of the unit.
By tightening the adjusting element, the parts of the gear pair are pressed against each other. This makes it possible to eliminate play in the steering rack.
Overtightening the screw leads to strong clamping of the components. In this case, strong friction is formed between them. In this case, free rotation of the steering wheel will be difficult. The wear rate of components will increase. Incorrect adjustment impairs the performance of the steering rack.
Subtleties and nuances of replacing the front suspension silent block, useful tips - read about it here.
The procedure for tightening the rack on Kalina
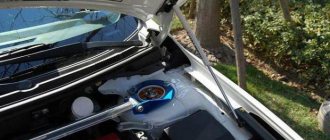
Now we need to crawl our hand under the steering rack in the place where it is marked with a yellow circle in the photo, only under the bottom, on the inside
and feel for the rubber cap there, which needs to be removed so that the key fits better:
As you can see in the photo above, I was unable to remove it successfully; it burst in half when removed, as it was sitting quite tightly. Try not to repeat this. Next, we take the special key that I mentioned above:
And we try to crawl our hand under Kalina’s rail to insert it into the desired hole - it is shown below, I photographed it from below to make it more clear what it all looks like:
You should not tighten the steering too much, as you may overdo it and then when turning, the rack may bite, which is unsafe for driving. Personally, in my example, I had to move the nut about 30 degrees. And this was enough for everything to become normal. Immediately after performing this procedure, check whether problems occur when turning the steering wheel all the way.
Now there are no knocks on the rubble. Just today the road turned out to be good for diagnostics (when leaving the garages it was solid rubble), it seemed to be quiet. Another question is how long will this last? Let's see. I'll keep you updated!
Adjusting the steering mechanism: features
To properly tighten the steering rack, it is better to work together with an assistant. In this case, one person will change the degree of tightening, the second will control the free play of the steering wheel.
It will be necessary to tighten the parts as much as possible without increasing the force required to turn the steering wheel.
The location of the adjusting screw varies from vehicle to vehicle. To identify the part, it is necessary to inspect the mechanism at the junction of the steering shaft and rack. The screw has a locknut that holds it in a stationary position.
To facilitate repairs, the part is cleaned. Stubborn dirt is removed with a wire brush. Specialized chemical compounds are applied to the threads to make turning easier.
On some models, you need a specialized tool to tighten the steering rack.
You can buy keys at the store or make them yourself. This will require experience in welding and turning.
Adjusting the steering wheel play on a VAZ 2101-VAZ 2107
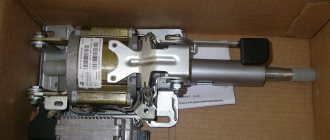
How to Remove Steering Rack Ford Focus 2
Welcome! Steering wheel play is a fairly common problem in almost all cars, especially cars of the “Classic” family. Backlash can occur for various reasons, ranging from a banal collision with a bump and ending with a malfunction in the steering system itself, so in order to remove the backlash you will have to make an effort that you will appreciate in the future.
Note! To adjust the backlash you will need to stock up on: A screwdriver and also a wrench set to “17”!
- Adjusting the free play of the steering wheel
- Additional video clip
What can cause backlash? In fact, it occurs for various reasons, some of which were described above. But if play occurs, this may be to blame: A loose or heavily worn fastening of the steering mechanism, as well as the pendulum arm and the steering rods themselves.
Note! Before sinning on all these items of the steering mechanism, it is first recommended to check and, if possible, correct the increased gap that can be found in the engagement of the roller with the worm of the steering mechanism - we will do this adjustment!
How to adjust play, also known as free play at the steering wheel on a VAZ 2101-VAZ 2107?
Note! It is better to do the work with an assistant, as it is much easier and more convenient!
1) First, remove the protective cap that covers the column adjustment screw.
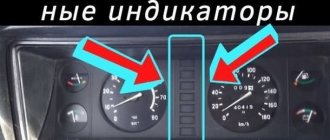
2) Then loosen the adjusting screw nut (Indicated by the red arrow) using a 17mm wrench. The nut must be loosened until the washer located under this nut can be lifted (Indicated by a blue arrow).
Next, when the nut is loosened, ask your assistant to sit behind the wheel of your car and sharply turn the steering wheel in different directions several times, while using a screwdriver, screw in the adjusting screw, which is indicated by the green arrow.
Note! Do this until the play at the steering wheel is within normal limits. Also, do not over-tighten the adjusting screw, otherwise the steering wheel may become very difficult to turn!
3) Next, completely tighten the adjusting screw nut, which is indicated by the red arrow, and while screwing, use a screwdriver to hold the screw itself from turning it.
Note! After the completed operations, check the free play of the steering wheel; if the steering wheel is difficult to turn, then slightly loosen the adjusting screw by loosening the nut. If, after completing the work, the steering play remains the same or has moved but not significantly, and if turning the steering wheel is accompanied by squeaking and clicking, then have it repaired at a car repair shop or replace the steering mechanism with a new one!
The steering mechanism is a very delicate thing and therefore it is not recommended to repair it yourself, because if assembled incorrectly, the mechanism can jam on the road and therefore the car will stop responding to steering movements!
If you don’t know how to check the steering wheel play, then read the article entitled: “Checking the free play of the steering wheel on a VAZ”!
Additional video clip: You can watch more detailed adjustment of the steering wheel free play in the video clip located just below:
Vaz-Russia.ru
How to adjust the steering rack
To tighten the rack, place the car on a lift. In garage conditions, an overpass or inspection hole is used. To make it easier to turn the wheel mechanisms, the front suspension is unloaded. To do this, jack up the front part of the hull. The work is carried out in the following sequence:
- Place the vehicle on an inspection pit or overpass.
- Avoid spontaneous rolling of the machine. To do this, install anti-roll devices under the rear wheels.
- Raise the front of the car. The degree of elevation is adjusted separately for each case. There is no need to completely lift the wheels off the surface. It is enough to reduce the load on the front axle.
- Inspect the mechanism for damage to parts. If any breakdowns are detected, the components are replaced with new ones.
- Clean the adjustment elements from dirt. If the parts are protected by a plastic plug, remove it. The dismantling method differs for different models. Before starting work, study the operating manual.
- Loosen the locknut that protects the screw from unintentional unscrewing.
- Adjust the degree of pressing of the gear pair. To determine how to properly tighten the steering rack, an assistant inside the car periodically rotates the steering wheel. At the same time, physical effort should not increase.
- Tighten the locknut while holding the screw stationary.
- Place the plastic cap on the seat.
- Lower the car.
- Check the functionality of the mechanism in motion.
If the mechanism jams while the car is moving, complete disassembly of the unit will be required. In this case, it will not be possible to tighten the rail.
How to tighten the steering rack and is it possible to prevent play?
Most often, steering rack malfunctions occur as a result of regular driving on dusty and uneven roads. Speed bumps, which are not always installed according to technology, have especially become a pressing problem in urban conditions; sometimes the entry to them is sharp, sometimes the height is high, and the car suffers. The longer this mode of operation continues, the faster the rack knocking will occur. This is the most pronounced symptom indicating its malfunction.
In order to repair the steering as little as possible, it is necessary to slow down if irregularities are clearly visible on the road. You should drive through them at very low speed.
Other causes of malfunctions are frequent collisions with curbs, a sharp increase in speed when the steering wheel is in the extreme position. In this regard, the load on the gearbox and other components of the steering rack increases. Under such conditions, even the car’s power steering can fail. Rack malfunctions are very similar to other breakdowns, so in some cases it requires complete disassembly for accurate diagnosis.