Priora support bearings are installed on the struts and are usually changed along with them. But it also happens that bearings fail much earlier - the quality of not all products is ideal. This element ensures the correct functioning of the entire suspension, as well as the rotation of the wheels. If the bearings fail, there are many inconveniences that affect the ride. Even a person who knows only superficially the design of the car can make the replacement independently.
Bearing manufacturers
You need to select spare parts before replacing the bearings on the machine. Similar products are installed on Priora and Tens. The highest quality products are produced by the following companies:
- SKF.
- KOYO.
- SNR.
The cost of products is very high - this is a fact. But their service life is longer than that of their domestic counterparts. If you want to save money, purchase domestically produced products, their cost is about 500-700 rubles per piece. It is advisable to choose spare parts from those companies that are recommended by AvtoVAZ. Remember that installing a new bearing will ensure stable operation of the suspension and will eliminate rattling in the place where the strut is attached to the body for a long time.
How to check the support bearing on a Priora
Some causes of car malfunction:
- expiration of service life (mileage has exceeded 70 thousand km);
- excess axial loads on the racks (careless driving, accidents);
- moisture and dust getting under the hood.
To do this, do the following:
- Raise the hood.
- Locate and remove the protective cover of the upper support cup.
- Start rocking the car body from bottom to top, while keeping your palm on the cup.
- If you feel a knocking noise with your hand or hear grinding and rattling noises, you probably need to replace the bearing.
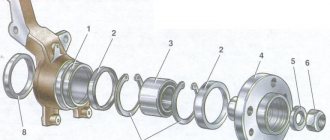
Separate support bearing VBF for Priora, Kalina
Kit with upper front support housing
What is required for replacement
In order to independently replace the support bearing of the Priora strut, you need to have a minimum set of tools on hand. You will have to completely dismantle the shock absorber strut, and this is not an easy task. But try to outline the position of all elements relative to each other - this will allow you to avoid adjusting the camber angles in the future. You need the following tool:
- Set of wrenches and socket heads.
- Screwdriver.
- Marker.
- Puller for tie rod ends.
- Puller for springs.
Having all these tools, you can start repairing. It is also advisable to have strong steel wire on hand. If you follow all the recommendations, you will complete the repair in an hour, or two at most. This is relatively little.
The price of a support bearing for a Priora is no more than 700 rubles (if you purchase domestic products). Repair at a service station will cost the same as spare parts, sometimes more. There are no difficulties in the work, then there is simply no point in overpaying.
Replacement process
- First of all, you need to remove the hub cap, after which you need to unscrew the CV joint nut;
- If you have an assistant, then ask him to press the brake pedal, while you yourself tear off the CV joint nut using a socket or wrench;
- Now you need to raise the car using a jack or lift;
- Now you need to unscrew the steering tip nut, and then remove the pin using the steering tip puller. You can also use a hammer and a pry bar for these purposes;
- The next step is to remove the two mounting bolts and disconnect the ball joint;
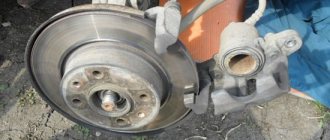
- Then you need to remove the brake hose from the strut clamp;
- Now you should loosen the petals of the washer and unscrew the two caliper bolts. Next, you need to move the caliper to the side so that it does not interfere and so as not to damage anything. You can hang it on a wire or clamp to simplify the procedure for replacing the support bearing on the Prior. It is important that the caliper does not hang on the brake hose. By the way, it is absolutely not necessary to dismantle the brake hoses.
- A little secret - for more convenient work with an already removed stand, you just need to loosen the stand nut, but do not unscrew it. Next, you need to unscrew the three support nuts.
- Then you should unscrew the CV joint nut and try to remove the strut at the same time as removing the CV joint from the splines;
- Using a spring tie, you need to bring the spring together. This can be done as follows: secure the tool to the coils, then tighten each nut in turn; after the spring is compressed, you need to remove the support bearing;
- Now you can replace the worn bearing with a new one;
- After this, you need to reassemble in reverse order.
In order to avoid premature wear of the support bearing, you should adhere to a careful driving style, use high-quality parts and avoid off-road conditions.
Preparation for repair
Before you begin any repairs, you need to do some preparation. To do this, perform a few simple manipulations:
- Park the car (Priora or Ten, it doesn’t matter at all, the operating algorithm is the same for them) on a level surface.
- Fix the position of the car - place shoes under the rear wheels, squeeze the handbrake and engage first or reverse gear.
- Remove all the front wheel bolts from the threads (it is advisable to replace the bearings on both struts).
- Lift up the side on which you plan to replace the support bearing first.
- Remove the entire wheel.
At this point, the preparation stage can be considered complete; it is time to disassemble the suspension and replace worn elements. Pay attention to the condition of all boots - if they are damaged, be sure to replace them.
Replacing support bearings without removing struts on a Lada Granta
Hello. Chassis repair is perhaps the most common work that a car owner has to do, or more accurately, “our” car owner has to do. These constant knocks and squeaks seem impossible to completely “defeat”, and after one is put in order, another goes out of order. In general, this is not strange, given the state of the roads in Russia. Constant loads and driving on uneven roads have the most unfavorable effect on the chassis. In principle, it would probably be wrong to blame the roads alone; part of the problem certainly lies with the designers of AvtoVAZ, who, despite problems with the roads, continue to produce cars with flimsy suspension and chassis. Well, enough of the ranting, I think, we need to get to work.
Today, dear readers of VAZ Repair, you will learn how to replace the support bearings on a Lada Granta, and not just replace them, but replace them without removing the struts. I wonder how? Then continue reading.
I’ll say right away that before replacing the support bearings, you need to make sure that they are really faulty. Read about how to check support bearings here.
Those who have ever encountered the need to replace support bearings know that to perform this work it is necessary to remove the struts along with the springs, which certainly complicates the task. However, as you know, laziness sometimes works wonders; in addition to being the “engine of progress”, it also often allows you to make your life easier. This photo report will clearly demonstrate to you how to replace the support bearings without removing the strut and you will be able to see that sometimes laziness can work wonders :-). Joke!
To work you must have:
- Set of keys: “13, 14, 17, 22”;
- Hexagon (to fix the rod from twisting);
- Two jacks or supports for the car;
- Special spring ties;
- Actually, the support bearings themselves.
Removing the rack
Perform further work according to the following scheme:
- Remove the cotter pin from the hole in the steering pin and unscrew the nut.
- Install the puller and remove the tip pin, move it to the side.
- Move the brake hose to the side.
- Use a marker to mark the position of the steering knuckle relative to the shock absorber strut - this is what affects the camber angle of the wheels.
- Unscrew the nuts from the bolts securing the strut to the knuckle and remove them.
- Move the hub and steering knuckle down slightly.
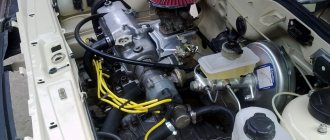
- In the engine compartment, use a 13mm wrench to unscrew the three nuts from the studs securing the Priora support bearing to the body.
After all these steps, you can remove the entire rack assembly; nothing is holding it in place. In this case, the spring will not unclamp - it still “sits” firmly on the rack.
Step-by-step instructions for replacing a support bearing
In a specialized car service, you will have to pay at least 500 Russian rubles for replacing the 1st “prop” with a LADA Priora. rub., however, the replacement can be done independently, the work does not take much time.
- The car must be parked on a level surface.
- Use a jack to lift the side from which the replacement will take place.
- We dismantle the wheel.
- Using a 19" wrench, unscrew the steering tip nut.
- If you have a special puller for pressing out the tip pin, you can use it. If there is no puller, you can press it out using a hammer and a small pry bar. The main thing in this process is not to damage the thread of the finger.
- Using the same wrench, unscrew the 2 nuts that secure the strut in the so-called steering knuckle.
- We remove the lid from the “glass”, then you need to unscrew the 3 nuts that secure the upper support to this very “glass”.
- Pull out the shock absorber completely, as if from underneath.
- In order to unload the upper support, you need to compress the shock absorber spring using a pair of ties.
- 9" and 22" wrenches will help tighten the nut securing the support to the rack.
- We remove the support and disassemble it in order to remove the support bearing.
- All that is required is to replace the worn “support” with a new device.
- We attach the support to the shock absorber.
- Assembly is carried out in reverse order.
Experts recommend replacing the bearings on both sides at the same time, and only after that adjusting the angle of the front wheels of the car.
In the cold season, it is more important than ever to install an electric heater in a car, which simplifies starting the engine in cold weather; on the website https://sto.ms/electric-heaters-installation you can order such an installation at a favorable price and with a guarantee.
Removing the support bearing
To remove the support bearing, you must use a spring compressor. Follow these steps:
- Install the device on three turns.
- Rotate the bolts evenly to compress the spring. There is no need to overdo it - it is enough for the spring to weaken and the pressure on the pillows to decrease.
- While holding the rod from turning, unscrew the nut with a wrench set to “17”.
- Carefully remove the bearing.
To ensure safe work, secure several turns of steel wire. It is most convenient to unscrew the nut from the rod using a special wrench. It often happens that the metal gets stuck, making it difficult to unscrew the nut.
Assembly of the unit
After dismantling the old Priora support bearing, a new one is installed in its place. Next, do the following:
- Screw the nut onto the rod.
- Release the spring and finally tighten the nut.
- Place the rack assembly in its place and attach the nuts to the three studs.
- Install the steering knuckle into the shock absorber strut in the same way as it was before - follow the marks.
- Install the bolts and tighten the nuts on them. Please note that the top bolt has an eccentric-shaped adjusting non-removable washer.
- Replace the tie rod end, tighten the nut and insert the cotter pin. Be sure to unclench its antennae so that it does not fall out during use.
- Tighten all threaded connections.
- Install the wheel and lower the car from the jack.
At this point the repair is completed; work is carried out on the second rack in a similar manner. There is nothing complicated about this, but it will require patience and the ability to work with keys. And if the support bearing suddenly knocks on a Priora, you know what to do. It is advisable to treat all threaded connections with a penetrating lubricant such as WD-40 or at least brake fluid before starting repairs.