It is not difficult to do a wheel alignment on a VAZ-2107 with your own hands, but you will have to adhere to a number of requirements and recommendations. Otherwise, the rubber will not last long. Camber is a term that defines the angle at which a car's wheel is mounted relative to the vertical. In cases where the top edge of the wheel protrudes outward, this is positive camber. If she looks inward, then negative. When adjusting on computerized stands, the angles are indicated with the prefixes “+” and “-”.
Basic adjustments
If the wheel camber is adjusted incorrectly on one side, then the car will drift sideways when driving. While driving in a straight line, take your hands off the steering wheel and watch where the car will “pull”. But before doing this, be sure to make sure that the tires have the same normal pressure. In case of problems, you need to do the wheel alignment yourself on the VAZ-2107.
Toe-in refers to how the front wheels are positioned relative to each other when driving on the road. But during adjustment, the angle relative to the normal position is measured. On sevens, the toe angle is positive; for front-wheel drive models it should be negative. This is necessary so that after starting off and while driving, the front wheels become level.
If you incorrectly set the wheel alignment yourself, the VAZ-2107 will very quickly “eat” the tires. Therefore, it is extremely important to monitor the angles of the front wheels, because the cost of the cheapest tire is approximately 2,000 rubles. And the adjustment procedure takes no more than an hour. After successful repairs, you will receive the car in perfect condition. The car will drive smoothly and will no longer pull to the side, which will increase safety and convenience.
Basic Concepts
If we consider the concept of wheel alignment, it means how the wheel of a car will be installed vertically. If the upper edge of the wheel is pointed outward, this fact means that the camber is positive. If the edge of the wheel goes inward, then the camber is negative, and it is designated accordingly: “-”.
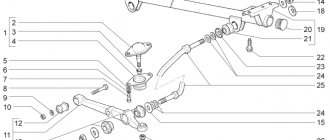
The diagram shows toe-in (a) and camber (b)
If the camber is adjusted incorrectly, and to be precise, when the camber of only the front wheel is adjusted, the car can drift to the side while moving; this is determined quite simply - the driver takes his hands off the steering wheel, and the car “steers away”.
As for toe-in, it shows how the wheels can converge with each other relative to the road.
If we consider cars with rear-wheel drive, then their wheels are placed at a positive angle, but on front-wheel drive the angle is determined by a negative indicator. This adjustment is necessary so that at the time of movement and during further driving the wheels can be aligned and continue to remain in the same position. Of course, incorrect toe adjustment quickly wears out tires and other elements of the car, so the motorist must pay close attention to his car and promptly adjust the wheel alignment himself or with the help of specialists. Tire wear due to correct and incorrect adjustment
Video: consequences of incorrect wheel alignment
When to adjust camber and toe
Before adjusting the installation angles, be sure to make sure that you have the following set of tools:
- Calipers.
- Open end and box type wrenches.
- Ticks.
- Strong thread.
- Metal hooks or pushpins.
- Wooden blocks - 2.2 cm and 6 mm thick.
This is the minimum set that will be required. The presence of WD-40 penetrating lubricant will not hurt, since the nuts and bolts are close to the road surface and dust and dirt constantly accumulate on them. Rust may occur, so you need to thoroughly clean the threaded connections before starting repair work on the car. All dirt accumulations must also be removed from the inside of the wheels.
Lada 2107: do-it-yourself camber adjustment in the garage
Operational wear of suspension elements, as well as numerous impacts due to uneven road surfaces, can change the architecture of its geometric connections. Actually, any manipulations with steering or suspension components also entail the need to adjust design parameters. Owners of domestic Lada cars have had time to practice a successful program for debugging chassis components, thereby ensuring impeccable handling and safety.
When to make adjustments
Make sure that you really need to adjust the wheel alignment yourself on the VAZ-2107. You definitely need to make adjustments if the following symptoms are present:
- The trajectory of movement changes, despite the fact that you hold the steering wheel straight. The car is still gradually moving to the side. But this needs to be checked when driving on a flat road, with the same tire pressure.
- If there are visible deviations in the alignment of the front wheels. If such symptoms are present, the tires will wear unevenly and gasoline consumption will increase. Suspension and steering components often fail.
- If you were involved in an accident in which components of the car's suspension or steering were damaged, you must do a wheel alignment on the VAZ-2107 yourself. Photos of the stages of the procedure are provided for clarity and understanding of the processes.
- When repairing suspension or steering components, be sure to check the wheel alignment.
The meaning of the term “wheel alignment”
Quite often, after completing the repair of the front suspension of a VAZ 2107, the auto repairman informs the owner of the car that the wheel alignment needs to be checked and adjusted. This type of adjustment is one of the most important, since the durability of car tires and the degree of stability of the vehicle on the road, and therefore traffic safety, depend on it . Adjusting wheel alignment most often applies to domestic cars, since the suspension design of modern foreign cars, as a rule, does not allow changes in wheel alignment angles. Correcting camber or alignment may only make sense for a foreign car after a serious accident or replacement of parts such as shock absorbers or springs.
The durability of car tires and the degree of stability of the vehicle on the road depend on the correct camber.
Prerequisites
The most accurate verification is possible only in workshops at stands. But in the absence of such attributes, you can use the proven “old-fashioned” method. It is advisable to install the car on an inspection hole, since you will have to unscrew the nuts and bolts of the suspension, and without it it will be problematic to do this.
When carrying out work, carefully inspect the entire suspension, the condition of the silent blocks and ball joints, and the tie rod ends. If there is play in them, then setting the wheel angles will not bring any result, and all the work will be done in vain, the car will change its trajectory spontaneously.
When is it recommended to carry out alignment - VAZ 2109
Various sources recommend adjustments at approximately 12-15 thousand kilometers, or once a year. Sometimes there are cases when it is necessary to perform such an operation ahead of schedule. The reason for this in most cases is the condition of our roads. It is enough to “catch” a good pothole once to require checking and adjusting the camber and toe of the front wheels.
Carrying out work on adjusting the front wheels of a VAZ 2109
If the owner plans to use his car for a long time without any problems, then it is not worth saving on this operation. After each replacement of ball joints, silent blocks, steering rods, shock absorbers, it is necessary to check and adjust the camber and toe of the wheels.
Tire wear due to incorrect camber of VAZ 2109
Performing this operation today is quite simple. You just need to go to a service center that performs such an operation, and specialists will quickly and efficiently complete this work. But there are times when such work must be done independently in a garage.
Preparatory work
Do-it-yourself wheel alignment on the VAZ-2107 is not carried out on the rear wheels, since the hubs are installed in one position and cannot be shifted to the side. The procedure is done only on the front axle of the car. Moreover, this does not depend on whether the car has rear or front wheel drive. Before starting work, do the following:
- To make the adjustment as accurate as possible, you need to load the machine. The load must weigh 320 kg and be distributed evenly across all four wheels. You can seat four people with approximately the same body weight in a car and throw a bag of cement into the trunk.
- A prerequisite is a full tank of gasoline. The capacity of the fuel tank in the VAZ-2107 is 39 liters. Make sure the gasoline level is close to the maximum mark.
- Tire pressure must be kept at a normal level - equalize it if necessary. Depending on the type of rubber, the pressure can fluctuate in the range of 1.8-2.5 Atm.
That's all, now you can do the wheel alignment on the VAZ-2107 with your own hands, the preparation for the procedure is completed.
What is needed for successful adjustment
In order for the adjustment to be completed successfully, it is not at all necessary to use the services of a specialized service. Both negative camber and positive camber can be brought back to normal with your own hands. Before carrying out the procedure, you should check the condition of the suspension. All its elements must be analyzed for backlash. If they are present, wheel alignment on a VAZ 2107 car is problematic and sometimes simply impossible.
Experts recommend loading the car before adjusting the wheel alignment yourself. A weight of approximately 320 kg is required. To do this, you can use some weights or seat four people of average build. It is also recommended to refuel the car to the recommended level. This is also a load that must be taken into account.
The last stage of preparation is checking the VAZ 2107 tires. Before performing wheel alignment, you should make sure that the pressure is correct. Help is required to complete the entire procedure from checking to setting the required angle. It is not possible to carry out the entire process on your own.
Controlling the camber angle on the front wheels
It should be noted that it is quite problematic to set the camber angles yourself, since there are many difficulties. But you can check how much the angle deviates from the normal position without much difficulty. To do this, you need to follow the following algorithm:
- Place the car on a level surface and secure its position by placing chocks under the rear wheels.
- Sit in the car and turn the steering wheel until it is level. The wheels must be parallel to the car body.
- Press the shock absorbers 2-3 times until the car's suspension is in its normal position. The force should be approximately 40-50 kg. The operation is carried out on all four shock absorbers.
- Take the thread and fix it on the top of the car's fender so that it passes clearly through the center of the wheel. To achieve a vertical position, tie a weight to the lower end. Measure from the top and bottom edges of the wheel to the thread. The difference in values is the wheel camber.
For example, the difference is 2 mm. This means the camber angle is 20 minutes (not degrees). Normally, the angle should be 4 degrees and 30 minutes. An upward deviation of no more than 20 minutes is permissible. But this is the case when the car is loaded with a mass of 320 kg. If there is no load, the angle should not deviate by more than 20 minutes. from 0 degrees and 5 minutes.
How to adjust camber and toe, aka wheel alignment angles on a VAZ 2101-VAZ 2107?
Note! A more accurate check of wheel installation must be checked in a specialized workshop on a special stand. But if you don’t have the money for this, then you can almost as well adjust the wheel angles without using a stand!
And also when adjusting, pay special attention to the suspension elements, because if the suspension is faulty or if play is detected in most of its parts, adjusting the wheel angles will lead to nothing!
Preparation for adjustment:
1) At the beginning, for more precise adjustment of the wheel angles, it is recommended to load the car with an additional weight of “320 kg”. For example, you can put “4” people in a car and a load of about “50 kg”.
2) Now check how much fuel is in the fuel tank, if it’s not enough, bring it up to normal, because the tank must be completely filled.
3) Next, check the tire pressure, it should also be normal.
Checking wheel alignment
As can be seen from the above, you can quickly do a wheel alignment on a VAZ-2107 with your own hands. The procedure for carrying out the work is simple, just have a little patience, mastery will come with time.
Preparation for adjusting wheel alignment is the same as in the case of camber, the only differences are in the subsequent actions:
- Align the wheels, place the machine on a level surface and place additional cargo on it. Only after the preparatory work has been completed can adjustments begin.
- To check the alignment, you need to use a strong thread with hooks tied at the ends.
- Fix the hooks on the front and rear wheels so that the thread passes clearly through the centers of both axles.
- The rear wheels have a 44 mm narrower track than the front ones. Therefore, a block with a thickness of 22 mm must be attached to the front of the rear wheel. The thread is laid on top of this beam.
- Turn the steering wheel so that the thread touches both sides of the front wheel tire.
- Fasten the thread on the opposite side and install 22 and 6 mm thick bars under the back of the wheel.
Examination
The essence of self-adjustment is that you can only check the wheel alignment indicator. Personally, it is very difficult to adjust and set the angles correctly. This will require the help of a qualified technician and special equipment, which is available at service stations. Adjusting the angles also involves installing the castor, which is almost impossible to do yourself without certain skills and experience.
The wheel alignment on a VAZ-2107 car can be adjusted independently. There are two ways to do this: using a thread or a special ruler. However, maximum accuracy will be ensured only by special equipment at the service station.
Wheel alignment adjustment
If the wheel alignment is incorrect, adjustment will be required. To do this, follow these steps:
- Loosen the tension on the tie rod end coupling clamps.
- Using Cobra-type pliers, you need to rotate the coupling. Before starting the adjustment, be sure to clean all threaded connections from dirt and dust and treat them with penetrating lubricant.
- Rotate the clutch until the gap between the thread and the front wheel tire is normalized.
- After completing the work, be sure to tighten the threaded connections.
- The adjustment on the second wheel is carried out in the same way.
- The total toe-in of the wheels should be no more than 2 mm.
Preparation and procedure for adjusting wheel alignment angles of VAZ 2107
Having a level area, balanced equal-sized wheels and tires with the required pressure are far from the only requirements. It is equally important to remove the decorative caps before starting the adjustment and ensure:
- lack of free movement in “running” units;
- permissible play in the steering;
- proper tightening of all connections in the chassis;
- serviceability of the depreciation system.
It is advisable to check and adjust the chassis by first placing 70 kg on each seat and 40 kg in the trunk. However, adjustments can also be made on an empty car. With the steering wheel in the direction of straight-line motion, you should remove all the play in the suspension by shaking each of the four bumpers several times.
The geometry specified by the manufacturer should be installed according to a strictly defined relationship: castor-wheel-alignment.
Checking and adjusting wheel camber angles.
- You need to make sure that the car is on a level surface.
- We apply a plumb line to the wing, and measure the distance to the rope near the top of the rim, and to the bottom. The difference between these two values should not exceed 3mm.
- Repeat step 2, only before changing the position of the wheel; this is done in order to obtain accurate values, since the wheel rim may be deformed and not have an ideal circumference.
- We do the same actions with the second wheel and record the received data.
- It is recommended to move the car to a slightly different place and take measurements again; if they coincide with the first ones, then we continue further.
- Using a 19mm wrench, loosen the fastening of the shock absorber strut to the steering knuckle; this must be done by removing the wheel.
- We move the fist forward or backward to achieve the camber we need.
- Having set the desired angle, fasten the bolts and put the wheel in place.
- We take measurements by first rocking or moving the car.
For cars with front-wheel drive, the camber angle is considered normal if it is in the range from -1 to +1mm, and for rear-wheel drive from 1 to 3mm.
Pras777 › Blog › Making negative camber on a Zhiguli (plus castor).
You will need a pit, a mount, a tool, as well as special camber washers (they look like a horseshoe in shape) and regular washers (washers from classic cylinder head bolts work well).
It's easier to do it with two people, but it can be done with one person. There is no universal recipe, because everyone’s car is different, has different body geometry, etc. Therefore, I can’t clearly describe the steps for you like in a magazine and tell you how much of what, where and with what.
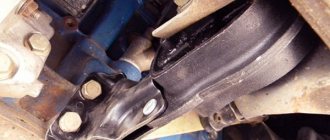
On Zhiguli cars there are such things as “camber bolts” (number 1 in the photo). There are two of these bolts on the right lower arm and two on the left lower arm. These bolts are used to adjust camber and caster.
The bolt closest to the front bumper will be called the front bolt, and the bolt that is closer to the rear bumper will be called the rear bolt. Number 2 in the photo indicates washers. In this case, only washers from the cylinder head bolts are installed, and special alignment washers (horseshoe-shaped) are not installed.
The arrows from number 2 are directed to the places where the washers need to be put on. You can build on how it was done on this machine. That is: we put three washers on the front bolts, and five washers on the rear bolts. Tighten the bolts and see if you are satisfied with the result. If the wheels are a little loose (in your opinion), then add washers. And if there are too many broken, then we begin to remove the washers.
You, of course, noticed that there are not the same number of washers on the front and rear bolts. This difference in the number of washers regulates the castor. Castor, simply put, is the return of the steering wheel. This phenomenon can be described as follows: you are rushing sideways, your steering wheel is turned in one direction, then when shifting, you release the steering wheel and it quickly turns (returns) in the other direction. This is castor.
Typically, a comfortable caster is achieved when the difference in the number of washers is approximately twofold. That is, for example, if you put three washers on the front bolts, then you need to put six washers on the rear bolts, that is, twice as many. Do this and then see how you feel when driving a car whether the caster needs to be increased or decreased.
Many people thoughtlessly strive to make a huge castor, but this is complete stupidity. The castor should not be large or small, it should be optimal and this is important. Castor is aimed at improving handling. When changing the caster (adjustment with washers), two parameters change: the speed of return of the steering wheel changes and, following this, the lightness of the steering wheel AUTOMATICALLY changes. The larger the castor (i.e., the greater the difference in the washers/the faster the steering wheel returns), the heavier the steering wheel.
Your task: to find a middle ground in which the steering wheel returns as quickly as possible, but at the same time, so that the steering wheel turns easily, so that you can handle it without problems, without getting sick from its tightness.
Also, do not forget that immediately after your intervention in adjusting the camber and castor, you will have to adjust the discrepancy. It is regulated much more simply - by steering rods (torsion of the rods). The wheels should be level or slightly to the sides.
There is no need to despair if something doesn’t work out right away. Setting up a car is always difficult. But the sooner you start trying, the sooner you’ll figure it out and understand what’s what.
An important point: if it turns out that your camber bolts are too short to put washers on them and thereby increase the camber, then simply buy longer bolts and replace them. The auto store sells bolts of different lengths, take your pick! A real camber bolt has a special rectangular head. If you want to replace your bolts with longer ones, you can install the bolts with a regular hat, it doesn't matter.
Be sure to use engraving washers and tighten these bolts regularly.
Source
Communities › VAZ: Repair and Modification › Forum › Negative collapse on the classics!
What is the purpose of such tuning? In general, you go to the wheel alignment and tell the dude to create a negative alignment.
They say that some kind of spacers need to be installed there, but I can’t figure out which ones exactly!
the goal is to increase the contact patch with the road, i.e. reduction of slippage and confidence