The process of installing xenon in PTF
If we don’t take the tuning option, where xenon-type fog lights are an integral attribute, then consider installing PTF on a standard standard bumper, as most motorists do.
Options
There are several options for installing fog lights, among which the motorist must choose the one that best suits him.
- Buying a bumper with installed fog lights.
- Purchase of individual PTF elements and their installation.
Algorithm and necessary tool
So, to complete the process you will need the following tools: a xenon kit (the selection of this product is described below), a drill, drill bits, a jigsaw. Is everything collected? Then we proceed directly to the consideration of the sequential process of installing xenon fog lights on the VAZ-2114:
- First you need to remove the front bumper.
- Now, we clean it from dirt, dust and other objects. The best thing to do is wash it and clean it.
- We carry out markings for future fog lights.
- Using a drill and jigsaw, we cut out holes for installing fog lights.
- Using a file, emery and other grinding devices, we process the edges.
- We fasten the fog lights into the holes using the bolts.
- The headlights themselves are installed, now you need to secure the xenon ignition units.
- We do this in the engine compartment, away from water.
- Wires with light bulbs extend from the blocks, which need to be installed as fog lights.
- Now, we connect the PTF and xenon to the electrical circuit.
- At the last stage, performance testing is carried out.
As most motorists and experts recommend, xenon installation should be trusted to a professional. Thus, if a motorist is not sure that he is able to do everything himself and correctly, the best option is to contact a car service center or an auto electrician.
Selection of xenon lamps for VAZ-2114
With the installation process covered, it's worth considering what's included in the xenon fog light kit and where it can be purchased. To begin with, let’s look at what the entire xenon kit in the PTF consists of:
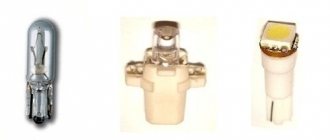
- Headlights;
- Light bulbs;
- Switching relay;
- Set of wires;
- Connection diagram;
- Button to turn on/off PTF.
Where to buy
Now that it’s clear what elements the kit consists of, it’s worth talking about purchasing options:
Chinese xenon, or?
You should not take the Chinese version of xenon, it is better to add a little and buy, albeit cheap, but high-quality branded goods.
As a rule, it has a guarantee, and the quality is certified by certificates. But, as practice shows, China is different from China and you can come across some pretty good and high-quality parts even made in China.
Selection of body and main criteria when selecting PTF VAZ
When choosing a PTF VAZ 2114 or for any other car, it is important to consider what kind of lamp will be installed in the fog lights, why fog lights are installed, etc. As a rule, such headlights themselves can be in a plastic, aluminum or magnesium housing. It is quite obvious that aluminum and magnesium are more reliable and durable, but they also cost more.
Fog lights may also have a plastic or glass light diffuser. Plastic products are resistant to damage, but quickly turn yellow and cloudy, and light transmittance decreases. As a result, after just a couple of years the quality of road lighting deteriorates.
PTFs with glass lenses last longer, but often the glass cracks due to temperature changes (especially when installing diode lamps) or as a result of mechanical damage. One way or another, it is advisable to select models where the diffuser can be replaced separately without changing the entire body.
We also note that if the car is used actively or in difficult conditions (for example, driving on the highway at high speed or driving on bad roads), when choosing, it is better to choose PTF models, which can be closed with special foglight plugs made of plastic to protect against stones, etc. d.
- Now let's move on to the choice. To decide which fog lights to install on the VAZ 2114, first of all, you should choose a reliable housing. As you know, the condition of roads in the Russian Federation and the CIS is poor, so PTF made from a material resistant to damage and temperature changes will be the best solution. If there are protective plugs, this will be an additional plus. The kit should also include good quality fasteners, wires, and relays.
The fogs themselves should provide the widest possible spot of light, distribute the light evenly, with a minimum of losses due to refraction and dispersion of the light flux. It should also be possible to adjust and adjust the light spot (both vertically and horizontally) so as not to blind drivers of oncoming cars. Even if the lamp burns out, access for replacement should be easy. This allows you to quickly change the llama yourself.
We also note that when choosing PTF 2114 or 2115, as well as for other cars, it is important to take into account their power. The fact is that fogs that are too powerful can create a large load on the generator and wiring. As a rule, 55 W lamps are sufficient. If the PTF is lensed (fog lights with a lens), you need to pay special attention to the quality of the lens, the reliability of its fixation, etc.
Finally, we note that when choosing PTF, it is also important that such headlights have acceptable aerodynamic performance and fit well into the overall exterior of the car.
As practice shows, car enthusiasts install domestic fog lights VAZ or Avtosvet as PTF on VAZ 2114. The list of imported solutions includes Bosch or Hella, as well as various Chinese PTFs. Also, regular PTFs from Samara, Niva, Priora, etc. are often installed on VAZ 2114 or 2115.
In fact, Avtosvet products are considered a high-quality budget option. However, it is important to remember that non-original fakes are often found. If we talk about expensive headlights, then Hella is a recognized leader, but the price for Hella PTFs is quite high.
As for fog lights from China, they can be either cheap or expensive, and the quality can also vary greatly. At the same time, it often happens that more expensive analogues may turn out to be no better or even worse than average-priced options.
Installation methods
There are several ways to equip a VAZ-2114 with fog lights:
- Purchasing a tuning bumper with fog lights already installed. Such bumpers are usually made in a tuning studio, where they are installed and connected. It's not cheap.
- Installation of a bumper from the VAZ 2115 model on a car with seats made for fog lamps, followed by the purchase of a PTF kit and their independent installation on the car.
- Purchasing a set of fog lights and “glasses” - facing elements for these headlights, installing them yourself. Let's look at this method in more detail.
Typically, a PTF kit includes: headlights, bulbs for them, power relay, wiring, connection diagram, power button. When choosing this kit, you should take into account the shape of the headlights; they should fit well into the “glasses”.
For the VAZ 2114, small rectangular headlights produced by Kirzhach are considered optimal.
The optics of this manufacturer are used in the standard installation of PTF on model 2114.
When choosing another manufacturer, there is a risk of purchasing low-quality equipment, in particular light bulbs. As a result, the quality of headlight illumination will be poor.
Fog lamps VAZ 2114 and VAZ 2115: which is better to choose
As you know, traffic safety is greatly influenced by the quality of road lighting. At the same time, fog lights can provide a noticeable improvement in visibility in difficult weather conditions (rain, fog, etc.)
Drivers also actively use PTF in the dark as a supplement to the head beam or high beam. However, not all cars are equipped with fog lights from the factory. Unfortunately, the popular VAZ 2114 and VAZ 2115 may not have PTF.
Naturally, owners of such cars often install fog lights themselves. Next, we will look at which fog lights for the VAZ 2114 are better to choose, what to look for when purchasing fog lights for the VAZ 2115, etc.
How to install a PTF: necessary materials and tools
Installation of fog lights, regardless of the chosen installation method, requires the presence of certain parts and tools, without which it is impossible.
What are the button and relay for?
In order to install fog lights on a VAZ, you need to assemble certain parts in advance or purchase a ready-made kit. The cost of such a set rarely exceeds one thousand rubles.
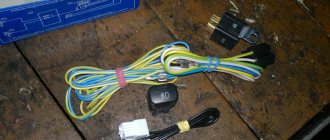
The PTF kit includes:
- wires with blocks and terminals for a specific VAZ model. There are three of them as standard: one connects the headlights, the second goes to the relay from the switch, and the third goes from the relay to the fuse box;
- fog lamp relay;
- power button;
- clips and ties that secure the wires;
- fog lights.
Which PTFs should you prefer? The headlights themselves are chosen by the driver to his taste, but the main thing when choosing is not to make a mistake with the power, so as not to overload the generator and the car’s electrical wiring. It is better not to purchase headlights with xenon: the generator has a certain power reserve, but is not designed for too high loads. Regular light bulbs will be sufficient.
Fog lights VAZ 2114 and VAZ 2115: what you need to know
So, in order to decide which PTF is better for the VAZ 2114 or 2115, it is worth noting that the choice must be approached responsibly. First of all, early versions of the VAZ 2114 were produced without fog lights, but subsequent “fourteenth” and similar “tags” may initially have standard PTFs.
If there are no fogs, in the second case there are still bumper plugs. This makes installation much easier. Let’s also add that many drivers of VAZ 2114 or 2115 are simply not satisfied with the standard VAZ fog lights. One way or another, owners are looking for the best option for both installation and replacement. Let's figure it out.
What are fog lamps for?
The main task of the PTF is to illuminate the space in front of the car. Correctly adjusted “fog lights” can illuminate a section of road 10–15 meters long. This distance is quite enough for safe movement by car in poor visibility conditions. The switching on and off of such lighting devices must be fully controlled by the driver.
Adjustment of fog lights is carried out during their installation. The procedure does not take much time, but requires care and precision. You can install the rear and front PTFs yourself.
Adjusting the fog lights
Any more or less experienced driver understands the need to use additional lighting devices, such as fog lights.
Standard high-beam (low-beam) headlights, designed to provide a sufficient level of illumination of the roadway, do not always cope with their functional task, and in conditions of drizzling rain, sleet and, especially, fog, they can significantly complicate the reality of the driver’s perception of the road situation. The relatively high beam of light they create, refracting in the humid air, creates a rather dense light curtain that limits the view of the road. The solution to this problem was the use of special external lighting devices on the vehicle, called fog lights. The practice of using these headlights has shown a direct dependence of the degree of efficiency of their functioning on the correct location of the device relative to the surface of the earth.
Preparing for installation
If your VAZ 2114 does not have fog lights provided by the factory, then you can install them yourself. First, you need to buy all the necessary parts and tools, namely:
- Fog lights, along with special wires;
- The framework in which the PTF will be installed;
- Mounting brackets;
- Light bulbs.
Before you start connecting this device, you need to prepare the holes in the bumper. On some models, plugs are installed that you simply need to remove and replace with headlights. But with some samples of the VAZ 2114, the situation is a little more complicated - you need to make the holes for the headlights yourself.
In order to do this work, you will need a stencil. To get it, trace the headlight mounting frames on paper and cut them out. Then, attach the stencil to the place where the fog light will be located. Trace the stencil, leaving a clear outline. Next, using a drill, drill many holes along the contour, close to each other, so that the middle of the plastic falls out and a hole is formed. It is advisable to sand the edges of this hole.
How to connect fog lights with your own hands
Before directly installing the headlights, their location is determined. In the case of the VAZ 2115 car, the bumper already has standard holes for installing additional lighting fixtures. Similar ones can be cut in the bumpers of VAZ 2113 and VAZ 2114.
There is no need to spoil the appearance of the bumper - fog lights are easily installed on special brackets. Many PTF kits contain special decorative plugs that add attractiveness and neatness to the installed headlights and facilitate the installation process.
Installation and connection algorithm
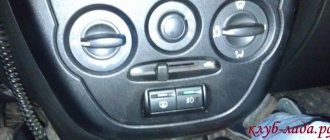
- Installation of a power button in the car interior. In the case of the VAZ-2114, the place for the button is on the left side of the driver on the front panel. However, its placement can be arbitrary - the main thing is that it is convenient for the driver to drive the car. Often, PTF power buttons are installed instead of plugs on the control panel.
- The grille with the speaker is removed from the standard front panel. Behind it there are two connectors - one is for turning on the headlights, the second is for indicating the operation of lighting fixtures and illuminating the key itself.
- The button is placed in a convenient place, and chips are connected to it. The speaker grill can be returned to its place.
- Under the hood there should be a mounting block that combines fuses and relays. The PTF relay will be mounted in the same place, so the block must be removed: to do this, unscrew the nuts that secure it and lift it.
- On the bottom panel of the mounting block there are two blocks - 7 and 8. Each of the blocks is signed during production at the factory, so it is impossible to make mistakes at this stage.
- The PTF set contains a wiring harness with four contacts. The mentioned wires are pulled to the fuse block from the fog light relay.
- The relay is mounted in the engine compartment of the car.
- The wires coming from the PTF relay are connected to connectors 7 and 8 of the mounting block: in connector 7, terminal 8 is connected to terminal 30 from the relay, terminal 87 is connected to connector 1, terminal 85 is connected to connector 17 on terminal 7, terminal 86 is connected to ground . From block 8, terminals 2 and 3 are directed to the left and right fog lights, respectively.
- The ground wires are connected to the fog lights: they are usually attached to the nuts of the headlights.
Wiring diagram for connectors and terminals of fog lights
The functionality of the entire connection can be checked by turning on the side lights - only then will the fog lights work.
Fog lights only function when the side lights are on
After completing the installation of the PTFs on the car, they only need to be adjusted correctly. The flow of light should not blind drivers in the oncoming lane.
Video: instructions for installing and connecting fog lights
Fog lights are essential lighting equipment on any car, making it easier to travel in conditions of minimal visibility. If there is no PTF on a certain car model, you can install them yourself. The installation procedure does not require special knowledge and can be carried out by the driver without the involvement of third parties.
Basic adjustment aspects
Adjusting VAZ headlights is done without material costs and a lot of time:
- To make adjustments, you must place the transport on a flat surface.
- Next, with the headlights on, one of which will be covered by something, you need to open the hood of the car and find the adjusting screws on the back of the headlight unit. One of them is designed to adjust the direction of light on a vertical surface, and the second – on a horizontal one. After adjusting the first headlight, you can proceed to the second.
It will be useful to replace BMW oil pump chain
Connecting PTF and control keys
The connection diagram that comes with the kit is simple and easy to understand.
First, we cut the wiring of these lighting devices into the mounting block installed under the hood, near the windshield on the right. To do this, unscrew the bolts securing this block and lift it to gain access to the pads, marked Ш7 and Ш8.
These blocks provide for the connection of fog lights, although they are not installed regularly. They connect the wiring from the headlights themselves, as well as from the relay included in the kit. All this needs to be connected correctly, and the diagram is as follows:
- The wire coming out from pin “87” is ground and we connect it to the car body.
- Pin “85” leads to block Ш7 (connects to connector 17).
- Pins “30” and “86” are connected to block Ш8 (pin “30” - to connector 8, and “86” - to connector 1).
From the installed headlights, we lay the “positive” wire through the entire engine compartment, since they are connected to the Ш8 block, but only these wires are inserted into connectors 2 and 3.
Then we connect the pads to the mounting block, install the block itself in place, select a place for mounting the PTF relay not far from the mounting block.
The connection diagram for the foglight control is also simple - the kit includes a button that we install in a seat on the panel.
The factory provided the possibility of connecting these headlights, so there is a control block under the panel. For everything to work, you need to remove the panel, find the required block and connect it to the button. Afterwards the panel is put in place.
To check the functionality, turn on the side lights on the car, and then turn on the PTF. When the headlights are turned off, even if the fog light switch is pressed, they should go out.
Installing this lighting equipment on a VAZ 2114 with the right approach should not take much time. But the presence of working PTFs on a car will significantly improve the illumination of the road at night.
Connection process
Connecting fog lights on a VAZ 2114 should be carried out strictly as shown in the diagram. This process starts from the inside of the car. On the panel of any VAZ 2114, regardless of its configuration, there is a special connector for the button for turning on the fog lights.
After the button is installed, the connection diagram goes into the engine compartment, to the fog lamp relay. This element is sold in a kit for connecting PTF. Its location should be in close proximity to the mounting block. This is explained by the fact that the block contains two terminal blocks that will need to be connected to the relay.
Next, when all the elements are connected, the relay should be connected to the fuse block, according to the order indicated in the diagram. Now, take the positive wire and lay it along the engine compartment, connecting the button contacts to the relay. Also, connect the PTF to this “plus”. The negative wire, in turn, needs to be connected at one end to the headlight, and at the other to the fastening nut, for ground.
Now that the connection is complete, connect the battery and try turning on the PTF. If everything works, then the work can be considered complete, and if not, then you should review the connection diagram again. You may have connected the wires incorrectly, or damaged the wiring when installing parts.
In general, experts recommend leaving as little excess wire length as possible. Since the loose presence of wiring in the engine compartment can cause it to weaken, and as a result, fall away from the relay.
Connecting the PTF on a VAZ 2114 should not be done independently, without the appropriate skills, as it can cause a short circuit and damage some elements of electrical equipment. If the installation of this device is simply necessary, then it is better to contact a specialist for help in connecting it.
Installation and configuration of VAZ headlights
Installation is carried out in the reverse order of removal. To adjust the headlights after replacement, you need a vertical wall and a flat area in front of it. The size of the site should be sufficient to park the car at a distance of 5 meters from the wall. Before starting the setup, fill a full tank of gasoline and place an assistant in the driver’s seat, whose weight is approximately equal to yours, and set the hydraulic corrector to the driver and passenger position. This will allow you to more accurately adjust the headlights. Cover the left headlight with a piece of cardboard or a black flat rag. Turn on the low beam.
The upper border of the left side of the light spot should be equal in height to the distance from the ground to the middle of the headlight. The right border of the spot should be 6-7 cm higher. The lower part of the light spot should be located opposite the center of the headlight. If the light spot is shifted vertically, then move it using the vertical adjustment screw (it is located on the side of the radiator grille in the upper part of the headlamp). If the spot is shifted horizontally, level it using the horizontal adjustment screw (located at the bottom of the headlight on the wheel side). After you have adjusted the headlight unit, check the operation of the hydraulic corrector. To do this, switch it to different modes and check whether the height of the light spot changes.