Bright headlights are the motorist's main assistants in the fight against bad weather and evening twilight. They should illuminate the road well so that you can be confident while driving even in the thickest fog. But if the light provided by standard headlights is not enough for you, we recommend installing fog lights on the VAZ 2107 for better visibility. You can do this yourself without resorting to the help of specialists. We will describe in detail below how to install correctly and how to choose “lanterns”.
What it is?
Already from the name it becomes clear that these headlights were invented specifically so that motorists could clearly see the road in fog or, for example, snowfall. The fact is that they are located very close to the road surface, where the fog is not very thick. Thus, they can easily penetrate it with their light and improve visibility around. They are not afraid of the most unexpected vagaries of nature, so those who often drive a car simply need them.
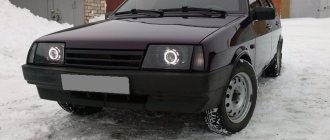
It is worth noting that such headlights will not only improve your car, but will also make it look different from other VAZ 2107, since fog lights were not intended by the manufacturer as standard elements on this car. Such tuning greatly decorates the car and makes it noticeable.
Who determines the level of responsibility?
The traffic police officer decides on the spot whether to issue a fine or limit himself to a warning. He looks at the situation, how the driver behaves, how often he had violations, and other mitigating or aggravating circumstances.
It's more of a human factor. But for the first such violation, you can count on a written warning.
If a car gets into an accident with the exterior lights not turned on, it automatically becomes the culprit of the accident! Even if he complied with all other traffic rules and was not actually at fault.
Driving without running lights or daytime running lights on automatically creates an emergency situation on the road, because the car becomes less noticeable to other road users.
If a traffic police officer is going to issue a fine, but the driver does not agree, then a protocol is first written, and then a decision is made.
The driver has the right to challenge the decision of the traffic police officer in the traffic police department or in court if he has arguments in his defense. To do this, the protocol must describe as accurately as possible what the driver disagrees with and what the road conditions were.
It is advisable to provide a photo or video confirming the absence of a violation. In special cases, even a voice recorder recording of a conversation with a traffic police officer can help the driver! The driver is given only 10 days to challenge.
Penalties for not turning on running lights are small - this is the minimum fine for violating traffic rules
But the importance of switched on, and most importantly, correctly switched on lights is very often underestimated by road users
If a car does not have illumination, it can simply not be noticed or mislead other drivers.
Such carelessness can lead to serious accidents. Therefore, for your own safety, never forget to turn on your daytime running lights or low beams - make your presence known on the road!
Therefore, for your own safety, never forget to turn on your daytime running lights or low beams - make your presence known on the road!
Which ones to choose?
As we have already said, fog lights are not only an important part of the car, but also its decoration. Thus, their choice must be approached responsibly.
First decide on the design and color of the light. You can choose round or square, yellow light or white. A wide range is offered by such companies as Osvar, Wesem, Hella, Catz and Osram.
The pricing policies of these brands are different, but you should assume that the more expensive the headlights, the better they are. Please note that the larger its surface, the brighter it will shine. That is why it is best to choose the largest size models from all those presented in the store.
In addition, we advise you to immediately purchase bulbs for them of the required category (H1, H2, H3, H7 or others) with a power of no more than 55 watts, so as not to blind drivers of oncoming cars and not to overheat the relay.
Using devices during daylight hours
Paragraph 19 of the traffic rules determines that it is necessary to turn on the lights on the car both during the day and at night. If lighting devices are used incorrectly, the responsible person may be fined in the following cases:
- High beams are turned on in areas where the rules for built-up areas apply. This situation is especially common in the dark, when after driving along a country road the driver forgets to switch the headlights to low.
- Using fog lights instead of low beam headlights. The traffic regulations recommend using fog lights when road visibility is not particularly good, if traffic occurs during heavy rain, in fog, or during a snowstorm.
- Cars driving at night with running lights on. Many distracted drivers make mistakes. With daytime running lights used throughout the day, sometimes when it gets dark, drivers forget to switch to the correct light.
When can you do without it?
- During the daytime, you can drive without low beams by turning on the daytime running lights or fog lights. This can be done provided that the movement does not occur in poor visibility, which is not enough for a correct assessment of the road situation. Otherwise, the chosen approach is considered a violation.
- At night, turn on either low or high beam headlights.
It is not always possible to use high beams - if there is lighting in a populated area, it is prohibited, and you should not turn it on if there is a possibility of blinding oncoming drivers. If visibility is insufficient during daylight hours, you can also drive using high beams, except in prohibited situations.
Cases in which to include
- Lighting devices must be available on any mechanical vehicle; this list also includes horse-drawn carts and bicycles, which are not required, but it is recommended to use devices with bright light when driving.
- For trailers and towed vehicles, it must be possible to equip them with side lights.
- It is necessary to keep the lights on at all times - for example, during daylight hours when driving in the city, low beams should be turned on to prevent accidental blinding of other persons driving oncoming vehicles. When the driver uses running lights, there is no need to turn on the low beam in addition.
- At night, after sunset, if visibility is poor, the driver can use high beams if he is sure that he will not blind the driver driving oncoming traffic.
Preparing for work
Once you have purchased the headlights you like, you can begin installation. Materials we will need:
- Female connector.
- Wiring.
- Four-stroke standard relay.
- On/off button.
If possible, it is best to purchase a special kit for connecting fog lights on a VAZ 2107.
To make the work more convenient, we recommend removing the bumper from the car before starting the process, since the fog lights should be installed under it. Please note that according to GOST, the lamps must be located under the low beam headlights and no lower than 25 cm from the road surface.
Adjusting the front optics of Almera Classic
The front optics of Almera Classic are adjusted according to the drawn diagram. The cut-off line should coincide with the broken lines. If alignment is not observed, each headlight is adjusted using two screws. One is responsible for the horizontal plane, the other for the vertical.
The high beam is adjusted so that the resulting light beam hits the center of the marking. It is difficult to achieve this in the field without special equipment. For this reason, a number of car owners prefer to entrust the work of adjustment to service workers.
The working process
We select the desired location and use a drill to drill holes for the bolts on which the foglights will be attached. Place the relay on the right side of the engine compartment. It should be connected to the wire located next to the splash guard. Now connect the relay to the new headlights.
We form a bundle from two wires coming from the left and right fog lights so that the wires do not dangle and interfere. Then we drill three holes in the bumper and secure the flagellum with wire.
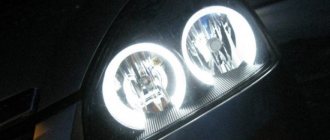
We screw the headlight mounts to the bumper, then put it in place. We disassemble the lanterns and insert pre-purchased light bulbs into them.
Now let's hang the back parts of the foglights. First, we thread the connected wires into the left headlight, strip them, and crimp the connectors. Now you can connect a light bulb to them and assemble it completely. We perform the same actions with the right one, but in addition we additionally crimp the parallel power supply and the harness onto the left fog lamp.
PTF connection diagram for VAZ-2107, 2105 and 2104 via a standard fuse box
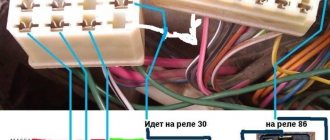
Today we will tell you how to connect fog lights on VAZ-2107, 2104 and 2105, using the standard fuse block, and protecting each PTF with a separate fuse in this block. This PTF connection diagram is interesting because there is no need to drill or pull anything from the interior under the hood; we use standard unused tracks in the block, the so-called reserve ones. It is reliable, practical and convenient. In our diagram, the PTF switch is shown in yellow and it will be supplied with power from connector Ш2, terminal number 3 (pink wire). That is, 12V will appear on it when the dimensions are turned on. The orange wire must be connected to the Ш4 connector, pin number 5. It should be noted that if terminal 5 in the Ш4 connector is not used in the classic, i.e. It is enough to have a terminal on the wire and insert it into the connector, then terminal 3 in connector Ш2 is activated. Therefore, in this situation, you need to have an adapter connector on the wire or connect two wires to each other using a connector. This completes the connection from the car interior to the unit.
Connections in the engine compartment are also made by inserting prepared wires with a terminal at the end into standard wiring connectors. Connectors Ш9, Ш11, Ш6 and Ш7 are used. I describe them in order, and if connected correctly, all connection points are not used by standard wiring. Remove connector Ш9 from the block and insert the wire from the headlight (they are shown in black in the diagram) into contact 1 and the wire from relay terminal 30 into contact 3. Insert connector Ш9 into place. The figure shows the removed connector Ш9. In it, the yellow wire from the headlight is inserted into pin 1, and the green wire from the relay is inserted into pin 3.
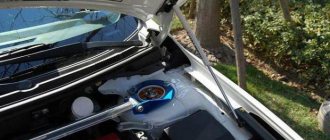
Next, remove connector Ш11 and insert the wire from the relay into pin 8 - terminal 85. Terminal 86 of the relay is connected to ground using a wire at the end of which there is a round terminal for a self-tapping screw. I placed the relay along the stem of the washer fluid barrel. Fundamentally, it does not matter if you confuse legs 85 and 86 with each other. After returning connector Ш11 to the block, it is necessary to remove connector Ш6 from the block. Insert the remaining wire from terminal 67 from the relay block into pin 8. We connect the Ш6 connector back into the block and all that remains is to insert the last wire from the second headlight into the Ш7 connector, pin 1. The figure shows the Ш7 connector (green) and the yellow wire from the second headlight in it .
The wiring of the block is made in such a way that this circuit uses fuses
number F3 and F4 for each headlight separately. In the event of a short circuit on the lamps in the headlights, the corresponding fuses must operate. Their rating is 7.5A with a 55W headlight bulb, or 8A if an old type fuse box is used. It should be remembered that power is supplied to the relay from fuse F1, which has a rating of 10A. It is advisable to change it to a nominal value of 15A, and for the old-style block 16A. That's all the description, I hope our article helped you!
Connecting fogs
All necessary actions should be carried out strictly according to this scheme.
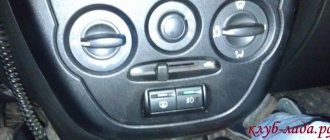
At the end, we install the power button on the dashboard inside the car, and also check how everything works.
As you can now see, the installation did not take much time, and the result exceeded all expectations.
Adjusting the fog lights
Fog lights (PTF is an abbreviated designation) on a car perform an important task. They help the driver to see oncoming traffic even in situations where thick fog reflects the light beams of the head optics. The rays coming from the fog lights should go below the main light and be parallel to the road.
With prolonged use, the factory settings are lost, so adjustment is required. On Almera Classic, the fog lights are adjusted as follows:
- The distance from the center of the fog lights to the surface on which the machine is installed is measured. The corresponding distance is measured on the wall and a horizontal line is drawn.
- The second line is drawn above the first at the same distance.
- Vertical segments are drawn on the diagram taking into account the position of the centers of the car and PTF.
- The car is driven 10 m away from the wall, the fog lights turn on.
- Use the adjustment screws to ensure that the centers of the light spots coincide with the points of intersection of the horizontal and vertical lines (for the right and left PTF).
- The rays descend until the upper boundary of the light spot is 10 cm from the drawn horizontal line.
Light and sound devices of the car and their location
We should start with the basics, or rather with what types of headlights and lanterns modern cars are equipped with.
Low beam headlights - designed to illuminate the road and surrounding area in a relatively small area.
High beam headlights are powerful lighting devices that illuminate the roadway over a fairly large area. Due to its high brightness, high beams can blind oncoming drivers.
Front fog lights - installed lower than conventional headlights, create a wide beam of light that well illuminates the road and the surrounding area in conditions of fog, snowfall and rain.
Daytime running lights are a separate type of headlights that are turned on during the day, regardless of weather or visibility, and are designed to increase the visibility of vehicles. Most models turn on immediately when the engine starts.
Tail lights - designed to identify the vehicle at night or in poor visibility conditions. The color of the lamps is red.
Brake lights are red lights that come on when a vehicle slows down. They burn much brighter than the side lights. Some cars are additionally equipped with a central brake light.
Rear fog lights - indicate the vehicle in fog, rain or snowstorm conditions. Not to be confused with brake lights.
Reversing lights are white and are designed to inform pedestrians and other motorists that the vehicle will be moving (or is already moving) in reverse.
Rear reflectors - used for the same purpose as side lights, they reflect the light falling on them from the headlights of passing cars. May also be known as retroreflectors.
License plate lighting – several white bulbs designed to illuminate the rear license plate of a vehicle.
Turn signals, or “turn signals,” are amber lights that are used to inform you that the vehicle is turning or otherwise maneuvering. Installed in the corners and on the sides of the car.