How to choose PTF
When choosing fog lights, you should pay attention to two parameters:
Color. PTF glasses should be either yellow or milky. Rays of this spectrum are most effective in foggy environments. Moreover, the traffic rules allow the installation of PTFs only in these colors, therefore, by installing blue or other “fog lights”, you can receive an administrative fine for violating the rules.
Advice: with PTF with yellow glasses, it is optimal to use white incandescent lamps. And, accordingly, yellow incandescent lamps are suitable for “foglights” with milky glass.
Marking. The presence of the letter “E” on the headlight (possibly with numbers) indicates that the headlights are certified in the EU. This should be followed by a Latin letter indicating the name and type of the lighting device. For PTF it should be the letter “B”. What is included in the PTF kit
The standard kit for installing fog lights includes:
- headlights with bulbs;
- set of wires;
- electromagnetic relay;
- PTF power button;
- VAZ 2114 PTF connection diagram.
Installation of PTF on VAZ 2114
There are three ways to install PTF on a car:
- Buy a new bumper with installed fog lights. This is the simplest, but most expensive solution. Such a bumper can be purchased at a tuning studio, where they will install it and connect the VAZ 2114 PTF.
- Buy a VAZ 2115 bumper, suitable fog lights and install and connect the parts yourself.
- Buy suitable PTFs with cladding, embed them into a standard bumper yourself and connect them to the on-board network.
To replace or modify a standard VAZ 2114 bumper, it must be removed from the car. The holes in the bumper should be marked using a stencil and then cut with a jigsaw or drilled. It is necessary to insert and secure the headlight trim (glasses) into the finished holes. The fastening must be done as reliably as possible, since poorly secured fog lights will vibrate when moving, which will shorten their service life. When the headlights are fixed in the bumper, and the bumper itself is installed in its original place, all that remains is to connect the VAZ 2114 PTF.
How to connect fog lights with your own hands
Before directly installing the headlights, their location is determined. In the case of the VAZ 2115 car, the bumper already has standard holes for installing additional lighting fixtures. Similar ones can be cut in the bumpers of VAZ 2113 and VAZ 2114.
There is no need to spoil the appearance of the bumper - fog lights are easily installed on special brackets. Many PTF kits contain special decorative plugs that add attractiveness and neatness to the installed headlights and facilitate the installation process.
Installation and connection algorithm
- Installation of a power button in the car interior. In the case of the VAZ-2114, the place for the button is on the left side of the driver on the front panel. However, its placement can be arbitrary - the main thing is that it is convenient for the driver to drive the car. Often, PTF power buttons are installed instead of plugs on the control panel.
A PTF activation button is installed in the cabin in a place convenient for the driver.
The power button is connected, chips are connected to it
Under the hood there is a block to which the PTF relay will be connected
The wiring harness connects to the fuse box
The PTF relay is located in the engine compartment
PTF connection diagram
Wiring diagram for connectors and terminals of fog lights
The functionality of the entire connection can be checked by turning on the side lights - only then will the fog lights work.
Fog lights only function when the side lights are on
After completing the installation of the PTFs on the car, they only need to be adjusted correctly. The flow of light should not blind drivers in the oncoming lane.
Installation methods
Bulbs in the fog lights of the VAZ 2114: approaching the choice correctly
There are several options for equipping your car with a fog light system. The choice depends on your personal preferences and capabilities.
| Way | Peculiarities |
| Buying a bumper with built-in PTF | Such bumpers are bought at a tuning studio, where everything will be connected and connected for you. The disadvantage of this option is the high cost |
| Buying a bumper from a VAZ 2115 and installing it yourself | To do this, you will have to buy a bumper from an older model, which has holes for fog lights. All that remains is to find a suitable set of PTFs and install them |
| Purchase of PTF and facing elements - glasses | Today this method is in greatest demand because it allows you to do the installation yourself for little money. |
The standard PTF kit includes several elements:
- Headlights;
- Light bulbs;
- Switching relay;
- Set of wires;
- Connection diagram;
- Button to turn on/off PTF.
When choosing a set, pay attention to the fact that the headlights match the shape of the glasses, that is, the facing elements. Standard kit
Standard kit
Today, for VAZ 2114 owners who want to install fog lights, it is recommended to choose rectangular kits from the Kirzhach company. It is used for factory installation of PTF on expensive versions of the model.
Xenon in PTF
Many car owners are thinking about installing xenon lamps in their fog lights. Is it good? Not really.
The thing is that when installing xenon in the PTF, focusing is disrupted. The operating principle of xenon is somewhat different compared to conventional Kirzhach type lamps.
Standard PTFs are designed for certain types of lamps, so they cannot cope with xenon. As a result, excessive reflection is observed in the reflector, rays are refracted, and the light is blurred. Where does this lead? To blind oncoming drivers.
The xenon option is not a practical or successful solution. Therefore, we recommend that you avoid it.
Another option is a combination of xenon and yellow fog lights. You will need H1 xenon bulbs, which are mounted in a bottle cap and only then placed in the headlight. This way the light beam has smoother boundaries, does not blind oncoming traffic, and better illuminates the roads in bad weather. Only after installing this combination lighting, be sure to make sure that your headlights really do not blind oncoming cars.
If oncoming cars stubbornly continue to shine their high beams on you, try adjusting the light beam. If this does not help, it is better to abandon xenon.
Xenon in PTF (installation, fines)
On the road you can increasingly see cars that have xenon installed in their fog lights (FTL). That is, instead of standard incandescent lamps, gas-discharge lamps are installed. Is xenon needed in foglights? In what ways can it be installed and is there a fine for this? Which is better, xenon or halogen? The situation when xenon in fog lights is no different from xenon in low beam headlights. Is xenon needed in PTF? People’s opinions are divided:
- Some claim that xenon light with a glow temperature of 4300 and 5000 Kelvin performs significantly better in fog than conventional halogen lamps.
- The other half is ready to puncture the tires or throw a brick at the windshield because the xenon in the PTF blinds oncoming drivers.
Let's try to find out whether it makes sense to install xenon in fog lights at all:
- The main task of fog lights is to “shine under the fog”, thereby not blinding the driver with reflected light. Moreover, the yellow light of the PTF is preferable, because it disperses fog better and makes the car stand out more in the fog.
- Requirements for fog lights: the upper cut-off line must be as sharp as possible, the dispersion angle in the vertical plane is the smallest, about 5 degrees, and in the horizontal plane the largest, about 60 degrees, and the maximum light intensity must be close to the upper cut-off line.
Now about the ways to install xenon in PTF:
Installation of xenon in PTF (factory/standard)
The most popular method is when a xenon kit is installed in the standard foglight, for example, from Sho-Me or other brands. Let's look at a specific example of installing a xenon kit with “h4” lamps (such lamps are installed in the fog light without any modifications). In order to secure the ignition units, you will need to remove the front wheels and fender liners. We place them from the inside behind the bumper. By the way, in the Kirzhach PTF there will be enough space to install h2 lamps; they will not fit the length of Bosch fog lamps. What do we get as a result? The focusing of the headlight is disrupted because A xenon lamp has a non-fixed light source. Since the headlight was designed for a specific type of lamp, it can no longer cope with the new light source. Multiple reflections and refractions occur in the reflector, which blurs the cut-off boundaries and ultimately blinds oncoming and passing drivers. In addition, PTF loses the ability to provide visibility and illumination of the road in bad weather conditions. Another way: yellow PTF with xenon. H2 bulbs were first installed in a bottle cap, and then in a headlight using sealant. All examples resemble the conclusions that were obtained after installing xenon in Kirzhach and Bosch headlights. In the first case, the beam of light had smooth boundaries and this even made it possible to legitimize xenon. Secondly, when the absence of a lens in the Bosch headlights (only a reflector) showed light beyond the permissible limits and led to blinding of other road users.
PTF lenses and xenon
Some xenon advocates have this position: the benefits of xenon light are best achieved with a focusing lens that ensures the correct distribution of the light beam.
Lensed fog lights with xenon light do not dazzle and perform PTF functions better. How to make a PTF on lenses? The first example shows how to modify a PTF for lenses with your own hands: It will not be possible to install a lens into a standard fog lamp housing; the dimensions of the structure are too large and will not allow them to be installed in place. However, you can go the other way: Lenses from the headlights of the VAZ 2110 “Kirzhach” were used as lenses. It was possible to install them, but without the housing of the headlight itself, so in order to prevent moisture from penetrating, it was decided to cover the back of the headlights with silicone for now. Lens mounts are made independently. Decorative PTF plugs in the bumper are also made according to an individual project from plastic. Initially, Philips halogen lamps were installed in the PTF. Tests: xn--2111-43da1a8c.xn--p1ai
PTF adjustment
VAZ 2114, 2115, 2113 technical characteristics. trunk volume of Lada 2114
Standard adjustment is not provided even on cars equipped with PTF. If several years of operation of a car equipped with PTF have passed, or you installed the headlights yourself, the headlights need to be adjusted, because the direction of the light spot will not comply with the rules.
If changing the angles of inclination in the headlight itself is impossible, use gaskets, linings and other devices. A special stand is required to carry out the work. If you wish, you can draw the same grid on the garage as on the stand and adjust the low, high beam and PTF yourself.
Installation, connection and adjustment of PTF
Depending on the type of fog lights, installation may be simpler or more complex. It is easier to install PTF where there are already places for installation and are simply covered with plugs. If there are no such places, then they will need to be cut or drilled. In the case of VAZ, some owners also sometimes change the entire bumper (for example, from 2115 with holes for PTF).
If we talk about connection, according to traffic regulations, fog lights should only be turned on together with the side lights. The PTFs themselves must be connected via a relay, suitable wires must be used, and there must be a fuse in the circuit. If you have certain skills, you can install the PTF yourself in a regular garage.
As for adjusting the PTF, this option is not provided on many cars. In the case where headlight adjustment is required on non-adjustable PTFs due to the fact that the fog lights are blinding or do not shine on the road, special gaskets are used to change the tilt angles, overlays are installed, etc. By the way, to adjust the light, you need a special stand, with the help of which you can adjust the low and high beam, as well as the PTF.
https://youtube.com/watch?v=q54l-DzD0bk
Installation of fog lights
Fuses and relays VAZ 2114, 2115, 2113
The easiest way (but will also be more expensive) is to install a new bumper, which initially has holes for the DRLs. The owner of a VAZ 2114 needs to dismantle the old bumper - remove the fastenings at the top and bottom, and install a new one in its place. To cut holes on a standard bumper, you will need an electronic drill with special attachments or a simple jigsaw, as well as glasses. The process goes like this:
- The bumper is removable, you need to apply markings for optics on it under a stencil.
- Next, work is carried out with a jigsaw or drill.
- When the holes are ready, “glasses” are mounted in them, which are needed to close the cutout. The “glasses” consist of two parts – internal (attached to the bumper from the outside) and external (perform a decorative function).
An excellent visual example of installing PTF
Legal features of installing PTF in Russia
Like a number of other equipment that a car is equipped with, PTFs must be installed in accordance with traffic regulations. According to the rules based on GOST 8769–75, installation of anti-fog optics is allowed in the amount of 2 pieces. On the car they should be located:
- no further than 40 cm from the side plane of the car (along the outer edge of the headlight);
- not lower than 25 cm from the road surface (along the lower edge of the headlight);
- the light openings of the fog lighting devices must be below the top point of the light-transmitting opening of the low-beam headlights;
- The visibility angles of the fog lights, within which they are not blocked by any elements of the vehicle, should be: vertically +15–10˚, horizontally +45–10˚.
The PTF should be turned on only in conjunction with the side lights. Modern cars have space for installing such headlights. There are plugs in these places, and they will need to be removed to install the headlights. If there is no specially provided space on the car, you will need to find one.
It is important to follow the installation and connection rules. Only with proper installation can you achieve efficient operation of lighting fixtures
Fog lights on a car must be located in strict accordance with traffic regulations
What requirements must PTFs meet?
When installing fog lights on a car, you need to know the rules that they must comply with:
- For the best illumination of the road surface, the optics in question must have a clear upper boundary of the light beam.
- If there are no specially designated places on the car for mounting PTFs, they cannot be mounted above the head optics. The best option for their location is as close to the road as possible. A lower location will provide better lighting in bad weather. But a position that is too low will result in the headlight being constantly wet in the rain, and water may get inside.
- If the optics are not factory-made, then it is advisable to take them with plugs. This will allow you to use the headlights as needed and significantly extend their service life.
- To prevent the optics from becoming cloudy or fogging up, it is recommended to use special processing agents.
As you can understand, installing fog lights does not require any special tools, knowledge or skills. Each car owner can do this procedure independently, adhering to the recommendations described above.
Each car owner, if necessary, can independently install fog lights. The procedure does not require special knowledge and skills. By following a certain sequence of actions and choosing the optimal connection diagram, installing and adjusting the headlights will not be difficult.
How to choose foglights VAZ 2115 and PTF VAZ 2114
Let's start with the fact that there are several types of fog lights. More precisely, there are two types: standard and universal PTFs
It is important to understand that their effectiveness greatly depends on the quality of the fogs themselves.
Let's move on. Standard PTFs can be original or analogues. In any case, they are produced for a specific car model, have similar mounts, housing, etc. Such PTFs are the easiest to install, especially if the bumper already has places for installation, covered with plugs.
Universal PTFs have a mount that allows them to be installed on different car models; such fog lights can be installed in the area of plugs on the bumper, on the radiator grille, hung on the bumper, etc.
The disadvantages are the insufficiently bright and strong glow of such lamps, as well as a short service life. At the same time, it is not always possible to replace the blades quickly and easily, taking into account possible difficulties with access (especially if the fogs are installed in standard places).
PTFs with a xenon lamp shine brighter than halogen lamps, the service life is also 50-60 or even 80-100% longer (provided that high-quality lamps are used). However, the cost of the equipment is much higher; for such lamps it is also necessary to install separate ignition units, correctly connect xenon, etc.
Also, brighter xenon light, which is better than halogen lights on a dry road, often provides worse visibility in fog and rain, since the color temperature is slightly different from halogen headlights, even for xenon analogues that are as close in characteristics as possible.
It is also worth noting that the brighter xenon glow can cause blinding oncoming drivers. Taking into account this feature, PTFs with xenon need to be lowered lower, constantly monitor their adjustment, keep the headlights clean and do not turn on the fog lights under normal conditions (when there is no fog, snow or rain).
LED PTFs are more economical in terms of energy consumption and place less load on the battery and wiring. The service life of good quality LED PTFs is usually longer than halogen or xenon ones.
Such fogs shine well (if the product is of high quality), in some cases you can change the temperature of the glow (from white to yellow, etc.). In practice, such PTFs may well perform the function of DRLs during daylight hours.
The downside is the high cost of high quality products. Additional requirements should be taken into account during installation, since in case of installation errors or poor ventilation, the LED headlights can become very hot, which renders them inoperable.
Types of fog lights
There are 2 types of fog lights:
- regular;
- universal.
PTFs perform effectively in bad weather
Standard headlights are produced for a specific car model with the same mounts and housing as the original.
Universal headlights have mounts that allow you to install them on any car at the plug points on the bumper, behind the radiator grille, or hang the headlights on the bumper.
Depending on the type of lamp, headlights are divided into:
- halogen;
- xenon;
- LED
Halogen lamps are cheaper than other options. But they burn out more often and need to be replaced regularly.
Xenon headlights illuminate the road better than halogen PTFs and last longer. However, the harsh light blinds oncoming drivers, and you can get a fine for excessive brightness of the lamps.
LED headlights are more economical and do not put as much strain on the battery as the previous two types of headlights. They are durable and illuminate the road well. If installed or vented incorrectly, LED headlights will overheat and fail.
PTF is produced in plastic, aluminum and magnesium cases. Aluminum and magnesium options are considered more durable and reliable.
Fog lights are equipped with plastic or glass light diffusers. Plastic lenses become cloudy over time and transmit light less well, which affects road visibility and driving safety. If you choose headlights with glass lenses, make sure they can be replaced if necessary.
High-quality PTFs provide excellent illumination
If the fog lights are not in use, they can be covered with plastic plugs for better safety.
Possible malfunctions and ways to eliminate them
And finally, let’s look at typical faults that can cause PTF failure:
- Burnout of lamps. We replace them with new ones (see section above).
- The fuses have failed. We open the mounting block and check fuses F8 and F9. If necessary, replace with inserts of the same rating (10 A).
- There is no minus power supply to the lamp. We crawl under the bumper and check the wire connecting the PTF lamp to the car body. Either it is torn, or the place where it is clamped under the headlight bolt has simply oxidized.
- There is no minus power to the relay. We open the engine compartment and check the wire coming from the 86th contact of the relay to the body. Either it is torn, or the place where it is clamped under the bolt has simply oxidized.
- A break or short circuit to the body of the wires supplying the PTF bulbs. In the second case, when replacing the fuse with a working one, the latter immediately burns out. We inspect the PTF power wires, find them, and fix them.
- The headlight relay is faulty. We exchange it for a rented one and check it. If everything works, we buy a new relay.
- The PTF switch is faulty. We remove it, call a tester, change it.
- There is no voltage at the 85th relay contact. We turn on the PTF and measure the voltage with a tester relative to the body. If it is not there, we look for a fault in the mounting block.
On this, perhaps, the conversation about the fog lights of the VAZ 2114 can be completed. Now we know how to install them ourselves, and, if necessary, repair them.
Previous Fog lightsHow to install fog lights on a Gazelle Business Next Fog lightsHow to change a fog light bulb on a Hyundai Solaris
Criterias of choice
To decide which fog lights to install on the VAZ 2114, you need to know the correct selection criteria.
Durable housing. In the conditions of Russian roads, the headlight housing must be made of material resistant to damage and temperature changes. It is better that the design includes plugs. Reliable fastenings and the presence of wires, relays and fasteners included. Wide light spot, uniform light distribution and minimal losses due to scattering and refraction. Adjustment and adjustment of the light spot vertically and horizontally. No dazzling of oncoming drivers. Easy replacement of a burnt out lamp
When purchasing, pay attention to the lamp replacement instructions section. The easier and faster it can be changed, the less time will need to be spent if the lamp burns out at the most inopportune moment
Ideally, after replacing the lamp, no further adjustment is required. Economical. When choosing headlights, try not to put unnecessary stress on the wiring and generator. In most cases, lamps up to 55 W will be sufficient. Thick durable lenses. Good aerodynamic performance. Compliance with machine design.
LED PTF VAZ 2114
The lineup
Having decided on the criteria, you can choose fog lights for the VAZ 2114, which ones are better and of higher quality.
Of the existing PTFs, the following models are most often installed on the VAZ 2114:
- VAZ;
- Autosvet (Kirzhach);
- Bosch;
- Hella;
- Chinese PTF.
Tuning PTF for VAZ 2114
The 2114 is equipped with both standard headlights from the latest modifications of Samara, and headlights from the Niva, Chevrolet Niva, Lada Priora and other models.
Avtosvet (Kirzhach) headlights are considered optimal in terms of quality and cost, but when purchasing, you need to check them so that the headlights do not turn out to be fake.
If you install Bosch headlights, they must be additionally sealed in the area of the bolts under the glass, otherwise water may get under the headlights.
Hella headlights are considered to have the best performance, but they are expensive.
PTF Hella
Chinese headlights are cheaper than all analogues. They are mainly used as a replacement for low beams to indicate navigation lights during daylight hours.
The best fog lights for the VAZ 2110-12
You can find fog lights (FTL) of various brands, both domestically produced and imported, on sale for about a dozen. Of the total number of headlights, about a third are fakes. Are there any differences between PTFs at all and how to buy high-quality PTFs for a VAZ 2110? What is the main function of fog lights? Fog lights primarily serve to illuminate the road in fog. PTFs are installed below the headlights and the beam from them is directed along the road, i.e. at a small angle to the horizon, which means they often blind oncoming people (especially when loading the car). Rough roads and dirty fog lights also affect driver glare. That is why it is recommended to use fog lights only during fog. How to replace PTF or a light bulb in PTF on a VAZ 2110? You can use this instruction. What is the difference between PTF? The difference is in the quality and shape of the light beam, which as a result, according to the rules, must comply with GOST. In addition, there are differences in the quality of the headlights. Because PTFs are close to the ground, then all the gravel, sand and dirt fall straight into them. How long they will serve you depends on the quality of manufacture of the case, glass and the tightness of the case. How to choose the right fog lights for a VAZ 2110? A very large number of low-quality PTFs (counterfeits) are sold for Russian cars. You can identify a fake PTF by the quality of the light. For high-quality fog lights, the beam of light should have a sharp upper edge and generally resemble a horizontal line. When using counterfeit headlights, you will immediately notice the difference; in addition, they will dazzle oncoming drivers. You can determine the original by the quality of the headlight assembly, as well as by the presence of an emblem on the PTF glass. Before purchasing, you can use several PTF reviews (one, two, three), rely on the survey results or comments. A small test of fog lights: All photos are taken from this forum. Of course, this is not a professional review, but just pictures from forum users. In one case, the PTFs are not adjusted correctly, in another, the headlights shine on snow and seem brighter than on black asphalt. Also, different types of lamps can be used in PTF, therefore, it is difficult to determine which PTF shines better, judge for yourself: PTF Bosch (Bosch) VAZ 2110 PTF Kirzhach (Avtosvet) VAZ 2110 (instructions) PTF Priora Kirzhach (installation on VAZ 2110) PTF Sirius NS-199 (white high beam + PTF yellow) PTF Hella Comet 450 (installation of Hella foglights) PTF Hella FF 50 PTF Hella FF 75 So, let’s vote and leave reviews about the PTF for the VAZ 2110-12:
- What fog lights did you choose?
- Impressions and comments on the work of the PTF?
ps Off-topic comments will be deleted.
xn--2111-43da1a8c.xn--p1ai
Installation
The PTF installation process can be divided into three main stages:
- Installation of headlights;
- Network connection;
- Functionality check.
So now we will talk about each stage separately.
Installing headlights
We will consider the option of installing PTF on a standard bumper. Therefore, it does not have holes for new optics. You will have to do them yourself.
To work you will need a certain set of tools and materials:
- File;
- Drill and drill bits;
- Electric jigsaw;
- Roulette;
- Marker.
Connection elements
Now directly about work.
- First of all, remove the bumper. Work is performed only if it is disconnected from the seat.
- Remove all dirt from the bumper.
- Make markings for the installation of future fog optics.
- It is best to mount the headlights slightly to the side of the lower air intake. Try to place the PTF strictly under the main optics of your car.
- For decorative glasses that have outer and inner halves, make markings. The outer half is decorative, and the inner half is designed to fix the outer part and headlights.
- The outer part of the glasses has a protrusion on the inside. With this mounting protrusion, the element should fit into the hole made in the bumper.
- To determine the optimal dimensions, you should measure the landing protrusion. This way you can make the appropriate markings on your bumper.
- Using an electric jigsaw, holes of the required size and location are cut.
- Use a file to file the cut areas.
- The outer part of the glasses should eventually fit tightly into the hole.
- Fog lights are mounted in the resulting holes. For this purpose, the kit includes special mounting bolts.
- Attach decorative glasses to the top of the headlights. The bumper can then be returned to its place.
https://youtube.com/watch?v=X6G0ROEQxUE
Connection
Together with the PTF, a diagram for connecting the devices must be attached. It is not complicated, so even a beginner will be able to understand all the nuances of connecting the components to each other.
You will need to embed the wiring from the foglights into the mounting block, which is located in the engine compartment to the right of the windshield. To do this, just unscrew the bolts from the block, lift it and find the pads marked Ш7 and Ш8.
These blocks are used to connect fog lights, although these lighting devices are not installed standard at the factory. Wiring from the headlights and from the fog lamp relay, which is provided in the purchased PTF kit, is connected to these blocks.
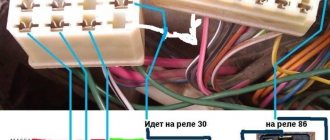
Your job is to make the correct connection. This is done according to the following scheme:
- The output wire from pin 87 is ground, so you need to connect it to the car body;
- Pin number 85 goes to the block marked Ш7 and is connected to connector number 17;
- Pins numbered 30 and 86 go to block Ш8. In this case, connect pin 30 to connector 8, and lead 86 to connector number 1;
- Having installed the headlights, stretch the positive wire through the engine compartment, as they are connected to the Ш8 block. But these wires need to be inserted into connectors numbered 2 and 3;
- Now connect the block to the mounting block, and return the block to its place;
- Select an area near the block where the fog light relay will be installed.
Connection result
Button
Now all you have to do is connect the control system for your PTFs. Included with the fog lights is a corresponding button, which will stand on the panel in the seat provided by the manufacturer.
PTF button
The manufacturer, that is, AvtoVAZ, provided for this. Therefore, under the panel you will find a control block. The panel is removed, the corresponding block is located and the button is connected to it. That's it, the controls are ready.
Examination
The last stage is to check the functionality of your PTFs.
To check the efficiency of the lighting devices, turn on the headlights on your VAZ 2114, then press the button to turn on the fog lights. When the lights are turned off, even if the fog lights button is pressed, they should still go out.
The importance of PTF is difficult to overestimate. They help you see the road better during fog, rain, and snow. Moreover, fog lights are designed to improve the visibility of your car to oncoming and behind vehicles. Therefore, we strongly recommend installing PTF not only in front, but also in the rear.
Loading …
Connecting fog optics on a VAZ 2114
A wiring diagram is provided for each fog light system. It is characterized by simplicity. Therefore, even a novice motorist will be able to complete all the work without any problems. To connect, you will need a mounting block located on the right side of the engine compartment. You need to remove the block cover and find the pads with the abbreviations Ш7 and Ш8. They are connected to the relay and headlights.
The installation diagram for fog lights on a VAZ 2114 , which is included in the PTF kit, will help you complete the work
The diagram shows that wire 87 needs to be connected to ground. The second wire 85 is connected to block Ш7 and connector 17. The wire from the relay number 30 goes to block Ш8.
The right and left PTF are connected to connectors 2 and 3 of the Ш8 block. Now you need to install the block into the mounting block, and then find a suitable location for the relay.
At the next stage, the car owner needs to install a button. The button is also supplied with the PTF kit and is intended for installation on a vehicle panel.
Since the manufacturer produces cars equipped with fog lights, there is a special place on the panel for mounting the button in question. To do this, you will need to remove the panel and find the corresponding block. Connection takes little time and is intuitive.
Connection diagram
Now let's connect the PTF. For this we need an installation kit. It is better to use the “native” one for the VAZ 2114, which includes:
- electromagnetic relay;
- PTF power button;
- mounting wires with blocks.
We will use the diagram that comes with the kit and is printed directly on the packaging.
Connection diagram for PTF on VAZ 2114
The numbers on the diagram indicate:
- Fog lights.
- Mounting block.
- Relay for turning on fog lights.
- Fog light switch.
We will connect points “A” and “C” to the “plus” of the power source, “B” to the power supply for the instrument panel lighting. We will not consider the wiring diagram of the VAZ 2114 now, since all modifications of the VAZ 2114 have all the necessary wiring, connectors and even places for fuses in the mounting block:
The circuit is quite simple, and almost every owner of a VAZ 2114 can assemble it. First of all, we climb under the bumper and connect the wires from the kit to the PTF lamps. We extend one of the power wires for each PTF into the engine compartment - this is where the mounting block is located.
This can be done through the holes through which the headlight power harnesses pass. We connect the second wire of each headlight to the car body using the headlight mounting screws.
Now the relay. We find in the kit a harness of four wires. At one end there is a block for the relay, at the other there are blade contacts, which we will install in the block of the mounting block.
We select a location for installing the relay and a suitable bolt for this - there are many fasteners in the engine compartment. We unscrew the bolt and clamp the relay under it. At the same time, under the same bolt we clamp the wire of the harness coming from the 86th contact of the relay.
Now let's figure out how to connect the fog lamp switch button. As noted above, all the necessary wires and connectors are already installed. You just need to find them. To the right of the driver we find the speaker grille and behind it we see two free connectors. One is used to control the PTF turn-on relay, the second is responsible for illuminating the button.
We squeeze out the plug from the inside, located at low tide above the speaker, and pass the pads through there. We connect the button to them, insert it into the socket and snap it into place.
Now the mounting block. To get to the blocks Ш7 and Ш8, you will have to remove the block. We arm ourselves with a socket wrench and unscrew the two nuts located on the sides of the block. The places where they are located are marked with arrows in the photo below.
Carefully lift the mounting block, turn it over until there are enough wires and pull out the Ш7 and Ш8 blocks from the sockets.
The location and numbering of the pads are indicated in the figure below.
We insert the knife terminals from the PTF and relay into the blocks according to the wiring diagram (see figure above). We insert the pads into the sockets, install the mounting block in place, and secure it with nuts. It remains to check the presence of fuses F8 and F9 - they are responsible for powering the fog lights. If there are none (and most likely there are none), we install a nominal value of 10 A.
All that remains is to adjust our fog lights so that they do not blind oncoming drivers.
This can be done using the method described in the article “How to install fog lights on a Gazelle Business.” The only difference will be that the adjusting screw is located in a slightly different place than in the Kirzhach headlights used in the Gazelle.
Location of the PTF adjusting screw on the VAZ 2114
Selection of body and main criteria when selecting PTF VAZ
When choosing a PTF VAZ 2114 or for any other car, it is important to consider what kind of lamp will be installed in the fog lights, why fog lights are installed, etc. As a rule, such headlights themselves can be in a plastic, aluminum or magnesium housing. It is quite obvious that aluminum and magnesium are more reliable and durable, but they also cost more. Fog lights may also have a plastic or glass light diffuser
Plastic products are resistant to damage, but quickly turn yellow and cloudy, and light transmittance decreases. As a result, after just a couple of years, the quality of road lighting deteriorates.
Fog lights may also have a plastic or glass light diffuser. Plastic products are resistant to damage, but quickly turn yellow and cloudy, and light transmittance decreases. As a result, after just a couple of years the quality of road lighting deteriorates.
PTFs with glass lenses last longer, but often the glass cracks due to temperature changes (especially when installing diode lamps) or as a result of mechanical damage. One way or another, it is advisable to select models where the diffuser can be replaced separately without changing the entire body.
We also note that if the car is used actively or in difficult conditions (for example, driving on the highway at high speed or driving on bad roads), when choosing, it is better to choose PTF models, which can be closed with special foglight plugs made of plastic to protect against stones, etc. d.
Now let's move on to the choice. To decide which fog lights to install on the VAZ 2114, first of all, you should choose a reliable housing. As you know, the condition of roads in the Russian Federation and the CIS is poor, so PTF made from a material resistant to damage and temperature changes will be the best solution. If there are protective plugs, this will be an additional plus. The kit should also include good quality fasteners, wires, and relays.
The fogs themselves should provide the widest possible spot of light, distribute the light evenly, with a minimum of losses due to refraction and dispersion of the light flux. It should also be possible to adjust and adjust the light spot (both vertically and horizontally) so as not to blind drivers of oncoming cars. Even if the lamp burns out, access for replacement should be easy. This allows you to quickly change the llama yourself.
We also note that when choosing PTF 2114 or 2115, as well as for other cars, it is important to take into account their power. The fact is that fogs that are too powerful can create a large load on the generator and wiring
As a rule, 55 W lamps are sufficient
If the PTF is lensed (fog lights with a lens), you need to pay special attention to the quality of the lens, the reliability of its fixation, etc.
Finally, we note that when choosing PTF, it is also important that such headlights have acceptable aerodynamic performance and fit well into the overall exterior of the car. As practice shows, car enthusiasts install domestic fog lights VAZ or Avtosvet as PTF on VAZ 2114
The list of imported solutions includes Bosch or Hella, as well as various Chinese PTFs. Also, VAZ 2114 or 2115 are often equipped with standard PTFs from Samara, Niva, Priora, etc.
As practice shows, car enthusiasts install domestic fog lights VAZ or Avtosvet as PTF on VAZ 2114. The list of imported solutions includes Bosch or Hella, as well as various Chinese PTFs. Also, regular PTFs from Samara, Niva, Priora, etc. are often installed on VAZ 2114 or 2115.
In fact, Avtosvet products are considered a high-quality budget option
However, it is important to remember that non-original fakes are often found. If we talk about expensive headlights, then Hella is a recognized leader, but the price for Hella PTFs is quite high.
see also
- VAZ 2114 which brake discs are better to put on
- What is the best front strut to install on a VAZ 2110?
- Which is better to install an alarm system with auto start?
- Which pump is better to put on a Priora with 16 valves?
- Which shock absorbers are better to install on a Priora sedan
- What are the best bulbs to install in fog lights?
- Which front springs are better to put on a VAZ 2107
- Generator for VAZ 2170, which injector is better to install?
Which thermostat is better to install on a VAZ 2114 injector- Which thermostat is better to install on a viburnum with 8 valves
- Which rear shock absorbers are better to install on a VAZ 2107
How can you install PTF on a VAZ 2113, 2114, 2115
Installation of fog lights on a car can be done in different ways. The car owner chooses a specific option based on his own capabilities, preferences and wishes. There are three main ways to install PTF:
- Purchasing a bumper with pre-installed fog lights.
Similar parts are presented in a wide variety at tuning studios, where they can be purchased and installed immediately. Adjustment and connection are carried out by service specialists. The disadvantage of this method is that the cost of the work is too high. One way to install foglights is to buy a bumper with already built-in PTFs - Buying a bumper with holes for headlights.
A bumper model with holes for fog lamps and a set of headlights are purchased. In this case, only the PTF is installed and the bumper is mounted. Front bumper VAZ 2115 with holes for fog lights - Purchasing a set of “foglights” and facing elements.
The most popular and simplest method - installation is easy and quick, does not require large expenses, both financially and in terms of labor costs. Purchase and subsequent installation of a set of “fog lights” from the PTF kit
Headlight installation
How to connect fog lights? The installation and connection procedure is described in detail below. Let’s make a reservation right away - if necessary, you can install xenon lamps in the fogs. Xenon in PTF will burn much brighter when compared with traditional incandescent lamps, but its cost will be an order of magnitude higher. Since the bumper on the VAZ 2114 does not have appropriate places for installing fog optics, the car owner will have to make them on his own.
All work on installing optics is carried out on the dismantled bumper. If you don’t know how to remove this body element, then you just need to unscrew the fasteners that secure it. The bumper itself needs to be cleaned; it is advisable to install it at the level of the lower air intake, under the headlight optics. Installation of lights must be done in specially designated places on the bumper - the so-called glasses.
These glasses must be marked in accordance with the dimensions of the optics themselves, after which the corresponding holes must be made in the bumper. The holes are cut using a jigsaw, and it is advisable to sand the sharp edges on them with sandpaper or a file. The PTF should fit into the hole as tightly as possible, so they must be securely secured with clamps. When the installation of the optics is completed, the bumper can be put back on the car.
Low and high beam in fog lights
Another way to modify fog lights (FFL) is to make fog lights with low and high beams. That is, they will be able to work in two modes, just like the head lighting of a car. Let's figure out how this was implemented and what connection diagram was used. To install low and high beam in the PTF you will need:
- Regular PTF VAZ of the tenth family;
- OSRAM lamps with two spirals, h5 power 60/55W. These auto lamps have two filament coils (high and low beam).
To make the fog lights work in two modes (low/high), you will need a connection diagram. The standard headlight circuit of the “tens” was taken as a basis, which was modified. The standard PTF button will not work, so instead it was decided to install a second button for turning on the side lights and low beam. We connect the PTF button according to the above diagram. As a result, the fog lights turn on after the headlights are turned on, which complies with the rules. With this, the modernization of the fog lights is completed, let’s perform the test:
- Low beam PTF;
- Near and far PTF;
- Low beam headlights and PTF with low and high beam;
- Low and high beam headlights and PTF with low and high beam.
In good lighting conditions, we use the low beam of the fog lights, and turn on the high beam in the PTF only when visibility is poor.
Thus, dual-mode PTFs allow you to control the light beam and not blind oncoming drivers, as is the case with xenon in PTFs. By the way, do you know which fog lights are better to choose? xn--2111-43da1a8c.xn--p1ai
How to install and connect PTF?
Installation and connection are carried out in 3 stages:
- We install the PTF in the bumper.
- We connect the wiring to the mounting block via a relay.
- Install a button in the panel.
Connection diagram
Well, I think everything is clear here! However, the diagram is not indicated in full: the mass of the PTFs themselves on the body, which must be done without fail, is not indicated. It needs to be secured in a safe place, on metal of course! Before fastening, be sure to clean the metal from dirt and tighten the mass well so that there is no loss of tension. Otherwise, the PTF will burn dimly and unevenly.
Bumper installation
As stated above, there are two options - either install a new bumper with ready-made cutouts for the PTF, or cut it yourself with a jigsaw. To do this, remove the element, mark the mounting holes, and cut it.
Next, we install the “glasses” - they cover the cutout on the outside of the bumper, they consist of two parts:
- Decorative - external.
- Internal - attaches glasses to the bumper using side latches and holds the PTF. (How to remove the bumper?)
Connecting wiring to the unit via a relay
Relay with wire set
- First of all, open the hood, find the required block and unscrew its two fastenings to the body on the sides, remove the cover.
- From the bottom of the mounting block, unfasten the two outer wire blocks marked “7” and “8”.
- Take the installation kit: put the wires from the kit on the relay.
- We add their other ends to the block of wires “7” and “8” according to the diagram.
- We stick the pads back into the mounting block and fasten it back to its original place
- Next, we attach the relay to the car body in any place you like: for example, next to the same block.
- We run long wires from the mounting block blocks (which we have already installed) to the fog lights and connect them. We also attach the PTF mass to the car body.
Installing a button in a panel
To install the button that comes with the mounting kit, you will need to partially disassemble the front panel.
Fortunately, the factory prudently installed wiring for the PTF in all Samar configurations, so all we have to do is remove the center console and find a block in the wiring for connecting the button.
Removing the center console
To disassemble the panel, use the article: How to remove the instrument panel and remove only the console.
Next, find the wire block, install the button and assemble the panel.
Then you need to check the headlights for functionality.
Don't forget that they only work after the side lights are turned on!
After installation, the PTF will need to be configured and adjusted!
Do-it-yourself repair or installation
Replacing a light bulb is not difficult, but installing new glass to replace a broken one is impossible without dismantling the headlight. The fastening to the bumper is elementary, with only two screws, but the glass is firmly glued to the headlight body.
When replacing it, the junction with the body is filled with sealant. By the way, it is better to change the glass immediately after a crack appears on it, otherwise the coating applied to the body will quickly peel off and you will have to buy a new device. The video or set of photos on how to change a headlight or light bulb on this page will help you, but I ask you to pay attention to some points:
- You need to install xenon in the fog lamp with caution. If the low beam intensity is set in GOST to its minimum values, then there is a limitation for fog lights. It should be approximately 3 times weaker than the worst devices.
- You can cut rectangular holes in the plastic bumper with an ordinary knife. It’s also easy to build beauty frames. Therefore, buying and installing such headlights yourself is not difficult. But if the car wiring does not provide for their connection, then it is better to contact specialists. According to the rules, it is impossible to connect fog lights to the simplest toggle switch. They should light up only after the side lights are turned on. Where is the relay that implements this sequence of turning on the lighting devices in practice, and how to connect the headlights to the electrical circuit, an auto electrician knows much better than a simple car enthusiast. There is a button for turning on the fog lights on the instrument panel, but connecting wires to it is a labor-intensive process that requires certain qualifications. In addition, being too clever with the wiring can lead to a short circuit, and repairs, in this case, will cost much more.