The VAZ 2107 clutch is designed to connect the engine crankshaft and the gearbox input shaft with the possibility of briefly stopping the transmission of torque. The reasons for its failure can be very diverse. However, all of them can be easily diagnosed and eliminated on their own.
- Reasons for replacing and adjusting the VAZ 2107 clutch
Replacing the clutch - Clutch adjustment
- Clutch slipping
- Tools and materials
Video: do-it-yourself adjustment of the VAZ 2107 hydraulic clutch
DEVICE OF THE CLUTCH MECHANISM VAZ 2107
The VAZ 2107 clutch is a rather complex mechanism consisting of several dozen elements. The reasons for its malfunction can be very different. However, they can all be divided into two groups:
- Defects in the clutch mechanism itself. These include malfunctions of the driven part of the clutch, pressure device, basket, flywheel, and clutch fork.
- Defects in the hydraulic drive of the clutch mechanism. They can be caused by leakage of the working fluid, the formation of an air lock in it, as well as malfunctions of the main or working cylinders (MCC and RCC) and the pedal mechanism.
The clutch, like any other car part, has a limited service life. First of all, it depends on the skill of the driver, and therefore is not regulated by the manufacturer. To increase the service life of the clutch, it is necessary to adjust it in time, monitor the level of working fluid, avoid off-road driving, and learn the skills of using the clutch correctly.
It must be remembered that in addition, the clutch is a safety device that protects the transmission from serious damage when the rear wheels are blocked by various obstacles. The car is stuck in a quagmire, the drive wheels are stuck, the engine power is enough to turn the stuck tires. In this case, the clutch will begin to slip, protecting the gearbox, cardan and rear axle from damage. Yes, the driven disc linings will burn out. Yes, the clutch will overheat, which can cause the steel flats to warp or weaken the spring plates. But more expensive units will be protected from breakdowns.
Classic VAZ models have a dry, permanently closed single-plate clutch. It includes two main elements:
- Leading part. It consists of a driven disk, the splined part of which transmits rotation to the gearbox due to friction between the friction linings and the surfaces of the flywheel and pressure plate.
- Non-removable drive unit (basket). The basket is attached to the flywheel and consists of a pressure plate and a diaphragm pressure spring.
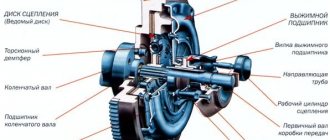
Classic VAZ models use a single-disc dry, permanently closed clutch: 1 - flywheel;
2 — clutch driven disc; 3 — clutch basket; 4 — release bearing with clutch; 5 — hydraulic clutch reservoir; 6 - hose; 7 — master cylinder of the hydraulic clutch release; 8 — servo spring of the clutch pedal; 9 — clutch pedal return spring; 10 — clutch pedal travel limit screw; 11 — clutch pedal; 12 — hydraulic clutch release pipeline; 13 — ball joint fork; 14 — clutch release fork; 15 — release spring for clutch release fork; 16 — hose; 17 — working cylinder of the hydraulic clutch release; 18 — clutch bleeder fitting The clutch mechanism must be reliable, durable, and capable of damping fluctuations in engine torque. The clutch has a hydraulic drive consisting of:
- clutch master cylinder;
- clutch slave cylinder;
- clutch on/off forks;
- release bearing;
- foot pedal.
Clutch structure and mechanism
The operating principle of a conventional mechanical device is simple: it transmits engine torque to the gearbox input shaft. It is based on the interaction of two disks - the slave and the master. You can close the connection, separating the power unit from the box, to change the speed. The force is transmitted using a drive: when the clutch is pressed, liquid under pressure enters the working piston. Then the cylinder rod acts on the fork and bearing, the moment is transmitted further to the mechanisms. After releasing the pedal, all drive parts return to their original positions. The basket and disc fit snugly against each other.
The drive is carried out hydraulically or mechanically. Pneumatics are rarely used. Most modern passenger cars are equipped with a single-plate friction clutch, consisting of several mechanisms:
- disk with basket;
- flywheel;
- bearing;
- torsion damper;
- crankshaft with its own bearing;
- tangential leaf spring;
- release bearing forks;
- guide pipe;
- working cylinder;
- input shaft;
- ball head bolt.
All this is neatly placed in the manual transmission housing.
A robotic gearbox works on the same principle - with the difference that actuators controlled by the unit are responsible for squeezing the clutch, and the drive here is electric.
Is there a difference between automatic and manual transmissions?
Automatic transmissions use an electronically controlled hydromechanical drive (sometimes a hydraulic distributor). There is no usual clutch here. Dry discs are completely absent, and on a manual transmission they are the main element. The torque converter (or converter) is responsible for turning on/off the torque on automatic transmissions. Instead of discs, oil turbines are used, which is why the automatic transmission torque transmission and cancellation device is called “wet”.
If a manual clutch most often has a single-disc clutch, then an automatic clutch usually has a multi-plate clutch. Due to the absence of a separate accelerator, the force is transmitted by an actuator or servo drive.
REASONS FOR REPLACING AND ADJUSTING THE VAZ 2107 CLUTCH
Replacing a VAZ 2107 clutch is a rather labor-intensive and expensive process. Therefore, before replacing, you should consider adjusting the mechanism.
REPLACING THE CLUTCH
To install a new clutch, you will need an inspection hole, overpass or lift. It is important to detect in time the signs indicating the need to replace the clutch (it is impossible to replace it on the road), and take the car to a garage or car service center. Driving with a faulty clutch is very dangerous - you can get into an accident when crossing a railway crossing or a main road.
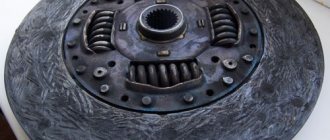
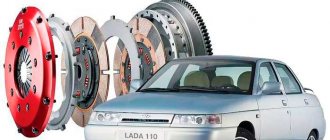
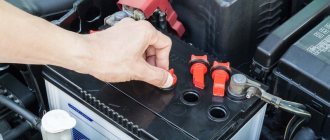
The VAZ 2107 clutch cannot be repaired, but is replaced as a kit, which includes a basket, driven disc and release bearing
The entire VAZ 2107 clutch is replaced, so auto shops sell a kit consisting of a driven disc, a basket and a release bearing. You should consider replacing the clutch in the following cases:
- the car climbs heavily uphill when the accelerator pedal is pressed all the way down, and you can smell a burning smell - these are signs of slipping of the driven part of the clutch;
- when the clutch is disengaged, noises appear in the area of the flywheel housing - this indicates a malfunction of the release bearing;
- when starting the car, it is difficult to engage first gear (the gearbox “growls”) - this is a sign that the clutch is not completely disengaged (the clutch is moving);
- when accelerating, the car begins to twitch, rattling sounds are heard - the reason for this is usually broken damper springs or loose sockets for them on the driven disk, deformation of segments or loose rivets on the hub.
Any noise, vibration, or whistle in the clutch area requires more detailed diagnostics and diagnosis.
ADJUSTING THE CLUTCH
If the clutch pedal becomes too soft, falls down, and does not return to its original position, then most likely air has entered the system or the hydraulic drive adjustments have been disrupted. Clutch slipping after prolonged use usually indicates a failure of the clutch. It will probably have to be changed.
When adjusting the hydraulic clutch of a VAZ 2107, the regulated values of the gaps and the pedal stroke are set
If the clutch drives, that is, shifts gears with difficulty, in about half of the cases the reason is a discrepancy with the required values:
- play between the rod and the piston in the working cylinder;
- clearance between the release bearing and the fifth basket;
- free and working travel of the foot pedal.
Do-it-yourself clutch adjustment on a VAZ 2110
The design of the clutch mechanism of injection or carburetor “dozens” with 16 valves is absolutely identical to the mechanisms installed on 8-valve cars.
At the same time, the operating principle of the unit is based on the use of a mechanical cable, in contrast to classic machines that use hydraulics. The main advantage of the system is the ease of adjustment and repair. To perform the operation, you do not need to drive the car onto stands or an inspection pit - all manipulations are performed at the top of the engine. Precise calibration consists of tightening the drive cable and setting the required pedal position.
Detailed instructions on how to set up the VAZ 2110 clutch are below.
You can also watch how the procedure is performed in the video:
How to adjust the clutch cable
Before repairing, you must prepare the necessary tools. For this you will need:
- ruler;
- WD40 or similar product;
- clean rags;
- head No. 10;
- two open-end wrenches number 13.
The further sequence of actions looks like this.
- Using head No. 10, unscrew the air filter mounts to facilitate access to the required unit.
- Remove the air supply housing.
- The required part is located directly below the element.
- Lift up the rubber boot to release the nuts.
- Using keys No. 13, loosen the locknut securing the cable to the release bearing fork.
- Next, you need to scroll the thrust element to achieve the required pedal position.
- After an approximate adjustment, you need to get into the car and press the pedal all the way 3-4 times.
- Check the height of the pad from the floor.
- If the results are satisfactory, tighten the cable in the reverse order and return the boot to its place.
- If the factory parameters are violated, the adjustment procedure must be repeated.
In this case, if you tighten the cable, the pedal will rise up, and when loosened, it will go down.
How to properly adjust the clutch pedal
The manufacturer's manual states that the required height of the lever is in the range from 12 to 16 cm. In this case, the most efficient operation of the mechanism is achieved. If there is a violation in the installation height, it is necessary to calibrate the mechanism.
You can set the required gap like this.
- The car is put into neutral and the engine is turned off.
- The driver's mat is removed.
- A ruler or other measuring instrument is applied perpendicular to the lever to the pedal.
- The height of the lining position is measured.
If there is a result on the ruler that goes beyond 12-16 cm, urgent adjustment is required. The required position is established by tightening or loosening the clutch cable. When unscrewing the nuts, the lever rises, and after tightening it lowers. In this case, when adjusting the tension, it is necessary to press the clutch all the way and measure the position of the lever with a ruler.
This procedure indicates the standard setting recommended by the manufacturer. However, experienced motorists know a way to lower the clutch to an acceptable position for each user.
- Start the engine and squeeze out the clutch.
- Without releasing the pedal, engage the rear position of the gearbox.
- Smoothly raise your leg and simultaneously turn on your back leg. At the moment the pressure bearing is activated, the rocker handle will begin to vibrate.
- With “conveyor” tattooing, the moment of operation is 70-95 mm from the floors.
- For convenience, it is recommended to reduce the threshold to 2-3 cm from the mat by tightening the cable.
After performing this procedure, the lever clutch will be much lower than the “stock” position, which has a positive effect on driving comfort.
Adjusting the clutch on a VAZ 2107: Diagnostics and step-by-step instructions
How to adjust the clutch on a VAZ 2107 with your own hands, without special experience. Despite the fact that domestic models of some brands are fading into oblivion, creations of the Soviet automobile industry are still roaming the roads.
Considering the age of the machines, they, more than anyone else, need systematic repairs to maintain working condition. Repairing equipment with such mileage in modern car repair shops is not always justified from a financial point of view.
Therefore, many car owners strive to fix breakdowns on their own, on their own. They don’t always succeed, but articles of this kind – recommendations like this one – come to their aid.
Clutch diagnostics
So, before you start repairing, check to see if the part needs to be adjusted enough. For example, frequent problems arise with the clutch, or more precisely with the release plate. Owners first of all blame the “basket”, they say, it has burned out, when you often keep the pedal in the active position in traffic jams.
In fact, it turns out that this is not at all the case, you need to tighten the clutch cable a little and everything will work out. At the same time, the need to replace the unit as a whole simply disappeared. Proper operating conditions for the clutch will ensure a service life of at least 70 – 90 thousand km.
Facts of a maximum mileage of 390,000 km have been recorded, however, this happened on the “famous” troika manufactured in those days. Some manage to “kill” the basket and disc within 50–60 thousand runs.
Replacing the cable
The situation in which the clutch pedal fails on a VAZ 2110 is not at all uncommon. And she says that the cable has broken. There is nothing left to do but replace it.
Even if there is no break yet, but there is deformation or a violation of the integrity of the cable, there is definitely no point in postponing the dismantling process.
The whole process can be divided into three main stages:
- Preparation;
- Dismantling;
- Installation.
Let's consider them separately.
Preparation
During preparation, we recommend that you not only get ready for work, but also study the operating manual and watch several visual videos. This will give you additional knowledge and understanding of what needs to be done with the clutch system.
Also stock up on the necessary tools:
- 8 wrench;
- Two 17mm wrenches;
- Phillips screwdriver;
- New high-quality clutch cable;
- Lubricants.
Dismantling
Next, you need to remove the old cable, which will allow you to install a new element of the clutch system. The sequence of work will be as follows:
- Remove the windshield wiper from your "ten".
- Loosen the locknut and adjusting nut slightly.
- Remove the rim of the damaged cable from the clutch release fork.
- Slightly move the cover of the lower end of the cable casing using a 17 wrench.
- At the same time, you need to loosen the nut securing the tip to the bracket. The tip must be held with a second key of 17, which will prevent turning.
- Remove the required tip from the bracket.
- The windshield wiper mechanism bracket is held on by 2 nuts that need to be unscrewed. Plus, dismantle the bracket itself directly.
- Do not forget that during reassembly, the bracket must be installed with the inclined part towards the front of the car.
- Now you tighten the screw that secures the protective cover and remove its holder.
- Bend the cover a little, which will allow you to reach the fastening of the cable tip to the pedal responsible for the clutch.
- Using a flathead screwdriver, pry and remove the support bracket from the “finger”, and then remove the cable end from it.
- The next step is to remove the bolt securing the cable holder to the pedal bracket. This way you will finally be able to pull the damaged cable through the interior.
- But that's not all. Remove the bushing from the pedal pin.
- If the bushing is broken or worn out, be sure to replace it with a new one. But keep in mind that the design stipulates that the sleeve is cut. Therefore, this is not a defect that arose during operation, but the manufacturer’s idea.
Installation
The hardest part is probably behind us. But the work cannot be considered complete. Installing a new cable does not involve complex processes, but then you will need to reassemble the entire structure, adjust the clutch and check its operation.
Installation is performed as follows:
- Immediately before installation, remove the bushing from the pedal pin to check for integrity. As noted earlier, if it is damaged, the element must be replaced;
- The fastening of the new cable is carried out in accordance with the dismantling, only all processes are carried out in the reverse order;
- The end of the cable is inserted through the passenger compartment into the engine compartment, after which it is fixed to the clutch pedal of the car;
- Next, the cable together with the shift fork is hooked and led to the mounting bracket on the gearbox, where fixation occurs;
- The pedal travel is checked, which should be about 13 centimeters from the floor. We will tell you about clutch adjustment separately, in specially prepared material.
Well, at this point the cable replacement can be considered complete. It has certain difficulties, but with the right approach you can easily cope with the work on your own.
Be sure to study the instructions in the instruction manual, watch video tutorials, and also get a high-quality new element. Only with a combination of all these factors will you be able to achieve the desired result and save an impressive amount of money on the services of specialists from service stations.
Loading …
Read with this
How to adjust the clutch on a VAZ 2107
First, we need to make sure that such a procedure is necessary.
What tools will be needed for repairs?
We check in advance the availability of automotive tools needed for repairs, such as:
- stationary set of keys;
- pliers;
- extension cord and additional lighting if work will take place at night or in low light conditions;
- new cable, cuffs, boots, other parts of original production from the manufacturer.
Step-by-step instruction
1 The beginning of it all - the slave master cylinder
Reasons for adjusting the clutch pedal
It is important to understand that improper clutch operation may create virtually no problems when driving, but nevertheless it will significantly reduce the life of the clutch mechanism and gearbox. Over time, the discs wear out, which increases the clearance between the bearing and discs.
There are two main reasons why pedal adjustment is necessary:
- Replacing the clutch cable in a mechanical drive or replacing the slave cylinder. After such an intervention in the operating structure of the drive structure, adjustment is a mandatory procedure.
- Changing the pedal stroke. Excessive travel can occur as the friction linings wear out. To avoid negative consequences, it is better to regularly measure the working stroke.
In most foreign cars, adjustment is not required, since they have a self-regulating mechanism installed. The difference between the foreign-made design and the domestic one lies in some details of the ratchet mechanism.
A separate reason for adjustment is interruptions in the operation of the gearbox. If the desired gear does not engage, or is difficult to engage, the clutch is not pressed enough. Otherwise, the car may not move when the clutch is engaged. Then we can talk about a highly tensioned mechanical drive cable.
Most common breakdowns
Every car owner of domestic brands is familiar with the concept of slipping and dragging, this applies to the clutch.
- in the first case: when the pedal is fully lowered to the bottom position, the clutch disc itself slips a little, thereby not providing the transmission with the required amount of power;
- in the second: the clutch pedal, which is completely flooded down, cannot move the basket away from the flywheel, because of this the car moves even when the rocker is in the neutral position. This situation is extremely negatively reflected in the control process itself, since the speeds will turn on either too early or too late.
Second stage of clutch adjustment
As mentioned earlier, the entire adjustment process consists of two stages, the first was described earlier, we are starting the second now.
- Using pliers, remove the return spring from the pusher. This is necessary for the convenience of setting up and adjusting, as well as during major repairs or complete replacement of the unit;
- use a key set to “19” to unscrew the lock nut;
- with the second wrench set to “14” we tighten the nut a few turns forward or backward, depending on what purpose you are pursuing;
- Check the pedal free play size. If necessary, we bring it to the required standards;
- fix the nut and tighten it with a little force.
When to do this?
Novice motorists often ask the question: when is the VAZ-2106 clutch adjusted?
The clutch drive is designed in such a way that there is free play on the pedal. So, normally it ranges from 0.4 to 2 millimeters. If there is a lot of play in the pedal and noticeable “dips,” it means that the element settings have gone wrong. Pay attention to the clutch slave cylinder. The VAZ-2106 is equipped with it near the transmission. The element must not contain traces of liquid leakage. If the boot is damaged or the tightness of the connections is broken, the mechanism must be replaced.
Important Tips and Recommendations
- carry out technical inspection of parts in a timely manner;
- Never keep the pedal depressed for a long time while the gear is engaged. Inexperienced owners often suffer from this. It is in such cases that the clutch fails at a rapid pace;
- Before each departure, carry out a light inspection of the engine compartment;
- Don't pedal too fast or too slow. In the first case, this will lead to a break, in the second to combustion;
- purchase only original spare parts, no fakes or cheap analogues;
- If you are in doubt about the correct installation, read the operating instructions for the equipment.
It would be wrong to consider that this procedure is completely over. Operation in motion should be checked carefully. To do this, we start the vehicle, remove it from the handbrake, depress the pedal, and begin to move away.
How to adjust the clutch on a VAZ 2107
A correctly adjusted VAZ 2107 clutch ensures normal operation of the vehicle and long-term operation of the machine’s components and parts.
It is recommended to check the correctness of the adjustment at every vehicle maintenance. During operation, incorrect adjustment can result in two types of malfunctions:
- The clutch slips - when the pedal is fully released, the disc slips and does not transmit the full amount of engine power to the transmission;
- The clutch drives - when the pedal is fully depressed, the disc does not move away from the flywheel, which does not allow normal gear changes and makes the car move when it is not needed.
In addition, the clutch may engage too early or late, making it difficult to control the vehicle.
The adjustment process itself consists of two parts. The first is carried out in the cabin, the second - under the bottom of the VAZ 2107, from the inspection hole. Tools you will need:
- Key for 8 or 10, depending on the model of the clutch slave cylinder;
- Open-end wrench 13;
- Open-end wrench 17.
The first adjustment involves setting the clutch pedal travel. It is performed from the interior, under the steering column. To limit the full stroke, use a special adjusting screw secured with a lock nut. By tightening or unscrewing it, we achieve normal pedal travel, which should be approximately 140 mm. Usually there is no need to adjust the full stroke; it is set from the factory and is changed very rarely.
The second part of the adjustment is to set the pedal free play. In normal mode it should be 30-35 mm. However, some car enthusiasts adjust the freewheel to suit their individual habits and preferences. This approach is quite acceptable provided that it does not affect the performance and durability of the parts of the VAZ 2107 car.
So, to check and adjust, we go down into the inspection hole. The clearance is checked by pulling the fork away from the pusher.
The free play distance should be 4-5 mm. If the gap differs significantly from the standard, it must be adjusted. For this:
- Remove the spring that pulls the clutch fork to its original position;
- Loosen the locknut on the pusher;
- Holding the pusher with a 8 (10) wrench, screw or twist the thrust nut until the required clearance is achieved;
- Fix the thrust nut with a locknut;
- Checking the gap;
- We install the spring in place.
At this point the adjustment procedure can be considered complete. However, in order to ensure that the result obtained is correct, it is necessary to check the clutch in action. To do this, start the car, engage the gear and gradually begin to release the pedal. When adjusted correctly, the car should move off at approximately half the pedal stroke. Adjustment is allowed, including the clutch lower or higher, but engagement at the very top or bottom is unacceptable, as there is a risk of the above malfunctions occurring.
Clutch checking and adjusting pedal free play
The clutch serves as the main link between the engine and the transmission, of which it is an integral part.
The clutch mechanism performs a number of important functions: it constantly and reliably transmits torque from the engine, temporarily disconnects the transmission from the engine, which is necessary when changing gears, braking the car, and smoothly connects the engine to the transmission.
It is also necessary to recall that the clutch, under excessive loads, protects the parts of the transmission mechanisms from damage.
Clutch mechanism
Zhiguli cars have a dry single-disc clutch.
The clutch release drive is hydraulic, and to reduce the force applied to the foot pedal, an additional spring mechanism (servomechanism) is used.
The clutch used on Zhiguli cars, provided that it is handled correctly, is very durable and reliable in operation.
It provides easy and smooth gear shifting, is well balanced and has a minimal moment of inertia. The clutch mechanism consists of the following main components and parts:
- crankcase 1, cast from aluminum alloy
- steel driven disk 8 with friction linings riveted on both sides 7
- pressure (drive) disk 10, which, together with a diaphragm spring, is installed in a steel casing 9 (we would like to remind you that in everyday life this unit is often called the “clutch basket”)
- clutch and drive release mechanism.
The normal operation of the clutch mechanism depends on numerous factors, one of which is the amount of pedal free play.
It should be 30-35 mm, the full travel of the clutch pedal should be 140 mm. A decrease or significant increase in the free play of the pedal leads to disruption of the normal operation of the clutch.
Most often, these violations are expressed by incomplete disengagement of the clutch (with increased free play) or noise when the clutch operates when the pedal is released (with insufficient free play).
Considering the importance of the functions performed by the clutch and its vulnerability due to inept operation, the factory recommends monitoring the amount of free play of the pedal during each maintenance. The operation of adjusting the free play of the clutch pedal does not take much time, but an inspection ditch or overpass is required to complete it
From the tool you will need two keys 13 x 17 mm and 17 x 19 mm
The operation of adjusting the free play of the clutch pedal does not take much time, but an inspection ditch or overpass is required to complete it. From the tool you will need two keys 13 x 17 mm and 17 x 19 mm.
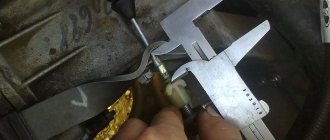
It is very easy to measure the full and free travel of the clutch pedal using a ruler while sitting in the car. If adjustments are required, you will have to go down into a ditch or climb under a car standing on an overpass.
Checking the free play of the clutch pedal
Before proceeding with the adjustment, you can once again check the amount of pedal free play while under the car.
The check is performed as follows:
- Place the thumb of your left hand on the pusher (Fig. above), and with your index finger pull the clutch release fork 3 towards your thumb, overcoming the force of the release spring 6 until it stops.
- if in this position the free play on pusher 2 of the working cylinder is within 4-6 mm, then the alarm was in vain. Otherwise, adjustment is necessary.
- The free play of the clutch pedal is adjusted with nut 4.
- To do this, you need to unscrew the lock nut 5, use nut 4 to adjust the pusher stroke so that the minimum deflection of the clutch release fork is 4 mm, and the maximum is 6 mm, and tighten the lock nut.
If you have carefully adjusted and set the amount of free play of the clutch release fork, then you do not need to check the amount of free play of the pedal. It is within the required limits.
It is useful to read - increased noise when the clutch is engaged.
How to adjust the clutch of a VAZ-2107
During vehicle operation, an incorrectly adjusted clutch is expressed as follows:
- The clutch drives. When the clutch pedal is fully depressed, the disc does not move away from the flywheel, making it impossible to change gears normally. Thus, the car can start moving even when it is not necessary.
- The clutch is slipping. When the clutch pedal is fully released, the disc begins to slip. As a result, it does not transfer all the engine power to the transmission in full.
In addition, problems with the clutch sometimes result in it setting too early or, conversely, too late. As a result, driving may become significantly more difficult.
When to adjust the clutch drive
The standard adjustment procedure is required as routine maintenance or emergency repairs. Usually the reason for performing the operation is such problems.
- Gear shift violation - positions are engaged with knocking, crackling or extraneous sounds.
- The clutch switch response threshold has been violated. A dip of 25 to 35 mm is considered optimal.
- Increased fuel consumption. If the mechanism is faulty, excess gasoline consumption can be up to 20% of the reference value.
- Knocking out positions. During acceleration of the vehicle, the gears “fly out”.
- Dissonance when revving the engine. When you press the gas pedal, the internal combustion engine spins up, and the car lags behind.
- Clutch lever failures, this also includes an increase or absence of operating play in the system.
- Early or late operation of the mechanism when the pedal is pressed.