The domestic auto industry always requires attention from its owners.
One would be interested in tinkering with the maintenance of the power unit on their own, another would be interested in doing a little tuning of the appearance, and a third would be interested in connecting fog lights to Kalina.
The automaker only equips the “sport” modification with fog lights.
Indeed, to make driving in bad weather conditions safer, owners can:
- Purchase a freely available kit for connecting fog lights to Kalina;
- Install them yourself.
Preparing for work
Before going to an auto parts store and choosing fog lights (FFL), car owners should know that the procedure for installing them is regulated by the Road Traffic Rules.
In particular, the installation of PTF on a car must be carried out in places specified by the car manufacturer.
In relation to AvtoVAZ wiring products, the connection diagram for fog lights on Kalina implies their installation in the front bumper:
- For this purpose, it has special places covered with plastic plugs;
- The package of purchased headlights must have all the necessary elements for proper connection (wiring, terminal blocks, power button, fuse and relay).
Seat for PTF in the front bumper of Lada Kalina
Note! Purchased headlights are always smaller in size than the standard installation location. Therefore, plastic sidelights should also be included with the PTF.
What can you buy for Kalina?
A wide variety of foglights for cars amazes the imagination with their appearance and shapes:
- Round;
- Oval;
- Square;
- Twin;
- Recessed;
- For outdoor installation, etc.
Not all PTFs are suitable for Lada Kalina, which forces owners to redo the mount themselves
However, only a few PTFs produced by different manufacturers are suitable for Lada Kalina.
In particular, these are:
- Bosch products, characterized by flat glass headlights and sold only in pairs;
- Fog lamps “Kirzhach” with lens-shaped (convex) glass;
- Fog lights “Luch” are an analogue of German products. The price is lower, but so is the quality;
- Products of Chinese companies under the ProSport brand.
Note! This list is not an expert list. Simply, the products of the listed companies are installed in the standard places of the Lada Kalina without any additional modifications. And the complete set of kits is selected exclusively for this AvtoVAZ model.
PTF ProSport in chrome configuration
How can I install
There are 2 ways to install fog lights on a Lada Kalina car:
- Without removing the front bumper;
- With bumper removed.
Advice! If you do not have sufficient skills in working with plastic parts, then it is better to completely remove the bumper. In this way you will protect it from breaking off latches and fasteners due to negligence.
The factory instructions provide detailed information on all mounting points for the front bumper
What is needed for installation and connection
Standard PTFs are included in some Kalina configurations; they are installed on the lower bumper. The lighting quality of standard optics is not always optimal - many mechanics recommend purchasing a higher-quality kit and installing it on the car. The designers have provided for the possibility of replacing such headlights; repairs do not require completely removing the front bumper.
Which PTF is better to install?
Manufacturers offer different sets of optics in terms of price and quality. It is worth noting the most suitable options for Kalina:
- Bosch optics have flat glass and are sold in a set of 2 devices. Has high build quality and long service life.
- Kirzhach headlights can be purchased one at a time - they use convex glass in the shape of a lens.
- Luch foglights are of good quality, but the design does not include a fogging valve.
- ProSport headlights, despite the manufacturing country of China, are of good quality at a low price.
PTFs from different manufacturers differ in price and quality
Advice: It is worth noting that domestic manufacturers are practically not inferior in quality to foreign companies. They also offer a good warranty on their devices.
Tools and materials
Besides the optics itself? you will need to purchase a mounting kit for connection. It includes:
- relay;
- headlight switch;
- several wires with connectors;
- connectors;
- self-tapping screws;
- instructions with installation diagram.
Everything you need is included in the installation kit for connecting PTF
We recommend: How to diagnose a diesel engine?
The kit must have a special marking 1119. This means that all parts are intended for installation in the prepared location of the mounting block.
PTFs can be sold with or without external frames. Before installing the frame, you need to paint it to match the body color or purchase ready-made ones in a suitable color scheme. The tool you will need is a standard 8mm wrench and a good screwdriver. Work can be carried out both with the front bumper installed and with it removed.
Installation of PTF
If you bought fully equipped headlights, then integrating them into the front bumper will not be particularly difficult.
You will only need:
- Install PTF in regular places;
- Secure them with self-tapping screws;
- Install incandescent lamps in the headlights;
- Connect the plug and lead the wires into the engine compartment.
Advice! For additional glass protection, order the production of headlight stickers. This transparent film can protect fog lights from stones and plant branches.
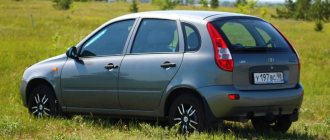
What functions do fog lights perform and is it worth installing them on Kalina?
Mechanics and experienced car enthusiasts recommend installing PTF on most models of domestic cars. These lights are inexpensive and easy to install. They come in handy when driving in thick fog, when visibility is only a few meters. PTFs are installed below the main optics, they illuminate the road at a height of about 50 cm - this is where the fog collects.
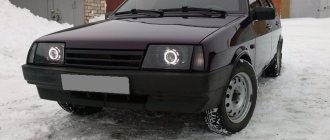
External view of the PTF on Kalina
On sale you can find different sets of fog lights, which differ in price and quality. It is better to choose well-known manufacturers, as their optics really provide good visibility and have a long service life.
Tip: Even bright PTFs, if installed correctly, will not dazzle the eyes of other drivers, so such optics can be turned on at any time of the day.
Installation of electrical components
More technically complex is the operation of installing and integrating electrical components into standard wiring.
To successfully complete the work, the owner must solve the following tasks:
- Correctly connect the PTF to the fuse block;
- Install a button for activating fog lights in the car interior.
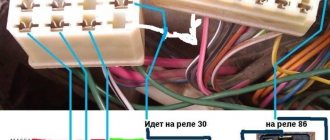
Original wiring diagram for fog lights on Kalina
If you use the wiring and the attached electrical diagram from the PTF kit, the connection will be reduced to:
- Installing a fuse in the block;
- A relay responsible for the operation of the power button is also installed there;
- Connecting the fog lights themselves and the standard electrical wiring into a single electrical network;
- Outputting control of their work to a button.
The photo shows a proprietary set of electronic components that does not require modifications. It is easy to connect to the standard electrical wiring system
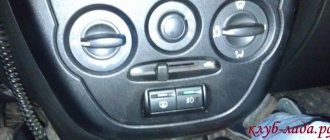
Installing the PTF button
The button for turning on Kalina's fog lights can be installed at the request of the car owner:
- On the tunnel between the seats;
- On the instrument panel for Kalina equipment without air conditioning (installed instead of the air conditioning button);
- In the external lighting control unit.
The light control module (LCM) of the Lada Kalina car has a fog lamp button, which is responsible for the operation of the rear lights. The fuse box is also hidden behind it.
The most difficult option for connecting a button will be connecting it to an existing one in the ICC. To do this, you will have to cut into the wiring harness and isolate the connection. (see also the article Wiring VAZ 2114: differences from its predecessor)
Under No. 4 in the photo there is a button to activate the PTF operation
Less difficult to install would be options with connecting and outputting a button near the cigarette lighter on the tunnel, or with installing a button in a socket on the instrument panel provided for turning on the air conditioner (in versions without it).
How to install a set of fog lights with your own hands + diagram
To save time on dismantling the bumper, we will show you how to replace it without removing it.
- When installing the right headlight, turn the steering wheel as far as possible in this direction - this increases the working space.
- Remove the front mudguard.
Turn the steering wheel to the right and remove the shield
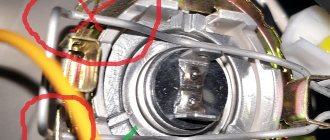
- From the inside, we open the latches that secure the old PTF or plugs.
- We remove the plug.
- We fix the new headlight from the inside with 3 self-tapping screws.
Attach the headlight to 3 self-tapping screws from the inside
- Installing a new frame. To do this, press it firmly against the bumper until it clicks.
- We do the same with the left headlight.
This completes the installation of the optics. Now we connect the headlights using the pre-purchased installation kit.
Nuances of connecting PTF on Kalina
The connection process is a little more complicated than installing equipment and requires care when working. We recommend immediately laying all the wires from the engine compartment into the Lada's interior in a high-quality manner so that they do not interfere or get underfoot.
- We connect the harness to the right and left fog lights and secure the ground wire to the body.
- We connect the positive wire to the battery.
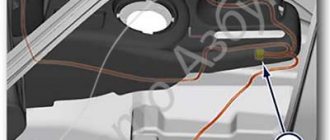
- Next, we pull the harness into the cabin through a standard hole in the left wing of the car.
- When the harness is pulled into the cabin, you will need to remove the ashtray by unscrewing 4 small bolts.
We extend the harness into the cabin and remove the ashtray
- Through the resulting space from the inside we push out the plugs for the buttons on the front instrument panel.
- Pull out the airflow control knobs.
Pull out the blower control knobs
- Move aside the panel trim, push out the cover of the air conditioner switch button and install the PTF switch in its place.
We mount the PTF power button in place of the plug
- We connect the wires with the connectors that come with the installation kit.
We connect the wires using connectors
- We connect two long wires to the front panel mounting block.
- We connect the harness from the button to the mounting side and push it into the cabin as far as possible.
Pull out the mounting block
- Now we have 2 wires in one place that come from the button, and 3 wires from under the hood.
- We connect the wires, fuses and relays as shown in the diagram.
We connect the wires using the connection diagram
- We check the operation of the optics and, if the circuit is connected correctly, isolate the connections and install the mounting block in place.
- We assemble the panel elements in the reverse order.
We recommend: Do-it-yourself connection of fog lights via a relay