01/12/2021 2,754 VAZ 2110
Author: Ivan Baranov
In any car, optics play an important role, since the driver’s safety depends on the quality of road surface lighting at night. Accordingly, because of this, many car enthusiasts change their headlights to provide better illumination. Find out more about what faults the factory headlights on a VAZ 2110 have and which headlights are best to choose from this material.
[Hide]
Do-it-yourself VAZ 2110 headlight repair video
It is extremely rare to replace a headlight on a VAZ 2110-2112 car, and in most cases this need arises in the event of an accident or other damage in which it is no longer possible to restore the headlight unit. You can remove the headlight yourself and to do this you will need the following tool:
- 8 mm head
- Extension
- Ratchet handle
Since cars of the tenth family, such as the VAZ 2110, 2111 and 2112, are identical with regard to the front part of the body, the procedure for replacing headlights will be the same.
Removing and disassembling the headlamp, replacing lamps
Disconnect the negative cable from the battery.
Disconnect the two electrical connectors of the headlight unit.
Using a 10mm wrench, unscrew the two bolts of the upper headlight mounting.
Remove the radiator grille.
Unscrew the lower mounting bolt.
Carefully pry off the decorative trim with a screwdriver.
We move the trim to the center of the car and remove it.
Using a 10mm socket, unscrew the nut securing the headlight unit to the bracket
Quite often, motorists have to deal with such a problem as damage to the headlight glass. As a rule, assembled headlight units are installed on VAZ cars. It is sealed, the glass is firmly glued to the body, and many car enthusiasts, if the glazing is damaged, simply replace the headlight assembly. Such repair of VAZ-21099 headlights, like other models (2105, 2107, 2108, 2109, etc.), as they say, “will cost a pretty penny.” A more profitable option is to replace the glazing. This procedure is easy to do yourself.
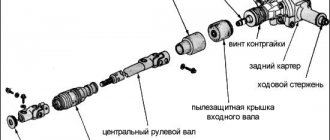
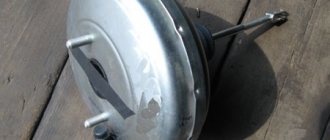
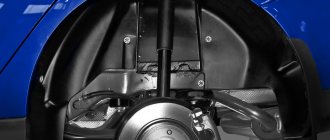
What does a hydraulic corrector look like and what does it consist of?
The device adjusts the angle of the light flux depending on the position of the car body. The shape of the regulator resembles a long tube, one end of which is located in the cabin, and the other is attached to the headlights. The design of the hydraulic corrector consists of:
- The master cylinder, which is installed on the instrument panel.
- Executive cylinders that regulate the position of the headlights.
- Connecting pipelines.
- Working fluid.
How the design details of the headlight hydrocorrector on the VAZ 2110 work
There are no complicated parts here; minor repairs can be done by yourself. This does not require a complex tool or special skills.
Preparing for adjustment
To get started, we recommend watching a video on adjusting headlights on a VAZ 2110. Training lessons will allow you to understand the nuances of the procedure in more detail and pay attention to the important points of the operation.
Everything is not as complicated as it might seem at first glance. First, prepare the car appropriately for adjusting the optics.
- Wash your car headlights to keep them as clean as possible.
- Examine the condition of the optic glass. In some cases you will have to polish it. The procedure is not complicated, but requires a careful and careful approach.
- Now check the reflector for defects or damage. If they are, it is better to immediately replace it with a new one.
- If the car has been in use for a long time, then the existing lamps are unlikely to be modern and highly efficient. Experts recommend using modern halogen bulbs, which do an excellent job of illuminating the road surface.
- Pay attention to the standard indicators specified in the owner's manual for your vehicle. Before adjusting the headlights on a VAZ 2110, you must: fill the fuel tank, inflate the wheels to the required levels, and check the spare wheel.
Having completed the preparation to obtain the necessary conditions, you can proceed directly to the settings.
Choosing a headlight manufacturer
Drivers, first of all, always need a good low beam. Kirzhach headlights are equipped with a lens for low beam and, accordingly, a reflector for high beam. Bosch uses reflectors in both cases. Unlike a reflector, the lens has a much clearer light line; in addition, Kirzhach lighting devices can be legally “equipped” with xenon, which is not provided for Bosch. However, if we compare the results of the review of experts and the opinions of car owners, it is worth noting that they are somewhat different. Bosch headlights have weak flare from the side in the low beam, but besides this, they are the ones that cause preference. In addition, they have a large surface for low beam due to the reflector. This has the best effect on the quality of automobile road lighting in cloudy weather.
In order for lighting to be as productive as possible at night, choosing high-quality optics is not enough. The headlights should be adjusted correctly, and the glass should be clean (the glass should be secured with a sealant, but on Bosch they are held on by sealants. This makes the process of replacing glass easier). However, the best option would be to use bright halogen lamps for car lighting.
Tuning headlights Kirzhach
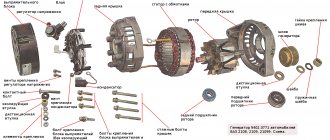
The uniqueness of Kirzhach headlights is that with a little modification their glow can be significantly improved. By changing individual elements, experienced car enthusiasts expand the light output and make it brighter. To repair the Kirzhach VAZ-2110 (2112) headlight, first remove it, then disassemble it in the following order:
- Particular attention should be paid to removing the glass. It is glued to the sealant, so you first need to heat the sealant with a hairdryer, and then carefully remove the glass using a sharp knife.
- Unscrew the 3 bolts and remove the reflective gasket.
- There is no need to remove all the internals, or completely disassemble the modules. For modernization, we only need low beam units. We unscrew them using a screwdriver.
Repair of the VAZ-2110 (2112) headlight unit by modification can be performed in various ways:
- Moving the lens.Repairing headlights 2110 (2112) by shifting the lens towards the reflector will lead to a decrease in the curvature of the reflection area. Thus, the angle of incidence and reflection of the rays will change for the better. It should be remembered that excessive lens displacement can lead to overheating. An offset of 10 mm is optimal.
- First, we take measurements and mark the cut location on the module.
- We saw off and make cuts for fastening.
- We attach the lens to the module.
Such repair of the VAZ-2112 (2110) headlight will make the module shorter. Accordingly, the luminous flux will increase in width and height.
2. Sewing the modular ring . In the standard version, the edges of the modular ring, which are located under the lens, cover the light flux. If you repair VAZ-2110 (2112) headlights by grinding off the ring by 1 mm, you can increase the luminous flux by 10-15%. This procedure will not affect the strength of the module structure.
3. Changing the shape of the reflector. Repairing headlights 2112 (2110) by changing the shape of the reflector will increase the width of the luminous flux of the headlights. The reflector has a round shape and is made by stamping from sheet metal. If you squeeze it with your hand, resting it on the floor, you get an oval.
It must be remembered that the width of the flattened part should be no more than 93.2 mm. Otherwise, the light beam will be severely deformed. In order for all the fastenings to match, the reflector fastening should also be made oval.
All these modifications can be done either individually or in combination. In any case, after the modernization is completed, it will be necessary to repair the headlight adjustment of the VAZ-2110 (2112).
Remember that unqualified modifications can lead to disastrous consequences. If you are unsure of your capabilities, entrust the issues of modernizing your car to professionals.
Eliminating headlight shake
Some owners of the domestic VAZ 2110 noticed that the light trembles when driving. This problem appears more often in Kirzhach headlights, but in this part from Bosch this phenomenon occurs quite rarely. Reason: rattling of the reflector itself.
To eliminate light jitter you need to check:
- Is the reflector in place in the latch?
- Is the adjusting bolt rod in place?
- Does the hydraulic corrector rod rest against the seat;
- Is the thread slack (we swap the high and low beam lamps)
- Is the tube in the hydraulic corrector frayed?
Among the most successful ways to troubleshoot the problem:
- Replacing the hydraulic corrector with an electric corrector.
- Increasing the length of the hydraulic corrector rod, which will help tension the spring.
This popular method allows you to get rid of the twitching of the light by placing a cap on the hydraulic corrector rod.
Use as a cap:
- plastic dowel 8mm long,
- brake fitting cap,
- another plastic cap.
The operating procedure is simple:
We take out the hydrocorrector from the illuminator. We tightly place the cap on its stem
It is important that it does not jump inside. We insert the hydraulic corrector into the seat
We insert the hydraulic corrector into the seat.
Removing glass
In fact, replacing headlight glass on a VAZ 2110 is not a rare event. It may be required if a large number of microcracks have formed on the glass, it has become cloudy or simply cracked due to an impact, collision or careless parking.
Changing glass
The removal procedure depends on the type of flashlight you are dealing with.
Replacing glass on Bosch optics looks quite simple. You need to press the latches, after which the glass can be easily removed.
But when installing a new one, do not forget to look at the condition of the rubber seal. This is a consumable item that is best replaced immediately. Additionally, craftsmen advise using a sealant. This procedure is not mandatory, but it improves the quality of installation and protects the interior of the headlight from the same condensation, for example.
But if you have Kirzhach, we sympathize a little. In this situation, it will be much more difficult to remove the glass. But this does not make the procedure impossible.
- Arm yourself with a flathead screwdriver and insert it into the corner of the glass. This will create a gap of sorts.
- With your other hand, take a sharp utility knife, thereby cutting off the sealant.
- If the sealant has hardened firmly, try heating it with a regular hairdryer. Hurry up with removal, as the composition will quickly harden.
- In any case, you will have to dig deeper into the headlight. Be careful not to damage the glass. If it is already cracked and needs to be replaced, you can resort to more aggressive glass removal methods.
- When installing new glass, use a softer sealant that is used in construction.
Replacing headlights is not as difficult as it might seem at first glance. Such repairs have their own nuances and features, but if you follow the instructions and be careful, you will definitely be able to do everything with your own hands.
How to remove a headlight on a VAZ 2110-2112
I recently made a detailed video report on this topic, so below is an overview from my channel.
Video instructions for replacing headlights
This example was shown on the right headlight; of course, everything is done a little easier on it than on the left. But in essence, there is practically no difference:
Photo report of the work done on dismantling and installation
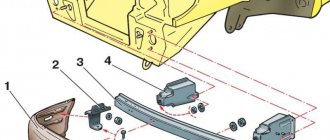
The first step is to remove the radiator grille by unscrewing the two bolts securing it from above:
And remove the grille, bending the fastening clamps from below:
Next, you need to unscrew one bolt securing the headlight from below, as shown in the photo below:
And two bolts on top.
After this, we free ourselves from the lower headlight trim, between it and the front bumper:
After this, disconnect all the power wires from the light bulbs from the inside, as well as the headlight range control tube, and then you can remove the headlight without any problems, since nothing else holds it.
Installation is carried out in reverse order. As for the price of a new headlight, for a VAZ 2110 it can range from 1000 rubles apiece. The price, of course, also depends on the type of headlight (lens or regular) and on the manufacturer (Bosch or Kirzhach).
Replacing an element manually
What to do if the hazard lights don’t work, the low beams are off, the brake stop doesn’t work? If the brake lights do not light up and the headlights do not work, first of all you need to check the functionality of the relays responsible for their functionality. The performance of the lamps themselves is also checked - often they are the reason for the lack of lighting. If everything is in order with them, the problem will in any case lie in the electrical part.
Installing xenon on a VAZ 2110 will provide better lighting for the car. To make the car have an original appearance, you can connect the DRL and tune this element of optics. We have already written about how to change and connect daytime running lights in this article.
As for replacing the lights on the “ten”, it is carried out as follows:
- First you need to disconnect the wiring from the lights, and then dismantle the upper radiator grille, to do this, unscrew several bolts using a 10mm wrench.
- Next, you need to disconnect the wiring from the turn signal elements and dismantle the hydraulic corrector device. To do this, press the latch and rotate the device 90 degrees clockwise.
- Unscrew the three screws securing the optics using a wrench, the headlight can be moved back. Move the so-called eyelash of the optic a few cm, moving it beyond the edge from engagement with the wing.
- After these steps, you can loosen the two screws of the upper buffer clamp. Remove the so-called eyelash.
- Now all you have to do is unscrew the last fixing nut with a wrench, after which the lamp can be lifted and removed. If necessary, the headlight is repaired or tuned.
Sorry, there are no surveys available at this time.
We repair the light fixture without disassembling it
You can snap the ball into place without removing the glass, through the holes of the light bulbs on the back side of the illuminator:
- We drill a hole exactly opposite the latch at the top of the headlight;
- Insert a screwdriver into the hole;
- Attach the collet to the corrector ball;
- We seal the hole we drilled;
- We attach a hinged loop from a furniture cabinet (hinges 5-6 centimeters long, with mounting holes and a cutout on top on which it is attached) to each broken corrector unit;
- We insert the canopy into the slot of the adjustment screw;
- We move the screw so that the slot is in a narrow place of the canopy;
- Holding the canopy, unscrew the screw until it stops with force. This is how the canopy is fixed, which needs to be placed in a horizontal position;
- Using an electric drill, using a 3 mm drill, we make a hole in the base of the light where there is a hole on the canopy;
- We screw a shortened screw into the hole so that it does not reach the high beam reflector. This slot secures the adjustment screw securely; it can be broken again.
Removing faults without disassembling headlights
Fixing the ball in plastic can be done without removing the glass parts, through the holes for replacing lamps on the back side.
Those. a hole is made opposite the latch on top of the device and a screwdriver is pushed into it, the adjusting part is snapped onto the ball and the hole is sealed. Next, take a loop to fix it on the furniture wall. It is about 5 cm in size and has holes for fixing on furniture, a groove on top for fixing the wall. The canopy is inserted into the groove of the adjusting screw, it moves and the groove ends up in a narrow area of the canopy.
Then the bolt is turned out strongly, but the canopy is held in place. In this way it is fixed and positioned horizontally.
A 3 mm hole is drilled in the base of the metal device in a place that coincides with the canopy hole, a not very long self-tapping screw is fixed there, it should not rest against the reflector. Basically, such a slot secures the screw securely and it will not break.
Features of domestic transport
The headlights on the VAZ-2110 are adjusted with two screws: 1 - horizontally, 2 - vertically.
Owners of foreign-made cars can be considered happy people, since their vehicles are crammed with electronics and automation, which simplifies the use of the car. Almost all settings there are carried out automatically using the on-board computer.
This also applies to headlights. Their angle is adjusted depending on the load on the car, tire pressure or the quality of the road surface. Therefore, such cars can rarely blind oncoming traffic, and the driver can see all the obstacles on the road in the dark.
There are no such adjustments on the VAZ-2110, and therefore the headlight angle must be adjusted manually . Experts advise carrying out such adjustments on special stands that are available at service stations. But when this is not possible, you can make the correction yourself. To do this you will need to call a friend for help.
Changing the type of optics (tuning)
Car enthusiasts often tune their car headlights to improve their appearance. High-quality tuning gives the car a fashionable look and beauty. If you choose the right accessory, the appearance of dozens will change completely . The most popular among car enthusiasts is tuning headlights in the form of tinting. It is carried out in a variety of ways that have virtually no effect on the brightness and quality of road lighting. Types of headlight tinting:
- Painting of the headlight mask;
- Glass painting;
- Glass tinting film.
The process of such tinting is best shown in a video. For those who don't want to paint or tint their headlights themselves, there are ProSport headlights. They are already sold in black or chrome. You just need to install them instead of the standard headlights. Only they cannot boast of high quality or bright light.
Fog light
A very useful device, provides light in bad weather environments. The factory version is supplied for the VAZ 2110 “Lux” configuration. In other versions you need to install them yourself. At the same time, the place in which they will be placed is determined. Most often, this is the bottom of the bumper, there are holes for fastenings.
- transparent - they give light in spots, they are a little worse;
- corrugated - scatter light well on the road surface.
They purchase frames, relays, a power button, and wires for them. The latter are placed under the hood from the instrument panel, they are connected to the connectors on the instruments, they are isolated, the instruments are fixed in frames and secured to the bumper, and the wires are connected. The button is mounted in the break of the supply wire. Then the devices are adjusted.
Replacing the headlight range control on a VAZ 2110
Every car enthusiast can change the headlight hydraulic corrector. The work process takes no more than half an hour. The only tools needed to replace the hydraulic corrector are a wrench with a size 21 head and a straight screwdriver. The rest is done by hand:
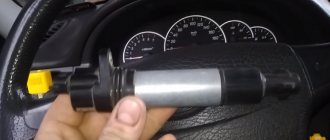
- Remove the adjustment knob located on the instrument panel. To do this, you need to pull it with medium force, slightly shaking it.
- Using the existing wrench, unscrew the nut under the handle (it pulls the master cylinder to the panel).
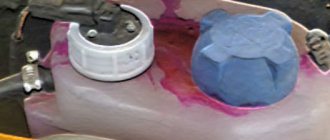
- Click on the rectangular button on the panel. It is located slightly below the hydraulic corrector adjustment. As a result, the door opens. Through the resulting opening from below, we can easily reach the free master cylinder.
- Open the hood. We find headlight units with integrated working cylinders. To remove them, unfasten the clamps. After this, each cylinder is turned counterclockwise and removed.
- Using a prepared screwdriver, unscrew the bolts that secure the tube clamps.
- We push the released elements of the hydraulic corrector into the cabin at the place where the connecting tubes come out. The seal present here is flexible, so it won’t hurt much.
- Installing a new headlight range control is carried out in the reverse order.
Have you noticed how simple it is? So, if the hydraulic corrector in your VAZ 2110 does not want to work, take half an hour and replace it. Agree, the ability to adjust the direction of the light beam at any time without leaving the car is, it seems, a small thing, but a pleasant one.
Author: Lagoda Vladislav Fedorovich
Higher education: secondary specialized. Specialty: Auto mechanic. Good knowledge of the design of foreign-made passenger cars. Work skills: replacing the timing belt of the cylinder head, chassis wheel alignment and maintenance. Repair…
- Dim Dimych says: I read that to install xenon together with a washer, you need an automatic headlight leveler. I couldn’t quite imagine what it was – please explain.
Yuri Kaplan says:
This is a device that adjusts the angle of the lights depending on the position of your car. By the way, a very useful thing - I installed a German Hella for myself for 18 and a half thousand, it does an excellent job. Driving has become much more convenient.
I can't understand what the operating principle is based on. Can you tell me more about this?
- Stanislav says: Good afternoon. The operating principle of the auto-corrector is based on conventional tilt sensors. Your car changes angle, the sensor reads it and sends a signal to change the position of your lights.
Replacement instructions
Since the cost of a new hydraulic corrector is 200-300 rubles, most car enthusiasts do not get tired of manual repairs. To replace the device we will need:
- Flat head screwdriver;
- Wrench with extended head.
The first step is to remove the old hydraulic corrector:
- Open the hood and remove the actuator cylinders from the inside of the headlights. To do this, simply turn the cylinder counterclockwise until it clicks.
To get to the actuator cylinders, you need to open the hood and go down to the headlight mounting area
Remove the adjusting knob by pulling it towards you
The fastening nut is removed with a socket wrench
Press the button to open the cover and gain access to the main cylinder of the hydraulic corrector
Pull the main cylinder through the hole
Tip: If snagging occurs when removing the pipes, you will need to loosen the fastening clamps under the hood or remove the water tank.
Installing a new kit is done in the same way, only in reverse order. The tubes must be supplied from the passenger compartment through a special hole, as shown in the photo.
We pull the tubes through a special hole in the cabin
Video: how to replace the headlight hydraulic corrector on a VAZ 2110 with your own hands
The hydrocorrector of the headlights allows you to smoothly adjust the direction of light and provides good visibility of the road surface. If this device breaks down, it can be easily replaced with a new one; the cost of the kit is very small. Before repairs, it is better to conduct a visual inspection and measure the stroke of the rod - this will help to understand the cause of the malfunction and eliminate it.
Adjusting the headlights on the VAZ-2110, as on any other car, is carried out in order to illuminate the space as efficiently as possible and at the same time not dazzle oncoming drivers. This applies to both low and high beams. The top ten can be equipped with two types of optics - German Bosch block headlights and domestic headlights from the Avtosvet plant from the city of Kirzhach. Both headlights need adjustment, which is what we will do now.