How to properly install and connect the radio in a VAZ-2107 (2106) car
- How to install
- How to connect
- Speakers
- Subwoofer
- Antenna
The standard sound system in the VAZ-2107 car has long been outdated. In order to enjoy high-quality sound, you should consider installing new equipment. Installation of the VAZ-2107 radio can be carried out with a minimum set of tools.
How to install
When choosing a radio, it is recommended to pay attention to products manufactured under the Pioneer brand. It is characterized by high performance characteristics and can last for a long period. You can install the radio to improve the quality of music as follows:
- In the car, the radio is fixed using a standard ISO connector. This international standard has become widespread.
- When choosing a radio, you should consider its size. If they do not fit, installation will become more difficult. The seat can be changed in the machine.
- There are no problems with updating the radio if the seat has the required dimensions. All cables are fixed into a rectangular block.
- If the contacts do not fit, you can use a special adapter.
It is easy to install the radio correctly, since in most cases it has standard dimensions. For cars, it is recommended to purchase appropriate wires that are well insulated.
How to connect
You can connect the radio to the VAZ-2106 via the ignition switch, but this scheme is considered less attractive, since you won’t be able to listen to the radio with the engine turned off. The standard connection diagram involves the use of standard wiring. Among other features of connecting the VAZ-2107, we note the following points:
Are you a car driver?! Then you can take this simple test and find out. Go to test »
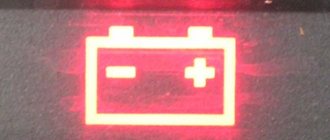
- It is forbidden to connect directly to the battery, as this can lead to rapid wear.
- To eliminate the possibility of battery discharge, a power button is embedded in the yellow wire.
- There is no standard fuse in the classic assembly. To install it, you need to change almost the entire electrical circuit. The easiest way is to purchase a power cable that already has a safety element built into it. A 20 A device is required for normal starting.
The service life of the speaker system largely depends on the correctness of the created power system. It is recommended to insulate the wire; the contacts are connected by soldering or using special adapters.
Speakers
In order to connect the radio to the VAZ-2106, you should connect it to the speakers. Among the main recommendations we note the following:
- The speakers are being installed and sealed tightly. Otherwise, vibration may occur.
- Most attention should be paid to correct cable routing. At the point of contact with metal, high-quality insulation should be carried out, since vibration can cause the insulation to rub through.
- The connection procedure involves the use of special adapters. In addition, connections can be made by soldering; all connections are insulated.
A modern radio has appropriate outputs for speakers. The power supply network should have a minimum number of connections, as they may cause increased resistance.
Subwoofer
When improving the sound system of the car in question, a subwoofer is often installed. This element is designed to output low frequency sound. Among the connection features, we note the following:
- A modern device has a corresponding output for connection.
- For a speaker like this, it is recommended to use a larger gauge wire.
It is recommended to lay the cable under the vehicle's skin. The radio tape recorder is connected to the VAZ-2107 using special chips.
Antenna
Before connecting a car radio to the VAZ-2107, you should consider the correct position of the antenna. Various artificial interference can cause signal quality to deteriorate, resulting in extraneous noise. Among the antenna connection features, we note the following:
- There is a corresponding connector for connecting an external device.
- If you do not have the required plug, you can purchase it and solder it to an outdoor antenna.
- A high-quality connection requires insulation using electrical tape or sealant. Too much humidity can cause corrosion, which will degrade the signal quality.
Installing and connecting the speaker system takes a relatively small amount of time. Most attention is paid to laying the cable to the power source, since it uses a battery.
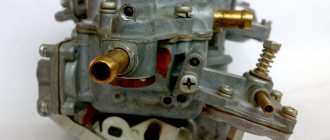
Connectors for connecting the car radio to the vehicle's on-board network
Many manufacturers, when preparing cars for audio, install a connector for connecting a car radio of an internal standard, since there is no international one. In Europe and Russia, preference is given to the German standard ISO 10487, which regulates the design and geometric dimensions of the connector, but does not regulate the color marking of wires. But many manufacturers adhere to the same color coding, which has practically become a standard.
The photograph shows an ISO 10487 connector. It consists of two separate terminals - “A” and “B”, which can be easily identified by the location of the latch. In block “B” it is located - offset from the center to the side.
| ISO standard for pinout of blocks for connecting a radio tape recorder | |||
| Block | Contact number | Purpose | Color coding |
| "A" food | 1 | Changing volume at speed | Not standardized |
| 2 | Off sound when calling | Not standardized | |
| 3 | Reserve | Not standardized | |
| 4 | +12 V constant (memory) | yellow | |
| 5 | +12 V external devices (antenna) | blue | |
| 6 | Radio backlight | orange | |
| 7 | +12 V ACC from ignition | red | |
| 8 | Minus (mass) | black | |
| "B" audio | 1 | Right rear (+) | violet |
| 2 | Right rear (-) | purple with black stripe | |
| 3 | Right front (+) | grey | |
| 4 | Right front (-) | gray with black stripe | |
| 5 | Left front (+) | white | |
| 6 | Left front (-) | white with black stripe | |
| 7 | Left rear (+) | green | |
| 8 | Left rear (-) | green with black stripe | |
If the connector in the existing radio differs from the connector installed in the car, then you can purchase an adapter or, as I did, cut the wires from the standard connector and solder them to a new one.
As an example, the photo shows an adapter for connecting a car radio with an ISO connector in Hyundai and Kia cars of some years of manufacture. When choosing an adapter, you should take into account that the block that is inserted into the car connector always has pins (the male type in the photo on the right), and that connects to the radio - sockets (the female type, in the photo on the left).
The type and color marking of the standard connector can be found in the car's electrical diagram, and the color marking for connecting the radio is usually present on its body or is available in the documentation.
How to install a radio in a Zhiguli.
It is no secret that AvtoVAZ in Tolyatti still gives the future owner of the VAZ 2107 car complete freedom of action, covering the place for installing the radio in the “beard” or the center console with a plug. Connecting the radio yourself is a matter of honor for an amateur. Installation here is safer in terms of theft, since the radio is not conspicuous to anyone and is located low. In addition, it is easier to install the device - no re-arrangement of electrical and internal space is required. The only significant “minus”, even two, is the rather strong heating of the audio system when the heating is on. At high temperatures, the radio does not work for long. There is also the inconvenience of pulling out the audio disc due to the fact that the gear shift lever is in the way. But since disks are already becoming a thing of the past, giving way to “flash drives,” this is not a very significant drawback, unlike the first.
Some prefer an unusual place for it: to place it where the VAZ 2107 has upper air ducts. Like this:
Shown here is a homemade installation on a “seat” under the radio instead of elongated and removed air ducts. This homemade configuration has the following advantages: no heating (after all, the air ducts are removed), and ease of control of the device. Disadvantages are: changes in design, strong heating in direct sunlight, and the risk of theft. In addition, if you put it on top, the interior ventilation works worse, and this is an important argument against. Selling such a VAZ 2107 will most likely be more difficult. Therefore, before you connect a radio with such a serious modification, think carefully.
The picture shows the finished converted structure:
Either way, you need a radio. If you are just a fan of listening to “Autoradio”, then you can install “Aiwa”. If you want to get professional car audio, then think about purchasing a full-fledged audio system to connect a serious system, such as Pioneer. But at the same time, remember that you need to start working with proper complete soundproofing of the interior, purchasing a subwoofer, amplifier and other expensive things.
In addition, if your radio does not have a USB input, then know that you are purchasing and intend to install a very cheap and old model.
What are the benefits of new technologies?
In the second generation Lada Kalina 2 there is a standard radio, or simply put, the car radio has a simple and understandable control system. One or two taps on the touch screen allow you to activate the desired function. Unlike the previous version of the radio, this device boasts improved characteristics and the ability to function in different temperature conditions.
Very frequent complaints from owners of LADA Kalina 2 were indications that in sunny weather operating the radio became very difficult. The fault lay in the numerous glares that appeared on the capacitive display, which did not allow the characters to be read correctly. When developing the new generation of MMC, the designers took this negative point into account. Also, owners now have access to a car radio with a practical visor that protects the screen from glare.
The maximum diagonal of the radio display used in the Lada Kalina 2 is 7 inches. The basis of its functionality is the Windows CE 6 software product. This version of the software is specially designed for MMS and has almost optimal parameters. The process of turning on the device will take a few seconds. RAM is characterized by a volume varying from 128 to 256 MB.
With the help of the new firmware, the developers managed to significantly improve the functionality. Now the options include:
- ability to support formats: “wav”, “wma” and “mp3”;
- availability of memorization of six “shades” of playing musical programs;
- the display contains information regarding the name of the composition and album;
- the device’s ability to read programs in the “wmv” format;
- maximum screen resolution is 320 x 240 pixels;
- compatibility with a convector that allows you to play video materials in other formats;
- built-in FM radio;
- ability to support micro SD cards;
- The firmware allows you to play images that were saved in various formats, for example: “jpg”, “bmp”, “gif”, “jpe” and “jpeg”;
- there is no limitation in terms of the maximum size of photos, although if the volume of a particular photo is over 2 MB, the firmware will allow it to be opened after some time (2-10 seconds).
How to properly install and connect a radio in a VAZ-2107 (2106) car
- How to install
- How to connect
- Speakers
- Subwoofer
- Antenna
- How to check the connection
The primary element of modification of VAZ cars is the installation of an acoustic system and loudspeakers. Installation of the radio on the VAZ-2107 is carried out in several places located in the instrument panel. It is possible to use an additional subwoofer, amplifiers or distributed acoustics. The list of devices depends on the wishes and financial capabilities of the car owner.
How to install
Model 2107 has 2 locations suitable for mounting a 1DIN head unit. The radio can be installed in a standard place on the center console; it is also possible to install equipment instead of the central vents. The first installation option requires trimming the mounting socket to the required size.
The second option reduces heating of the player body by the hot interior heater, providing comfortable control of functions. But at the same time, ventilation deteriorates and there is a risk of heating the head unit by direct sunlight.
On the VAZ-2106, the only place for installation is the center console, which needs to be cut to the standard 1DIN size. The head unit is attached using a metal shaft, which is located in the instrument panel. The shaft fixation scheme is the same for VAZ-2106 and 2107 - using bent tongues.
It is possible to install 2DIN standard equipment, which is located in the glove box.
To fix the device, a housing must be manufactured; control is carried out using a remote wired remote control or via radio. It is possible to install the head equipment in the front passenger's feet, but such a scheme is rarely used due to the risk of damaging the radio.
How to connect
The correct connection of the radio on the VAZ-2107 and any other car is carried out through the contact group of the ignition switch. In this case, when the key is removed, the power supply to the equipment is stopped; only the memory unit is powered, which is supplied from the battery.
On carburetor cars it is necessary to modify the contact group:
- Disassemble the plastic steering column cover.
- Remove the connector from the ignition switch and unscrew the 2 mounting screws.
- Remove the lock from the column by squeezing the lock with a thin object (with the key inserted and turned to position 0).
- Remove the contact group that needs to be modified by soldering an additional element.
- Assemble the lock and install the parts in their original places.
A lock modified in this way receives the ACC position instead of 0, which is used to operate the head unit in the parking lot. An additional fuse is introduced into the connection circuit of the tape recorder to protect the circuits from overload. Connection with speaker cables is made through an adapter.
Speakers
The 2107 car has standard installation locations for front speakers, located in the corners of the instrument panel. When installing speakers in door panels, it is necessary to cut holes in the parts; diffusers and loudspeaker magnets are placed in standard recesses available on the inner metal part of the door. It is necessary to correctly route the speaker cables; for this, a special adapter sleeve is used, placed between the end of the door and the stand. The element protects the tourniquet from creases and damage.
For improved music playback, a pair of rear speakers are installed, which are located on the shelf behind the back of the rear seat. To install the parts, trimming of the metal panel is required; the cables are routed under the floor covering.
You can connect the radio on the VAZ-2106 only to the speakers located in the front doors and on the rear parcel shelf. There is no space in the instrument panel for installing speakers (except for the central oval-shaped loudspeaker, which was mounted in the console during the Soviet era).
Subwoofer
The low-frequency speaker on the VAZ-2107 is installed in the trunk. For connection in the car, separate speaker cables are used, connected to the head unit or additional amplifier. When using an active device connected to the on-board network, a protective fuse must be placed in the power circuit.
Antenna
The antenna on a VAZ-2106 or 2107 is installed on the roof or trunk lid; it is possible to use an active type device mounted on the windshield. The unit is connected to the car radio in a VAZ-2107 or 2106 using a standard plug or adapter.
How to check the connection
To check that the cables are connected correctly, turn off the ignition and measure the leakage current, which should not exceed 30 mA. An additional test will be to turn on the equipment in high volume mode, and the components should not turn off spontaneously.
Rules for choosing an audio system
Before you begin installing the radio on Kalina, you should select it at a car dealership or hardware store. The choice should be approached carefully and carefully. And before going to the store, it is better to decide on your desires and capabilities.
When choosing a radio for your car, you should decide which music media will be used as the main one. This will help you save some money. If, for example, a car owner is sure that he will not need a CD or cassette player, then why should he overpay for a radio with these functions.
For those choosing CD players, there is one minor drawback that manufacturers are trying to combat - the loss of music fragments due to shaking during a trip. But progress does not stand still, and the mechanics are improving. The presence of ISO in the car and, accordingly, in the audio device will simplify the connection. The presence of a USB adapter will allow you to play music from various media.
Pioneer model range
When choosing a car radio, you should pay attention to the power ratings. They have a maximum and minimum threshold. Maximum power is rarely used, except in extreme situations. The choice should be made according to the rated power, that is, the one that is used most often. Manufacturers often indicate only maximum values on packages, so when choosing, you need to carefully study the instructions (passport), and not the box.
It is also worth paying attention to the control panel. It should be extremely simple and convenient, since it will most often be used while moving. Intricate designs can distract from the road. Convenient and understandable buttons and adjustable backlight brightness will only be beneficial. It is imperative to check the range of perceived frequencies. Since radio stations mainly broadcast in the range from 80 to 110 MHz, it is better that the tuner also has this range.
New Lada: How to tune the interior of a Lada Kalina car
Pay attention to the number of outputs to the speakers and the resonant frequency, it should be lower.
Lada 2107 ❆ Snezhka ❆ › Logbook › Installing the radio in its normal place
I will continue the topic of yesterday’s post about installing central deflectors. Today I decided to install the radio in its original place.
Installation process:
We remove the cover-plug, take out the buttons, the part on which the clock is installed.
Unscrew the “beard” and remove it. I didn’t photograph the entire removal process; I’ll describe the reverse installation in full.
We try on the frame for attaching the radio to the central part, mark it and cut it out.
You can cut it with anything, I did it with an ordinary jigsaw.
But I couldn’t cut out the main part of the beard with a jigsaw; I cut it out separately with files from the jigsaw, using pliers, and then smoothed it out a little with a file.
We install the “beard” back, screw the two nuts on top with a 10mm head;
How to connect a VAZ 2110 car radio with your own hands
Installing a radio in a VAZ
Today you can find almost any speaker head unit on the market. Different prices, different needs and finally, a car radio is purchased. Almost every one of them today is equipped with a radio receiver and is capable of reading discs of any format. And if the choice of a head unit is not a problem for many, then installing a VAZ or other car radio becomes a real problem. In our article we will look at how car radios are connected. Installation on a VAZ 2107 or another model should be easy and quick if you study everything that is presented below.
Installation
Installing a car radio on a VAZ 2107
We will begin our story with the simplest way to install a car radio. This approach is completely justified, because it is impossible to learn complex installation options right away and you need to start from the simple. Before purchasing expensive equipment, you should decide on the choice of installer. If you intend to carry out such an operation on your own, then you need to know many secrets. On the contrary, an inexpensive device is very easy to connect and there is no need to spend money on the services of a specialist. So, what does a typical speaker system consist of? Of course, the main role here is occupied by the car radio, the installation of which we will do. But don’t forget about the four standard speakers that come included. You will need to connect wires from the head unit to them.
Note. All speaker components are installed only in places designated in advance by the automaker. This is done not only for the sake of simplicity, but also to avoid short circuits.
Starting the installation process
How to connect a car radio to a VAZ 2106
First of all, you should check the wires of the power supply, each of which should have its purpose written on it. The wire can simply be painted a certain color:
- The red color of the wire will indicate a cable implying power supply of plus 12 V when the ignition is on.
- Yellow will mean constant feeding.
- The blue wire is the power going to the antenna.
- The orange wire is for controlling the backlight.
- The black wire is always negative.
Let's consider installing a head unit, which, in addition to playing CDs, is also equipped with a radio receiver:
- We study the block for connecting speakers (see How to choose speakers for a car radio on your own). It consists of 8 plugs. Each speaker has two plugs. It turns out – 4 speakers x 2 = 8.
Note. The speakers can be installed as follows: two in the front doors, two in the rear parcel shelf.
- We study the player's power supply, which consists of 5 plugs.
Note. This does not mean that it should always be this way. There are different power strips, and they can have different numbers of plugs: 5, 8, etc.
How to install a car radio on a VAZ 2107
The connectors for connecting speakers and power are traditional. In other words, they (the plugs) have a specific purpose. In our case, it is assumed that these pads are included with the car radio and there is no need to buy them separately:
- We purchase special connectors, which are very important when connecting a car radio. Such components a priori eliminate the need to use soldering. These components are designed to connect an additional wire to the vehicle wiring. Typically, the connector has two channels: the main wire goes into the through hole, and the additional wire goes into the blind hole.
Note. In the contact part of the connector there are two slots for clamping the conductors through which current flows.
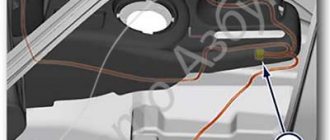
- As for the insertion point into the standard wiring, you can find it using the electrical connector diagram.
- After you have inserted the connector into the car wiring, you need to check the voltage plus 12 V and ground. This is done at the corresponding contacts of the block. We use the simplest probe - a 12 V car light bulb with two connected wires or a special one.
- We connect the wire blocks for the amplifier (which were not or will not be used during installation) with insulating tape.
Note. The wiring harness is a kind of block, it should be made in such a way that the wires for connecting the player are pulled out from there without excessive tension.
- Now you need to thread the wiring harness for the player and antenna through the special slides of the head unit.
- We insert the slide into the socket of the instrument panel console.
Advice. The slide must be installed without any distortion. Thus, the outer flanging of the slide must fit tightly to the edges of the player’s socket.
- Take a suitable screwdriver and bend the mounting brackets of the slide. We make sure that the sled sits securely in the nest and does not wobble.
How to connect a car radio to a VAZ 2101
- While we are not in a hurry to install the car radio, we once again check the voltage and ground on the required contacts of the power supply with a homemade probe.
- We connect the antenna cable to the radio.
- We also connect the remaining wires.
- We insert the radio into the socket of the instrument panel.
Connection diagram for car radio VAZ 2105
Note. To easily remove the radio from the slide, the installation kit contains two pullers. They are installed on both sides in the gaps that remain between the walls of the turntable and the slide. It is enough to simply pull these same pullers to remove the radio.
- We install the car radio panel trim.
- We install the panel itself.
- We check the functionality of the entire system.
Connection in a simple way
Car radio in VAZ 2110
To correctly connect the radio to the VAZ 2110, you should do the following:
- Apply plus to the red and yellow wires.
Note. Don’t forget that the yellow wire will be responsible for powering the device’s memory, and the red wire will be responsible for turning off the radio.
- In order for the radio to turn off after turning off the ignition, you need to pull the red wire through the lock.
Note. Features of the VAZ 2110 car will allow owners not to pull the wire to the ignition switch, but to connect directly to the fifth contact of the block.
But this connection also has disadvantages. In particular, you need to leave the ignition key with the passenger so that he can listen to music if the driver is not present. In addition, listening to the car radio with the ignition on significantly increases power consumption.