Design and features of bumpers on Lada Priora
Previously, bumpers were made of metal; they were durable, but easily scratched. Nowadays, metal elements are installed mainly on SUVs and sports cars. The basic configuration of the Lada Priora uses plastic bumpers, which serve more of a decorative than a protective function. Therefore, the likelihood of damage is higher.
The front bumper is fixed at sixteen points, the rear bumper at only ten. The original part is marked 217 04-280 30 15-10. Starting from the second release of the Priora, it comes without an internal grille. Therefore, instead of a built-in grille, the original spare part should have a burr-free slot. Another difference from analogues is that all the holes for the bolts coincide with the slots in the body.
On Priora 2, the original grille comes with black honeycombs. There is no reinforcement for the brand logo badge that was present on older models. If dismantling is carried out, the bumper is often removed along with the amplifier - an additional metal beam that gives the structure strength. This part is always curved and must match the shape of the grille. The design of the amplifier depends on the year of manufacture; if desired, it can be removed and not put back. However, it performs a protective function and reduces damage in the event of an accident.
One of the types of amplifiers for the front bumper of a Priora
Bumper replacement is required in the following cases:
- after an accident;
- in case of cracks in the plastic caused by severe frosts;
- bad parking;
- tuning cars.
Why do you have to change bumpers?
The obvious answer to this question is after the car gets into an accident, when the body kits literally fall apart. It is impossible to repair and paint broken parts, so in this situation you have to buy new ones. Fortunately, the price of the products is quite affordable and it is possible to select elements by color or buy them unpainted.
The nickel-plated grille on the front bumper looks better than the stock one.
There are other reasons why Prior owners resort to removing or replacing these parts:
- During operation, the bumper received multiple cracks or the paint peeled off, and the owner does not have the time or desire to repair and paint the elements.
- If a car enthusiast still wants to repair and paint the body kit, then it will still have to be removed.
- As a result of the impact, the plastic latches of the bumper broke off or the fastening screws were torn out in such a way that the material cracked.
- When you need to gain access to other parts and parts of the car body. For example, install new headlight units.
- Cars sold as standard were at one time equipped with black budget bumpers. They have to be removed to paint or exchange for painted ones.
- If the owner of a VAZ 2170 decides to start tuning his car and install beautiful body kits that differ from the standard ones in shape.
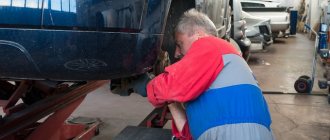
How to remove the front bumper on a Priora
The operation is simple, it will take no more than ten minutes; Naturally, provided that the bolts and screws are not stuck. On sedans, station wagons and hatchbacks, removal is carried out in a similar way. If the element is severely worn, dismantling the amplifier may be necessary.
The first step is to disconnect the negative cable from the battery. If fog lights are installed, disconnect their wires before carrying out the operation. To do this, you need to find a plug in the engine compartment. There are such plugs near each headlight; they need to be pulled out.
To turn off the fog lights, you need to remove the plug with wires from each of them
The Lada Priora of the latest configuration has parking sensors. Parking sensors are installed in both bumpers. Therefore, you will have to turn them off on both sides.
Removal begins with the fender liner, unscrewing three screws on each side. During this process, it is recommended to turn the left wheel to the right and the right wheel to the left to make it easier to unscrew the lower bolts.
Next, the hood opens and two plastic trims located above the headlights are unscrewed. They are held in place by 4 bolts. Then the pads are removed.
Removed trim
Next, you need to unscrew the two central screws from the protective casing in the radiator fan area.
Advice!
You can unscrew these two bolts not completely, then after all subsequent manipulations it will rest on them and will not fall when the lower bolts are unscrewed. Then all that remains is to unscrew these bolts and calmly remove the bumper.
Next, you need to go down under the car and use a 10mm wrench to unscrew the 5 nuts that hold the bumper on the bottom of the body.
Finally, all that remains is to unscrew three screws on each side located under the front wings.
Now you need to carefully remove the bumper. It is recommended to start from the side of the fender liners, carefully moving the bumper in this part towards you. Once this part is disengaged, the bumper can be easily removed.
Advice!
It is not recommended to snap off the bumper using rough and sharp objects such as screwdrivers, pry bars, steel rods, etc. It is recommended to do everything by hand. If you cannot manually snap off the bumper, it is recommended to wrap the screwdriver with a cloth or electrical tape so as not to damage or scratch the car’s paint.
Useful video instructions:
Stages of work
If fog lights are installed on your car, you must first remove them. It is also better to remove all the wires that went to them
After removing the PTF, it is important to disconnect the terminal from the battery. All bumpers on Priora are attached in a standard way; to remove them you will need to do the following
- First of all, you need to open access to the screws. To do this, remove the engine mudguard.
- Next, you need to unscrew 3 screws on each of the fender liners to remove the protective elements. Most likely, when performing the manipulation, your hands will get dirty from the rubber, so it is better to do this with gloves with a protective rubberized layer.
- Remove the plastic covers. Each of them has 4 screws that secure them.
- Next you will have access to 2 screws that secure the bumper to the body. You need to unscrew them.
- From the bottom you need to unscrew the 5 nuts that secure the part to the motor protection. It is most convenient to do this with a socket wrench. Before performing work, you must make sure that the car is on the handbrake, and if you use a jack, place stands under the body.
- You also need to unscrew the 3 side nuts that hold the part in place.
- After dismantling all hardware, you must carefully remove the bumper. For this purpose, it is better to involve an assistant, since a slight distortion can lead to damage to the part. The bumper is carefully and evenly dismantled from its place so that in the future it will be possible to repair or upgrade it for further use.
You may also be interested in the question of how to remove the headlight on Kalina. You can learn about this from our expert’s material.
If all the work is carried out without using a jack, then it is better to stock up on bedding first, since some hardware is located under the car, which will require you to crawl under the car. The entire dismantling procedure takes no more than 10 minutes, so you can replace a damaged bumper yourself.
https://youtube.com/watch?v=IWc4t9o_qVM
How to remove the rear bumper on a Priora: hatchback, sedan, station wagon
The steps are approximately the same as when removing the front bumper. The main dismantling method is described below.
First, use a screwdriver to unscrew the fender liners, which are held on by three screws: 2 at the bumper and 1 at the mudguard.
Next, you need to open the trunk and, depending on the type of body, unscrew a certain number of fasteners.
- U Priory sedan you need to unscrew 6 bolts: 4 in the center and 2 on the sides (in some models - only two, on the sides).
- In the Priora Hatchback, you will need to unscrew 4 bolts: the 2 central ones are unscrewed with a 10 key, and the two outer ones with a 13 key.
- For bumper on Priore station wagon You will need to unscrew 5 bolts.
Next, you need to move under the car and unscrew 2 nuts on the sides of the bumper and 4 more screws along its length (the number of nuts and screws may vary depending on the version of the car, but they are all located there).
Everything is unscrewed, all that remains is to take the rear bumper on either side of the wheel arches and, as in the case of the front, pull it towards you.
To make everything go faster, you can use the following tools:
- Screwdriver. Use it to unscrew the bolts at the rear wheel arches.
- Head with extension . She unscrews the bolts of the upper bumper fastenings. They also unscrew the nuts on the bottom.
Useful videos with examples of rear bumper removal:
Work algorithm
To understand how to remove the bumper on a Priora, take the following tools:
- Phillips screwdriver;
- 10mm socket wrench.
The algorithm for how to remove the front bumper on a car is as follows:
- Provide access to screw fastenings. To do this, disconnect the negative terminal wiring from the battery. Remove the splash guard located on the engine.
How to remove the front bumper
- Since the front bumper on the Priora is located on a transverse mount at the front of the body, to dismantle it, unscrew two bolts on both sides.
- Remove the screws located on the right and left optics casing (4 pieces), two fasteners each - near the wheel arches and a pair of self-tapping screws that are used to secure the bumper on the Priora.
- Pull the accessory towards you. You will see 3 more bolts securing its beam to the body cross member. You need to unwind them.
To unscrew the screws at the bottom, you will need to crawl under the car (first lay cardboard or rags there). This is just as convenient and less labor-intensive than putting the vehicle on an overpass or lifting it on a jack. Installing the bumper yourself is done in the reverse order. In order not to confuse the places where the fasteners are located, you can first draw up their location diagram on a sheet of paper, and put the screws and self-tapping screws themselves in separate boxes.
A couple of decades ago, a car bumper was designed to perform protective functions. It was entrusted with the role of a kind of bump stop, which in the event of a collision could minimize damage to the body and mechanical impact on the car’s engine. That is why the part was made of metal and had very high strength characteristics.
Today the situation has changed. Nowadays, bumpers are made of polymer materials and serve only as an element of the design of the car. If this part is damaged, only the appearance of the machine will suffer, so it is still necessary to repair or replace it. You will learn how to do this on a Lada Priora hatchback from our article.
Tips and tricks
The Priora's bumper is attached on the sides only to the fender liner, as in many foreign cars. At the joints the element simply fits into the grooves. This greatly simplifies the dismantling process. But sometimes you additionally have to remove the protection from the motor. After unscrewing the bolts, simply pull out the bumper.
To unscrew the lower screw that holds the fender liner in place, it is better to unscrew the wheel to the side in advance. If this is not possible, you can reach the hard-to-reach area using a small short screwdriver. When the bolts do not budge, they must be pre-treated with WD-40 lubricant.
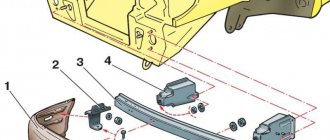
The bumper contains upper and lower radiator grilles, as well as headlights. If replacement is necessary, all these elements can be easily removed. The grille is held on by metal latches. These latches can be pryed with a screwdriver and removed using pliers. The grille will then detach. The headlights are held on by self-tapping screws and can be easily unscrewed in one or two minutes.
Location of the radiator grille to bumper mounts
Metal elements under the bumper can quickly rust, so it is recommended to remove it along with the body kits. Parts must be cleaned of dirt and thoroughly washed in warm water. To avoid the formation of rust, it is advisable to treat the body with a protective compound. To do this, its surface is cleaned with a solvent, after which the anticorrosive agent is applied with a brush.
Replacement: step-by-step instructions
Auto mechanics know how to quickly remove the front bumper. To do this, you will need a socket wrench with a “10” head and a Phillips screwdriver. Removing the bumper begins by disconnecting the negative wire from the battery terminal. If necessary, you will need to remove the motor protection.
Then unscrew 3 screws securing the bumper to the protective covers and 4 screws attaching the part to the upper cross member of the front body. The next step is to remove the 2 screws securing the left and right headlight housings. To remove the front bumper, you need to push it forward. To dismantle the beam, you will need to unscrew 3 bolts securing it to the lower cross member of the body. Installation proceeds in reverse order.
Removing the rear protection
If you need to remove the rear bumper of the Lada Priora, then you will need to disconnect the negative wire from the battery terminal. Then unscrew:
- nuts for fixing the dismantled unit at the bottom;
- on 2 sides there is one bolt for fastening the bumper at the top and to the wings;
- mudguard fixing screws.
What to do after replacing the bumper
When parking or driving in a traffic jam, you can easily damage the headlights or scratch the body. Therefore, it is better to install the bumper in its old place as soon as possible. Until the repair is completed, the motorist has the right to drive without a bumper. Traffic police officers can impose a fine only if the person has removed the part permanently and deliberately changed the design of the car. They have the right to fine you if you don’t have a rear bumper, since it must hold license plates.
Installation of a repaired old or new bumper is done using self-tapping screws. If a skirt or a tuned bumper is added, these elements are secured with screws. Before installation, it is important to ensure that there is a thread for the towing eye. Cars produced since 2011 have such a thread. The eyelet can be used either the original one or any other one that is suitable in size.
Adviсe
Before installing the bumper in its place, it is recommended to treat the metal parts of the body with special compounds, since water most often flows under the bumper during rain and from puddles while driving.
To keep the body in good condition, it is recommended to treat all problem areas with anti-corrosion agents, as well as additionally coat them with protective compounds.
If corrosion has already appeared, then it must be cleaned and the body treated with anti-corrosion agent.
If you don’t pay attention to the part with rust and fasten the bumper on top, then most likely there will be nothing left of it the next time you remove it
Conclusion
Removing the bumper does not require special knowledge from the driver; the most important thing is to remember which bolts need to be unscrewed. Even in minor accidents, it is this part that often suffers, so information on how to dismantle it will always come in handy. This operation does not require an assistant, but when installing a new part, it is better to ask a friend for help. This is due to the fact that it is difficult to fit a new element alone.
How to remove the front and rear bumper on a Priora hatchback, sedan, station wagon
5 (100%) 1 vote
Types of restyled bumpers and their prices
Today, buying a new bumper for a Priora is not a problem at all. The fact is that the VAZ-2170 and its modifications are the most popular model for tuning. Taking advantage of this popularity, a large number of enterprises produce many varieties of bumpers and other body kit elements for Priora.
At the same time, you can buy them either as blanks (unpainted, without seats for additional headlights), or ready-made (painted in the desired color, with spaces for headlights, or with built-in headlights). Here are just a few popular models:
- "I am a robot";
- "Tokyo";
- "Fan" -2;
- "Boxing ring";
- "Ring"-2;
- "Sniper";
- "Strike".
Tuning bumpers can be made of ordinary polyethylene, ABS plastic, fiberglass or fiberglass. Prices for such products vary between 3000-5000 rubles . A stock bumper (catalog number 2170-2803015) produced by AvtoVAZ will cost from 2400 to 4000 rubles .
Replacing a bumper at a service station
If you have no desire to tinker with your car, or the owner of the car is a fragile girl, then you can replace the bumper at a service station. This procedure can be performed in almost any service. The cost of carrying out such work is relatively low. In many car services, the price list states a price of one and a half thousand rubles.
The price may vary depending on the make of the car, but for a Priora it should not be much higher.
The full cost of a bumper with replacement at a service station will cost you 6 thousand rubles for the front bumper of a new Priora model and 4 thousand rubles for the rear bumper.
Thus, replacing a bumper on a Lada Priora car is a very simple task. You can easily carry out this manipulation alone in your garage and save on car service.
As for the advice of experienced craftsmen, they categorically prohibit installing and dismantling the bumper at low ambient temperatures. Since the bumper is made of plastic, and plastic, like any material, has worse deformation properties in the cold. This means that there is a high risk that your bumper will simply burst during installation.