I think that many Kalina owners already know that under the hood of the car there are two coolant temperature sensors. One of them is installed on the side of the cylinder head, which sends a signal to the arrow in the instrument panel. And the second is located on the thermostat, and it transmits its readings directly to the ECU to turn on the fan. In this article I will talk about the second engine temperature sensor (coolant).
So, to replace it on Kalina, you will need the following tool:
- Phillips screwdriver
- Driver or ratchet
- Head 19 - best deep
- Extension
Progress of repairs to remove and install the sensor
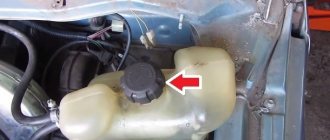
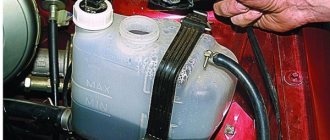
To make dismantling more convenient, you need to unscrew the clamp of the intake pipe, which goes from the air filter to the throttle assembly:
And after that you need to pull the pipe, pulling it out of its seat. And then move it a little to the side so that it does not interfere, approximately as shown in the photo below:
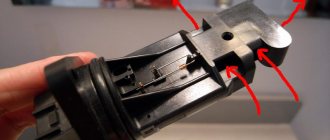
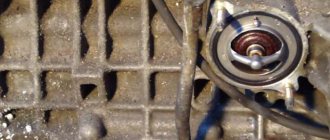
And the photo below clearly shows the location of the temperature indicator sensor:
First you need to disconnect the power plug, which is fixed in the same way as most others - just lift the latch up and pull the plug:
Now, using an extension cord and a deep socket, unscrew the sensor. If the pipe still gets in the way, you can move it a little more to the side with one hand, and at the same time put on the head with the other. Then unscrew the sensor with a ratchet:
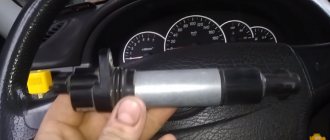
After this, you can completely unscrew the sensor by hand. And this is what it looks like after extraction:
Now you can start replacing this part. Its price is approximately 150 rubles. So, even if you have to change this part, this repair will cost very little.
The cooling system is responsible for the optimal temperature regime of the power plant, at which the power output is maximum. This system includes a radiator cooling jacket and pipes through which fluid circulates. Circulation is provided by a pump driven by the crankshaft.
The system also includes a thermostat, which ensures quick warm-up of the engine by shutting off the pipeline going to the radiator, while the liquid circulates only inside the cooling jacket. When a certain temperature is reached, the thermostat opens the pipe, after which the liquid circulates in a large circle, including the radiator.
The radiator cools the heated liquid. To cool the liquid faster, a fan is installed on the radiator, which creates additional air flow. But this fan does not always work; it turns on only when the liquid temperature exceeds a certain value.
Coolant temperature sensor
To monitor the coolant temperature, a coolant temperature sensor is included in this system. The readings of this sensor are displayed on the dashboard, which provides the driver with information about the temperature conditions of the engine.
But this is not the main task of this sensor. The coolant temperature sensor transmits temperature data to the electronic control unit, after which this unit adjusts the fuel supply depending on the temperature. When the engine is cold, based on the readings of this sensor, the control unit sets an enriched mixture; after warming up, the fuel mixture becomes normal. Based on the readings of this element, the electronic unit regulates the ignition timing.
How to check the functionality of the coolant sensor
There are two main methods for checking the health of the coolant temperature sensor. The first - with its dismantling, the second - directly on the seat in the car engine. In turn, the first method can also be divided into two more. The first is with the use of a thermometer, the second is without it. Removing the sensor can usually be done using an ordinary wrench of a suitable size, after first disconnecting the contact terminals from it. But before dismantling the sensor, you need to make sure that power is supplied to the DTOZH. Typically it is equal to 5 Volts DC voltage. This can be easily found out by disconnecting its chip from the sensor, and using a multimeter set to DC voltage measurement mode (with the appropriate range) using probes to check the voltage value. If voltage is present and at the specified value, then further testing of the coolant sensor can be performed.
Checking the temperature sensor on the car
Many car enthusiasts are interested in the question of how to check the coolant temperature sensor without removing it from its seat in order to simplify the work and complete it as quickly as possible. And they do this using a multifunctional tester, measuring the resistance between its output contacts, that is, the resistance of its electrical winding.
They do a DTOZh check right on the car by disconnecting the chip from the sensor so that there is normal access to its electrical contacts (terminals). Please note that if the engine is hot, you need to work carefully so as not to burn yourself or melt the electronic multimeter and/or its probes! Next, using a multimeter switched to resistance measurement mode, you need to measure this value between its terminals. As mentioned above, on a cold engine the value will be quite high, and on a hot engine it will be lower. As an example, we provide technical information for the VAZ-2110 car , which gives a general understanding of resistance values. It is necessary to understand that for other passenger cars (using sensors of similar models) these values will be very similar, that is, they will not differ critically.
| Water temperature, °C | Resistance value, Ohm | Water temperature, °C | Resistance value, Ohm |
| +5 | 7280 | +45 | 1188 |
| +10 | 5670 | +50 | 973 |
| +15 | 4450 | +60 | 667 |
| +20 | 3520 | +70 | 467 |
| +25 | 2796 | +80 | 332 |
| +30 | 2238 | +90 | 241 |
| +40 | 1459 | +100 | 177 |
To be fair, it must be said that sensors do not break down so often, but instead there are situations when the DTOZH “lies”, that is, it produces incorrect information. Therefore, you can compare the temperature readings on the dashboard and compare them with the obtained resistance value. If the sensor still produces incorrect information, then it makes sense to dismantle it and carry out additional diagnostics using a thermometer and a water heater.
Checking with a thermometer
So, you must first remove the sensor from its seat on the car engine. This is usually not too difficult and can be done using a wrench of the appropriate size. At the same time, you can carry out preventative maintenance on its threads in the pipe, clean and lubricate it, and the sensor itself, too, if it is in good working order and the car owner will not replace it with a new one.
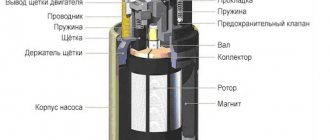
Design, principle of operation
The design of this sensor includes a thermistor - a resistor that changes resistance depending on the temperature surrounding it. This thermistor is placed in a metal case with a thread applied to it. A tail section made of plastic is connected to this body. This part contains contacts for connecting wiring. One contact is positive and it comes from the electronic unit, the second is negative and it is connected to ground.
In order for the thermistor to work, a voltage of 5 V is constantly applied to it. This voltage is supplied to it by the electronic unit through a resistor having a constant resistance. Since the coolant temperature sensor thermistor has a negative temperature coefficient, as the temperature increases, its resistance will decrease, and the voltage supplied to it will also decrease. Based on the drop in this voltage, the electronic unit calculates the engine temperature and also displays its value on the dashboard.
The exact installation location of this temperature sensor differs from car to car, but only slightly. It can be installed in the cylinder head near the thermostat housing, or on the thermostat housing itself. It must be located near the outlet pipe through which the liquid flows into the radiator. It is located near this pipe in order to transmit accurate temperature data.
How to find and when to replace the sensor?
Where is the sensor located? The “hero” of our material is screwed into the thermostat housing. It is quite easy to detect. Another coolant temperature sensor, from which information is transmitted to a device located on the panel in the cabin, is present next to the DTOZH. Detecting a sensor is not difficult, but identifying a malfunction is a more serious and responsible matter. The design itself is reliable and allows the element to have an enviable resource. The main thing here is not to succumb to the installation of a low-quality product, which can upset the owner with its breakdown after a couple of months.
You should resort to replacing the element if you experience the following symptoms:
- lack of stability of engine idle speed;
- starting the unit is difficult;
- there is an unauthorized increase in fuel consumption;
- The warning light on the dashboard warns of overheating of the power plant by shining.
Signs of sensor malfunction
This sensor is considered to be very reliable due to its comparative simplicity of design. However, there may be problems with it too. Usually they come down to a violation of the calibration, which leads to a violation of the resistance and, as a result, incorrect operation of the electronic unit, since it performs part of its functions based on the engine temperature.
One of the most obvious signs of failure of this sensor is the failure of the fan to turn on when the temperature exceeds the set value. But this indicator will not be reliable if there are two sensors - the main one, for transmitting the temperature value to the electronic unit, and the additional one, responsible for turning on the fan. In this case, failure to turn on the fan will indicate damage, oxidation of the wiring, or failure of the sensor responsible for its operation.
On modern cars, a malfunction indicating incorrect operation of the coolant temperature sensor is displayed on the display of the on-board computer. However, a fault message does not always indicate sensor failure. Often problems in its operation are associated with broken wiring or oxidation of contacts.
Incorrect functioning of the coolant temperature sensor or a break in its wiring leads to excessive fuel consumption, high idle speed, and detonation. It is possible that the power unit will have difficulty starting after warming up. The biggest trouble that can occur due to the inoperability of this sensor is overheating of the power plant, which can cause the cylinder head to move.
Signs of failure of the coolant sensor
A number of signs will indicate the need to check the coolant temperature sensor. However, it is worth noting that the situations listed below may be signs of other breakdowns in the car’s engine, therefore, to obtain an accurate result, it is necessary to perform additional diagnostics. So, signs of a faulty coolant temperature sensor include:
- Activation of the warning lamp on the Check Engine panel. However, it can also be activated during other failures, so it is necessary to perform an additional scan of the error code.
- Increased fuel consumption . This is due to the fact that incorrect information is supplied to the electronic control unit, and accordingly, it is also unable to determine exactly how much fuel is needed not only to create an optimal air-fuel mixture, but also to maintain the engine temperature in the normal (non-emergency) range.
- Unstable motor operation . In particular, its unstable operation at idle, difficulty starting (especially in the cold season), spontaneous stopping at low speeds.
- The engine stalls when hot . That is, it may suddenly stall when the critical coolant temperature is reached. Moreover, this does not depend on what kind of coolant was poured into the system (in particular, factory-made antifreeze or ordinary water).
- Problems with the cooling fan on the radiator . This can manifest itself in different ways. In some cases, the fan does not turn on at all, in others it does not turn on in emergency modes, in others it does not turn off even when the engine cools down. When the coolant temperature sensor is disconnected, the electronic control unit perceives this as an open circuit in the sensor and forcibly turns on the fan. In any case, to obtain an accurate picture, it is necessary to perform additional diagnostics of the sensor and/or thermostat.
Due to the fact that this sensor has a fairly simple device and most often a non-separable housing, if it fails it must be replaced. This applies to almost all machines on which this device is installed.
Sensor check
Checking the functionality of this sensor is not difficult. But before you do it, it is advisable to check the integrity of the wiring going to it. You can also check the voltage coming from the control unit. To do this, you need to disconnect the chip with wires from the sensor and connect it to a voltmeter. After this, start the engine and measure the voltage supplied to the sensor; it should correspond to 5 V. If the voltage is normal, check the sensor for resistance.
How to install an ambient temperature sensor on a Priora
The standard configuration includes this controller. But there are times when for one reason or another it is absent. For example, you bought a used car, but there is no sensor or there is one, but it doesn’t work.
However, this is not a big problem. True, for installation or replacement you will need to remove the bumper, since it is not always possible to get under it. It is located directly behind the front bumper and mounted on the front of the body. If there is an air conditioner, then there will be two such sensors. First of all, you need to check the functionality of the old one. The best option is to take a household thermometer and compare the readings. Deviations may be caused by excessive voltage on the contacts.
If the sensor is missing, then install it in the appropriate socket. There should be a wiring harness, so all that remains is to connect and enjoy the result. If the old sensor is acting up, then take it out, turn on the ignition and check the voltage on the connecting block (wire harness). It should be in the 3.5 V range. If there is no voltage, then the problem is somewhere in the circuit. We call and eliminate.
Replacing the coolant temperature sensor
The coolant temperature sensor cannot be repaired, so if it is found to be operating incorrectly, it is simply replaced.
Video: Replacing the coolant temperature sensor (DTOZH) VAZ 2115 (2113, 2114)
After purchasing a new sensor, it is advisable to immediately check it using the specified methods. If all readings are normal, it is installed in place of the one removed. Before screwing it into the seat, the threads are treated with sealant.
After installing the new element, a leash is connected to it; it is impossible to confuse the position of the chip, since it has special guide grooves. Next, the coolant in the system is brought to normal. Then you should check whether liquid is leaking through the sensor, and then start the engine.
If replacing the sensor does not give any result, the engine continues, for example, to overheat or does not reach the proper temperature, look for the cause in other elements of the system. It is possible that the thermostat does not work and the liquid is constantly circulating either in a small or large circle.
Share with your friends:
The Lada Kalina family car is equipped with over ten digital sensors that monitor the operation of mechanisms and assemblies. Most often, drivers complain about premature wear of the coolant temperature sensor (hereinafter referred to as DTOZH).
They say it displays incorrect data, and sometimes is completely inactive. The process of replacing the DTOZ yourself is not at all complicated. The task can be done by a driver without experience in servicing equipment.
ATTENTION! A completely simple way to reduce fuel consumption has been found! Don't believe me? An auto mechanic with 15 years of experience also didn’t believe it until he tried it. And now he saves 35,000 rubles a year on gasoline! Read more"
What temperature sensors are installed
The principle of operation of the DTOZH is as follows: after receiving data on the current antifreeze temperature, the measuring device sends the readings to the electronic control unit of the ECU.
The on-board computer compares the received data with the programmed ones. In case of discrepancy, an error is indicated on the dashboard. The owner of the car, seeing a system error, decides on the nature of the breakdown and visits a service station to order a comprehensive diagnosis.
In addition to the DTOZH, the Lada Kalina car is equipped with an external temperature sensor (hereinafter referred to as the DNT). However, not on all trim levels, but only on Lux and Premium.
If desired, the owner can install the measuring equipment himself. The installation work is not at all difficult. In time no more than an hour.
DTOZH is designed to monitor the temperature of antifreeze in the cooling system circuit of the power unit. After receiving the “degree” data, the ECU increases or decreases the speed of the power unit in order to adjust the temperature.
The quality composition of the fuel mixture depends on the accuracy of the DTOZ readings. The service life of the sensor is unlimited, with the exception of mechanical damage or short circuit in the circuit.
Where it is located: the standard installation location is the outer part of the thermostat housing. The base is screwed into the thermostat body. Two power contacts are connected to the upper part for power supply from the on-board network.
A melting element is installed inside the DTOZh base. As soon as the antifreeze degree reaches “90”, the contacts close and the on-board computer signals an error.
Next, the driver decides on the advisability of stopping the car immediately, carrying out preventive maintenance, or calling a tow truck.
Catalog articles, prices of temperature sensors for Lada Kalina:
| Name | Catalog item | Price in rubles |
| DTOZH (original), 8 valves | 2112-385101000 | from 250 |
| DNT air (original), 16 valves | 21120385101082 | from 350 |
The device is installed in the mounting location of the front bumper, to the left of the center of the radiator grille. The DNT shape is conical with two contacts on the back side.
The fuse in the mounting block at number 24 is responsible for the operation of the DNT. The absence of temperature readings on the dashboard is the first sign of a malfunction.