In what cases do you have to remove the bumper?
Removing and installing a car bumper is required in strictly defined cases; it is not recommended to simply remove it from its standard place and install it back, since in this case its standard fasteners will wear out and become loose.
Among the situations in which such an operation must be performed are:
- repair after an accident.
- performing repair work and periodic maintenance of other components and assemblies of the vehicle.
- performing tuning work.
- damper modernization.
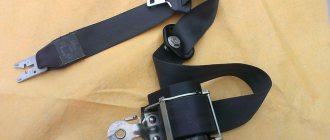
- the need to carry out repair work on standard fastenings.
Most often, replacement of the rear bumper is required, since it is the one that usually suffers in accidents and various types of emergency situations. The front bumper is usually replaced after it has been seriously damaged for various reasons, mainly a collision with an obstacle. In addition, the front damper often undergoes a tuning procedure and that is why it must be removed periodically.
Features of installing tuning elements
Since most body kits significantly increase the mass of parts, the fasteners must be of the highest quality. You cannot use the cheapest materials for expensive tuning bumpers with a skirt.
The best way out is to contact a specialized service center. Experienced employees will be able to securely fasten the body kits, guaranteeing a long service life of the products.
After installing non-standard parts, you should check the rigidity of the fixation after some time. The peculiarity of tuning elements is that they are not always made of reliable materials. Therefore, the attachment points become loose.
Installation example:
Thus, following simple step-by-step instructions, you can not only remove and install bumpers if necessary, but also repair fasteners.
Did you manage to solve your problem using the recommendations from the article?
Yes!
45.09%
No. More answers required. I'll ask in the comments now.
38.25%
Partially. There are still questions. I'll write in the comments now.
16.67%
Voted: 468
How to remove the front bumper
The dismantling procedure occurs according to a certain algorithm. It can be described step by step as follows:
1. placing the car on a jack or inspection hole. 2. dismantling the front wheels.
3. de-energizing its electrical wiring. 4. removing the radiator grille, and this procedure directly depends on the design of the damper installed on a particular car model.
5. in the case when there is a hole in it for the towing cable, use a hex wrench to find the heads of the fastening bolts and unscrew them. 6. in the case when the arch protection is screwed to the car body, you need to unscrew three of them and remove it. 7. The part is carefully “torn off” from the latches located on the wings.
8. All existing fastenings of the described device to the body and energy-absorbing beams are checked. These could be the lower bumper mounts, other types of screws located under the fender liner, as well as in the radiator area.
Removing and installing the front wing of Mitsubishi Lancer 9
Auto News
New Skoda Superb photographed during road tests
Motor1 has obtained spy photos of a test prototype of the new generation Skoda Superb.
Journalists note that the photographs show a mule in the back of the current Superb station wagon, so it is too early to draw conclusions about changes in the design of the model. 01 Oct 2021 12:24:44 +0000
New Chinese crossovers were photographed in Moscow
It is known that by the end of the year, the Chinese brand’s lineup may be replenished with the future Uni-K flagship, packed with the most modern options, as well as two simpler crossovers, but made in the new corporate style of the brand. These are the restyled CS35 Plus and the new generation CS55 Plus.
01 Oct 2021 14:01:00 +0000
Lamborghini unveils restored 1971 Countach LP 500
Lamborghini built a replica of the very first sports car, the Countach LP 500, which was presented at the Geneva Motor Show in 1971. The time spent on developing the replica is more than 25 thousand hours.
01 Oct 2021 16:36:14 +0000
Images of the new generation Bavarian crossover BMW X1 have appeared
The current generation of the BMW X1 crossover was introduced in 2015, and underwent restyling several years ago. That’s why the company is now actively working on a new generation of the model. The model is being actively tested by the brand’s engineers, since the debut is expected to take place in 2022.
01 Oct 2021 07:04:46 +0000
Russian citizens were given 3 minuses and 1 plus of the new Chevrolet Trailblazer crossover
In mid-September, sales of the new Chevrolet Trailblazer crossover began in Russia, which entered its third generation and completely changed its form factor, trading American traditions for compactness and a lower class. The magazine “Behind the Wheel” spoke about three disadvantages and one advantage of the model.
01 Oct 2021 12:58:26 +0000
BMW X3 topped the TOP 5 crossovers that do not require repairs after 500 thousand kilometers
The rating was topped by the premium BMW X3, which has established itself as one of the most reliable cars of the “German trio”. Particularly successful in its case are the versions with V6 engines of the M4 series - these engines can easily survive half a million kilometers even without major repairs.
01 Oct 2021 04:30:19 +0000
The second generation GAC GS8 crossover hits the market
The large crossover GAC GS8 entered the Russian market less than two years ago, but in its native China it is already a played-out card. The second generation car is presented there.
01 Oct 2021 13:15:42 +0000
Volkswagen brand announced prices for the updated Teramont crossover for Russia
The maximum configuration is called R-Line - it was not previously presented for the Teramont model.
29 Sep 2021 11:09:18 +0000
Genesis introduced its first electric crossover, the Genesis GV60.
Genesis has revealed the specifications of its first production electric vehicle, the GV60 crossover. The new product, built on the same platform as the Ioniq 5 from Hyundai and EV6 from Kia, received three modifications with a power reserve of 400 to 451 kilometers.
30 Sep 2021 06:12:29 +0000
Jeep introduced the updated Jeep Grand Cherokee 2022
Jeep has introduced the fifth-generation flagship Grand Cherokee SUV, which will appear in Russia in mid-2022, and in the United States by the end of 2021. According to the manufacturer, this Grand Cherokee was “the most advanced, luxurious and off-road ready” in its entire history.
30 Sep 2021 05:04:49 +0000
Stellantis began supplying Russian-assembled engines to Europe
In the fall, the first batch of Russian-assembled engines was sent to Europe, and starting today, deliveries have become weekly. In the coming months, the geography will expand to Latin America and North Africa.
01 Oct 2021 11:03:47 +0000
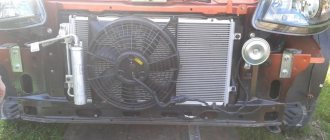
Installing the front bumper
Installation of the front bumper of the car occurs in the reverse order, and it is necessary to thoroughly clean the seats and fastening points of this element of the car's structure from dirt and rust. It is worth installing it back with the help of an assistant, since you need to correctly place the product in the fastening areas and its normal location. As a last resort, this procedure can be performed independently, but in this case there is a high risk of damaging the fragile antennae of the plastic latches.
Removing the rear bumper
Removal of the rear bumper is also carried out according to a specially developed algorithm and step by step it looks like this:
- The car is placed on a jack or driven into a viewing hole.
- The rear wheels are being removed.
- The electrical wiring is de-energized.
- The fastening of the arch protection to the bumper is unscrewed, if this is provided for by its design. To do this, use a screwdriver to remove self-tapping screws or a wrench for “8” and “10”.
- The rear light is removed.
- Under the lantern two latches snap off.
- the condition of all types of fasteners is checked, with special attention paid to the bracket, the fastening of which has a complex structure. Those of them that are secured with screws and self-tapping screws are unscrewed.
- Using moderate physical force, the rear damper is removed.
It is worth noting that the repair algorithm is general and not always worth following. The fact is that on many car models, gaps are specially left so that you can carry out the necessary technical work on your own. As a result, there is no need to dismantle the device, spending a lot of effort and time.
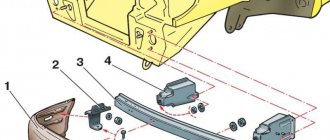
Bumper replacement process
Front bumper diagram
The front bumper of a car performs a protective function, which primarily absorbs any possible impacts. Recently, there has been a tendency among car manufacturers that it should perform a decorative and aerodynamic function. Then what should have an impact?
For this purpose, a special metal amplifier was developed that precisely fulfills this role.
Before you begin the replacement process, you need to decide on the tools. What exactly you will need: a screwdriver with a set of bits or a set of screwdrivers, socket and open-end wrenches for 8 and 10, a ratchet with a head for 13, a new bumper.
So, once the driver has assembled everything, you can proceed directly to the process.
Step by step process
Let's take a step-by-step look at the process of replacing the front bumper of a VAZ-2114:
- Position the machine so that you can easily stand up from underneath to work. Ideally, this should be a pit or a lift.
- Remove the radiator grille bolts. Radiator grille bolt diagram.
- Remove the license plate, there are two screws under it. Under the license plate there are two bolts that secure the bumper to the amplifier. They should also be removed. Remove the license plate from the front bumper Place two bolts under the license plate Remove the bolts under the license plate
- Remove the bolts securing the front wheel arch covers. Unscrew the bolts securing the wings to the bumper. Remove the front wheel arch covers.
- Using a 10 mm open-end wrench, unscrew the two nuts from the side bumper mounts. Remove the side mounts of the front bumper.
- Pull the bumper forward and remove it. Carefully pull the bumper from the fender trim side. Pull it forward to remove the front bumper.
- Assembly is carried out in reverse order.
Radiator cap bolt diagram
Removing the side supports of the front bumper
Selecting a part for the VAZ-2114 (article)
General view of the original front bumper
2113-2803015 - original part number of the AvtoVAZ front bumper. There are no analogues of this part, so there are no other options other than factory purchase. The average cost of the product is 6000-7000 rubles.
Reasons for removing the front bumper
There are several reasons why you need to remove the front bumper. So, let's look at the main ones:
- Deformation, destruction or damage as a result of an accident.
- Disassembly to remove or repair components located under the protective element. This could be the amplifier, headlight, radiator frame or engine cover, among other things.
- Dismantling of parts for painting or repair.
- Other reasons.
Tuning
One of the options for tuning the front bumper
In many cases, it is necessary to remove the front bumper for performance or customization purposes. This is a fairly common practice, especially in the CIS countries.
In this way, the security elementIt can be completely upgraded, and sometimes it can be completely changed. There are many tuning options, and each motorcyclist has chosen a design and modification option.
A small modification to the bumper - installation of pipes. It looks stylish and wears the standard bumper.
The only thing that remains unchanged in this case is the mounting elements. So no matter how you change the appearance, the item is installed in the same way it was removed, just in reverse. order.