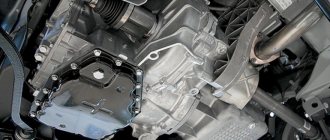
What is a car boot?
Interconnected parts of the car require constant protection.
The presence of various lubricants in the units (interaction points) requires the use of covers that prevent the leakage of lubricant, as well as the ingress of various microparticles (dust, water, dirt, etc.). These protective special covers are made of rubber and are called anthers. They can be of completely different sizes and shapes, for example, elongated or bell-shaped, but they all have only one purpose - to protect any rubbing joint (hinge or any other). Any damage to the boot is a fairly serious nuisance, because even the smallest crack will lead to moisture and dust getting into it. This creates an abrasive that can lead to faster wear, corrosion, and operational problems.
Since the anthers are subject to various influences, it is necessary to constantly check their condition. This is necessary so that you can replace them with new ones in time, thereby preventing disruptions in the operation of the unit protected by the anthers.
For the boot to do its job perfectly, it must have the following characteristics:
- The material used for manufacturing must be elastic;
- The boot must be adapted to function under a wide variety of temperature conditions and be resistant to aggressive environments;
- There should be no reaction to fuels and lubricants.
Consequences of untimely replacement of the CV joint boot
The driver can independently draw a conclusion about the need to replace the anthers. To do this, it is worth taking into account the workload and interaction of the anthers. This will determine the likely rate of their breakdown. If inspection is not carried out, these components themselves will warn the car owner about the presence of serious damage to the CV joint.
If the CV joint becomes clogged with dirt, a loud crash will be heard when turning. If you ignore the symptoms, over time the structure simply falls apart, and very quickly. Therefore, it is recommended to immediately replace faulty anthers.
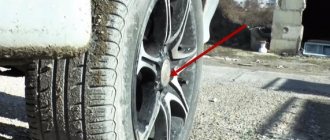
CV boot
CV joint is a part of every car with front-wheel drive. Its design provides for 2 “grenades” (the second name for CV joints) on each side (one internal and the other external), each of them is protected by an external CV joint boot and an internal CV joint boot, respectively. They are usually made of silicone or neoprene to provide protection even under the most difficult conditions.
In appearance, the CV joint boots resemble a cone, which is folded like an accordion. This shape was chosen for a reason - thanks to it, the part can be protected from pinching when the angle changes. The boot is fixed on both sides with clamps, which help to reliably protect the hinge from dust.
If the drive is regularly inspected, any damage to the boot can be noticed in time. If you find the slightest crack or other defect that could break the seal, you must immediately replace the boot with a new one.
Replacing the boot is not such a difficult task, but it is quite troublesome. The first step is to dismantle the drive. Next, after completing this process, the damaged boot is cut and then the grenade is removed. Before putting a new boot on the hinge, you need to wash it and then apply lubricant. If everything is done, you can return the parts back to their place.
Clamps, as well as a damaged boot, must be replaced and cannot be reused. You can find out more about replacing the CV joint boot in the article “Replacing the outer CV joint and CV boot.”
Classification of CV joint boots.
By location in the car: 1. Front CV joint boots (installed on front-wheel drive).
1.1. Front outer CV joint boots (installed near the wheel). 1.2. Front internal CV joint boots (installed near the automatic transmission, gearbox or transfer case)
2. Rear CV joint boots (installed on rear-wheel drive). 2.1. Rear outer CV joint boots (installed near the wheel). 2.2. Rear internal CV joint boots (installed near the gearbox).
According to the material from which CV joint boots are made: 1. Rubber CV joint boots. 2. Thermoplastic CV joint boots.
According to the manufacturer of CV joint boots: 1. Original CV joint boots (manufactured by the company that manufactured the car). 2. Duplicate CV joint boots (manufactured by third-party companies).
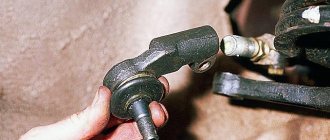
Tie rod boot
Anthers are also used in the steering. Their shape, as well as their fastening, are determined by the specific design. The difficulty of replacing the boot directly depends on where they are attached:
- If the boot is located in the place where the steering rods are attached to the rack, as, for example, in the “nine”, then you will have quite a difficult time, since to replace it you need to perform a number of procedures, which include disassembling the steering mechanism.
- In VAZ cars, the anthers are usually located at the ends of the rack. To replace any of them, you will only need to remove the clamps, then unscrew the nut that secures the rod, disconnect it and remove the boot.
- Among the many types of anthers you can find some very interesting ones. For example, in one of the Volkswagen models they are made in the form of elastic caps, which are put on the body and secured with clamps. Such boots protect the steering mechanism from dirt and are quite easy to change.
What is a tie rod boot?
The steering mechanism also provides for the use of boots. Their fastening and shape directly depend on the design features. Based on the mounting location, the complexity of the repair work required to replace the boot when damage is detected changes:
Steering rack and steering rod boots
- If the boot is located in the place where the steering rods are attached to the rack , as is done in the VAZ-2109, then you will have to work hard here. In order to replace it, a number of procedures are required, including complete dismantling of the steering mechanism.
- In car models such as the VAZ Oka, the anthers are located at the ends of the steering rack . To replace any of them, it is enough to remove the clamp, disconnect the rod by unscrewing the fastening nut, and remove the damaged boot.
- Among all the varieties of tie rod boots, there are some quite unusual ones. Thus, in the Volkswagen Polo II model, the anthers are elastic caps placed on the body and secured with a clamp . They prevent dirt from getting into the steering mechanism and are easily dismantled.
Ball joint boot
This type of anther differs from the models described above in that their design resembles a mushroom, where the narrow part fits tightly to the finger, and the wider part is located on the body of the support itself. A retaining ring is used to secure the boot.
Replacing a damaged ball joint boot is quite easy. You just need to disconnect the hub and support, and then carefully pry up the retaining ring with a screwdriver. After you have done this, you can safely remove the boot from the support. Before installing a new boot, it is necessary to wash all surfaces as thoroughly as possible and also lubricate them.
The same boots are used for tie rod ends - they are absolutely identical (both the design itself and the method of replacement). Size is the only thing that makes them different.
What is a ball boot?
Ball joint boot
Unlike previous models, the boot for the ball joints in the suspension has a mushroom-like design . The wide part is located on the support body, and the narrow part fits the finger. Low loads on the ball boot made it possible to abandon the “accordion”, which is used in analogues to prevent mechanical deformations.
In order to secure the boot, a locking ring is used. It is attached only to the body. On the other hand, the boot is held in place by a tight fit.
Replacing a damaged ball boot is easy. To do this, you need to disconnect the ball joint from the hub, and then pry off the retaining ring with a screwdriver. Once this is done, the boot can be pulled off the support. Before installing a new boot, thoroughly wash the exposed surfaces and pre-lubricate them.
Similar boots are used on the tie rod ends. Their design is identical, as is the replacement process. The only difference is the size.
Shock absorber boot
These boots are used to protect shock absorbers; they are usually made in the form of a corrugated rubber cover and quite often are not secured at all. They are held in place due to a good fit, and their purpose is to protect the rod from dust and dirt. As always, there are exceptions - the VAZ “classic”, where a metal cover is used. It, of course, provides longer-lasting protection, but is less effective than its relatives made of rubber.
Thanks for subscribing!
The requirements for the material from which the anthers are made are very high, because in order to function as needed under overload conditions, it must withstand a fairly wide temperature range. In addition, it must be durable and not be destroyed when it gets exposed to oil or salt, which is used to treat roads in winter.
What is a shock absorber boot?
Shock absorber boot
To protect shock absorbers, anthers are used in the form of a corrugated rubber cover, which most often are not attached at all. They are held in place by their tight fit and protect the chrome rod from dirt and dust.
The exception is the “classic” VAZ models, which use a metal casing that protects the shock absorber rod. It provides long-lasting protection, but is slightly less effective at keeping dirt out than its rubber counterparts.
High demands are placed on the material of shock absorber boots. In order to work normally under high load conditions, it must withstand temperatures from -40 to +70 degrees. In addition, the material must be resistant to oil, fuel or salt solutions used to treat roads in winter.
Any damage to the boot cannot be repaired. As soon as it is noticed, the cover should be replaced immediately to avoid negative consequences.
Brake caliper boot
There are two types of caliper boots - one of them is intended for the guide, and the second protects the piston. They differ in shape, but both are made of a springy material that can withstand overloads and protect the caliper from dust.
Quite often, a car boot is changed during scheduled repairs. If you find any damage, it is best to immediately replace the worn part with a new one. A replacement that is not carried out on time can very well lead to very sad consequences.
What is a caliper boot?
Caliper boots
The car caliper boasts the presence of two types of boots: guide boots and piston boot. Each of them has a different shape, but is made of elastic material that can withstand increased load and protect the caliper from the penetration of dirt and dust.
Often, caliper boots are changed during preventative repair work. If material wear or structural damage is detected, the car owner must immediately replace the part. If this is not done on time, the consequences can be very unpleasant.
For example, a rupture of the piston boot and subsequent entry of dirt will lead to mechanical damage to the cylinder and piston, the formation of rust and even jamming. And damage to the guide boots leads to them turning sour, causing uneven wear of the disc brake pads.
Flywheel boot
Flywheel boot
This boot especially stands out among the rest. Metal is used to make it - this is its main difference from other variations. The flywheel boot is designed to reliably protect the part itself from the ingress of third-party liquids or particles, which is why it has a second name - the clutch housing cover.
Of course, just like other parts, it can be mechanically damaged or worn out. If it is not possible to restore its working condition, then it must be replaced.
CV joint boot: what it is and what its purpose is
A modern car consists of more than a thousand different parts. Each of them fulfills its functional purpose. Safety and ride comfort largely depend on the serviceability of each component. If you find that the CV joint boots are damaged or have a defect, you need an urgent replacement of the Mitsubishi L200 CV boot.
First of all, it’s worth telling what a CV joint is. This abbreviation stands for constant velocity joint. Its main task is to transmit torque between mechanisms that are located at an angle.
The part has an extremely complex design, as a result of which the cost of the CV joint is quite high. It is also worth noting that if this component breaks down, it cannot be repaired. What is needed here is virtually a complete replacement. Many drivers are to blame for the breakdown of CV joints themselves, since they did not take care of the anthers.
The boot is a special protective rubber element that “envelops” the CV joint, performing several key functions, in particular:
- protection from dirt, dust and various types of pollutants;
- preventing clogging of lubricants inside the structure;
- retention of lubricant inside the CV joint.
In the event of a crack or rupture of the boot, the constant velocity joint will lose lubrication and also succumb to the harmful effects of water, dirt and sand. This leads to increased wear and will ultimately cause complete failure of the CV joint. Timely replacement of the boot of the internal CV joint L200 will help to eliminate such an outcome.
A high-quality boot on a Mitsubishi L200 has an average service life of one year. This, of course, does not mean that you do not need to check the condition of this part throughout the year. Regular inspection of the car is the key to excellent technical condition.
Article on the topic: Tara
Signs of replacing a CV joint are:
- specific crackling sounds when turning wheels;
- crunching noise when pressing hard on the gas.
If you hear such sounds while driving, you should definitely check the integrity of the anthers. You don't need any special equipment or stand to do this. All you have to do in your garage is turn the steering wheel all the way, then inspect the anthers. After this, simply turn the steering wheel in the other direction and inspect the other boot. If cracks or mechanical damage are detected, it is necessary to urgently change the Mitsubishi L200 CV joint boot.
Every Mitsubishi car owner can replace the boot himself in his garage. The technique is very simple and does not require specific knowledge or specialized tools. You will need a hammer, a set of wrenches and, if possible, one assistant.
Instructions for replacing the boot on the right side include the following steps:
- Turn the steering wheel completely to the left.
- Have an assistant press the brake pedal directly, then simply unscrew the hub nut.
- Unscrew the top ball joint. The structure is secured with three bolts.
- Unscrew the steering rod, and then “siege” the steering pin with a hammer. Carefully remove it.
- Unscrew the four bolts responsible for securing the CV joint to the front axle.
- Directly use the CV joint itself to push out the plug of the inner CV joint.
- Disassemble the retaining ring, wash the part and assemble the CV joint.
Assembly is actually done in reverse order. It is worth paying attention that the tightening torque of the hub nut should be 210 Nm.
Article on the topic: Replacing the driveshaft crosspiece: how to understand that the time has come
To replace the inner boot on the left side, the procedure is identical, with the exception that to remove the part you need to pull the CV joint so that the retaining ring fits into a special groove. Only after this can you continue disassembly.
Also refrain from turning the steering wheel during this repair. This can lead to such serious damage as a damaged brake hose, ABS wire, or a damaged cable (spring) in the steering wheel.
If you have access to a lift or have jacks, this greatly simplifies the process. You can leave the steering wheel unscrewed and also remove the wheel completely for ease of operation. The rest of the technique is identical. Everything will actually take you from one to two hours (here everything definitely depends on the level of skills in this matter).
For such a procedure and a completely original boot, you will be asked from an official dealer for at least ten thousand rubles or even more. There is no need to overpay when you can buy a good boot for less money and replace it yourself. By completing this procedure once, you will gain invaluable experience, and you will also save 5-10 thousand rubles every year.
Share with friends on social networks:
Telegram