Most of the used cars are real rubbish, the problem is in the bodies and their characteristics. Damaged and restored cars are often found - it is not safe to buy these. But how can a beginner recognize a damaged car? You can recognize it, you just need to know what thickness of paint should be on cars.
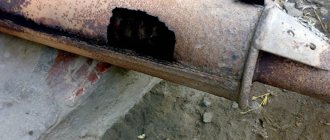
The fact is that it is very difficult to paint a restored car with a factory paint layer thickness - it is expensive, and not every reseller will paint it perfectly. It is much easier and cheaper to paint it somehow, but beautifully, and hiding all the imperfections. And under the layer of paint there may be a weld that is not factory (often a car is assembled from two or more parts). Under the layer of putty and paint there may be holes and rotten metal.
Knowing how thick the paint on cars usually is, you can recognize a painted car, which means that it was definitely involved in an accident.
How to determine the thickness of paint on a car?
A simple device - a thickness gauge - will help you check your car for paint thickness. This is relatively new equipment that will help you avoid making a mistake when buying a car. It is not at all uncommon for such cases when a beginner chooses a beautifully painted car, and then it turns out that it was restored after a terrible accident literally from scrap metal, the geometry of the body is broken, and there are also other flaws.
A thickness gauge can be purchased at any auto store - the prices for these devices are quite affordable. Let's see how to use this device:
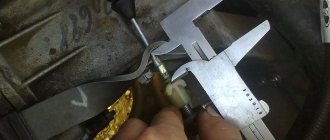
- First of all, the thickness gauge is turned on and applied to the surface being examined - the device will make a certain sound and numbers will appear on the digital screen. This is the thickness of the coating in microns.
- When the paint thickness has been measured, you should compare the result with the factory values. The factory thickness is indicated in special tables - the thickness table is on the Internet, it can be easily found. On average, the paint layer on a car is from 70 to 150 microns - this result is acceptable.
On the working surface of the thickness gauge there is a special sensor that generates waves, and they, in turn, are reflected from the surface of the body. This is how the device picks up signals and converts them into numbers.
When comparing the measurement result with the table, it is worth remembering that the numbers may fluctuate within 10 microns in any area of the body - this is normal. Even at the factory the paint job is not perfect. Paint can have different densities. Anything more is a sign of renovation. On restored surfaces, the paintwork can reach 200 microns or more.
It is also worth remembering that the thickness gauge measures the thickness of the coating with putty and primer. If high values are obtained, repaired areas on the body can be identified.
On video: how to use a thickness gauge.
Which parts should you check first?
Experts recommend starting from the roof surface - this element is least susceptible to various damages. The roof is tinted very rarely and it is the standard and guideline for all other measurements. The average for the roof will always be lower than for all other parts.
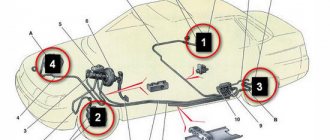
Next, measure the racks - their upper parts can be used as a guide. The front and rear of the body are areas that are very often repaired. You should also pay attention to the front doors and sills. Then measurements are taken in all other external segments.
Don't forget about the internal cavities - the space under the hood, trunk, interior, gas tank hatch.
First of all, measure the parts separately. Suspicious areas are measured 4-5 times - in the center and along the edges. The differences should not be more than 35 microns. Then the arithmetic average is calculated and the total thickness of the paint layer for the entire car is determined.
How it's done
The process consists of taking measurements of the thickness of the paint layer on different parts of the car body. To do this, three main conditions must be met:
- Have a properly configured device called a thickness gauge. It will be used to take measurements.
- Be able to use it yourself or take a competent friend who knows this technique to inspect the car.
- Understand where damage to cars most often occurs during road accidents and when the owner drives carelessly. It is these places that are painted after repairs.
Armed with this knowledge, you can choose a car.
Measuring the thickness of the paint layer on a car body
Preparatory work
Using a thickness gauge is quite simple - you do not need to have the skills to use common hand tools. However, before checking the thickness of the paint on a car with a thickness gauge, the device needs preliminary adjustment, which in relation to most measuring instruments is called calibration. Note that some professional models are equipped with a self-calibration function - their configuration is not required before use. But since the bulk of thickness gauges are budget models, it is worth considering the calibration procedure in more detail.
The essence of the procedure is that the device that comes off the production line knows exactly the reference values of the measured quantities (after all, any measurement is a comparison of the measured quantity with the reference). Many instrumentation and control instruments are calibrated by specialized companies, but for thickness gauges this operation can be performed independently. For this purpose, several calibration plates are included in the delivery package. Usually one of them is metal, it is used as a substrate (base). The rest are dielectric, most often plastic, which will act as the measured paintwork. As a matter of fact, it is the last plates that are the reference ones. To simulate a body base, you can take any flat metal surface.
However, there are nuances here too, which we discussed above. Thus, some types of thickness gauges only work with body parts made of ferrous metals; for others, the type of metal surface is not particularly important. And this must be taken into account if you do not use factory plates. As for calibrator plates, since they are reference plates, you need to use only those that are supplied with the device itself. To be fair, we note that currently the de facto standard for reference wafer thickness is the same for all manufacturers and is 102 microns. If the kit includes plates with other thicknesses, they are used for more precise adjustment of the device, or rather, double-checking the calibration using a reference plate.
We will describe how to set up (calibrate) the thickness gauge yourself. To do this, you need to take two calibration plates that imitate the base and paintwork (if they are new, you need to remove the protective polyethylene film from them), and lay the plastic one on the metal one. Then you should turn on the device itself and reset its settings to factory settings. How it's done. Must be described in the instructions. Most budget models have a “0” key, which, when held while turning on the device or after, resets the current settings of the device to the factory settings.
The next step is to perform a test measurement on a reference sample. To do this, you need to press a special key, the designation of which may vary (most often the symbol “K” or the abbreviation “CAL”). If the thickness gauge is configured correctly, the error value will be zero. Otherwise, the device readings must be adjusted in accordance with the following instructions:
- using two other calibration keys designed to increase/decrease the displayed value, it is necessary to ensure that the reference value of the thickness of the top plate is displayed on the display (in our case it is 102 microns.);
- press the calibration key again;
- To double-check, we repeat the test measurement procedure until the instrument error is zero.
However, deviations from the standard not exceeding 3 microns are considered acceptable. If you are using a universal device, it is better not to limit yourself to calibration using a ferromagnetic substrate plate - the kit probably includes a non-ferrous metal plate, which is also used in the calibration procedure in the appropriate mode (nFe, that is, non-ferromagnetic material).