Replacement
We hang and remove the front wheel. Clean the surfaces of the mechanism from dirt.
|
|
|
|
|
|
|
Source: https://lada-niva.ru/niva/20-3.html
Replacing front brake pads on a Niva
Brake pads are consumables. They take on the load that is formed during braking - the friction linings on the pads rub against the brake discs, stopping the car's wheels as a result.
Many car enthusiasts prefer not to carry out replacement by an official car service center or workshop, but to carry out this operation themselves. The price tag for replacing pads (without the cost of taking into account the products themselves), even in an unofficial workshop, starts from 500 rubles. for a couple.
You can save that money - it's really easy to replace the front pads yourself. Below we will talk about the procedure for replacing the front pads on a Lada 4×4 car (aka Niva 2121). The front pads for the Chevrolet Niva model are changed in exactly the same way, since the calipers of the models are completely the same.
It is recommended to change the front pads on the Niva every 10 thousand km. However, you can check their wear during maintenance or just from time to time. Remember that the more active the driving style (and, therefore, braking), the faster the pads wear out, and, therefore, replacement may be required after 5 thousand km or after 25 thousand.
The minimum friction lining thickness, after which the pads must be replaced, is from 1 to 2 mm.
Otherwise, you risk encountering complete wear of the friction layer, as a result of which the metal part of the pads, left without wear-resistant protection, will rub against the brake disc, also made of metal - we will not write about the consequences of metal-on-metal friction during braking in this material. , but we think it’s clear that nothing good will come of this.
Remember that although the replacement operation is not particularly difficult, everything should be done carefully and without unnecessary fuss. Don't forget that good brakes are your safety.
First you will need to select new pads. Their cost ranges from 300 to 700 rubles per pair (but can be higher). It is advisable to give preference to those products that have proven themselves well. Car enthusiasts usually try to purchase products from the following manufacturers: Ferodo, Finwhale, Nippon, Nachalo, TRW, Dafmi, etc.
The tools we will need are:
Apply the parking brake lever. Next, using a crosspiece, slightly unscrew the nuts securing the wheel to the hub.
Using a jack, lift the car, then unscrew all the nuts completely.
Then remove the wheel. For greater safety, it can be placed under the car.
Using a lubricant like WD-40, clean the joint between the cotter pin and the clamp arm shaft.
Then, using pliers, remove the clamp arm shaft cotter pin.
Next you will need to pull out the axis of the clamping lever. If it fits tightly, then you can tap the axle from behind or, if necessary, knock out the axle with a drift.
Pull out the lever shaft using pliers.
Then remove the clamp arm itself.
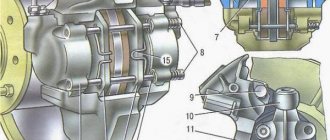
After this, remove the caliper. If necessary, use a slotted screwdriver to pry out the caliper if it does not budge. To keep the caliper out of the way, rotate it towards the cylinder block.
Then you will need to remove the old pads.
Before proceeding with installation, use a pry bar or a heavy screwdriver to press the caliper pistons so that they go as far into the cylinders as possible.
After the piston goes into the cylinder, it will be useful to measure the amount of brake fluid. The level should be checked after each pressing of the cylinder.
- If the liquid level is exceeded, the excess can be collected with a rubber bulb.
- We install new pads.
Then we return the caliper back. Before inserting the axle into the lever, it is recommended to process its edge so that the end of the axle is slightly hewn (this can be done either on a lathe or using a file). Lubricate the edge of the axle with grease.
- It is also recommended to lubricate the two springs located in the guides with grease.
- The lever axis, after returning it to its place, is pinned again.
The wheel installation operation is performed in the reverse order to that used during removal. Then sit in the car and press the brake pedal several times until you feel the pressure become tight.
Over the course of approximately 500 km after replacing the pads, when braking, it will seem that the pedal seems to be “wobbly” and does not respond well to your pressure - this is explained by the fact that the linings and discs have not yet ground into each other, you should not be alarmed by this. But you need to brake with due care.
Source: https://olade.ru/zamena-perednix-tormoznyx-kolodok-na-nive
What front pads can be installed on a car?
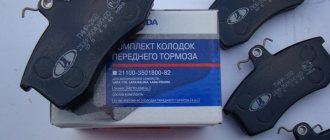
According to the AVTOVAZ catalog data for the VAZ 2123, the front pads are assigned the number 2123-3501090. The average price of original pads is 550 rubles.
Due to the low quality of most original products, we will consider analogues:
- SANGSIN SP1168 — 480 RUR;
- TRW GDB265M - 620 RUR;
- BOSCH 0986466601 — 650 RUR;
- FERODO FDB195 - 950 RUR;
- ATE 13046080062 — 1450 rub.
Based on the proposed substitutes, we conclude: for a small additional payment it is better to take a high-quality analogue from a world-famous manufacturer. Improved braking performance and safety may come at the cost of reduced brake rotor life.
Replacing brake pads VAZ 21214 injector
The pads need to be replaced if the thickness of the pad linings has decreased to 1.5 mm.
Using pliers, remove the cotter pin of the lower axis of the clamping lever.
Using a drift we touch the axis of the clamping lever
Holding the lever, use pliers to remove the axle.
Remove the clamping lever.
We remove the two clamping lever springs from the pad guide so as not to lose them
Using a screwdriver, lift up the brake caliper
...and place it on the steering knuckle.
Remove the brake pads from the guide.
Before installing new brake pads, it is necessary to move the pistons as far inside the cylinders as possible.
Using sliding pliers (or a gas wrench), press the pistons into the cylinders.
- You can recess the pistons into the cylinders in another way.
- To do this, insert the outer block into the guide and, having installed the caliper in place, use a mounting blade to press the pistons into the cylinders
- Then we assemble the assembly in reverse order.
- To make it easier to install the axis of the clamping lever, we sharpen its tip on a sharpener so...
- ...to make a cone.
- Before installation, lubricate the axis of the clamping lever with graphite grease
- Pressing the lever, insert the axle
- After installing the brake pads, you must press the brake pedal several times so that the cylinder pistons move the pads to the brake disc.
How to replace it yourself
Before changing elements of the brake system, you need to treat the cotter pin and caliper with a special anti-corrosion lubricant, for example, WD40, since problems may arise during removal due to rust. If upon inspection it is clear that there is uneven wear, this may indicate that there are problems with the caliper. It may also be that the pressure cylinder boot is torn; if so, it needs to be immediately replaced with a new one. If there is uniform wear, then you can replace them with new ones.
- Using pliers, pull out the cotter pin from the bottom finger.
- Take a thinner screwdriver and push out the cotter pin itself
- We remove the clamping lever with two springs
- Take a screwdriver and hook the caliper, lifting it up
- We remove the worn pads and inspect them; if there is wear, replace them with new ones.
- We recess the pistons onto the caliper as deeply as possible so that the new ones will fit in without problems since they are thicker and simply won’t fit.
- When you have installed the new pads, we begin to assemble everything in the reverse order.
After changing, press the brake pedal a couple of times so that the pistons take their working position. You should also check what level the brake fluid is, since after replacement the level of brake fluid may increase. Replacing these elements on a Niva Chevrolet SUV takes no more than four hours and can be done independently. And only after a complete inspection of the brake system and replacement of all faulty elements can you be 100% sure that it will not let you down.
How to replace brake pads on a VAZ 21213 yourself
The braking system is very important for driving safety. Therefore, it is necessary to monitor its serviceability. One of the main elements of the brake system are brake pads (BC), which, due to friction, slow down the rotation of the wheel. Naturally, over time they wear out and require replacement. You can perform the operation of replacing the TC on a Niva yourself in a garage.
All elements of the car wear out to varying degrees during operation, depending on the load experienced. The wear of brake pads is influenced by many factors, so the frequency of replacement for each Niva will be different.
SUVs are used in difficult off-road conditions, so they are replaced after 15-20 kilometers. The reason for rapid wear is the nature of the road surface on which the vehicle has to drive: sand, water and dirt.
The wear and tear of the roadway depends not only on the quality of the road surface, but also on other factors:
- climatic conditions of the area where the SUV is operated;
- driver's driving style;
- quality of consumables.
The manufacturer recommends replacement after an average of 30-50 thousand. But given that wear varies, experts strongly recommend checking the brake system every 10 thousand kilometers.
When checking, you need to pay attention to the presence of creaks, other extraneous sounds, and smooth braking. When replacing, in parallel, you should check the integrity of the anthers on the guides, brake hoses, rubber covers, and the degree of wear of the brake discs. This is necessary for timely identification and elimination of faults.
The front axle bears the main load, so the front axles wear out faster than the rear ones. On average, for every rear pad replacement there are two front pad replacements. Any driver can understand that there is a problem with the brake pads if he pays attention to the characteristic symptoms:
- increased braking distance;
- knocking noise when braking hard;
- ineffective brake operation;
- creaking when braking;
- metal shavings on brake discs or pads.
If at least one of the signs appears, it is necessary to check the brake system and replace worn parts if the following signs of wear are found:
- cracks and delaminations of the TC are visible;
- defects in the form of chips and scratches were found on the surface of the block or lining;
- a protruding rim has formed along the edge of the disk;
- the thickness of the linings on the pads is less than the required technical specifications;
- uneven wear of the TC.
The pads must be changed in pairs: two front, two rear. When replacing the pads on only one wheel, the driver will not be able to brake effectively; the car may pull to the side when braking, which threatens to create an emergency situation on the road. The thickness of the overlay is measured using a caliper. The minimum thickness allowed is 1.5 mm.
To carry out the replacement you will need the following tools:
- jack;
- wheel wrench;
- a set of keys;
- pliers;
- gas wrench or sliding pliers;
- flat blade screwdriver;
- hammer;
- mounting blade;
- support post;
- calipers.
Naturally you need to buy new brake pads. It is advisable to have WD-40 penetrating fluid to relieve stuck fasteners.
Changing the pads of the front wheel pair
To make it convenient to work, we place the SUV on a flat, horizontal plane. We place wheel chocks under the rear wheels and set the handbrake. Before dismantling work, we treat the threaded connections with WD-40. We perform the replacement according to the following algorithm:
- We tear off the wheel mounting bolts with a spray bottle. Let's jack up the side of the car on which we will carry out the replacement. We install the car on a support stand for safety.
- We unscrew all the bolts and remove the wheel.
- Using pliers, pull out the cotter pin of the pressure lever (PR) of the lower axle.
- Use a tool of suitable diameter and a hammer to knock down the axle.
- Then, holding the PR with pliers, remove the axle.
- Remove the pressure lever.
- From the TC guide we take out two springs that held the PR.
- Using a screwdriver, pry up and remove the caliper.
- It is convenient to place the removed caliper on the steering knuckle.
- Next, we easily remove the TC from the guide.
- Before installing new parts, you need to press the pistons into the cylinders, which pop out under the pressure of the brake fluid. This can be done with sliding pliers.
- There is an alternative way: we insert the external TC into the guide, return the caliper and use the installation to recess the pistons into the cylinders.
- Before inserting the axle, it is advisable to sharpen its end using sandpaper so that the edge takes a cone-shaped shape.
- Before installation, the axle should be lubricated with graphite grease or rubbed with graphite so that it fits in and out of the hole easily.
- Press the lever and insert the axle.
- After installation, press the brake pedal several times so that the pistons come out of the cylinders and press the pads against the brake disc.
Changing the rear wheel pair pads
You can assess the condition of the brake drum without dismantling the brake drum by pulling the plug out of the shield and looking into the inspection window. To replace the rear fuel tanks, we drive the vehicle onto a lift or inspection ditch. Further work consists of a sequence of steps:
- Loosen the wheel nuts, place supports under the front wheels and jack up the car. We substitute a safety support, lower the car onto it and remove the hand brake.
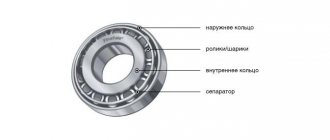
- At this stage, you can check the rear hub bearings and whether the wheel is rubbing or not. It depends on the settings of the handbrake. Rotation should be free and without delay.
- Unscrew the fasteners and remove the rear wheel.
- We turn out two bolts with a hex head to “12”. To fix the wheel, turn on the handbrake.
- We screw the removed bolts into two threaded holes located opposite each other.
Replacing pads on the rear axle
To replace the rear pads, you will need to carry out the same preparatory work, after which the first thing you need to do is loosen the handbrake. Subsequence:
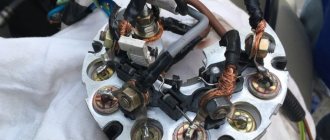
We remove the spring near the lever from which two cables go.
Using two “13” keys, you need to unscrew the bracket nuts, after which the cables weaken and do not affect the pads.
You can start directly replacing the pads
You need to remove the drum from the axle shaft using a “12” key by unscrewing two bolts. The drum often sticks, so you need to tap it with a hammer around the entire perimeter.
The working cylinder must be pushed inward on both sides using a flat screwdriver.
- You need to pry the tension springs by pulling them out.
- The block must be moved to the side opposite to the other block by the lower part, after which the two blocks are removed from the shield.
After removing the pads, the brake flap and drum must be cleaned and degreased and checked for the presence or absence of cracks.
Replacing the front brake pads of a VAZ 2121 Niva 2131
The removal and subsequent replacement of the front brake pads on a VAZ 2121 and Niva 2131 is carried out in case of wear, when the thickness of the friction linings has become less than the maximum permissible, when mechanical defects have appeared on the surface - chips, cracks, etc.
It is recommended to replace the pads on both sides at once, regardless of the condition of the other pair, in order to maintain the quality of operation of both wheels and not violate the basic characteristics. We hang the side to be repaired with a jack and remove the wheel.
Prepare a standard set of tools, and then perform the following sequence of actions:
After removing the wheel, we clean the brake mechanism from dirt using a wire brush or blow it with compressed air.
Now we need to pull out the cotter pin of the lower axis of the clamping arm. To do this, using pliers, you first need to remove the locking plate that secures it from spontaneous removal, then remove it from its place using a hammer and a stop of suitable diameter.
We grab the cotter pin with pliers and at the same time, holding the lever from falling, remove the cotter pin and remove the lever from its seat.
Remove the two lever pressure springs from the pad guide.
Then we pry up and lift the brake caliper.
Place the caliper on the steering knuckle with the pads facing up. Then we remove them from their seats.
Now that the pads have been removed, we replace them, and then proceed to installation. But first you need to recess the brake pistons into the cylinders; for this you can use sliding pliers, or install the caliper with one outer old pad back in its place and insert a small mounting blade between the disc and the pad and recess the piston.
- Also, before installation, it is recommended to grind down the end of the clamping lever axle to make it easier to install into place and lubricate it with graphite lubricant.
- We carry out all subsequent assembly in reverse order.
- At this point, the repair work to replace the front brake pads on the VAZ 2121 Niva 2131 has been completed.
Source: https://Remladavaz.ru/zamena-perednix-tormoznyx-kolodok-vaz-2121-niva-2131
We change the front and rear brake pads of Niva Chevrolet
The brake system of any car should always be in good working order. This is the most important and mandatory, because the driver’s life directly depends on the braking system. To ensure that the brakes are always in order, it is necessary to monitor their performance and check the brake pads. Checking the condition of the brake pads should be carried out once a year, if the car is not used daily, and once every 2 years, if the car is used on average 3-4 times a week.
Removing front brake pads from a Niva Chevrolet
Replacing the front pads in a Chevrolet Niva begins with jacking up the left or right side of the wheel, having previously removed the bolts on this wheel. The car must be set at speed and on the handbrake, and supports must be installed under the wheels. And only after that jack up the car and completely unscrew the nuts. Having removed the wheel, you can begin to unscrew the caliper and remove it from the brake disc. A caliper is a complex unit in which the brake pads are attached and the braking effect itself is produced. The caliper is removed as follows: the clamping brackets are removed after first removing the fixing cotter pin from them. It is not so easy to pull out the clamping brackets; to do this, you need to arm yourself with a hammer and a punch (it is better to use a punch with a rubber end). Knockout should be carried out with progressive movements so as not to lose the springs that secure the brackets.
Once the staples are removed, the caliper can be removed. Perhaps, if it was not removed for a long time, it could become stuck. In this case, a can of WD-40 or motor oil may come in handy. By prying it up with a screwdriver, the caliper is carefully removed and hung on the brake hose or placed on a previously placed brick. Now you can begin to remove the pads on the Chevrolet Niva. They are easy to remove; after removing the block, you need to compare its width with the new one. If the old pad is twice (or more) thinner than the new one, then they should definitely be replaced.
The sequence of installing new front pads on Shniva
Before proceeding with installation, you need to know that the pads must be changed in pairs on each side. You cannot install only one new pad and leave the old one on the other; this can lead to poor performance of the brake system.
Before inserting new pads into place, you need to press out the pistons, which are elements of the braking mechanism. In this case, you will need a regular long screwdriver. Having squeezed out the piston, we install the pads in place, in the same form in which the old ones were removed. Installation of the caliper is carried out in the reverse order of disassembly.
Before installing the clamping brackets, you need to lubricate them with Litol type lubricant.
It is imperative to lubricate the staples, otherwise it will be more difficult to knock them out next time. Having lubricated the brackets, install the fixation springs and check them for compression strength. To do this, you need to press the bracket where the spring is fixed. If light force is applied to the bracket and it rotates, the springs need to be replaced. It's better to change them now than to wait until they simply become unusable. After everything, we put the wheel in place and similarly replace the pads on the other side of the car. When the pads are replaced on both sides. You need to bleed the brakes to remove air from the brake system so that the hydraulic pistons reach the pads. Replacing brake pads on one side takes approximately an hour; specialists complete this work in 30 minutes.
Changing brake pads on a VAZ Niva 21214
The domestic SUV is considered one of the best in its price segment. Almost any Niva owner can assemble and disassemble it independently. This is due to the fact that with active off-road loads, many components need to be regularly changed or updated. One of these problem areas was brake pads.
How to Identify Brake Problems
No one will argue that a working brake system is a guarantee of safety. With serviceable brakes, you can compensate for the breakdown of any component in motion. Therefore, regular monitoring of these nodes is a mandatory procedure. Replacing brake pads on Niva 21214 occurs in the following cases:
- increasing the braking distance when you press the pedal;
- car drifting away from a straight line when braking;
- extraneous sounds when the brakes are applied;
- overheating, defects in the brake system elements;
- long travel of the handbrake lever and/or pedal;
- change in force when pressing the pedal;
- independent operation of the brakes;
- the hand brake does not apply on slopes;
- wear of brake pads less than 1.5 mm.
Replacing components is not a problem even for beginners in repairing their own car. The main thing is to strictly follow the instructions and check the new system after assembly to eliminate possible problems while driving.
Replacing front pads
It is logical that for replacement it is better to select original parts or those that have received official approval from the manufacturer. For the further process, you should hang the wheel and secure the car properly. Replacement procedure: Remove the wheel.
- Remove the cotter pin of the lower axle clamping element.
- Partially knock out the axle and then remove it with pliers while holding the lever.
- Remove the lever.
- Remove both springs so they don't get lost in the process.
- Remove the brake caliper using a screwdriver.
- Remove the pads from the guide.
Before installing new parts, press the pistons into the cylinders as much as possible. This is done with an installation spatula, pliers or an adjustable wrench. Afterwards the assembly is assembled in the reverse order. To simply install the clamping lever axis, it is recommended to slightly sharpen it into the shape of a nail and lubricate it with graphite lubricant.
Replacing rear pads
It is important to understand that when replacing these parts, the entire set, all four elements, are replaced. If you install only one new unit, then when braking the car may pull away from the straight line. After hanging and removing the wheels, proceed according to the following scheme:
- Loosen the handbrake cable.
- Tap the bolts securing the brake drum to the axle shaft.
- Unscrew the bolts using a hex tool socket.
- The last two fasteners are unscrewed with a 12mm head.
- The drum itself is removed by screwing two bolts into the threaded holes. They will rest against the flange. If the drum does not give in completely, then it is tapped at the end through a wooden beam. The blows must be made evenly while rotating the part.
- Remove the pads themselves. One way is to remove the support posts, move the lower element and remove the lower stop. After removing the upper stops from the slots, remove the lower tension spring, pull out the pads from behind the axle shaft (this must be done carefully so as not to damage the cylinder boots).
- Remove the manual shoe drive lever from the rear hand brake.
- Remove the pads with the upper spring and spacer bar.
- Stretch and remove the upper spring.
- Unscrew the axle of the manual brake pad drive lever and remove it.
Source: https://expertniva.ru/tormoznaya-sistema/smena-tormoznyh-kolodok-na-vaz-niva-21214.html
Choosing pads for Niva Chevrolet
Different types of braking systems are used on the rear and front wheels of this car. Based on this, the pads on them are also different: disc pads on the front wheels, drum pads on the rear wheels. The part that plays the main role in the braking process is the pads; they bear the main load and wear out the most during operation.
Pads for Niva Chevrolet
The pads differ from each other in the raw materials used in the manufacturing process, their service life and, accordingly, their price.
When choosing pads, you should focus on the following criteria:
- The lower the heating temperature during braking, the longer the pads will last.
- The need to increase the degree of pads in cold seasons.
- Sounds made by the brake system during braking.
- Maximum service life.