How to find out what exactly the pump on 2109 has failed
The main problem that prevents the continued use of a water pump is its loss of tightness, which leads to the leakage of working fluid. Slightly less often, problems are caused by bearing wear.
In the first case, the pump remains suitable, therefore the easiest way to protect the power unit from overheating is to regularly restore the volume of liquid in the cooling system. This measure, however, gives only a temporary effect, since the leak will intensify day by day.
Bearing damage is much more serious. At first, this element signals its wear and tear with a fairly loud noise. If you do nothing, the destructive process will accelerate, and, most likely, the matter will end in the complete destruction of the part. The backlash formed in it is manifested by the following signs:
- loud grinding noise;
- pump jamming.
Ultimately, the likelihood of the drive belt breaking or even damaging the engine valves increases.
The pump installed on 2109 cannot be repaired, and therefore, if its improper operation is detected, the unit is dismantled and a new one is installed in its place.
The procedure, fortunately, is not particularly complicated, which means that replacement with a VAZ can be done without going to a car repair shop. The pump is located in an easily accessible place and no overall engine components (for example, a carburetor) will have to be touched.
Pump location
The water pump is installed on the right (in the direction of travel) side of the engine under a plastic cover. There is also a gas distribution mechanism that drives the pump toothed pulley through a belt. This arrangement creates a number of problems.
- To inspect the pump you have to remove the plastic casing.
- Due to a leaky seal and a small leak, antifreeze gets onto the belt, which quickly fails.
- If the bearing is severely worn, the shaft may jam, and the timing belt may jump off or break. In 90% of cases this leads to pistons hitting the valves, and subsequently to expensive repairs.
The coolant pump is installed on the right side of the engine
For these reasons, it is necessary to periodically (every 10–15 thousand kilometers) inspect the gas distribution mechanism for belt tension and pump performance.
What you need for work
To replace the pump on your VAZ-2109, you need to prepare some tools and materials. In particular, you will need:
- heads and wrenches (socket and socket) 17 mm and 10;
- knob;
- wide flat-tip screwdriver;
- sharp knife;
- wiping ends;
- capacity up to 10 liters for liquid;
- silicone neutral sealant;
- jack and additional support for the car;
- new pump with gasket.
Replacing the VAZ-2109 carburetor pump should be carried out on a level surface. In summer it is not forbidden to work outdoors, but in winter it is better to use a warm garage.
Preparatory activities
First of all:
- position the car in a place convenient for you and be sure to set the handbrake;
- make sure the gear lever is in neutral;
- If the machine has been used recently, wait until its power unit has cooled down.
Next, drain the coolant from the system. For this:
- move the heater adjustment lever to the right until it stops;
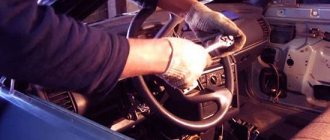
- remove the ignition mechanism with the bracket holding it;
- in the engine compartment, unscrew the coolant reservoir cap;
- find the drain hole (it is located at the bottom of the cylinder block);
- place the container;
- remove the plug;
- wait until the antifreeze has completely drained out;
- Wipe the engine dry if liquid gets on it.
An important point is that when the coolant is very dirty, it would be advisable to flush the entire system.
Replacing the VAZ-2109 pump
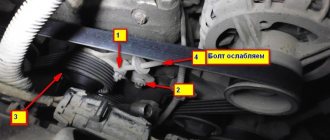
To carry out the replacement, it is necessary to remove the timing belt protective cover. It is held in place by 3 bolts - unscrew them with a 10 mm wrench. Next, the cover is dismantled and placed next to it, since there are marks on it that help set the TDC of the first cylinder.
Now, holding the crankshaft by the pulley, turn it until the notch on the camshaft gear coincides with the convex point located on its rear cover. Upon completion of the described manipulations, the casing is returned to its place, but not screwed, since you only need to make sure that the marks on it coincide with the position of the pulley.
It is also advisable to look into the inspection slot of the clutch housing - there the notches should similarly coincide. If this does not happen, you will have to turn the crankshaft some more.
At the next stage, arm yourself with a 17 mm wrench and use it to unscrew the nut holding the tension roller. The last element must be completely removed - be sure to check its functionality (unimpeded rotation and absence of play indicate serviceability).
Remove the transmission belt from the camshaft gear and throw it down. Now, using the same 17 mm wrench, remove the bolt holding the above-mentioned sprocket. To prevent it from spinning, wedge it with a screwdriver. Carefully remove the gear and be careful not to lose the locking key.
All that remains is to remove the nut and 3 more bolts that secure the rear camshaft cover - here you will need a ten key. After dismantling the named part, the pump can be removed quite easily - you just need to unscrew the elements that secure it.
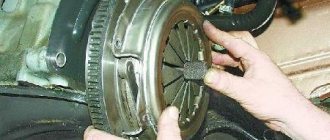
Proceed to remove the pump - you will not be able to do this with your bare hands. First, it is pryed up with a screwdriver and torn from its place, and then a jack is placed under the engine (exactly where the failed unit is located). The 2109 engine is raised a little - this allows you to increase the gap between it and the fender liner, without which it is simply impossible to move the pump.
When the assembly is dismantled, the installation site should be cleaned, since often part of the old sealing gasket sticks and peels off. This can be done conveniently with a regular knife. Upon completion of the action, everything must be wiped thoroughly with a dry, clean cloth.
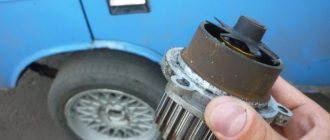
The new unit is mounted with the marking facing up (it is located at the end). Tighten the retaining bolts thoroughly, but be careful - they are screwed into the aluminum. Further work is performed in the reverse order to that described.
Troubleshooting
Malfunctions of the water pump on front-wheel drive VAZ models manifest themselves as follows.
- Extraneous noise appears on the right side of the engine, increasing with increasing speed.
- Traces of coolant (not to be confused with engine oil) form near and under the timing belt assembly.
- A puddle appears under the car, and the level of antifreeze in the expansion tank drops noticeably.
- The electric cooling radiator fan turns on more often than usual in any weather.
The protective cover is attached to the engine with three bolts
Practice shows that most car enthusiasts discover the problem at the penultimate and final stage of wear, when the antifreeze has already leaked to the ground or the pump shaft has jammed.
It is quite difficult to clearly identify the sound of worn water pump bearings against the background of a running engine. The problem is compounded by noise from other faulty components, such as knocking valves. Therefore, at the first suspicion, you should remove the plastic timing case by unscrewing three bolts with a 10mm wrench and diagnose the pump as follows.
- Carefully inspect the area around the water pump gear and timing belt for traces of coolant.
Traces of coolant under the pump indicate an antifreeze leak
- Look at the position of the toothed pulley relative to the other gears and the plane of the steel casing. It shouldn't be skewed.
After complete wear of the bearing, the pump shaft may become distorted.
- Try rocking the gear along the shaft axis with the belt tense. If this succeeds, the pump must be dismantled.
- Loosen the tension roller and timing belt and rock the shaft. If play is detected, move the belt and turn the pulley by hand. It should rotate easily and silently.
These symptoms can appear individually or simultaneously. You can detect oil seal wear when the bearings are working (there are traces of antifreeze, but there is no shaft play), and vice versa. In any case, the pump should be removed and, if necessary, disassembled or replaced.
The method for identifying a faulty water pump is the same for versions of a car with a carburetor and an injector; there is no difference.
Video: operation of a faulty pump
Assembly nuances
When returning drive belt 2109 to its place, make sure that all marks on the crankshaft are in the correct position. If they move, you will have to spend additional time adjusting both the ignition and the gas distribution system.
When the tension roller is put in place, do not forget to also make sure that the belt does not dangle on it.
Sometimes, after the reassembly is completed, the car does not want to start or starts poorly. This symptom indicates that the belt is installed incorrectly. To fix the situation:
- remove it from the gear;
- turn it literally a couple of millimeters;
- put the belt back in place.
Installing an additional pump
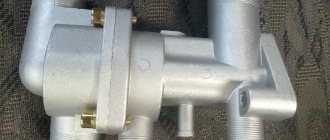
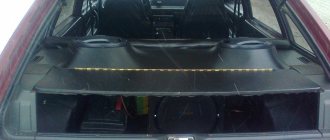
The disadvantage of the first front-wheel drive VAZ cars was the poor performance of the interior heater. Until the engine warms up to operating temperature, the cabin is cold. This is due to the design of the small circulation circuit, into which coolant enters in small quantities. The problem is solved by installing an additional electric pump from GAZelle.
An additional electric pump is installed in the stove pipeline
To install an electric pump, you must purchase:
- four-pin relay;
- multi-core wires and a two-pin connector;
- fuse socket;
- hoses and clamps for connection to the cooling system;
- electric pump from a GAZelle car.
The pump is placed on a homemade bracket, screwed to one of the bolts on the mounting flange of the gearbox. The antifreeze is first drained and the thermostat is removed, which will interfere with the installation of an additional pump. This is especially true for the injection model VAZ 21099.
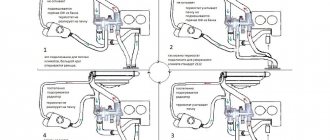
To turn on the pump, a small circuit with a relay is assembled
The insertion is made into the return pipe coming from the cabin heater. In this case, the electric pump will create a vacuum in the heater radiator. To turn on the pump together with the ignition and from a separate button, a simple electrical circuit is assembled. A relay with a fuse is placed in the cabin under the dashboard, and any free button is selected as a switch.