Features of the VAZ-2110 thermostat
- accelerates the process of warming up the engine as a whole;
- maintains optimal operating temperature.
Experts call the main function of a car thermostat device to block the flow of cooling antifreeze as it enters the radiator. This is due to the operating mechanism of the thermostat itself. The fact is that antifreeze does not pass through a cold engine, and when it is heated to a certain temperature, the thermostat is triggered - it opens, and thanks to this the engine can warm up faster.
The design of a car thermostat is no different, as it consists of several elements:
All these elements are enclosed in a housing on which information about temperature conditions is indicated that corresponds to a specific car engine model.
Installation of a modified vehicle
On a VAZ 2110 you can easily install a more advanced thermostat from Granta 2190. But you should still know a little about the design of the heating/cooling system in Granta. Its scheme can be easily implemented on the “ten”.
- Original TS Grants 2190 from BEHR;
- The lower radiator hose is from Granta, but the upper one 21214 will also work, or simply matched to size;
- Tee from VAZ 2110 for the cooling system;
- The studs are 8 mm in length - like from the camshaft bed;
- Straight long stove pipe from the “ten”;
- Gasket for thermostat.
We act according to this plan:
- We change the lower radiator pipe to the one from Granta (or similar). You can leave the original one, but connect it to a suitable diameter at a right angle using a piece of pipe. However, remember - the more connections, the more opportunities for leaks;
- We connect the expansion tank pipe through a VAZ 2110 tee: one end goes to the drain from the heater radiator, the other end goes to the supply pipe;
- Drain the coolant;
- We change the studs to longer ones and install the Granta thermostat;
- We twist the temperature sensor.
Next comes a check to see if the modified heating system is working properly. Typically, the Grant vehicle is more stable, provides faster heating of the air in the cabin, and is not subject to temperature fluctuations.
About the system
The cooling system in Grant is significantly different from the Priora one; it quickly warms up the engine to operating temperature even in the most severe frosts with the heater on and maintains a higher operating temperature, which helps quickly warm up the interior. The main difference in the cooling systems of these two cars is the thermostat. It is the Granta thermostat that ensures faster warming up of the car.
A clear difference between the two systems can be seen in the pictures below.
As you can see, the heater on the Grant is connected in series, and on the Priora in parallel. On the Priora, part of the heat goes into the expansion tank, but in the Grant, the antifreeze in the expander almost does not heat up and all the heat is transferred to the heater radiator.
No. 2 Modification of the thermostat on the Lada Grant - replacement of the thermal insert
This method involves completely dismantling the flow regulator and disassembling it into its component elements. The detailed process is described above.
We troubleshoot the thermostat cavity, wipe it with a rag, and inspect it for cracks and other defects.
Removed spring from thermocouple
We replace the entire “core”. The following cores are suitable for the standard thermostat:
- Wahler: 3017.87 D (at 87°C);
- Behr (Behr) 3091.92V (at 90°C).
We replace the complete set, including the spring, and the modification of the Luzar thermostat on the Lada Grant is completed.
Thermostat under the cover in disassembled form. As an alternative, use the core from Daewoo or Renault, catalog part number - Vernet 4898.92. The design of the part is somewhat different and requires adjustment. For standard thermostats from Luzar, such an upgrade is not possible.
Subject to the recommendations, fuel consumption will decrease by 1.0 - 1.5% minimum.
Modification of the thermostat VAZ 2110, 2111, 2112
For a long time I was bothered by the low temperature of the internal combustion engine with the Granta thermostat. Despite all the tricks, the temperature remained stably at 78C. Despite the outside temperature from +4 to -30, the situation did not change. Despite the low temperature of the internal combustion engine. It was very warm in the cabin. But it killed the engine’s horse appetite at low temperatures. In general, I decided to replace the thermocouple from 85C to 92C. I read here on D2 that people are changing it to VERNET 4898.92 (92 degrees), but it requires modifications because it does not fit the diameter a little. I abandoned this idea and began to look for analogues that were 100% suitable for the 2190 thermostat. And the VERNET company has never inspired confidence. In general, after a long search for analogues, a WAHLER 3091.92D (92C) thermostat was found. This insert is only suitable for the original 2190 BEHR thermostat. This solution is not suitable for thermostat 2190 from Luzar and I have no idea what to do with it and don’t want to know. Ask questions to Luzar.
0:1657
I ordered it and a couple of days later I received this box. Respect to Denis for his help with ordering and delivery (right elephant).
0:1886
1:2391
2:504
Actually, from the thermostat itself we only need its thermocouple and spring. The body is in the trash. We cut the housing according to the diagram and remove the thermoelement and spring. I advise you to grind the WAHLER spring along a plane (like the BEHR) so that the last turn is flat for a better fit.
2:1012
3:1517
Next, remove the thermostat from the engine, unscrew the back cover (with 3 screws). We remove the spring and thermocouple BEHR (85C) and replace them with a thermocouple and spring from the WAHLER thermostat. The clamping bar used is an old one from BEHR. We screw the cover back in place and install the thermostat on the internal combustion engine. This should leave you with a BEHR thermocouple and spring. Let's put it off until summer (you never know).
3:2202
4:504
Now the engine temperature does not drop below 88C (-20 outside), but does not overheat either. The thermostat opens a large circle at exactly 92C. I immediately noticed that fuel consumption dropped by 1.5L, and the engine began to run more smoothly. The interior was dominated by Africa in a period of drought. In general, I am very pleased with the result and highly recommend this modification to all owners of the Granto-thermostat.
4:1201 4:1211 next article:
Repair of cylinder head VAZ 2112 16kl.
3. Repair of cylinder head VAZ 2112 16kl. For a long time I could not understand the reason - the antifreeze was leaking somewhere. Everything I could see. Nowhere
5:1998
Rating 0.00 [0 Vote(s)]
10166
Additional purpose of SOD
VAZ 21102 engine cooling system and electric fan
Being a system that is designed to cool engine parts that heat up during vehicle operation, the SOD also has a secondary purpose. In particular, this applies to indicators such as:
- heating the air in the heating system inside the cabin;
- reducing the temperature of the forced air entering the cylinders (applies to turbocharged engines);
- cooling the transmission fluid if the car has an automatic transmission;
- reducing the temperature of exhaust gases entering the recirculation system;
- The oil is also cooled using an additional built-in radiator.
Marking of the VAZ 21102 engine cooling relay
You can learn more about the VAZ 2110 SOD through videos or photos that are widely available on the Internet. Each motorist can modify the system with his own hands as he pleases, but only if the instructions, of course, imply this. The price of a new fan is not so high that you would not try to upgrade the engine cooling system.
We install a thermostat from another model
There is another way to improve the operation of the thermostat; to achieve efficiency, you should use a part from a different model. With the correct selection, no additional modifications will be required, at the same time, the system will work correctly and without failures. The most important thing here is not to make a mistake when choosing a part. The best option would be to install a thermostat from Lada Granta; it is almost identical in mounting, but is more efficient. Therefore, many drivers limit themselves to installing it.
There is no need to modify the thermostat itself. But, it is a little larger compared to the standard part. Therefore, the studs will need to be replaced. 20 mm longer are installed in their place.
. This will be quite enough. There are no special features in the replacement process. Simply remove the old thermostat and install a new one in its place. Be sure to replace the gaskets.
Instruction No. 1
It often happens that the engine temperature does not rise to the optimal temperature during operation. For example, on the body of a thermostat device, 90 degrees is marked, and the temperature is not higher than 85. This problem can be solved with the help of a simple modification - modifying the rod. The fact is that in the process of opening the thermostat, the rod rests against the cover. If you expand the special recess in the lid, the thermostat will operate later. Therefore, it is easier to replace the rod with a bolt of the appropriate size.
- Pull the rod itself out of the cover.
- Drill a through hole at 4.5.
- Cut the internal thread to 5.
- Select the bolt length with a margin.
- Place a lock nut at 5 and a washer with an elastic band to seal.
- Reinstall the thermocouple.
- Fill with antifreeze.
- Check in practice, adjust the beginning of the opening of the large circle to 89 degrees.
Now the temperature will remain 90-92 degrees, as stated on the thermostat housing.
There is another way to improve the operation of the thermostat; to achieve efficiency, you should use a part from a different model. If selected correctly, no additional modifications will be required, and at the same time, the system will work correctly and without failures. The most important thing here is not to make a mistake when choosing a part. The best option would be to install a thermostat from Lada Granta; it is almost identical in mounting, but is more efficient. Therefore, many drivers limit themselves to installing it.
There is no need to modify the thermostat itself. But, it is a little larger compared to the standard part. Therefore, the studs will need to be replaced. 20 mm longer are installed in their place.
. This will be quite enough. There are no special features to the replacement process. Simply remove the old thermostat and install a new one in its place. Be sure to replace the gaskets.
“Fucking basin. "
Hi all! My name is Mikhail, now I’ll tell you a story about how I managed to exchange my two-wheeler for a 2010 Camry. It all started with the fact that I began to be wildly irritated by the breakdowns of the two-wheeler, it seemed like nothing serious was broken, but damn it, there were so many little things that really started to irritate me. This is where the idea arose that it was time to change the car to a foreign car. The choice fell on the melting Camry of the tenth years.
Yes, I had matured morally, but financially I just couldn’t handle it. I’ll say right away that I am against loans and taking a car, especially not a new one, on credit is unreasonable. My salary is 24k a month, so collecting 600-700 thousand is almost impossible for me. I started looking for different ways to make money on the Internet. You can’t imagine how many scams there are, what I haven’t tried: sports betting, network marketing, and even the volcano casino, where I successfully lost about 10 thousand ((The only direction in which it seemed to me that I could make money was currency trading on the stock exchange, they call it Forex. But when I started delving into it, I realized that it was very difficult for me. I continued to dig further and came across binary options. The essence is the same as in Forex, but it’s much easier to understand. I started reading forums, studying trading strategies. I tried it on a demo account, then opened a real account. To be honest, I didn’t manage to start earning money right away, until I understood all the mechanics of options, I lost about 3,000 rubles, but as it turned out, it was a precious experience. Now I earn 5-7 thousand rubles a day. I managed to get the car buy after half a year, but in my opinion this is a good result, and it’s not about the car, my life has changed, I naturally quit my job, I have more free time for myself and my family. You’ll laugh, but I work directly on the phone)) If If you want to change your life like me, then here’s what I advise you to do right now: 1. Register on the site 2. Practice on a Demo account (it’s free). 3. As soon as you get something on the Demo account, top up your REAL ACCOUNT and go to REAL MONEY! I also advise you to download the application to your phone, it’s much more convenient to work from your phone. Download here.
Removal and installation
Before you begin installing a new device, you must remove the old one from the engine. Let's look at the sequence of work using the fourteenth model as an example. To carry out this operation, you will need a minimum set of tools:
- Two screwdrivers: flat and Phillips.
- Set of wrenches.
- Sealant.
- Steel clamps (4 pieces).
- New thermostat from Lada Granta.
Work begins by draining the coolant from the system. Next, in order to free access to the part, you need to remove the air filter. Now that the element we need is in sight, it must be carefully removed. First of all, loosen the fastening clamps located on the thermostat pipes. It is necessary to remove the pipes themselves sequentially, starting with the lower ones, connecting the radiator and expansion tank.
After the pipes are disconnected, unscrew the fastening nuts on the device itself. This completes the dismantling. Before installing a new spare part, make sure there are no defects on the pipes and the device itself.
Installing a thermostat on VAZ 2114, 2109, etc. done in exactly the reverse order. A thin layer of sealant must be applied to all holes of the new part.
Pay special attention to the fact that the sealant is silicone based and can easily withstand temperatures up to 130 degrees
Place the thermostat in place and secure it with bolts. Next, put on the pipes: first the upper ones (from the stove and cylinder block), and then the lower ones (from the radiator and expansion tank). The mounting clamps must be completely replaced. Also, there is no need to tighten them right away, since they can squeeze the sealant inside the cooling system of VAZ 2114, 2109, etc. First, simply attach the clamps, and they should be fully tightened after 30 - 40 minutes.
After completing the procedure, do not rush to fill in the coolant. In order for the sealant to fully settle and not allow liquid to pass through, it must be allowed to dry for about 3 - 4 hours.
Replacement
To replace the thermostat, you need to purchase consumables. You will need the following:
- Granta thermostat with gasket included.
- Stainless steel studs 85 mm long, 10 mm in diameter - 2 pieces.
- Set of steel clamps.
- Plastic or metal tee for pipes.
- Pipe for connecting the lower “bathtub” of the radiator from Lada Granta.
- Silicone sealant with a temperature threshold of destruction of up to 200–300 degrees.
- Container for draining antifreeze.
- Set of tools.
Next, you need to wait until the power unit cools down completely, then proceed with replacement. It is done as follows:
- It is necessary to open the radiator tap and wait for the antifreeze to drain (approximately 3–4 liters).
- Remove the air purification filter housing.
- Loosen the clamps of the thermostat pipes and remove them.
- Using a “13” wrench, unscrew the nuts securing the thermostat and remove it.
- Screw 2 nuts onto each thermostat mounting stud and carefully unscrew the studs.
- Clean the thermostat seat from any remaining sealants and gaskets.
- Screw the previously purchased studs into place.
- Lubricate the thermostat seat, install the gasket, and cover it with a layer of sealant.
- Install the thermostat and secure it. There is no need to tighten the nuts all the way, and the sealant must harden a little, otherwise it will squeeze out into the system. The nuts can be fully tightened after 30 minutes.
- Connect the “saxophone” of the engine and the lower “bath” of the radiator with a pipe from Granta.
- Lubricate all pipes with sealant in the places where they contact the thermostat tubes, put them on the seats, and tighten them with clamps.
- Using a tee, connect the radiator drain to the expansion tank drain.
- Turn off the throttle heating with an M10 bolt and 2 clamps. If the car is equipped with an electronic throttle, then you do not need to touch it.
- Fill the cooling system with the missing amount of antifreeze.
- Reinstall the air purification filter.
You can check the operation of the upgraded cooling system an hour after installing all the elements. It is necessary to allow time for the sealing compound to harden.
Important! After purchasing a new thermostat, you need to check its response threshold. You need to pay attention to the temperature response threshold indicated on the packaging and body of the device. For more efficient heating, it is better to purchase thermostats with a temperature threshold of 92 degrees.
↑ Engine cooling system VAZ-2111 (with fuel injection system)
- 1–26 – see above
- 27 – hose for supplying coolant to the throttle pipe
- 28 – coolant drain hose from the throttle pipe
- 29 – coolant temperature sensor in the outlet pipe
- 30 – radiator tubes
- 31 – radiator core
The cooling system is liquid, closed type, with forced circulation. The tightness of the system is ensured by the inlet and outlet valves in the expansion tank plug. The exhaust valve maintains increased (compared to atmospheric) pressure in the system on a hot engine (due to this, the boiling point of the liquid becomes higher, steam losses are reduced). It opens at a pressure of 1.1-1.5 kgf/cm2. The intake valve opens when the pressure in the system decreases relative to atmospheric pressure by 0.03-0.13 kgf/cm2 (on a cooling engine).
The thermal operating conditions of the engine are maintained by a thermostat and an electric radiator fan. The latter is turned on by a sensor screwed into the left radiator tank (on a VAZ-2110 engine) or through a relay based on a signal from the electronic engine control unit (on VAZ-2111, -2112 engines). The sensor contacts close at a temperature of 99±2°C, and open at a temperature of 94±2°C.
↑ Temperature control
To monitor the coolant temperature, a sensor is screwed into the engine cylinder head and is connected to a temperature gauge on the dashboard. An additional temperature sensor is installed in the exhaust pipe of injection engines (VAZ-2111, VAZ-2112), which provides information to the electronic engine control unit.
↑ Coolant pump
The coolant pump is a vane, centrifugal type, driven from the crankshaft pulley by a timing belt. The pump housing is aluminum. The roller rotates in a double-row bearing with a “lifetime” supply of grease. The outer ring of the bearing is locked with a screw. A toothed pulley is pressed onto the front end of the roller, and an impeller is pressed onto the rear end. A thrust ring made of a graphite-containing composition is pressed to the end of the impeller, under which there is an oil seal. If the pump fails, it is recommended to replace it as an assembly.
The redistribution of liquid flows is controlled by a thermostat. On a cold engine, the thermostat bypass valve closes the pipe leading to the radiator, and the liquid circulates only in a small circle (through the thermostat bypass pipe), bypassing the radiator.
On a VAZ-2110 engine, the small circle includes a heater radiator, an intake manifold, a carburetor heating unit and a liquid chamber of a semi-automatic starting device. On VAZ-2111, VAZ-2112 engines, liquid, in addition to the heater, is supplied to the throttle assembly heating unit (heating of the intake manifold is not provided).
At a temperature of 87±2°C, the thermostat bypass valve begins to move, opening the main pipe; in this case, part of the liquid circulates in a large circle through the radiator. At a temperature of about 102°C, the pipe opens completely and all the liquid circulates in a large circle. The stroke of the main valve must be at least 8 mm.
↑ Thermostat
The VAZ-2112 engine thermostat has an increased resistance of the bypass valve (throttle hole), due to which the fluid flow through the heater radiator increases.
↑ Expansion tank
Coolant is poured into the system through the expansion tank. It is made of translucent polyethylene, which allows you to visually monitor the liquid level. The on-board monitoring system also reports a drop in the fluid level; for this, a sensor is provided in the tank lid. Two steam exhaust pipes are also connected to the tank: one from the heater radiator, the other from the engine cooling radiator.
↑ Radiator
The radiator consists of two vertical plastic tanks (the left one has a baffle) and two horizontal rows of round aluminum tubes with pressed-on cooling plates. To increase cooling efficiency, the plates are stamped with a notch.
The tubes are connected to the tanks through a rubber gasket. The liquid is supplied through the upper pipe and discharged through the lower. Next to the inlet pipe there is a thin pipe for the steam pipe.
The use of water in the cooling system is not recommended: hot water causes intense corrosion of aluminum parts.
How to check if the thermostat is working on a VAZ 2110
Checking and replacing the VAZ thermostat of the tenth family
| The redistribution of fluid flows in the engine cooling system is controlled by a thermostat. Over time, the thermostat valve may jam on a large or small circulation circle, and the cooling system will not work correctly (engine overheating/underheating). How difficult is it to check and change the thermostat yourself? |
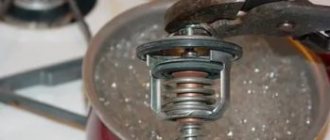
Checking the Thermostat
To check the thermostat, lower it into a vessel with coolant, heat the vessel and use a thermometer to control the beginning of the opening of the main valve.
| At a temperature of 87±2°C, the thermostat bypass valve begins to move, opening the main pipe; in this case, part of the liquid circulates in a large circle through the radiator. At a temperature of about 102°C, the pipe opens completely and all the liquid circulates in a large circle. The stroke of the main valve must be at least 8 mm. The thermostat of the VAZ-2112 engine has an increased resistance of the bypass valve (throttle hole), which increases the flow of fluid through the heater radiator. |
When checking the thermostat on a car after starting a cold engine, the radiator outlet (lower) hose should remain cold for a while and then quickly warm up, indicating the start of coolant circulation in a large circle.
Checking the thermostat in the store is very simple, just blow into the thermostat fitting. Thus, we will check how tightly the small circuit is closed when cold.
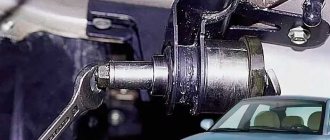
Removing the thermostat VAZ 2110
- Loosen the radiator outlet hose clamps.
- Loosen the clamps of the supply hose of the pump pipe and the hose connecting the thermostat to the outlet pipe.
- Remove thermostat.
Installation of a 6-hole thermostat in a VAZ 2110
- first VAZ 2110 - old style thermostat (left picture)
- until 2003 they had a 5-hole thermostat (2 pictures in the middle)
- after 2003 they have a 6-hole thermostat (right picture) - that’s why they are considered warmer compared to the previous ones. (catalog number 21082-1306010-11)
- More stable coolant temperature
- More productive heater operation
xn--2111-43da1a8c.xn--p1ai
Car engine cooling system repair
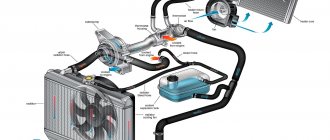
Operating principle of the engine cooling system
- Engine cooling radiator, which is designed to cool heated coolant with air flow.
- A radiator fan that increases the cooling intensity of the coolant in the radiator.
- The heater radiator, which is the source of heat for the car interior.
- An expansion tank, which serves to compensate for changes in the volume of coolant due to temperature. You won't be able to add antifreeze without it either.
- A pump or centrifugal pump that circulates coolant in the system.
- A thermostat, which is designed to regulate the amount of coolant passing through the radiator, thereby ensuring optimal temperature conditions in the system.
- The coolant temperature sensor is one of the cooling system control elements.
Diagnose the engine cooling system and identify problems
xn--2111-43da1a8c.xn--p1ai
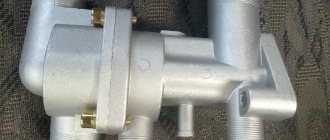
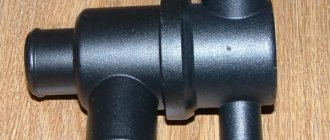
Modification of the VAZ 2110 thermostat
| Comparison of bypass channels of a 6-hole thermostat - 11mm (left) and 5-hole - 16mm (right) |
Reducing the bypass channel for a 6-hole thermostat
xn--2111-43da1a8c.xn--p1ai
The best thermostat for VAZ 2110, 2111 and 2112
| The main task of the thermostat is to prevent engine overheating, as well as rapid warm-up and timely removal of heat from heating parts. Is the thermostat not working on your VAZ 2110? No problem, just replace it with a new one. And to avoid problems with it in the future, you should choose the right thermostat in the store... |
- The engine gets very hot.
- The engine does not reach operating temperature.
- What was the lifespan of the old thermostat?
- Which thermostat manufacturer is better?
- Is it better to replace the thermostat assembly or just its thermocouple?
xn--2111-43da1a8c.xn--p1ai
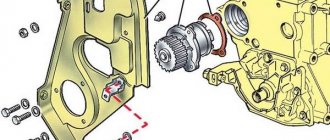
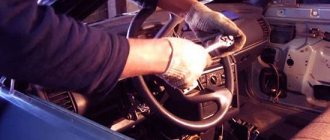
The process of replacing the VAZ-2110 thermostat
The location is indicated by an arrow.
Replacing one of the main parts of the cooling system begins with its dismantling. It should be noted that this procedure will have to be carried out not only to replace the thermostat, but also to check it.
Tool
Before starting work, you need to prepare the following tools:
- Two plastic canisters of 5 liters each. They will be needed to drain the coolant.
- Empty plastic bottle.
- Crosshead screwdriver;
- Several wrenches. Most likely, you will need keys for 8 and 12.
Replacement algorithm
Having prepared the place and tools, you can begin the procedure of removing the thermostat from the car. Disassembly occurs according to the following algorithm:
- First you need to unscrew the bolts that hold the air filter housing in place. To do this, you will need an 8 key, which will have to unscrew two bolts.
We squeeze the rubber supports out of the holes in the radiator frame.
Remove the MAF sensor from the housing.
By removing the filter, we gain open access to the thermostat.
Use a Phillips screwdriver to loosen the clamp on the supply hose.
Remove the pipe and drain the antifreeze.
During repairs, you need to pay attention to the condition of the pipes. If they are very worn, it is better to replace them. You can also change the coolant and air filter at the same time.
Next, you need to assemble the air filter and pour antifreeze into the system through the tank. Before moving off, you need to start the engine and check the coolant circulation through the system. This will help get rid of air pockets. If the antifreeze level in the tank has dropped, it should be topped up.
Modification of the cooling system of the VAZ 2110
Why modify the VAZ 2110 engine cooling system and make it similar to the Lada Kalina SOD? In this article we will try to find the answer to this question. Let's take a closer look at Kalina's SOD. Under the hood there is an expansion tank, from where the liquid flows through hoses into a large circle. It turns out that it does not heat up to 85 degrees Celsius.
On the heater radiator we do not see a steam outlet hose, but on the main radiator the steam outlet begins after the large circle is opened. What is the superiority of this system compared to the cooling of the “ten”? Firstly, the power unit heats up much faster, which means the interior warms up. Secondly, the pressure in the new system is significantly less than in the standard VAZ 2110 system, which means that the expansion tank will no longer explode and will not be damaged. There is no need to frequently add coolant.
The Kalina engine cooling system has only one drawback compared to the VAZ system of the “tenth” model. The disadvantage is that the fan is turned on frequently without external airflow to the radiator. What is required to modify the cooling system? First, we need to find out what kind of heater is installed on the car. You also need to change your tires on time so that unforeseen complications do not arise later. The stove can be old or new. The new type of heater has greater performance, it has so-called “swirlers”, and the output size of the heat exchangers is smaller than the size of their input. The Kalina engine cooling system can be installed on both the old and the new “tens” stove. True, on an old heater, if installed, you will have to throttle the output, that is, reduce it by 6 mm.
A heater running on the new system will function perfectly, but only at high speeds, that is, while driving. If you stand still with the engine running, only warm air will blow from the air duct. In this case, you need to press the gas pedal a couple of times and hot air will come out of the stove again. It turns out that the radiator of the cooling system creates a kind of resistance that can only be overcome at idle by the standard cooling system of the “tens” engine.
As a rule, the heating of the throttle assembly will eventually air out, and after a while the stove will stop working altogether. What are the benefits of reducing the size of the outlet from an old-style stove? By doing this, we slow down the movement of coolant in the heater, and accordingly, the pressure in the throttle assembly increases. You can reduce the diameter of the stove outlet in different ways, for example, we cover it on the left with a throttle, and on the right with a ball valve.
In the process of modification, we will need such materials as: Kalinovsky thermostat, two L-shaped pipes, a special tee, a plug for the heater steam outlet, a plug for the tank, clamps. We have prepared everything we need, it’s time to start modifying the engine cooling system. First of all, we change the five-hole thermostat from Kalina. We transfer the tank to a large circle. We turn off the heater's steam outlet, which slows down the entire flow, then we plug the steam outlet of the tank.
Another modification option is to use a six-hole thermostat. In this case, it will not be possible to completely copy Kalina’s system, but you can try. We plug the sixth hole of the thermostat, connect the lower radiator pipe to the outlet of the tank, plug the steam outlet of the stove, select the optimal width of the bypass channel, and do this using the narrowing method. After completion of the modification, the engine cooling system must be purged, that is, excess air must be removed from there. Next, we pull out the pipe from the throttle assembly, which goes into the return line. Fill the reservoir with coolant.
We observe the fittings in the throttle body pipe; coolant should flow from there. If the fluid does not flow, then start the engine and close the hose with your finger. After coolant begins to flow from the pipe, we loop it, warm up the car to operating temperature and check the operation of the heater at idle. If hot air blows, then the work was done correctly, but if the air is barely warm, you will have to pull the pipe out of the throttle assembly again and repeat the entire subsequent procedure. At the end, check the fluid level and, if necessary, add it to the normal level.
To summarize, we note that this is far from a new method of modifying the engine cooling system; it has proven itself to be the best, regardless of the heater model. So it makes sense to do this, especially since lately the winters have started to be harsh and it’s uncomfortable to drive without a heater.
Replacement process
The process of replacing the thermostat is simple and will not take much time, but the result will not be long in coming.
What is needed for replacement:
- Grant thermostat
- Gasket between thermostat and block
- Sealant
- Coolant
- Lower radiator pipe Grant
- Tee for stove VAZ 2108
- New clamps (it is best to use spring clamps)
- Two M8x80 studs (or a bolt of the same diameter and length)
Installation process:
- We prepare the car, remove the air filter box along with the corrugation and mass air flow sensor, and drain the antifreeze.
- Then we remove the old thermostat.
- If the Priora has a mechanical throttle, then we turn off the hoses going to heat it using an M8 bolt and a clamp. If the throttle is electronic, you don't need to do anything.
- We install new studs in the thermostat mounting points.
- Changing the lower radiator hose from the standard one to the Grant one
- We install the new thermostat, first placing the gasket on the studs.
- We connect the hoses according to the diagram
Grant thermostat connection diagram
- The inlet pipe to the heater radiator is connected from the thermostat, and the radiator outlet pipe is connected to the pump pipe.
- The outlet pipe is cut and a tee is inserted into it through which the expansion tank will be connected
- We unscrew the coolant temperature sensor from the old thermostat and install it in the new one.
- Filling with coolant
Then we start the engine and monitor the coolant level as the temperature increases, the liquid will decrease, do not forget to add coolant to the level until it stops decreasing.
Troubleshooting
A number of signs may indicate that the cooling system is failing, including:
- Antifreeze disappears from the system;
- The engine takes a long time to warm up. If this is due to weather conditions (frost, lack of a garage), then you need to insulate the engine;
- The engine detonates. This situation can most often arise due to the fact that a machine in which the cooling system is faulty is operated for a long time without proper repair;
- The sensor located on the instrument panel indicates that the coolant temperature has reached a dangerous temperature (arrow in the red zone);
- Torque is lost. This is a very unpleasant phenomenon in which, most often due to the fact that the engine has overheated, the head gasket leaks.
Narrowing of the bypass channel
If you decide that it is the bypass channel on the VAZ 2110 that needs to be adjusted, then the 6-hole thermostat should not have any problems. But with a 5-hole one, malfunctions may occur due to the fact that the cold pipe of the stove (outlet) will not be washed. Therefore, think about whether you need such a modification; maybe it’s better to immediately install a Granta thermostat or a six-hole one.
To reduce the bypass, you need to do the following:
- Cut a plate out of sheet aluminum so that it fits exactly inside the vehicle;
- Secure the plate with a rivet or cold welding, but so that the fastening does not interfere with the flow of coolant in a small circle;
- In this plate you need to drill a new hole of 5 or 6 mm (instead of the standard 8 mm);
- In addition to the steps described above, on a 6-hole heater, the stove return is connected to a thermostat.
After this modification, you will notice that the interior will warm up better and faster, but engine warming up will slow down somewhat.
We independently modify the VAZ 2110 thermostat or install a replacement
Many VAZ 2110 owners are dissatisfied with the performance of their car's heater. It would seem that the interior has already been insulated, no cold air is coming in from outside, the stove seems to be working, but it is still cold in the cabin.
Therefore, auto craftsmen come to the conclusion that the original stove may be nothing, but modifying the thermostat on the VAZ 2110 will not be superfluous at all. Therefore, someone, having bought a new thermostat, even before installing it on the car, makes modifications: the circuit on the 5-hole one is redone, making it 6-hole.
Factory thermostat
Others believe that it is enough to narrow the canal bypass. Third, it is much better to install a Granta thermostat, since it completely shuts off a large circle of coolant and, accordingly, the heater begins to supply hot air to the cabin much faster.
Let's consider all the options, but first you need to check whether the thermostat is to blame for the fact that there is clearly not enough heat in the cabin.
Engine cooling fan
VAZ 2110 engine cooling fan
Regarding the modification of the cooling system, which is often carried out, here we are talking about the fan. VSOD, as it is commonly called, on the VAZ 2110 has only one operating speed, although this causes a lot of dissatisfaction on the part of the motorist. So we have to carry out modernization and refinement.
VAZ 2110 engine cooling and fan
As a rule, motorists do not like it when the coolant arrow on the dashboard moves abruptly, and the fan turns on too abruptly. Let's consider below the disadvantages of the standard cooling system, which we will call CO in this article:
- the effect of thermal pumping, when during the hot season the temperature constantly fluctuates;
- constant shock loads (meaning electrical, current loads) on the on-board network.
It is not surprising that many drivers are annoyed when in the summer, at average driving speeds, the coolant temperature on the dashboard approaches the red zone. Of course, then the fan is connected and the arrow drops, but still.
- Such spasmodic behavior of the needle is considered the norm for VAZs, but drivers still look with envy at foreign cars where this is not observed. And all this can be easily eliminated if modernization is carried out.
- It is worth considering that when the needle jumps, errors on the on-board panel are possible, while the readings from the on-board computer are quite normal. But the irritation does not go away, and the effect is unpleasant and always alarming. I want to make temperature control smooth, so that the temperature is always maintained at the same level.
Modification of CO and fan using the first method
VAZ 2110 engine cooling system modification of Carlson (fan)
To do this, you will need to reduce the rotation speed of the Carlson. As for the electric motor, in this case, it will be necessary to ensure that it starts smoothly and, most importantly, at a lower coolant temperature (in other words, the electric motor will start earlier than usual).
It is worth noting that the method described above is more suitable for people who are professionally versed in electrical engineering. The method is quite complicated, but gives excellent results. As for modifications with your own hands, it is better to use the second method.
Second revision method
Modification of the engine cooling system for the VAZ 2110
Forced inclusion of Carlson is the second method. Needless to say, the fan will be connected via a button. This is very convenient and in the summer, in the hottest heat, you can turn on the Carlson with one press of a button, which will rotate at low speeds.