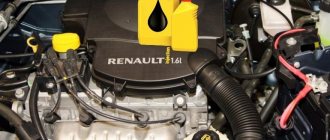
The VAZ 2115 line of cars was equipped with injection engines with electronic control units (ECU). The system collects readings from several controllers, and then adjusts the balanced operation of the engine. The coolant temperature sensor on the VAZ 2115 (DTOZH) is one of the main controllers, thanks to which the crankshaft speed, the proportion of the gasoline/air mixture, as well as the ignition are regulated. Next, we will tell you where the t° sensor is located on the 2115 Samara engine, what symptoms indicate its problems, and how to replace the defective device.
Attention! The VAZ 2115 has two types of water t° sensors. The first 1-pin - sends information to the instrument panel. The second 2-pin is responsible for starting/stopping the radiator fan and exchanging readings with the ECU. In this article we will talk about the second type (hereinafter referred to as DTOZH).
Replacement
On an injection engine, which is literally filled with all kinds of sensors, sometimes you need to pay attention to the fan control. If the check shows that the device is faulty, there is nothing left but to carry out the replacement procedure
https://youtube.com/watch?v=IWO7xJG5zGY
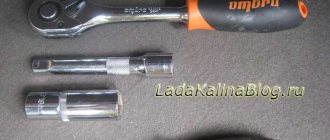
The work requires only a few tools and materials:
- 30 mm socket wrench;
- Container for draining the cooling liquid;
- Dry rags.
Having prepared everything you need, you can start replacing.
The first priority is to let the engine cool. Working on a cold engine is more convenient and safer. If hot coolant comes into contact with your skin, burns will occur.
Dismantling process
To replace, you do not need an inspection hole or overpass. For such work, these elements are not needed. A simple garage will do. Disconnect the negative terminal from the battery. Drain all coolant from the radiator. Do not drain the coolant from the cylinder block; this is not necessary. Remove the plug from the expansion tank of the cooling system of your injection engine. To drain antifreeze or antifreeze, unscrew the drain plug on the radiator. You will find it at the bottom of the radiator, and no tools are required for dismantling. The plug is easily unscrewed by hand. Place a pre-prepared container under the drain hole where the coolant will drain. Wait until the fluid flow stops completely. If you want to refill the same antifreeze, take a clean container
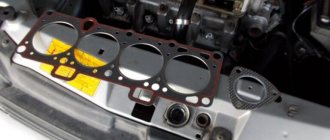
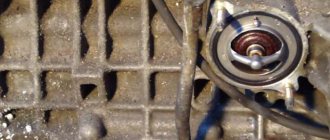
If the coolant is old enough and needs to be replaced, then the cleanliness of the container does not matter. Screw the plug back in. Disconnect the contacts from the fan sensor. Using a 30 mm wrench, the regulator is unscrewed. Twist carefully so as not to damage the plastic radiator container. Screw the new regulator in place of the old one. Be sure to insert a copper spacer under the new device.
Copper gasket in place
- Reinstall the fan control wiring.
- Fill the expansion tank with pre-drained antifreeze or antifreeze.
- Purge the system to avoid the formation of air pockets inside the system.
- Replace the negative battery terminal.
- Turn on the power unit and warm it up for a while to make sure the new sensor is working.
- If, when heated to the desired temperature, the sensor does not work again, you should check other elements that may be causing this behavior of the cooling system.
Replacement without draining coolant
If you do not want to spend a lot of time replacing the sensor on your VAZ 2114, you can do without the procedure of draining the coolant.
Replacing the fan control switch without the coolant drain stage requires experience and certain skills. Therefore, it is not recommended for a beginner to use this repair method.
- Using a 30mm wrench, start unscrewing the old sensor, but not all the way.
- Prepare a new sensor.
- Unscrew the old regulator completely with one hand, and quickly insert the new one with the other.
- In this case, a certain part of the antifreeze will leak out, but this is not scary.
- After replacement, be sure to thoroughly wipe all areas around the regulator with a dry cloth.
- Make sure there are no leaks after installing a new device.
It is especially important here to work on a cold engine, since when heated and under pressure after removing the sensor, coolant can get on you. The consequences of skin contact with hot liquid are hardly worth describing. After completing the work, thoroughly wipe the car so that the coolant does not remain on the engine and its components
This is especially true for rubber and plastic elements.
When finished, dry the vehicle thoroughly to ensure no coolant remains on the engine or its components. This is especially true for rubber and plastic elements.
Loading …
Symptoms of a problem
If you have problems with the operation of the fan (it turns on when the car is cold), problems with starting a “hot” engine, or too much fuel consumption, then the problem may lie precisely in the DTOZH.
Location of the coolant temperature sensor
You can easily check the performance of the part yourself by performing simple steps. Before replacing a part, you must first check the fuses. If everything is fine with them and current flows to the sensor, then there is only one diagnosis: replacement of the unit.
How to remove the coolant temperature sensor
To dismantle the old DTOZH in the VAZ-2115 with your own hands and then put a new model in its place, you need to follow the step-by-step instructions:
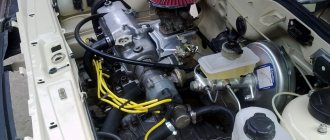
- The DTOZH is located on the cylinder head cooling inlet pipe, so in order to remove the old device, you need to remove the air filter.
- Disconnect the negative cable from the battery.
- Place a container under the radiator and drain the coolant.
- Disconnect the wiring from the meter.
- Using keys 19 and 21, slightly loosen the tightness, and then unscrew the VAZ-2115 DTOZH.
Which sensor is confused with the one connected to the ECU?
The sensor showing the temperature of the VAZ-2115, the injector is often confused with the indicator of this temperature. The latest product is different in that it displays information on the instrument panel; it has no other functions.
The sensor we are talking about in this article, as mentioned above, affects the operation of the engine and even sets the time interval for injection to the injectors. Thanks to the device, the fan of the vehicle cooling system is switched on in a timely manner. Therefore, if you notice that you are using too much gasoline and the VAZ-2115 engine is literally boiling, it’s time to check the serviceability of the device.
You can watch a video on how to check the condition of the DTOZH with your own hands below: https://www.youtube.com/watch?v=x75bSRazxhQ
A visual video instruction on how to change the old antifreeze temperature sensor in a VAZ-2115 to a new one is shown below:
Replacement instructions
To replace it, you need to buy a new VAZ 2115 coolant sensor. It should be checked for functionality before installation.
Replacement is a simple procedure and consists of the following steps:
- First you need to either drain all the coolant from the system, or only part of it.
- Next, you need to disconnect the wires from the meter.
- Then use the key to unscrew the device.
- Now a new one is installed in place of the removed meter. The seat should be thoroughly cleaned of dirt.
- Then the wires are connected. Next, antifreeze is added according to the level shown by the coolant level sensor.
Everything is done with the engine cooled down to avoid burns! After replacement, it is necessary to check whether fluid is leaking at the connection point.
For proper engine operation and economical fuel consumption, it is necessary to monitor the condition of the vehicle’s components and meters. The ability to replace the DTOZH with your own hands makes it possible to save money at a service station and troubleshoot problems in a timely manner if the device breaks down.
Signs of breakdown
Based on certain signs, it can be determined that the IAC is out of order and needs to be repaired or completely replaced with a new device.
These signs include:
- Floating idle speed;
- Problems with starting the engine; it starts with difficulty even with the gas pedal pressed;
- It is not possible to increase the speed even when the engine has warmed up sufficiently;
- The engine suddenly begins to stall when shifting into neutral;
- The speed decreases when you turn on energy-consuming devices - stove, air conditioner, audio system, headlights, etc.
https://youtube.com/watch?v=nBlCBIkFob8
But replacing the regulator is not always the right decision. In some cases, removing the old sensor and installing a new device in its place will not bring any results. And all because the culprits of the malfunction may be other elements, such as spark plugs or a fuel filter.
Functionality check
If the engine stalls, the speed fluctuates, or turns out to be high, you must definitely check whether the IAC is working.
To check, you will first need to dismantle the fastenings of the throttle assembly, and then carefully move it literally 10 millimeters.
https://youtube.com/watch?v=SSl-Wq7x-SU
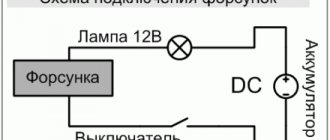
You will need a voltmeter with which you can check whether there is voltage going to the sensor and what its indicators are. In advance, connect the negative terminal from the battery to ground, and connect the voltmeter to the terminals marked with the letters A and D. Next, check the table.
| Indications | What do they mean |
| The voltmeter shows less than 12V | This means that the battery is most likely dead. |
| There is no data on the meter | The problem should be looked for in the wiring circuit or in the electronic engine control unit |
| Voltmeter shows 12V or more | Be sure to check the idle air control resistance. There are problems with him. The tester is connected to 4 pins. Normal resistance readings are 50 or 55 ohms |
Additionally, do a pairwise check. In this case, the resistance should be infinitely large. If the XX sensor shows different numbers, then the regulator requires mandatory and immediate replacement.
There is another way to check the functionality of the device. To do this, you need to remove the sensor and connect the block. Press the needle with your finger and watch it extend. When the ignition is turned off, the needle should push.
If there is no shock, you can still try to solve the problem by simply cleaning the device. Use a universal and all-powerful product called WD40. Wet the entire mechanism thoroughly with it and, armed with cotton swabs, clean everything you can get to.
When cleaning, pay special attention to the needle and stem
If these measures do not help, there is nothing else left but to replace the IAC.
Methods for checking the regulator for operability
Before checking the meter, you should first check the serviceability of the fuses, the integrity of the wiring and measure the incoming voltage, which should be 5V. If there are no wiring faults and the voltage is normal, then the meter is checked for resistance. To check it, you need to remove it (the author of the video is Car Design and Repair).
To check, you will need an electric kettle, a thermometer to measure the outside temperature, and a multimeter set to resistance measurement mode.
It is advisable to take an electronic thermometer not to measure the outside air temperature.
There are two ways to check:
- In the first case, the coolant temperature sensor with a thermometer is placed in an electric kettle. In this case, the device must be connected to the tester. The electric kettle should be plugged in and monitor the readings. As the temperature increases, the resistance should increase. When it becomes +15 degrees, the resistance should be 4450 Ohms, +40 - 1459 Ohms. At 100 degrees, the resistance reaches a minimum of 177 Ohms. If the values are different, this indicates a malfunction.
- If there is no thermometer, then the meter is checked after the water boils. When immersed in freshly boiled water, the multimeter should display a resistance of slightly more than 177 ohms. Otherwise the device is broken.
Checking with a multimeter
How to replace it yourself
Preparatory stage:
- Open-end wrench set to “19”;
- Rags;
- Additional lighting as needed;
- New "measuring device".
Replacement algorithm:
- We install the VAZ 2114 in the perimeter of the repair area;
- We turn off the engine, open the hood;
- We provide priority safety measures: block the rear row of wheels with wheel chocks, squeeze the parking brake;
- Remove the terminals from the DTOZH, unscrew the sensor with a key;
- We replace the device with a new one, screw it in, and put on the power terminals again.
We turn the key in the ignition, activate it, and check the functionality of the equipment. Add the missing amount of antifreeze as needed.
Sensors, their purposes and malfunctions
Let's now talk in more detail about each of the sensors, let's look at where they are and what they look like.
Idle speed (IAC)
The device is located in the throttle assembly. It is a small induction coil with a needle inside. Depending on the controller readings, one or another voltage is applied to the coil winding and the needle extends a certain distance into the throttle pipe, regulating the air supply. With this, the idle speed is adjusted.
Idle speed control
There is no indicator responsible for this sensor. Therefore, if this node fails, then this can be understood by the following “symptoms”:
- The engine stalls at idle or when changing speed;
- “Floating”, unstable idle speed;
- When turning on a cold engine, there is no increased speed.
To replace the sensor, you must turn off the power to the machine's wiring, completely disconnect the throttle assembly, and then remove the sensor from it, after first disconnecting the terminals that supply electricity to it. In place of the old sensor, you need to install a new device and place the throttle assembly in place.
Detonation (DD)
The knock sensor is located between the cylinders on a car engine and reacts when the fuel detonates inside the cylinder. In essence, it is a piezoelectric element. When gasoline detonates, the sensor converts the resulting vibrations into electricity. Current is supplied to the on-board computer and signals a fuel explosion. After this, the ignition timing is automatically adjusted.
If this type of sensor breaks down, the fuel begins to detonate in the engine. To check the device for functionality, you need to disconnect it using a key from its mounting location, connect it to a voltmeter and knock on it. If voltage was applied to the voltmeter, then the unit is working; if not, it is faulty.
To replace a device, you need to unscrew it from the seat using a key, disconnect the terminals from it and install a new device.
Oxygen (Lambda probe)
The oxygen sensor, also known as a lambda probe, is installed on the exhaust pipe close to the cylinders. It measures the amount of oxygen contained in exhaust gases and the environment. It only works when the engine is on, as it must be heated to function. When oxygen molecules hit the sensor, electricity is generated, which is supplied to the control unit. The on-board computer, based on sensor readings, regulates the supply of oxygen to the engine cylinders.
If the sensor fails, the following consequences occur:
- Unstable gasoline consumption: sometimes more, sometimes less;
- “Walking” speed at idle;
- A sharp drop in power when accelerating.
In order to replace this sensor, you need to turn off the power to the car, disconnect the wires going to the device, unscrew it with a key, and then put a new one in its place.
Crankshaft position (CPCV)
This sensor regulates the ignition of the combustible mixture in the cylinders depending on the position of the crankshaft. This position is determined by reading electromagnetic pulses from the toothed pulley of the electric generator. The sensor itself is located in close proximity to it.
Crankshaft position sensor
Symptoms of device failure may include:
- Idle speed instability;
- “Floating” speed;
- Power drop;
- Problems when turning on the engine.
At home, the performance of the sensor can be tested using a multimeter in ohmmeter mode. The resistance at the device contacts should be from 500 to 700 Ohms. If it differs greatly from these values, the sensor is faulty.
To replace the sensor, you need to turn off the power to the car's wiring, disconnect the battery, disconnect the electrical contacts from the device, and then unscrew the mounting bolt, remove the sensor and install a new one.
Camshaft position (CPRV)
This sensor, called DPRV for short, reads data from the camshaft. This happens with the help of a special gear installed on the shaft, on which two teeth are missing. This sensor is needed to adjust the ignition angle by the car’s on-board computer.
Camshaft position sensor
If this device breaks down, idling becomes unstable and the engine's fuel consumption increases.
The sensor is located to the left of the engine, near the air filter. Before replacing it, you need to de-energize the vehicle's wiring. Then you need to unscrew the sensor fixing bolt, remove it, disconnect the contact terminal, and then install a new device.
Coolant temperature (CLT)
The coolant temperature sensor (abbreviated as DTOZH) is located between the cylinder head and the thermostat. It measures the coolant temperature and transmits the resulting readings to the on-board computer. Based on this information, the rotation speed of the cooling fan is automatically adjusted, as well as the intensity of the pump pumping up antifreeze.
What temperature sensors are installed on the VAZ 2115
Modern cars are equipped with controllers to receive data of a certain content and send impulses to the electronic control unit for further processing and decision-making. Sensors are used in almost all systems and mechanical components of a vehicle to monitor:
- temperature of the environment in the system;
- amount of fuel;
- air pressure and flow;
- exhaust gas composition;
- outside air temperature.
There are not many temperature sensors installed in the VAZ 2115 car.
DTOZH (coolant temperature sensor).
It is characterized by simplicity of design and durability. It is a resistor that changes the resistance value depending on fluctuations in the temperature of the liquid phase: at low temperature readings, the resistance will be high and, vice versa.
The electronic unit uses information received from the thermostat to control the crankshaft speed and the air-fuel mixture ratio, as well as to select the ignition timing.
In most cases, temperature sensors fail due to internal problems, sending false information to the control unit. This can lead to problematic engine starting and incorrect operation of the machine in idle mode.
The thermocouple is a thermistor, providing information about the state of the antifreeze. When the element is strongly heated, its resistance sharply decreases, and when cooled, on the contrary, the resistance value will increase. The sensor is located next to the cylinder block near the thermostat. The impulse from the controller is transmitted to the car’s on-board computer and the radiator cooling fan.
Possible reasons for a non-functioning coolant temperature sensor:
- contact break inside;
- violation of tightness;
- breakage of supply electrical wires. They can be caught by a cable coming from the gas pedal at a very close distance.
As a result, the ECU assumes a decrease in temperature and gives an indication to pump in additional air. And after a while the driver will receive a message about antifreeze overheating. A faulty sensor in hot weather, giving false information to the unit, can cause a decrease in engine performance or its complete stop.
Mass air flow temperature sensor (MAF).
Another important monitoring device is the engine mass air flow sensor. It is installed directly in the fuel system of the power plant, namely in the incoming fuel line.
Most car owners consider this sensor to be the most important because it is responsible for proper fuel injection. If this element begins to act up, then the light on the dashboard starts to light up.
The main signs by which a sensor is judged to be faulty:
- reduction in engine power level;
- drop in speed when driving;
- fuel consumption increases;
- malfunctions in the power plant.
You can determine whether the device is operating correctly in the following ways:
- disconnecting the device from the system;
- during external examination;
- using a multimeter.
Often, the presence of contamination inside the device is a direct sign of a malfunction. As a rule, the problem occurs when the car owner forgets to change the air filter on time. Oil leaks also significantly reduce the life of the controller.
Then it is necessary to dismantle the sensor itself. It's easy to replace the sensor. Simply unplug the connector.
Although the sensor cannot be repaired, some drivers manage to clean it. To do this, you will need a soft brush, a Phillips screwdriver and carburetor cleaner.
DNTV
It was securely hidden behind the front bumper of the car, so much so that not every experienced driver is able to immediately detect it. It has the same functions as DTOZH and measures the air temperature “outside” the car.
| Gearbox type | Price in rubles | Price in rubles |
| New | Major renovation | |
| 01M | From 150000 | From 89000 |
| TF-61SN, TF-62SN | From 150000 | From 85000 |
| DQ250\02E, DQ500 (0BH\0BT) | From 150000 | From 88000 |
| *price indicated as of April 2021 |
Features of the DTOZH operation on the fifteenth VAZ model
The coolant temperature sensor (CTS) relates to the cooling system of the machine. Its purpose is to control the coolant temperature. While the engine is cold, the ECU sets an enriched fuel assembly; after the engine warms up, it becomes normal.
The device is a resistor called a thermistor placed in a metal case.
Device diagram
The resistance of the thermistor increases as the temperature decreases, and at the same time the voltage supplied to it will increase.
Causes of failure of the coolant temperature sensor
Structurally, the coolant sensor is quite simple, and accordingly, it rarely fails. Usually this happens simply due to its old age or mechanical damage. For example, corrosion of contacts and metal parts of the case may occur due to the fact that instead of antifreeze or antifreeze, ordinary water was poured into the cooling system (and even more so if this water is “hard”, that is, with a high content of metal salts). Also, the reasons for the failure of this device may be:
- Damage to the body. This can be expressed in various aspects. Often, leaks of coolant are visible, which flows from the threads of the sensor or its housing. Also, the electrical contacts and/or the thermistor itself may be damaged, which will produce an incorrect signal.
- Oxidation of contacts. Sometimes situations arise when, under the influence of fumes or simply from old age, the contacts on the sensor oxidize, so the electrical signal does not pass through them.
- Damage to the chip. In some cases, due to mechanical damage, the so-called “chip” may fail, that is, a group of contacts that is connected to the coolant temperature sensor. Simply put, the wires at the base of the connector fray. According to statistics from reviews found on the Internet, this is one of the most common malfunctions that occurs with the sensor and the corresponding system.
- Lost electrical contact inside the sensor. In this case, unfortunately, repair is hardly possible, since usually its body is sealed and does not allow access to the insides of the DTOZH. Accordingly, in this case the sensor only needs to be replaced with a new one.
- Violation of wire insulation. In particular, we are talking about the power and signal wires that go to the sensor from the electronic control unit and back. The insulation can be damaged due to mechanical stress, abrasion, or even simply from old age, when it “peeles” in pieces. This is especially true for those machines that are operated in conditions of high humidity and sudden changes in ambient temperature.
If it is possible to simply clean the body/threads/contacts of the sensor, then to restore its normal operation it is enough to carry out the appropriate measures. However, if the housing is damaged and/or the internal thermistor is damaged, then repair is hardly possible. In this case, you just need to replace the sensor with a new one. Its price is low, and the replacement process is simple and will not take much time and effort even for novice car owners.
Possible sensor malfunctions
If the DTOZH breaks down, the ECU considers that the engine temperature is zero, so it enriches the combustible mixture. A broken device must be replaced as quickly as possible. Most often, a meter malfunction is a calibration violation. In this case, the resistance does not change correctly, and since the control unit is based on meter readings, it does not work correctly.
You can identify a DTOZ malfunction by turning on the fan. It should turn on if permissible values are exceeded. True, there is also a fan switch sensor, which can also fail.
Thus, the fan may not turn on if:
- contacts have oxidized;
- wiring is damaged;
- sensors are faulty.
Incorrect operation of the DTOZ leads to increased fuel consumption, detonation, and high idle speeds. The most dangerous thing is if the engine temperature sensor is broken. In this case, the fan does not start, there is no cooling of the engine, it overheats, and as a result, the cylinder head may misfire.
How to check the serviceability of a part
After starting the internal combustion engine, the oil pump pumps fluid to all engine systems. From the crankcase through the filter, oil is supplied to each part, and the pressure gradually rises to operating condition. The light on the instrument panel lights up when there is insufficient pressure in the system. If the indicator does not go out longer than usual, then it is worth checking whether the sensor is working properly.
But a long-burning light can also indicate problems with low pressure due to other parts:
- The oil filter is clogged with dirt. The liquid entering the system is insufficient. The pump cannot create the required pressure. In this case, it is worth cleaning the filter and replacing it with a new one.
- Carbon deposits, which are washed away by oil from inside the engine, can also accumulate on the oil pan, clogging the oil receiver mesh and reducing its permeability. It is better to drain the lubricating fluid from the crankcase. If contamination is severe, replace with new oil.
- Oil pump malfunction.
- High wear of engine parts, in particular the crankshaft.
- Poor quality oil is poured - it is worth buying proven brands recommended by the car manufacturer (semi-synthetic 10W-40, volume - 3.5 l).
- Insufficient fluid level in the system - checked when the engine is cold with a dipstick, solved by adding oil.
If these reasons are considered, and the lamp on the panel is on, then the problem is a malfunction of the DADM (emergency oil pressure sensor) or the wiring from the device to the indicator. To check the device, you need to know where the faulty oil pressure sensor is located on the VAZ 2114. The part is located under the decorative cover of the internal combustion engine (internal combustion engine) on the left side of the engine compartment. The device is installed near the timing belt (gas distribution mechanism), on the right in the cylinder head (cylinder head), below the valve cover.
To professionally check the performance of the emergency oil pressure sensor, it is recommended to take the car to a specialized service station. But this is not always possible. Therefore, you need to know how to check the oil pressure sensor yourself. There are several options here:
- Visual inspection of the part - smudges in the place where the device is fixed may indicate a problem with the sealing washer. It is necessary to replace the ring and wipe the installation site. The fastener also leaks in the event of a malfunction of the excess pressure relief valve in the oil pump (the pressure in the system is above 0.8 atmospheres). If signs of a leak are found at the terminal attachment point, this clearly indicates the need to replace the sensor itself.
- The sensor is unscrewed and a pressure gauge is installed in its place. It is necessary to start the car engine and monitor the readings at idle speed. At normal oil pressure in the system, the parameter will be within 0.65 atmospheres. This indicates a faulty part.
- Without starting the internal combustion engine, with the sensor removed, it is necessary to crank the starter. Splashes from the device mounting hole indicate the presence of pressure in the system. But in this way it is impossible to find out its parameters.
- A new sensor is installed in place of the old device. If it works correctly, then the old device is faulty.
The oil pressure sensor on the VAZ 2114 cannot be repaired. But the low cost of the part will allow you to simply replace it with a new product.
In any case, if the pressure in the oil system is low or completely absent, it is not recommended to drive the car any further. This could lead to a serious problem with the engine.
How to make sure the sensor is working properly
First of all, let's consider the option when the temperature indicator on the instrument cluster does not work. Let us remember that a single-contact sensor screwed into the cylinder head is responsible for this. The verification procedure is as follows:
- Invite an assistant. No skill is required from him; his only task is to look at the instrument cluster.
- Open the hood of the car and, observing all safety requirements, make sure that the connector that should be placed on the sensor contact is in place.
- If everything is fine, ask the assistant to turn on the ignition.
- We remove the connector from the contact and short-circuit it to ground.
- If at this time the instrument needle moves to the right, it means that the coolant temperature sensor in the VAZ-2115 is definitely faulty.
- If there is no reaction from the pointer device, the sensor is working. In this case, you should test the instrument cluster and check the wiring.
If a sensor malfunction is diagnosed, it can only be eliminated by replacing it with a new one; the DTOZH cannot be repaired.
Do-it-yourself replacement of the VAZ-2114 coolant temperature sensor
Replacing the DTOZ is not difficult if the vehicle owner knows the design of the system designed to cool the engine fluid. In the 2114th model, the meter is located at the outlet of the motor, in the regular place of the outer contour of the thermostat housing.
For dismantling, the car owner will need the following tools and materials;
- wrench No. 19, an ordinary open-end wrench is sufficient;
- new and working DTOZH;
- if needed for replacement, use fresh antifreeze;
- if necessary, an additional light source may be needed;
- WD-40 lubricant;
- rags.
All work is carried out after complete cooling of all systems and components of the vehicle. The process takes place in the following order.
- Turn off the ignition and disconnect the battery from the terminals.
- Drain antifreeze to the level of the sensor. If the condition of the fluid is unsatisfactory, it will not cool and is completely removed from the system.
- To gain access to the device, the air filter is removed.
- At the output of the meter, the power supply wires are removed.
- Rozhkov No. 19 twists the DTOZH. Very often the threads “stick” to each other and it becomes difficult to disconnect the product. In such cases, penetrating lubricant comes to the rescue.
Installation of a new device is carried out in the reverse order of the above steps. On average, everything takes up to 15 minutes.
The main problems with DTOZH on the VAZ-2114
DTOZH is a full participant in the engine control system. Unlike the temperature indicator sensor, its purpose is to transmit readings to reading devices. DTOZH is a sensor that influences the correct operation of the engine and the VAZ-2114 vehicle as a whole.
- The device helps maintain the stability of all components of the car.
- Thanks to the device, accelerated warming up of the engine is ensured and overheating is eliminated.
Listed below are signs that may indicate that the TOZ sensor on the 2114th Zhiguli model has become unusable and requires replacement or repair.
- The engine starts to stall, runs with a delayed start, and malfunctions occur.
- The number of idle speeds decreases from 600-800 to 200-150. And instead of a stable rumbling, the engine makes sounds reminiscent of coughing and crunching.
- Increased gasoline consumption.
- Failure in the correct operation of cooling coolers: they turn off in warm weather and turn on in cold weather.
- The appearance of inclusions in exhaust gases. Dark smoke flies out of the chimney.
- The engine warm-up time increases.
- The engine gets very hot.
Purpose of dpkv
The crankshaft sensor on the VAZ 2115 belongs to the engine electrical control system. Based on the controller readings, the ECU arranges the ignition and the order of supply of the fuel mixture. DPKV, the second name of the element is a position sensor, monitors and transmits to the ECU the location of the crankshaft at any time. By processing information about the angular velocity and the frequency of its rotation, the ECU determines the moment of passing dead spots in the cylinders and calculates the operating mode of the following systems:
- ignition supply for each cylinder;
- injector opening time;
- gas distribution correction;
- control of adjacent systems of the output path, muffler, etc.
Crankshaft sensor 2115, an important component for the correct operation of the internal combustion engine, a faulty element leads to serious engine damage. Since the Lada Sputnik is equipped with injection engines, the part generates a signal to supply the ignition and to open/close the injectors; for carburetor engines, the unit only regulates the ignition operation. The sensor is located directly next to the crankshaft master or synchronization disk; the controller is mounted on a bracket screwed to the oil pump cover.
Checking the two-pin sensor
The responsibility assigned to the controller does not allow it to be checked as easily as the previous one. The fact is that the correct operation of the engine directly depends on it. With its help, the optimal quality of the working mixture is selected and the fan is turned on, and this happens at a certain, predetermined temperature. Changing its parameters can lead not only to additional expenses, but also cause, albeit indirectly, the failure of the power unit.
Checking the two-contact engine temperature sensor of the VAZ-2115 is more painstaking and time-consuming. It is done in the following sequence:
The VAZ 2115 line of cars was equipped with injection engines with electronic control units (ECU). The system collects readings from several controllers, and then adjusts the balanced operation of the engine. The coolant temperature sensor on the VAZ 2115 (DTOZH) is one of the main controllers, thanks to which the crankshaft speed, the proportion of the gasoline/air mixture, as well as the ignition are regulated. Next, we will tell you where the t° sensor is located on the 2115 Samara engine, what symptoms indicate its problems, and how to replace the defective device.
Attention! The VAZ 2115 has two types of water t° sensors. The first 1-pin - sends information to the instrument panel. The second 2-pin is responsible for starting/stopping the radiator fan and exchanging readings with the ECU. In this article we will talk about the second type (hereinafter referred to as DTOZH).
Replacement
Before repairs, it is necessary to carry out a number of preparatory measures. First, you should choose a level area for the machine. It can be in the garage, it can be outdoors. Secondly, prepare the tool: open-end and ring wrenches (19 mm, 13 mm, 10 mm, 8 mm). You will also need a capacious medical syringe of 100–250 ml, a 15–20 cm dropper tube and a 0.5–1 liter jar (so as not to drain the antifreeze/antifreeze). The sequence of actions is as follows:
- We wait until the engine cools down completely.
- Use a syringe to pump out the coolant from the expansion tank (100–200 ml).
- Unscrew the negative terminal of the battery (10–13 mm wrench).
- Unscrew the air filter housing fasteners (8 mm wrench).
- Carefully tilt the “pan” to the right.
- Disconnect the power supply from the DTOZH.
- We unscrew the sensor (19 mm wrench).
- We clean the landing area from dirt.
- We screw in the new DTOZH.
The assembly must be done in reverse chronology. There is no need to use sealant, since the copper O-ring fits perfectly and seals the connection. Let's start the engine. We check its operation and inspect the repair area for antifreeze leaks. The entire event takes 15–20 minutes.
How to understand whether the temperature sensor is working or not
It happens that one component of the temperature recording system malfunctions, and the driver immediately blames the sensor; in fact, it may be quite serviceable. Therefore, do not rush to throw away the old sample, first check it for serviceability:
- Place the seized coolant in the container where the drained coolant is located.
- Carefully and gradually heat the antifreeze, note that the container must be resistant to high temperatures, otherwise it will simply melt.
- Armed with a thermometer and a multimeter set to ohmmeter mode, monitor the readings on these 2 devices simultaneously.
For convenience, we have presented what readings a working VAZ-2115 antifreeze temperature sensor should give in tabular form.
| Temperature on the thermometer, degrees | Resistance, Ohm |
| 20 | 3520 |
| 40 | 1459 |
| 60 | 667 |
| 80 | 332 |
| 100 | 177 |
If the readings you took from the sensor differ from the data in this table, it means that the device really needs to be replaced; it is not working correctly. Some car enthusiasts are trying in every way to repair the device, but experts are skeptical about such experiments, stating that the sensor that records the heating temperature of the antifreeze cannot be repaired, but only completely replaced with a new product.
Inspection and repair
If you need to check the device, then take a small piece of rubber hose. On the one hand, a special adapter is attached to it, which corresponds to the diameter of the pump outlet, and on the other, an emergency engine oil pressure sensor. We begin to create artificial pressure using a pump. Be sure to record these pressure/resistance ratios. If the sensor readings and its characteristics match, then the device is working.
There is another way to check the sensor. You need to place it in a foam solution with a lot of soap. Hold the sensor there for a while. Take it out and connect it to the pump. Pressurize the device using a pumping unit. If bubbles come out of the folded joints, the device is unusable and leaks oil.
But if you are convinced of a malfunction, you need to replace the detector. The emergency oil pressure sensor for an eight-valve engine is located on the right side of the engine, and for a sixteen-valve engine it is on the left. Its location may vary depending on the model and make of the car. To remove it, use our instructions:
- Disconnect the wire from the sensor that goes to the dashboard;
- There is a thread underneath the sensor, so carefully unscrew it with a wrench. If it is torn off, then try to remove it using pliers;
- Afterwards you just need to remove the sensor from the hole.
Immediately inspect the aluminum O-ring. This may be the cause of oil leakage. Depending on the diagnostic results, you will need to buy either a new sensor or replace the seal. The process of installing a new device is the opposite of removing it. Be sure to check the tightness of the connection between the warning lamp and the oil alarm sensor. At the same time, the method of removal and connection largely depends on the brand of the alarm and the model of the car.
Photo - replacing the emergency oil pressure sensor
Sometimes the problem may lie in the way the sensor is installed. For example, the Land Cruiser Diesel is known for the fact that the device can “fall” into the pan, causing it to give incorrect readings. Sometimes the circuit has oxidized or the computer control wire for the detector has simply broken. Also, if the sensor is crooked, it may incorrectly measure the pressure level due to deformation of the membrane.
CHECKING SENSOR OPERATION
If any signs of a DTOZ malfunction are detected, you need to make sure that the problem lies directly in the device itself. To do this you need to do the following:
- We start the fourteenth and look at the dashboard; if, when the engine is cold, the indicator arrow shows the maximum temperature, you need to turn off the ignition, remove all contacts from the battery and disconnect the sensor power supply. Next, we connect the battery back and start the engine; if the indicator is at a minimum, the coolant temperature sensor does not work; if the indicator is at maximum, the problem must be looked for in the DTOZh contacts; perhaps they are not connected to the ground of the car;
- If, when the engine warms up, the coolant temperature gauge needle moves jerkily, most likely the problem is a blown fuse;
- If you have figured out the fuse and are sure that everything is in order with it, close the contacts of the device to the ground of the car; if the pointer has moved to the maximum, the coolant temperature indicator sensor on the VAZ 2114 needs to be changed.
A more accurate check of the coolant temperature sensor is performed using a multimeter that has an ohmmeter function. You can buy this device at any auto store for a small amount (about 400-600 rubles), which will cost you much less than checking the DTO at a service center.
To perform a test with a multimeter, the sensor must be dismantled; you can find out how to do this in the next section of the article. You will also need a kettle and a liquid thermometer that can withstand temperatures over 100 degrees.
Checking with a multimeter The check is performed according to the following algorithm:
- We switch the tester to ohmmeter mode and close the probes on the DTOZH contacts;
- Place the sensor in the kettle and start heating the water;
- Now you need to monitor and compare the water temperature and the readings on the multimeter screen. If the device is working properly, the indicators will be as follows:
If the actual data differs from the norm, the coolant sensor is faulty and must be replaced. In this way, it is recommended to check newly purchased devices before use, since factory defects are very common among domestically produced products.
What symptoms indicate problems with the sensor?
During long-term operation of the car, obvious and indirect signs may be observed indicating problems with the temperature sensor or its electrical circuit. The first ones directly indicate the need to check the functionality of the device:
- The engine heating indicator on the dashboard stopped working;
- the cooling fan stopped turning on, although the engine water jacket had already warmed up to 100 °C;
- antifreeze leakage from under the part body;
- The fan starts at random, including when the engine is cold.
If your car exhibits the listed signs of a malfunction of the coolant temperature sensor, then feel free to proceed to diagnosing it and fixing the problem, which will be discussed below. Indirect symptoms may indicate a breakdown of the meter or other elements of the cooling system or power unit. Here are the most common ones:
- Cold starting of the engine is difficult. The car starts, but immediately stalls, you need to make several repeated attempts. The cause may be a thermocouple, throttle position sensor, insufficient compression or ignition problems.
- Unstable operation at idle. In addition to the temperature meter, it is affected by the serviceability of the spark plugs, mass flow sensor, injectors and many other factors.
- The temperature is within normal limits, but the coolant begins to boil. If the thermostat fails or the level of antifreeze in the jacket decreases, then the readings of the device may differ from the real state of affairs.
The serviceability of an electronic temperature meter can be checked at home. If indirect symptoms of a malfunction are observed, the test will help to identify them or exclude them from a number of parts that are “under suspicion.” If you successfully check the problem, you will have to look elsewhere or contact the nearest auto repair shop.
Design
The VAZ-2115 temperature sensor is a thermistor with a negative temperature coefficient. This means that its resistance decreases as the engine warms up. This is very convenient because you can connect an ammeter, calibrated accordingly, in series and get a simple temperature indicator without additional transformations.
You will be interested: How dangerous is the new coronavirus?
This is exactly the scheme that is used in the fifteenth model. In addition, the fluid temperature sensor in the VAZ-2115 is connected to an electronic control unit (ECU). Thus, the computer receives information about the thermal conditions of the engine and makes adjustments to the composition of the working mixture. But that's not all. In the “tag”, as in any car with an injection engine, there is no separate sensor for turning on the fan. It is launched by a signal from the ECU in accordance with the data received from the DTOZH.