We often find out about the stove not working with the arrival of cold weather (this can be either mechanical or electronic breakdowns).
To deal with the main malfunctions, first you need to study the design of the “tenth generation” Lada heating system and the very principle of operation of the stove.
We have identified five main reasons why the stove does not work on a VAZ 2110:
- The temperature is not regulated or the stove operates at one speed;
- The dampers distributing air flows do not work;
- The cabin temperature sensor (mounted on the ceiling) fails;
- Malfunction of the ACS controller;
- Antifreeze leaking from the heater radiator.
As a result of simple diagnostics and checking of these components, we begin to repair the heater.
How to check the serviceability of the SAUO controller
To check the automatic control system, you will need a multimeter to measure the voltage on the pink and brown wires (turn on the ignition and turn the temperature knob). Depending on which controller is installed on the car, the voltage changes differently. On cars before 2001, a heater control controller 1303.3854 was installed; its voltage in the “min” position decreases after 13 ± 5 seconds, and is constantly supplied to o. Thus, when the output voltage of the ACS unit does not change, it is not working. On cars after 2003, block 1323.3854 and stove 2111-8101012 were installed.
When the controller malfunctions, the dampers may not work, but in order to diagnose other causes of the malfunction of the VAZ 2110-12 heater, you will have to disassemble the heater.
The VAZ 2112 stove does not work (reasons and repairs)
For any owner of a VAZ 2112, as well as any other car, the most unpleasant problem in winter is the failure of the stove. In this article, we will look at why the VAZ 2112 stove does not work (reasons and repairs). At the same time, you need to understand that we cannot cover all possible options in one publication, so we will present the most common breakdowns and ways to solve them.
Checking the dampers of the VAZ 2110 heater system
The stove system has 2 dampers. The upper one regulates the intake of cold air, and the lower one regulates the intake of hot air from the heater radiator. And when the drive mechanism or the damper itself breaks down, the stove can heat weakly, not heat at all, or fry too much.
Breakdowns of the stove damper can be of different types; firstly, the damper often gets stuck or jams, and secondly, the damper drive (micromotor-reducer) fails. In some cases, the damper warps or jams due to rust, since there are two types of dampers: the old and the new type, the old ones are plastic with a foam rubber seal, and the new one is metal with a rubber seal. Therefore, if you cannot hear the damper moving, you can move it by hand by removing the deflector in the central panel.
The problem with metal ones is that they often jam from rust, and plastic ones warp from exposure to hot air. So if, for example, warm air blows into the front window of a VAZ 2110, and hot air blows from the sides and into the legs, then most likely the damper has not completely blocked the air intake from the street. And when the dampers do not move at all, then you need to check the microdetector - the damper drive mechanism.
Principles of interior ventilation
Before you understand the causes of the malfunction, you should know the principle of the device and the rules by which ventilation is carried out. So:
- Air is supplied to the passenger compartment through the holes in the trim on the windshield : when the car is moving voluntarily, or forcibly with the help of a heater fan.
- Air escapes through the gaps between the inner door panels and between the upholstery, then through the holes located at the ends of the doors. The thermal insulation of the interior is improved by valves built into the openings, which allow air to pass out and prevent it from entering the inside of the car.
- The main part of the air is directed to the windshield; flows are directed to the central part and side windows through deflectors blocked by flaps.
- Air is supplied to the driver’s feet and the passenger sitting next to him through two pairs of deflectors: one pair is located near the floor, the other at knee level.
- Through a lining located on the floor tunnel and two air ducts built under the front seats, air is supplied to the feet of passengers in the rear.
- To prevent the entry of outside air, especially if the road section is polluted, smoky or very dusty, there is an air recirculation system. When the recirculation button is recessed on the instrument panel, the electro-pneumatic valve opens. In this case, under the influence of the vacuum that occurs in the intake pipe, the access of outside air is blocked by the recirculation system flap into the vehicle interior.
- The air temperature is regulated by the controller handle from 16°C to 30°C.
- Information about the temperature is read from its sensor by a unit with a microfan located on the ceiling. The unit turns on the micromotor when a temperature difference occurs, which controls the heater dampers. When the damper reaches the desired position, a signal is sent from the sensor to the control unit, which turns off the micromotor.
How to check the heater damper micro-reducer?
To check the damper drive, you will need an ohmmeter for measurement. In old SAUO controllers, the resistance at the minimum position of the blue dot should be from 800 to 1200 Ohms, and in new controllers - 3.5-5 kOhms. To check, you will first need to set the degrees to minimum and wait 15 seconds. Disconnect the controller connector and, with the engine running, measure the resistance between contacts X1.4 and X1.1.
At maximum temperature (red dot of the left handle), the multimeter should show 3.2-5 kOhm if the controllers are old and 1.2-1.6 kOhm if there is a new controller (1323.3854). If there is no resistance or if it does not change, it reports that the micro-gearbox shaft position sensor is faulty (the tracks are erased) or the ACS itself has simply failed and no voltage is supplied to the micro-gearbox.
To replace the microdetector, check the fan or repair the heater radiator, you will have to disassemble the stove.
Main Culprits
Let's try to find the culprit that may be causing the stove to not work.
temperature sensor
If the sensor works well, the damper will move depending on the value set on the regulator. You can check this by removing the deflectors and observing the movement of the damper.
Checking the operation of the coolant sensor at home with a multimeter
You should also check the resistance of the temperature sensor in the cabin itself. At 20 degrees the resistance should be 20 ohms, at 15 degrees - 25 ohms.
Stove controller
To check the operation of this element, you need to pull it out of its socket. Next, you need to turn on the ignition and turn the temperature switch knob. In this case, you should measure what voltage is on the wires in different positions of the regulator (these are brown and pink wires).
Disassembled stove controller
If everything works properly, then voltage on the wires will appear depending on the position of the switch itself. This voltage should subside on its own within 10-15 seconds after turning the regulator knob . If this does not happen, then the controller is acting up. It can only be completely replaced.
Gearmotor
Gear motor diagram with explanation
Due to the fact that it is out of order, the stove on the VAZ-2112 can also malfunction. It is quite difficult to check the operation of this unit. To do this you need to get into the engine compartment. After removing the sound insulation and frill, you will need to remove the wiper drive. There will be two connectors. The connector to which the brown and pink wires fit will be the connector of the gearmotor.
Initially, you need to check if the wires themselves are broken. To do this, you will also have to check the voltage at the gearmotor connector. If the wires are not broken, then there will be voltage.
To check the condition of the gearbox itself, you need to apply a voltage of 12 V to the connector. When it starts to spin, then everything is in order. If this does not happen, the part will have to be completely changed. If the gearbox spins, but the stove does not work, then the reason must be looked for in the wires and connectors. They may be oxidized.
The heater only works in one position
There are several options here. We'll have to check them all.
- Test the wires in the controller . They may break or burn out.
- The wires in the relay may have come loose . You need to look for the relay block in the engine compartment.
- An additional resistor on the heater housing may burn out . It is he who regulates the speed of the fan.
Cold air coming from the damper
This may be due to a faulty thermostat or air temperature sensor. It is also possible that the antifreeze level in the cooling system is low.
Checking the resistance resistor
The stove resistor has 2 spirals, the resistance of the 1st is 0.23 Ohms, and the 2nd is 0.82 Ohms. When both are activated, the heater electric motor operates at the first speed, but if the resistor operates at the first spiral, then the 2nd speed is activated. At the third, maximum fan speed, when the resistor is not used. When the electric motor is turned on without a resistor, the fan rotor rotates at the maximum 3rd speed.
In addition to the above malfunctions, the stove may also not work due to a low level of antifreeze, air in the cooling system, or a non-working thermostat or pump.
The stove releases cold air
The first thing to do is to determine the cause of the breakdown. This will help you find ways to solve it. But there are quite a lot of them, so let's look at the most popular ones.
One common reason is that only cold air comes out of the unit. This is the first sign that the stove is not working properly. The reason lies in the fact that the interior temperature sensor has broken down - it is responsible for what conditions are in the cabin and whether they correspond to those set by the driver. If it fails, then its readings are incorrect. Thus, the stove receives information that it is hot in the cabin. It will therefore produce cold air to make conditions more comfortable.
It's easy to fix this problem. There are several steps you need to take. First, remove the lampshade by unscrewing it. Then install a new sensor and check it for serviceability.
In this case, care must be taken not to reverse the polarity. Otherwise, the device will not work properly.
Also, the reason that cold air comes out of the stove can be a breakdown of the gear motor.
To determine it, you must first check the temperature sensor for serviceability. If everything is in order with the latter, then clearly the problem lies in the gearmotor. It is worth noting that this part, like the previous one, cannot be repaired. The only way to solve the problem is to replace it with a new one. This process is a little more complicated. It consists in carrying out the following actions. First, the wipers are removed. Then you need to unscrew the bolts that are responsible for fastening the frill and remove it so that it does not interfere. Thus, access to the element that has failed will be obtained.
Then you need to remove the gearmotor itself. To do this, its fastening is unscrewed. A Phillips screwdriver will help with this. Next, you should carefully disconnect all the wires. This should be done as carefully as possible so as not to damage anything. This is the only way you can completely dismantle the broken part. Using the same principle, but in reverse, install a new element. At the same time, make sure that the cut of the part clearly fits into the damper.
Possible causes of malfunction
Before carrying out repairs, you should carefully study the possible causes of a malfunction of the car heater fan:
- Burnt fuse. The real reason is the most banal and simple, but at the same time it is the one that leads to the greatest problems in solving the existing issue. Replacing a fuse turns out to be a very simple procedure that any motorist can successfully handle. Despite simple repairs, it is extremely difficult to detect the short circuit that led to the blown fuse.
- Oxidation of contacts that should be used to establish the operation of a car heater.
- The ignition relay does not allow the heater to turn on and start working successfully.
- An additional resistor can result in only the third speed being operational.
- A faulty car interior heating switch requires replacing the fuse.
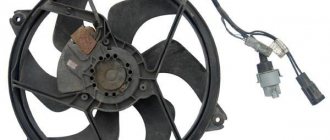
- A non-working electric fan motor is another important reason. In this case, it is necessary to replace the heater motor or at least check its contact with the vehicle. In most cases, the cause is hidden in a burnt-out electric motor, poor contact with the machine, or sticking electric motor brushes.
Regardless of the cause of the malfunction, you can successfully adjust your car heater. The most important thing is to understand what exactly is the cause of the breakdown or partial disruption of the functionality of the heating equipment.
If diagnostics have confirmed that the cause lies in the heater motor, replacing the heater fan most often becomes a mandatory task. How to carry out such a responsible procedure and how easy does it promise to be?
