09.28.2021 5 112 Transmission
Author: Victor
Problems when shifting gears in a car lead to a decrease in driving comfort. Malfunctions of this kind are usually associated with the transmission and errors made during its operation. In this article we will look at the reasons why first gear does not engage well on a Priora and how this problem can be solved.
[Hide]
Why are gears difficult to engage?
First, we suggest finding out what is the reason why reverse or first gear is sometimes or systematically difficult to activate.
If, when you press the clutch pedal and try to turn on the speed, a crunching sound is heard from the car’s transmission, this indicates problems in the operation of the unit.
The reasons why the gear is difficult to engage may be different, let’s consider them in detail:
- If it is difficult to switch between first and second gears, the problem may be that the clutch is not fully activated. On a VAZ Priora, the reason often lies in damage or disconnection of the cable on the pedal. This problem can be identified by diagnosing it. If the pedal is sunk into the floor, the cable must be replaced.
- Failure of the drive rod for controlling the gearbox activation mechanism.
- Damage or incorrect operation of the transmission's torque rod.
- Loosening the fixing bolts on the gear selector rod lever or on the hinge. It is necessary to determine the reason why the screws may have become loose.
- Making mistakes when adjusting the gear activation drive.
- Failure or damage to plastic components that are installed on the Lada Priora gearbox control drive.
- Mistakes made when adjusting the scenes. This unit on the VAZ Priora is designed to connect the gearbox to the selector in the car interior. As a result of long-term use, the plastic bushings on the rocker could wear out.
- Failure of synchronizer elements. These mechanisms are made in the form of brass bushings, which are used for more simplified gear shifting. Brass is a soft metal and will wear out over long periods of use. If the first and reverse gears are difficult to engage, and the reason lies in the synchronizing elements, when you try to change gear, an unpleasant crunching or grinding noise will be heard. When there are no problems with activating gears, but there is an uncharacteristic sound when the gearbox is operating, then in the future you will encounter difficulty changing gears.
- Failure of bearing elements due to damage or wear. This type of malfunction is not common, but over time the bearings wear out, so every car owner can encounter it. If a part breaks, one of the transmission pulleys is no longer able to rotate, which leads to problems when activating speeds. Usually we are talking only about the first gear.
- Failure of the box shaft. This unit is not subject to wear or critical loads during its entire service life, but it may break due to a manufacturing defect. Even minor errors made by the manufacturer when assembling the vehicle can lead to shaft failure. Because of this, the car owner will face the problem of not only difficulty engaging first gear, but also a breakdown of the transmission unit as a whole.
- The reason may lie in the car's engine mounts. The power unit hangs on them and is connected to the transmission. During long-term use of the car, the fastening fails or is unscrewed from its seat. This leads to sagging of the car engine or transmission. As a result of subsidence, damage to the backstage may occur.
- Failure of the clutch fork.
- Clutch basket malfunctions. This assembly breaks due to wear or damage to the petals. The “spider” of the basket can also fail. This element is a bearing mechanism that is fixed on several stretch marks. If they tear, they cannot fully stay on the basket, which leads to difficulties in changing gears. Due to damage to the paddles, it will be impossible to release the clutch disc. If the disk itself is worn out, this will lead to the appearance of wear. When the wear of the part is too great, it will be impossible to switch on the speed.
- Damage to the ball joint or spherical spring.
- Often such problems occur as a result of changing the transmission fluid. The main feature of the Priora gearbox is that the gear ratios in the first and second stages of the unit differ as much as possible. When the driver changes gears, it is necessary to wait for the input shaft to slow down during the process. If it takes longer than usual to slow down, it may be due to low viscosity lubricant or slight underfilling.
User Sergey Tsapyuk made a video in which he talked about the problem of poor gear engagement on a Priora.
VAZ 2110 gear shifts poorly: causes, troubleshooting, gearbox diseases
› Cars › VAZ ›
Like any car, the VAZ 2110 also has a gear shift mechanism. The VAZ gearbox is five-speed, activated by a lever located in the car's interior.
In order to be able to fix problems yourself, you need to understand a little about how exactly the switching mechanism works, which is why there are cases when some speed does not turn on or goes out. And also know how to fix it on your own.
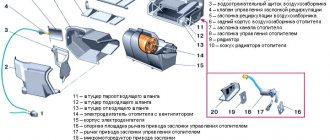
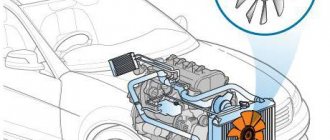
Checkpoint diagram
The gearbox design is as follows:
- To ensure gear shifting, the gearbox contains a primary shaft consisting of a gear block. They are constantly engaged with the drive gears from the first to the fifth speed (that is, those that are oriented towards driving forward);
- The secondary shaft is equipped with a drive gear for the main transmission, and it also has gear synchronizers that ensure forward movement of the driven gears. There are also bearings plus an oil sump;
- VAZ two-satellite differential, with the driven gear of the main gear attached to the flange of its box;
- the gearbox drive consists of a gear shift knob, a ball joint, a selector rod, a rod, gear selection mechanisms, and gear shifting mechanisms;
- Jet thrust is designed to protect the gearbox from flying out of gear. Its ends are attached to the support and the power unit.
Gear shift drive diagram
How speeds are selected
A separate important gearbox component is the gear selection mechanism. It has a special speed selection lever, as well as two locking brackets. One arm of the selector lever turns on the forward stroke, the second serves to turn on the rear.
Adjustment
On a VAZ 2110, it is not so uncommon for the gears to shift poorly or get knocked out. A mechanism for adjusting the speed selection drive is provided specifically for this purpose.
Adjustment may be necessary if:
- the box was recently removed for repairs;
- one of the gears falls out;
- the speeds do not engage well or simply get knocked out when the car is moving.
If you have one of these problems, try making adjustments first. Its sequence:
- Under the bottom of the VAZ 2110, find and slightly loosen the nut on the bolt that tightens the clamp that secures the rod designed to control the gearbox;
- Use a screwdriver to slightly move apart the grooves in the end of the rod and the resulting gap on the clamp itself. This is necessary to ensure easy movement of the rod in relation to the gear selection rod. Place the rod in the neutral position;
- Release the shift knob from the cover in the cabin;
- Align the lever using a special template. This is done like this: install a template in the window of the rear speed lock bracket lining. After this, insert the lever axis stop into the groove of the template, pressing it without unnecessary force in the transverse direction;
- Then adjust the axial play of the rod in the rear direction, and its axial play by turning to the left;
- Install the clamp, not reaching a few millimeters from the end of the rod. Then tighten the clamp thoroughly with the bolt.
Repair
If the described adjustment did not help you, you need to remove and disassemble the VAZ 2110 gearbox. Pay special attention to the fact that the gears with which the first and second speeds are engaged often knock out. Be sure to check each fastener.
They are made in the form of springs, there are three of them. The first clamp is long, it is responsible for first and second gears. Second is medium, for third is fourth gear. For the fifth, the shortest clamp is used.
How to fix the problem
If the gearbox on a Lada Priora refuses to work normally, it is necessary to disassemble and repair the unit. Below are instructions that will prompt you to solve some problems.
How to remove manual transmission
Dismantling the transmission is carried out as follows:
- Drain the gearbox oil. Drive the car onto a flat surface, into a garage with a pit or onto an overpass. Climb under its bottom and find a plug for draining the working fluid; place a container under the hole into which the “working off” will be drained. Unscrew the bolt with a wrench and wait about one hour until the fluid is completely out of the system. After this, the transmission is dismantled.
- The next step is performed in the salon. Under the control panel there is a fastening nut of the cable housing; it is connected directly to the pedal. Unscrew the nut with a size 8 wrench. After unscrewing, you can remove the stop from the bracket.
- Remove the locking assembly, as well as the housing of the driven pulley lining wear compensation mechanism; these components are connected to the so-called pedal pin. To dismantle, use a screwdriver with a Phillips head; the tool must be used to pry off the mechanism. Remove the plastic bushing from the pedal and inspect it carefully. The presence of damage and defects indicates the need to replace the part.
- Then the seal on the cable sheath is removed; this component is located in the engine compartment. Remove the tip from the fork by moving it forward in advance as the machine moves.
- Unscrew the nut that secures the tip to the bracket in the gearbox. This nut will require a 17mm wrench. Remove the cable end from the fastening hole. After this it can be removed. Remove the plastic plug and remove the plug with wires from the speed controller.
- Unscrew the three screws securing the crankcase cover; this will require a 10mm wrench. The cover is removed. A reliable support should be placed under the power unit of the machine. Unscrew the nut that secures the rear of the engine mount to the bracket; this will require a 15mm wrench.
- Remove the upper limiter of the rear engine mount cushion. Unscrew the screws that secure this element to the car body. Remove the cushion along with the restraint device.
- Unscrew the nuts securing the rear motor mount to the transmission. To unscrew, you will need a 13mm wrench. The number of nuts depends on the year of manufacture of the car. Using a size 8 wrench, unscrew the upper fixing screw, and then remove the rear support bracket.
- Remove the plastic plug and remove the block with wiring from the reverse optics activation mechanism. Unscrew the screw that secures the gear shift device hinge on the rod; this is where the speed selection takes place. To dismantle, use a 10mm wrench.
- Unscrew the screws securing the torque rod. Also unscrew the bolts that hold the front wheel hubcaps and remove them using a flat-head screwdriver. There are rubberized seals on the removed parts; be careful not to lose them.
- Using a 30mm wrench, remove the wheel retaining screws and wheel nuts. When performing this task, the vehicle must be on the ground and not on an overpass or lift. Secure the vehicle in place by lifting the parking brake lever. Support the rear wheels.
- Using a jack, lift the front of the car and remove the wheels. Then completely unscrew the hub nuts and remove the washers installed under them. Dismantled parts (we are talking about nuts) must be replaced. Disconnect and remove the rotating devices from the suspension arms, before doing this you should unscrew the mounting screws, use a 17 key. Remove both drives by pressing them out of their seats. Place a support under the gearbox to avoid damaging the unit.
- Unscrew the screws securing the transmission to the motor; this will require a 19mm wrench. Then move the unit as far as possible. The gearbox removal procedure is complete. Assembly is carried out in reverse order.
Video “How to solve the problem of poor gear shifting?”
The Avto-Blogger channel made a video that describes all the nuances of poor gearing in a car when the engine is running and gives recommendations for solving such a malfunction.
I've read a lot about this in the last hour and am confused about what needs to be done. And my situation is the following, I squeeze the clutch, the speed is tight... but it turns on (but very hard) with the second one in the same way, I also remember the words of the master at 15 thousand like turn it on through the second one), so now it’s not possible to turn it on through the second one, well, if it does to overcome this tight inclusion, then the subsequent times 1st and 2nd come in so that it breaks into a smile (very easily), there used to be moments when if you switched super sharply there was a crunch, for example from 1st to 2nd, but somehow I got used to it and everything went away, oil in korobos it is replaced by semi-synthetics.
Manual transmission: What you need to know when shifting gears
The result is premature wear of the clutch disc. In order to keep the car from rolling on an incline, you need to depress the brake pedal. In order to start, of course, you will have to press the clutch and smoothly press the gas, releasing the clutch. In this case, you will reduce the load time on the clutch basket and release bearing. You can also hold the car by maintaining certain engine speeds, catching a certain moment when you release the clutch and press the gas.
We recommend: Car wheel balancing
Surprised? But in fact, this advice is really very important, because having a habit of leaving your hand on the gear shift knob can lead to premature transmission failure. If you most often leave your hand on the gearbox when stopped in a traffic jam or at a traffic light, then the first gear of the manual transmission suffers the most. Remember that by placing your hand on the gearshift knob, you create extra pressure on it, which is transferred to the gearbox. As a result, excess pressure on the handle can lead to unfree shifting of the desired gear. This can damage the gear shift knob as well as the transmission itself.
Why might there be such interruptions?
The gearbox of any car is one of the most important components of the vehicle. Breakdowns in it can occur both due to improper operation and due to driving on bad roads. If on your Priora the first gear does not engage well or does not engage at all, then this is due to a breakdown of the gearbox.
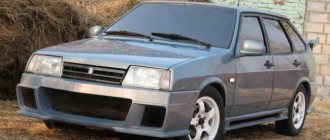
VAZ Priora car
If your car was purchased second-hand and not from a showroom, then there is nothing to be surprised about. In any car, sooner or later the problem of unstable gear shifting may arise. Moreover, if at the beginning of the problem the speed is turned on, but poorly, then in the future the gearbox lever may not respond at all to the driver’s attempts. Of course, this is not very pleasant, because not every car enthusiast can move from a stop in second gear, and the situation on the road does not always allow this.
Let's consider the main malfunctions that may occur when it is difficult to change gears in a VAZ 2170 car:
- incomplete disengagement of the clutch. On Priors, the mechanical clutch cable can fly off. This can be determined very quickly: if the cable breaks, then the clutch pedal in the car will simply be recessed into the floor;
- failure of the gear drive control rod;
- failure of jet thrust;
- the fastening screws on the hinge or lever of the speed selection rod have become loose for some reason;
- incorrect adjustment of the gearbox speed shift drive;
- The service life has expired or the plastic parts in the gearbox control drive have failed;
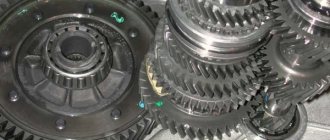
VAZ Priora gearbox disassembled
- the link is poorly adjusted. This device in the car performs the function of connecting directly the gearbox with the lever in the cabin. Also, the plastic bushings on the rocker may wear out;
- synchronizer malfunction. Synchronizers are brass bushings designed for easier gear shifting. Because brass is a soft material, it can wear away over time. To understand that it is the synchronizers that have failed, when it is difficult to switch gearbox speeds, you will regularly hear an unpleasant crunching or grinding noise. If you only hear sound from the gearbox, but the gears are switched without problems, then be prepared to soon encounter difficult gear shifting;
- bearing failure. The problem is not so common, even rare, but nevertheless occurs. If the manual bearings are jammed, then one of the gearbox shafts may stop rotating, as a result of which not all speeds can be engaged. As a rule, this problem only appears when first gear is engaged;
- gearbox shaft malfunction. This element is not subject to physical wear or heavy loads, but the problem may be a manufacturing defect. If minor errors were made during its installation at the factory, the shaft will fail. In this case, not only may it be difficult to engage the first gear, but the entire gearbox may fail. As a result, the vehicle owner is subject to expensive repairs.
It’s worth noting right away that there is no way to determine a faulty gearbox shaft or bearings at home. Only a competent technician at a service station with expensive specialized equipment will help you do this. Therefore, if you encounter problems shifting the gearshift lever, then you can only hope that the problem lies in the adjustment.
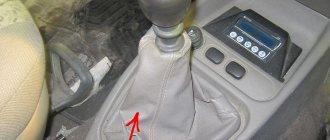
Gearbox lever of a VAZ Priora car without a casing
VAZ or foreign car - is there a difference?
To begin with, we note that the operating principle of the main components is the same for all cars. And such a malfunction can happen to anyone, be it a foreign car or a domestic car. The only difference is the type of drive. On rear-wheel drive vehicles, the lever is connected directly to the gearbox.
On front-wheel drive cars, the engine is located transversely relative to the body. Therefore, to operate the box, a rocker or cable drive is used. The latest VAZ models (including Kalina and Vesta) use the latter type of drive. It is more reliable, but it also has problems. If the gears do not engage with the engine running (including Niva), do not panic and take the car to a service center. Perhaps the reason lies in trivial malfunctions that can be fixed on your own.
What to do?
Next, we will look at several ways to solve the problem that can be done at home. The process of repairing a transmission is not such a simple task, so if you are not confident in your abilities, then do not try to do it yourself. It is better to contact specialists, because if you make even a small mistake, it can develop into more serious problems in the future.
Tools
Regardless of what kind of breakdown you have, prepare in advance all the necessary tools that you may need to disassemble the gearbox:
A set of tools for dismantling and repairing the VAZ Priora gearbox
Step-by-step replacement instructions
Removing the manual transmission
- First of all, before disassembling the gearbox, it is necessary to drain the transmission fluid from the gearbox. To do this, find an oil drain hole under the bottom of the vehicle, place a previously prepared container and unscrew the plug. Wait 40-60 minutes until the oil is completely drained. Now you can begin dismantling the gearbox.
- To begin, find in the cabin under the instrument panel the fastening nut of the clutch cable housing, which is connected to the pedal. It needs to be unscrewed. To do this, you will need an "8" socket or wrench. When the nut is unscrewed, remove the stop from the bracket.
- Then you need to dismantle the locking element and the housing of the wear compensation device for the driven shaft linings from the clutch pedal pin. To do this, take a slotted screwdriver and pry out the element.
- Now remove the plastic bushing from the pedal and then inspect it. If the bushing shows signs of wear or any physical damage, the bushing should be replaced. Before installing it directly, take “Litol” and lubricate the element so that it does not become dry.
- Next, dismantle the rubber seal of the clutch pedal cable sheath - it is located in the engine compartment.
- Then you need to remove the end element from the cable fork, after pulling it forward in the direction of travel of the vehicle.
Diagnostic methods
Do not start the situation if you notice that the box is not working correctly. Carry out the diagnostics yourself:
- Check the oil level and condition.
- Listen to the engine at idle and while driving. As a rule, defects detected by ear can be eliminated by a simple repair of the Priora gearbox in a garage in a couple of hours.
- Check electrical wiring and line pressure.
- Carry out a parking Stell test by manipulating the levers (don't forget to secure the car's wheels with shoes).
In difficult cases, remove the unit completely, but only if you are confident in your knowledge. It is safer to take the car to a car service center, where there are stands, computer diagnostic equipment, special measuring instruments, machines and tools for repairs. There they will find defective components, determine the degree of their wear, and recommend the type of repair.