Domestic cars are always in constant demand in Russia. On the one hand, these are affordable means of transportation, on the other hand, their ease of maintenance allows you to carry out repairs on your own. One of the most serious breakdowns of the Lada Kalina can be considered pump defects. Indeed, if the pump is out of order, you cannot operate the car - there is a high probability of the motor jamming. Therefore, Kalina owners should pay special attention to the performance of the pump and the engine cooling system as a whole.
Why do you need a pump in a car?
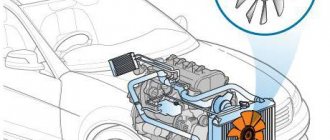
The pump (or water pump) on the Lada Kalina is a device that circulates coolant. The pump starts working together with the power unit, that is, after the moment of ignition, the pump also starts working.
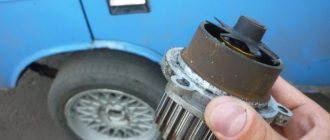
The circulation of antifreeze/antifreeze in the system is ensured by the rotation of the pump shaft on which the impeller is located . The impeller blades create the necessary fluid pressure, due to which the motor is cooled uninterruptedly. However, if there are any defects in the pump, antifreeze stops being supplied to the cylinder blocks, so the engine can “boil” and fail. Therefore, for high-quality and timely cooling of the engine, it is necessary to monitor the condition of the pump.
Original pump, which is installed on the Lada Kalina
How to monitor the functional condition of the pump?
This is the key difficulty of the issue under consideration: the “symptomatic range” for the imminent failure of the cooler is extremely meager. For most drivers, a pump breakdown becomes an unpleasant surprise, as car owners do not know how to identify signs that can help determine the imminent “death” of the unit. Let us immediately note that the pump cannot be repaired. The only way to restore the functional state of the cooling system is to install a new unit.
According to automakers, the pump should run smoothly for 180 - 200 thousand km. However, they change it earlier - during routine or major maintenance of the timing belt (usually they do this: replacing the timing belt is accompanied by replacing the cooling blower). When approaching the specified mileage interval, we recommend paying attention to extraneous sounds in the engine compartment. A worn-out pump makes cyclic clicking sounds, sometimes grinding. The driver can independently change the service interval: most “experienced” drivers are convinced that the pump needs to be changed at 80 thousand km in order to minimize timing belt wear.
How to determine if the pump is faulty on Kalina
The first sign that the water pump on a car has started to work incorrectly can be considered extraneous noise in the engine compartment while driving.
Lada Kalina cars are equipped with water pumps with a strictly fixed service life - 60 thousand kilometers or 48 months of operation (whichever comes first). Therefore, when this period approaches, it is recommended to change the pump, even if there are no signs of malfunctions yet.
However, in some cases, the pump may fail earlier than stated. You can check the functionality of the water pump in the simplest way:
- Warm up the engine to the optimal temperature. After warming up, use a gloved hand to pinch the upper pipe that comes from the radiator.
- If the pump is working properly, you will immediately feel the fluid pressure in the nozzle. Accordingly, the pump works as coolant circulates through the system.
- If pressure is felt, but weak, or not at all, it will be necessary to proceed to a detailed inspection of the pump.
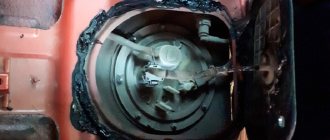
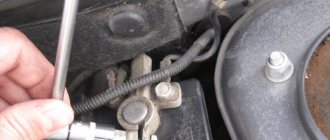
- You will have to remove the timing case and visually assess the external condition of the pump.
- If there is a leak of antifreeze at the landing site, it means that the oil seal (seal) has failed.
- If a roar is heard while driving, we can conclude that the pump shaft bearing has worn out. You can pump the drive part of the pump gear by hand. If there is play, the pump will not work correctly.
Loss of pump tightness leads to disruption of fluid circulation in the system
Thus, it is possible to identify pump malfunctions without removing it from the car. The procedure is quite simple and accessible even to a novice driver.
Pump Lubrication Procedure
When drivers talk about lubricating the pump, they mean lubricating the water pump bearings. There are two bearings installed on the shaft, which require a small amount of lubricant to operate correctly. Experienced drivers lubricate the pump without removing it from the car:
- Remove the gas distribution casing.
- Clean the pump mounting area and the pump housing itself from deposits, dust and dirt.
- Apply Litol-24 or VNIINP-207 with your finger to the joints of the housing.
A better lubrication procedure will be carried out during pump repairs, when faulty parts are replaced. However, this procedure can also ensure a normal amount of lubricant in the bearings:
In principle, it is possible, but it is not convenient to remove the oil seal. Remove the oil seal and lubricate the cage with warm lithol, it covers the balls there but there are slots in it, so it will still get on the balls, although there may be lubricant there
A N
https://www.lkforum.ru/showthread.php?t=49205
Diagnostics of the LADA Kalina engine cooling system
When operating a vehicle, the technical condition of the cooling system can be assessed by looking at the coolant temperature gauge and the fluid level in the expansion tank. A decrease in coolant level is usually caused by a leak in the system. Some cars have a coolant level sensor installed. When the level drops to the MIN mark, the corresponding indicator lamp in the display unit of the on-board monitoring system lights up.
| 1. Checking the coolant level in the expansion tank . The liquid level should be 25 - 30 mm above the MIN mark on the expansion tank body. If the fluid level is at the MIN mark or below, add coolant to the reservoir |
Warning!
| The coolant level should be checked on a cold engine. A slight increase or decrease in the coolant level during heating and cooling of the engine is not a malfunction. This is due to the thermal change in the volume of the liquid. |
If you have to regularly add coolant, you should check the tightness of the cooling system.
2. Check the tightness of hoses and connections of the cooling system . Inspect the engine compartment and pay attention to the condition and tightness:
- Expansion tank hoses;
- Radiator drain holes and hoses;
- Heater radiator hoses;
- Engine cylinder block;
- Places for installing temperature sensors;
- Thermostat hoses.
3. Checking the integrity of engine cooling system elements.
- Expansion tank housing;
- Engine radiator;
- Heater radiator;
- Connections between the coolant pump (pump) and the cylinder block. We also check that there is no leakage of liquid from the drainage hole of the pump (located at the bottom of the pump), indicating wear of its seal.
There should be no coolant leaks anywhere.
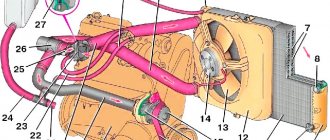
| 4. Checking the thermostat . We control the coolant temperature using the indicator on the instrument panel, and the circulation of the liquid in small and large circles by touch, by changes in the temperature of the hoses and pipes of the cooling system (in the photo the air filter is removed for clarity). |
Comment
| If the engine cooling system is working properly, then when the coolant temperature is less than 90 ° C, the main thermostat valve should be closed and the coolant should circulate in a small circle. As a result, the lower radiator hose and the radiator itself will be noticeably cooler than the thermostat housing, through which hot coolant circulates. When the coolant temperature reaches about 90 °C, the main thermostat valve will open and a gradually increasing flow of hot liquid will begin to flow into the radiator. In this case, first the radiator and then its lower hose will begin to heat up. |
Once the temperature reaches 102 °C, the main thermostat valve will fully open and all fluid flow will circulate through the radiator. In this case, the radiator will become hot in the upper zone and slightly cooler in the lower zone.
We leave the engine running until the engine radiator fan operates. When the coolant temperature rises to the point where the temperature gauge needle approaches the red zone, the electric fan should turn on, and when the temperature drops, it should automatically turn off.
Replacing the pump on a Lada Kalina (8 valves)
On an 8-valve Kalina, you can change the water pump yourself. However, if the car owner does not have minimal experience in car maintenance, many questions may arise. For example, which pump to buy, how to choose the right tool, and is it worth draining the antifreeze from the system completely?
Which pump to choose
When the time comes to change the water pump, car owners begin to look at car dealerships for a worthy replacement. But which pump to choose so that it lasts as long as possible and does not cause problems for the owner?
It is important to choose original factory products. This is immediately evident from the packaging - an uncreased box, a warranty card, the date of manufacture and service life are indicated. Original pumps are necessarily packaged in protective film and have holographic stickers.
In contrast, it will not last long - after 10 thousand kilometers the pump will need to be changed again.
At AVTOVAZ, designers install a TZA water pump on the Kalina. It has a long service life; drivers often change the pump only after 100 thousand kilometers. As an alternative, you can install more expensive German-made Bosch pumps - they are also famous for their quality and durability.
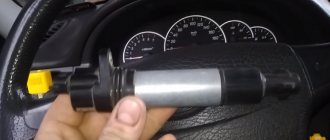
Where is the water pump located on Kalina?
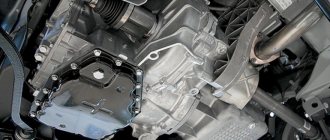
Due to the fact that the pump is driven by the timing belt, it is part of the gas distribution mechanism. That is, you need to look for the water pump on the Lada Kalina from the side of the engine itself. Visually, before removing the belt, you can only see the pump pulley, which is involved in the gas distribution system.
The pump on the VAZ is located in the timing device
Preparing tools
It is recommended to prepare a standard set of tools for removing bolts and unscrewing nuts. You will also need a 6-point hex key. To drain the antifreeze without contamination and inconvenience, it is better to immediately find a container for draining and a rag to blot up any drops that have fallen on the engine elements. To ensure reliable installation of the pump, you can use a sealant with good thermal conductivity properties.
How much coolant to drain/fill when replacing the pump
In any case, before dismantling the old pump, you will need to drain the antifreeze from the system. This is necessary in order to reduce the pressure in the hoses and not be injured during sudden releases of liquid.
If the water pump has not been changed for a long time, then it is advisable to immediately drain the entire volume of antifreeze from the system and replace it with a new one. If the car owner has recently filled in new coolant, then there is no point in completely draining it: just disconnect the hoses from the expansion tank and wait until the antifreeze comes out.
To make it easier to fill a large volume of coolant, drivers usually use funnels
Operating procedure
First of all, you will need to install the machine on a flat surface. You can drive the Kalina into the inspection hole, you can simply lift the front right part on a jack. It is recommended to make sure that the car is securely secured; it is better to place additional supports under the body beam.
When dismantling the pump, you will need to remove the timing belts.
The work of replacing the pump on the Lada Kalina is carried out according to the following instructions:
- Remove the engine splash guard.
- Disconnect the negative terminal from the battery.
- Unscrew the cap from the expansion tank and immediately remove the plug located on the cylinder block. Wait until the coolant drains out.
- If all the antifreeze is drained, then unscrew the cap from the radiator and place a container under the drainage area.
- After the antifreeze has been drained, screw all the plugs back on.
- Remove the protective cover from the timing belt.
- Loosen the belt by slightly tightening the timing pulley.
- Remove the drive belt.
- Remove the four bolts that secure the pump pulley to the cylinder block.
- After removing the pulley, unscrew the last screws securing the pump.
- Pull the water pump out of its socket along with the gasket.
- Clean the planting site from adhering dirt and antifreeze drips.
- Apply heat-resistant sealant to the edges of the hole and install a new gasket on it.
- Place a new pump on the gasket and then proceed in the reverse order of removal.
Video: how to replace the pump yourself
When working with timing rollers and pulleys, it is recommended to immediately fix the working position, since the installation process can be very drawn out due to the length of time it takes to set all the marks.
Cavitation, bearing damage
When considering the symptoms of a motor pump failure, you should pay attention to such a negative phenomenon as cavitation. This is the process of formation of air bubbles in antifreeze. They damage the internal surfaces and individual parts of the pump. As a result, scratches remain on them. Then they rust.
Air bubbles appear in the pump inlet. When the pressure in the system increases, they are destroyed. This process causes significant system damage and can cause engine failure. Therefore, it is better not to save money and buy a new pump. It will be much more reliable than a refurbished pump.
It is very important to install it correctly in its original place. Particular attention is paid to seals and proper tightening of fasteners. In some cases, a special sealant is used for joints. Eliminates leakage. However, it is not always possible to use the presented material. This will prevent you from later loosening the engine mounts to secure the timing belt on some car models.
If you know the signs of a bad pump, you can replace it on time. First you need to remove the cover from the timing belt. If necessary, the tensioner will need to be loosened and removed. Then reduce the mounting force on the generator. Its belts and timing belt have been removed. The hose from the pump can be disconnected. Then the antifreeze is drained. After this, you can remove the protective cover and pump.
After installing the new pump in place, align the alignment marks. This is necessary because the crankshaft can move relative to the camshaft.
How to connect an additional pump on the Lada Kalina
Most modern cars have two water pumps installed at once. This ensures the highest quality engine cooling in any operating conditions. You can also install a second (additional) pump on the Lada Kalina, and this work takes a little time and effort. The most difficult thing is to get to the place where the pump is fixed, since you will have to disassemble many engine compartment parts.
An additional pump is needed not only for high-quality engine cooling. Mostly, Russian car owners install a second pump to improve the operation of the heater in the cabin during the winter - the car warms up faster.
In order to install the second pump on the Kalina, you will need:
- new pump;
- hoses of different lengths;
- fasteners (depending on where exactly it will be easier and more convenient to screw the pump);
- sealant.
The essence of the work is to organize a small circle of coolant circulation throughout the system.
Doing the work yourself
The first step is to assemble the assembly itself from the materials that are at hand. The pump is connected to two hoses (the short one will provide fluid removal, and the long one will provide supply). The hoses are attached to the two ends of the pump with clamps. Then follow the following procedure:
- The coolant will need to be drained. You can simply empty the expansion tank without draining the entire volume of antifreeze.
- Near the bottom of the car, find two hoses (one leads the antifreeze to the stove, and the other takes it away from it). Disconnect the outlet hose and instead attach the assembled structure with an additional pump.
- After this, attach the pump to the gearbox housing. Depending on the availability of fasteners, you can place the device on brackets or secure the pump with metal clamps.
In this case, the hoses are connected with clamps, and the pump itself is mounted on a metal bracket
At the end of the work, you will need to plug all hoses and plugs and fill in new antifreeze.
Video: second pump - preparation and installation
Thus, on Lada Kalina cars, the owner can independently change the water pump without resorting to the help of service station specialists. This will save money and also allow you to independently control the operation of the pump, taking into account the knowledge about the state of the machine system that was obtained during operation.
- Author: ratico19
Rate this article:
- 5
- 4
- 3
- 2
- 1
(14 votes, average: 3.5 out of 5)
Share with your friends!
Signs of trouble
I would like to immediately note that in order to determine faults in the water pump, you will need to remove the unit and disassemble it. Only this method provides a real opportunity to see the resulting traces of corrosion, signs of cavitation and contamination.
Practice clearly shows that this happens on a wide variety of machines:
- VAZ 2107;
- Volkswagen Passat;
- FF2, that is, Ford Focus 2nd generation;
- Lada Granta;
- Kia Spectra;
- Chevrolet Aveo;
- Audi A5;
- Nissan Qashqai;
- Mitsubishi Outlander;
- Toyota Camry;
- Skoda Octavia, etc.
Moreover, the situation is approximately the same everywhere. That is, it is impossible to determine whether there are problems without disassembling and looking inside the cooling system water pump.
Therefore, the main emphasis is on indirect signs. With their help, the driver gets the opportunity to diagnose the problem in advance and prevent serious consequences.
The following indirect signs are distinguished:
- A thin whistle appears without interruption during engine operation. Moreover, it comes from the area of the camshaft pulley of the internal combustion engine. A whistle indicates that a higher bearing is failing;
- Coolant leaks. Traces of antifreeze can be seen directly on the power unit, or under the bottom of the car, that is, on the asphalt;
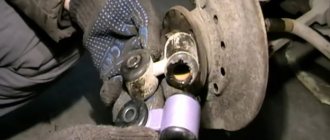
- Pump play. To check for its presence, simply grab the pump pulley with your hand and try to swing the device up and down.
Do not forget about the possible airing of the system, due to which the antifreeze does not fully perform its functions, the engine overheats and a number of resulting breakdowns occur. Here it would be correct to remind you about removing the air lock from the cooling system. Also, be sure to read the material about checking the cap of the expansion tank, which is directly related to the engine cooling system.
I won't talk about how the pump changes. Usually replacement is carried out according to the owner's manual from the car manufacturer. The point is to drain the cooling liquid, disconnect the pipes, first turn off the power to the car, and dismantle the problem unit.
The design and location of all pumps are different, therefore there is no universal instruction. You can find a video online, or simply take the car to a car service center.
We recommend: 6 reasons why the air conditioner in the car began to work poorly
Necessary equipment
To carry out the work of replacing the liquid pump on a VAZ-2109, not much equipment will be required. All you need to have is:
- Open-end and ring wrenches for “10” and “17”;
- Heads with collars of the same sizes;
- Powerful flat screwdriver;
- Knife;
- Container for draining working fluid;
- Rags;
- Sealant;
- Jack;
- New liquid pump and gasket;
It is also better to carry out all work in the garage. Having collected the necessary tools and purchased a new pump, you can begin the replacement.
Replacing a pump in a 16-valve system
What are the possible causes of pump failure? This question worries not only beginners, but also quite experienced car enthusiasts. Here are the main reasons, from the most common and widespread to the “exotic”. Among them:
Faulty bearing. This device wears out due to natural reasons. However, accelerated wear is possible due to additional negative factors. For example, incorrect (higher) belt tension results in increased load on the bearing. Another reason for significant wear is the transfer of antifreeze to friction pairs due to leaky seals and coolant leakage.
Damage to the seal. The pump has two seals - a packing and a rubber gasket. Most often the sealant (gasket) is damaged. This happens for two reasons - natural wear and tear (tanning of rubber) and the use of cheap, low-quality antifreeze without appropriate additives or even water. After a longer period of time, these liquids “eat up” the seal, it begins to leak, which leads, firstly, to a decrease in the level of coolant in the system, and secondly, to the entry of antifreeze or water into the bearing, washing out the lubricant and the problems described higher.