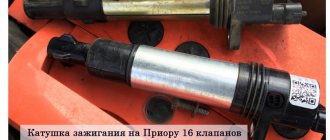
VAZ 2112 engine ignition coil - this is the main part of the car’s ignition system, which serves as a conventional low-voltage direct current converter, which comes from the battery or directly from the electric generator into high-voltage voltage for further supplying an electrical impulse to the spark plugs.
In today's article we will learn how to check the ignition module on an injection VAZ-2112 8 valve with our own hands, and also consider step-by-step instructions for replacing this car unit.
Purpose and design of the ignition coil of the VAZ 2112
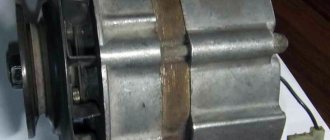
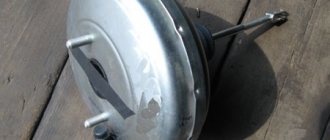
To create a pulse (spark) between the electrodes of the spark plug of the VAZ 2112 carburetor engine, a “standard”, classic or case coil was used for a non-contact ignition system (BSI), which is a high-voltage pulse step-up transformer with an open or closed magnetic circuit. Its use on “two-wheelers” continued until it was replaced by a two-spark (four-terminal) ignition coil (module) for 8-valve injection engines and an individual coil for power units with 16 valves.
New ignition coil for VAZ 2112
Diagnostics of malfunctions of the VAZ 2112 housing ignition coil for BSZ, nomenclature number 3122.3705 or 8352.12, consists of measuring the resistance of its primary and secondary windings and comparing the obtained data with table values. The resistance of the primary winding of coil 3122.3705 should be 0.43 (±0.04) Ohm, the secondary winding - 4.08 (±0.4) kOhm. The resistance of the coil 8352.12 is respectively 0.42 (±0.05) Ohm and 5 (±1) kOhm. The insulation resistance to ground must be at least 50 MOhm.
If measurement results differ by more than tolerance values, the coil must be replaced. You need the VAZ 2112 ignition coil, with its relatively low price, it is quite reliable and its replacement is rather an exception to the rule.
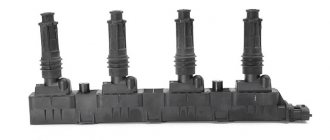
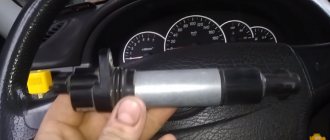
Ignition module VAZ 2112
The ignition module (four-terminal coil) provides simultaneous sparking in two cylinders (the first and fourth or the second and third). It needs to be checked for serviceability if there is no spark on one or more spark plugs. It is checked using a stand that simulates various engine operating modes and an oscilloscope. Checking “in the field” consists of connecting a known working spark plug one by one to the tips of high-voltage wires, grounding it to ground and, turning the crankshaft with the starter, visually detecting spark formation on the electrodes of the “test” spark plug.
DIY diagnostics
In a VAZ-2112 you can check the ignition module using a multitester. All that remains is to arm yourself with a cunning device and determine the serviceability of the winding. During the procedure, follow the step-by-step instructions:
- Determine the operating format of the multitester in ohmmeter mode; it measures the resistance that occurs between the terminals of the secondary winding.
- Mount the probes by connecting the 1st and 4th cylinders to the terminals. Then fix to the 2nd and 3rd cylinders. An adequate result, indicating the absence of a breakdown in the winding, is approximately 5.4 kOhm; fluctuations in values of plus or minus 0.1 kOhm are acceptable. What you should pay attention to? The resistance between the terminals in a pair must correspond in terms of indicators to each other - be the same.
- If the difference is more than 100 Ohms, then we can say with confidence that the fault lies in the secondary winding. How can I solve this problem? Only by replacing the ignition module.
Version of the module on the 8-valve VAZ-2112
Two 8-valve engines of different volumes were installed on the twelve-wheeler - 1.5 and 1.6 liters. The ignition modules for these engines are different. The one and a half liter engine has a module with article number 2112-3705010, and the 1600 cc engine is equipped with a module 2111-3705010. A module for a 1.5 liter engine costs about 1500-2100, and the second one is 500 rubles cheaper.
Which is better?
SOATE devices manufactured in Stary Oskol have proven themselves to be the most reliable ignition modules.
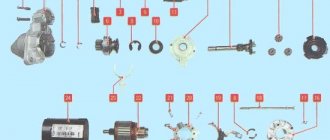
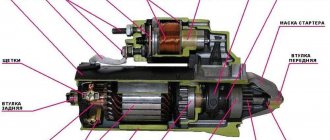
Module structure
It consists of two ignition coils and two high-voltage switch switches. The coils are designed to create high-voltage pulses.
In essence, it is a simple transformer that has two windings: a primary winding, with an induction voltage of approximately five hundred Volts, and a secondary winding, with an inductive voltage of at least twenty kiloVolts. Everything is placed in one housing with one connector for signal wires and four for high-voltage.
Structure of the ignition coil module of the VAZ 2112
The operation of the ignition module is based on the “idle spark principle”. The module is capable of distributing a spark in pairs: to the first and fourth, second and third cylinders when transmitting pulses from the electronic control unit.
Malfunctions of ignition modules on VAZ-2112
The process of removing the ignition coil on a VAZ 2112
If the VAZ 2112 engine starts running intermittently or does not start at all, the cause of the problem may be the ignition module.
Characteristic symptoms of a malfunction of the ignition module of the VAZ 2110:
- insufficient engine power,
- when accelerating the car jerks,
- either 1 and 4 or 2 and 3 do not work at the same time,
- the engine does not start.
It should be noted that on the VAZ-2112 one of the coils is responsible for the operation of cylinders 1 and 4, the second - for cylinders 2 and 3. If one ignition coil fails inside the monolithic block, two cylinders stop working at once.
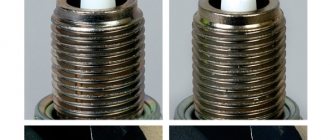
To eliminate all other components of the ignition system, make sure that the spark plugs are in working order.
Installation of a new ignition module for VAZ 2112
To do this, unscrew them and check the spark on each of the spark plugs by cranking the engine with the starter and placing the spark plug with the high-voltage wire on the head so that the body (threaded part) of the spark plug touches the engine mass.
If there is no spark or it is weak, replace the spark plug with one that is known to work. If this does not lead to anything, check the high-voltage wires.
Thus, we will exclude spark plugs, caps and high-voltage wires from the list of non-working elements. Next we will check the ignition module.
Instructions for replacing the module
If checking the VAZ 2112 ignition module showed that the device needs to be replaced, then you can change the ignition module yourself.
The replacement process looks like this:
- Initially, you should turn off the power to the on-board network; to do this, you just need to disconnect the negative terminal from the battery. Many car enthusiasts neglect this step, although in fact it is very important. If you do not disconnect the battery, a short circuit may occur as a result of moisture or other external influences during repairs. And if this happens, then there is a chance that you will have to completely change the wiring in the car. So, to reset the battery terminal, you just need to unscrew the bolt that secures it with a wrench.
- Having done this, you will need to disconnect all high-voltage wires connected to it from the module. At the same time, you need to remember their location so that during installation you do not accidentally confuse them, which, again, can be fraught with danger for the entire system as a whole.
- After completing these steps, you will need to disconnect the connector with wires from the device itself. To do this, grab the block with your hand and press the latch with which it is attached - the fastener is located at the bottom, you can feel it with your hand. Having done this, you will need to remove the block and put it aside so that it does not interfere with you in the future.
- So, now you have two options - remove the device together with the mount or remove it separately. The first option is usually relevant in cases where, in addition to replacing the MZ, you need to perform other repair actions, for example, to get to the antifreeze drain hole of their cylinder block. Of course, it will be more convenient to dismantle the module separately, but then access to other parts and elements will be blocked. To dismantle you will need to unscrew the nuts with your own hands that secure the device to the bracket. Depending on the car, the nuts can be different; for example, they can be made in the form of hexagonal studs. If so, you will need a hex wrench to unscrew them. In any case, after unscrewing the nuts, it is necessary to dismantle the module from the seat.
- The procedure for installing a new module is carried out in a similar way, only in reverse order. When connecting with your own hands, be careful and be sure to correctly connect all the wires that connect to the module from the spark plugs . If at this stage you mix up the cylinder numbers on the high-voltage cables, the power unit may not work correctly or may not start at all.
Photo gallery “Replacing the MZ with your own hands”
1. Disconnect the wires from the MZ.
2. Disconnect the power plug.
3. Unscrew the nuts and dismantle the MZ.
Price issue
The cost of the device directly depends on the manufacturer. For example, the price for a new MZ from the manufacturer SOATE is about 1,700 rubles. A module from the manufacturer BOSCH will cost around 2 thousand rubles, and from General Motors - about 5 thousand rubles.
Loading …
Removing and replacing the ignition coil
In order to replace the module (ignition coil) on a VAZ 2112, you must perform the following steps:
- Before starting work, be sure to disconnect the battery by disconnecting the “-” terminal from it. (How to de-energize a battery.
- Then, approaching the ignition coil, disconnect one single high-voltage wire from its central part.
- Next, use a wrench to remove the two side nuts that hold the ends of the wires in place on the side of the coil.
- Next, when the nuts are unscrewed, remove both side wires from the coil.
- And to complete the operation, unscrew the two side nuts securing the ignition coil itself to the bracket.
- And then remove the coil from the car engine.
Result
After two revisions, a number of improvements were noticed:
- ─ the car accelerates better;
- ─ failures disappeared;
- ─ response to the gas pedal has become clearer;
- ─ idle speed became stable;
- ─ gasoline consumption decreased by 0.7-0.9 liters to 7.8 l/100 km in the city.
- ─ the engine starts faster, the starter does not turn for more than 2 seconds.
It feels like the engine has become 100 thousand km younger.
Let us remind you that you can improve the spark on engines with an ignition module. By the way, do not forget that sparking is affected by high-voltage wires.
Your feedback on modifying ignition coils using capacitors:
Your feedback on reducing the connectors in the ignition coil circuit:
Do-it-yourself installation of the VAZ 2112 ignition module
- Having picked up the new coil, first install it in its place by tightening the two nuts that secure it.
- Then place two wires on the sides of the coil and secure them with retaining nuts.
- When installing two side wires, pay attention to the markings that are marked on the sides of the ignition coil (see photo below). So this marking indicates which terminal of the coil should be connected to this or that wire. The blue wire must be connected to the “B” marking, and the red wire must be connected to the “K” marking!
- Then place the high-voltage wire on the central part of the ignition coil.
- And then install the negative terminal on the battery.
On old ignition coils, as a rule, instead of the letters “B” and “K”, the designations “-” and “+” are used, which means the same thing, but only in signs. The blue wire must be connected to the “-” sign, and the red wire must be connected to the “+” sign!
Checking the Ministry of Health with your own hands
There are several options for checking the device yourself at home; let’s look at the simplest one.
To carry out independent diagnostics, you need to know what the wires connected to the module are responsible for:
- red-blue - provides 12-volt power to the device;
- the brown wire is ground, usually connected to the car body;
- white-blue - connects to the spark plugs of the first and fourth cylinders;
- the red-gray wire connects to the spark plugs of the second and third cylinders.
Scheme of the VAZ module
First, you need to check with your own hands that all pulses are sent to the ignition device 2112:
- First of all, you need to turn off the ignition and disconnect the connector.
- Next, the key in the lock must be moved to position I.
- Now you will need a dial voltmeter; it must be connected to the negative terminal of the battery.
- With the second probe, that is, the plus one, you need to find the 12-volt contact on the connector.
- When connected to the control contact, the arrow on the tester will show almost 0.
- If the starter unit starts working, the parameters may increase, but they will not exceed 0.7 volts. Please note that the voltage level at both control contacts must be identical.
There is another test option - you can diagnose the functionality of the module using a pointer ohmmeter. In this case, we mean a pointer tester, not a digital one. First you need to connect the probes of the device to pins 1 and 4 of the module, and after that to pins 2 and 3. Ultimately, the diagnostics should show the same result.
Please note that depending on the manufacturer, these parameters may differ:
- for devices manufactured by ATE-2 with number 3705010-02, this parameter should be about 5-6 kOhm;
- for SOATE modules with number 3705010-12, diagnostics should show 12 kOhm.
If the obtained indicators differ from those described above, then the module must be replaced. Please note that the inductance of the coils installed inside the MZ is quite high, therefore, connecting an ohmmeter, a spark may slip. Therefore, when diagnosing, we strongly do not recommend touching the probe leads at the same time (the author of the video is Avtoelektika HF).