In the age of advanced technology, more and more cars have front-wheel drive, which does not use a driveshaft with hinges. Nevertheless, many companies continue to make rear-wheel drive cars, using the old classic drive-wheel drive scheme. Along with Mercedes and BMW, our VAZs continue the tradition. Therefore, car owners are interested in how to replace the VAZ-2107 driveshaft crosspiece themselves.
Node device
Before you begin dismantling it yourself, you need to at least in general understand the structure of the entire unit, then repairs can be done according to all the rules. Cardan shaft device:
- Front part (short). Through an elastic coupling, which softens jerks and shocks when changing gears, it is connected to the input shaft of the gearbox (gearbox).
- The back is longer. It is connected to the rear axle gearbox using a flange.
To the eternal question, how many crosspieces are there on this car, there is a very clear answer: two.
Structurally, everything is done exactly this way due to the fact that the gearbox and the rear axle gearbox are not located in the same axis, that is, they are offset relative to each other. From this it is absolutely clear that the driveshaft cannot be solid, since this is structurally impossible.
The design also provides a suspension device - an additional support consisting of a rubber cushion enclosed in a steel cage and a bearing in the center of the structure.
This is the brief structure of this node.
Replacing the VAZ 2107 crosspiece
To make disassembling the cardan transmission easier, you should first clean the parts with a wire brush and treat the mating areas with kerosene or WD-40.
Before disassembling the cardan, it should be placed on a flat surface in a well-lit place. Replacing the VAZ 2107 crosspiece begins with removing the retaining rings using a puller.
Before dismantling the crosspiece, it should be tapped with a hammer through a wooden spacer and treated with WD-40.
The crosspiece is removed by successively beating its bowls with a hammer and removing them from the holes of the forks. After the cross is removed, it is necessary to thoroughly clean its seats and grooves for installing the retaining rings.
Installation of the part begins with dismantling its bowls, which are sequentially installed in the seats on the cardan forks, while simultaneously being put on the cross.
The metal of the crosspiece bowls is very hard, but fragile. Therefore, they should be driven into the seats very carefully. After the bowl has taken its place, it must be secured with a locking ring.
Please note: Retaining rings may be supplied in different thicknesses. If the thickness of the ring does not match the width of the mounting groove, you need to purchase rings of the required thickness and install them
Otherwise, the rings will fly out of their places during operation of the machine and the cardan drive will fail. When the cups of the cross are installed and secured with retaining rings, you can begin to install the assembly in place. But before this, it is necessary to check the condition of the elastic coupling and the outboard bearing, so that you do not have to soon return to the labor-intensive work of removing and installing the propeller shaft.
Installation of the cardan is carried out in the reverse order of removal. The spline assembly should connect without effort and should be lubricated before assembly.
Hi all! It’s been a long time since the rear began to click when starting off and changing gears, slight twitching at low speeds, and the thought of crosspieces immediately arose. Indeed, when examining the rear crosspiece, there was a noticeable axial play between the cardan and the gearbox end; lubrication of the crosspiece through the grease fitting did not help.
Therefore, I decided to replace the rear crosspiece, in the store the choice fell between JSC Kardan and GKN, I chose the latter, since it was more neatly and beautifully made, and the difference in price is small. Unfortunately, I couldn’t find any crosspieces with oilers.
I decided to replace it without removing the cardan; to do this, I jacked up the left rear wheel and placed stops under the bottom and axle.
Prepared the necessary tools.
I first made marks on the cardan and shank with chalk, just in case.
I cleaned and soaked the cups of the cross with a high-pressure motor and unscrewed the bolts securing them to the shank.
About 50 grams of oil spilled out of the cavity between the flanges - the oil seal has been leaking for a long time.
The nut seemed to be in place, it was not unscrewed, the shank was not loose, I decided not to go there again. The cross piece really stuck in one plane of travel and there was play along the axes.
Removing the retaining rings caused a lot of hemorrhoids, since there was no puller.
I removed the crosspiece by pressing the cups through the heads on 11 and 27 yews, and then took them out with pliers, this did not cause any special problems. It is enough to remove 2 cups and take out the cross with the flange, the rest can be replaced outside the car.
Under the seized cups it was already dry and there were traces of rust, it is clear that it was running dry. Before installation, I checked the presence of lubricant under the cups - there is sufficient quantity, however, nothing can be said about the quality, it resembles pork fat.
The cups fit without any problems, but the rings included in the set were a bit thick; I had to grind off almost a third of the thickness, since the old ones had already become unusable when dismantled.
I pressed the crosspiece back with yews, knocked down the cups and lubricated the ends with pushsal to prevent corrosion. True, the marks were erased and I had to join the ends at random. I used a center punch to make marks on the flanges and shaft so as not to confuse them next time. After the replacement, the clicks disappeared and no vibration appeared. Let's see how long it lasts.
Basic faults
Any component or mechanism sooner or later wears out and requires complete or partial replacement (repair). The most common driveshaft malfunctions:
- wear of the suspension device bearing;
- wear of the rubber cushion;
- wear of crosspieces.
The latter malfunction occurs for various reasons. The most likely of them:
- Aggressive driving style.
- Poor quality of crosspieces.
- Unsatisfactory maintenance of crosspieces, which consists of timely lubrication, if provided for by the design. If they are maintenance-free, they fail earlier due to a lack of lubrication.
- Bad roads.
- Constant driving through deep puddles.
The signal to replace these parts is increased noise while driving, vibration and extraneous sounds emanating from under the car.
Causes and symptoms of malfunction on the VAZ 2107
Problems with the spider, as a rule, arise for one reason: the oil seals wear out, after which dirt gets into the bearings of the spider . It begins to work as an abrasive material, as a result the bearings wear out prematurely and collapse.
There are a number of characteristic signs of wear on the crosspiece:
- While the car is moving, clicks and other extraneous sounds are heard in the area of the cardan.
- When the car starts moving, a characteristic creaking noise is heard, which usually disappears after the car accelerates.
- A strong beating of the driveshaft appears, which can be felt even from the cab.
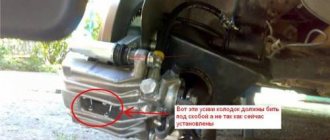
- There is a strong play in the crosspiece, which is felt if you move the cardan up and down with your hands (to do this, it is better to go down into the inspection hole).
Spare part selection
In order to repair this unit less often, you need to purchase good quality spare parts. The correct choice of crosspiece determines how often it will need to be replaced. Choice of cross:
- It is advisable to make purchases in specialized stores and markets where there are quality certificates and traders value their reputation. It is better to never buy anything from random sellers who trade in spontaneous markets from time to time. In addition, a normal retail outlet provides a guarantee that allows you to return the product within 14 days if there is something wrong with it.
- The spare part should be from a well-known brand that has been proven over the years, and not of some dubious quality.
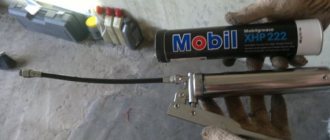
- The crosspiece should be purchased equipped with a grease fitting (grease fitting), through which you can always renew the lubricant in the bearings using a supercharger (“syringe”) - both manual and electric. This part will last longer.
And another effective way to check. The crosspiece taken out of the package should be placed on a piece of glass - a glass counter is quite suitable, or on the same side-view mirror (removed, of course). Holding your fingers opposite the axis of the cross, you need to try to swing them on this surface. Next, you need to do the same with other axes. Then turn the part and do the same operation again. During the inspection process there should be no knocks on the glass surface, which will indicate the absence of deformation of the part.
You should buy two parts at once, because after replacing one, the replacement of the other will very soon follow. Many people immediately change the bearing of the suspension device, so as not to have to repeat what they have done before, that is, disassemble everything, wasting time and their own nerves.
This is interesting: 9 main fines for illegal parking in 2018 and advice from a car lawyer on how to avoid them
Preparing for work
You can't do any job without the right tool. You should prepare:
- Wrench No. 13. It is better with a head and a ratchet to unscrew the hanging device, and for a flange connection, a spanner or open-end wrench is best suited.
- Hammer - preferably bronze or copper.
- A flat blade screwdriver.
- Pliers.
- A special puller, if, of course, there is one. Whether to buy it on purpose or not is up to each car owner. You can use a punch.
- A product like WD-40. In the absence of such, you can also use kerosene, for example, together with an oil can (medical syringe) and a brush.
And, of course, it is better to carry out the work on a lift, overpass or inspection ditch - it will be both more convenient and safer.
If work is carried out on the first two structures, then you need to fix the wheels by placing blocks under them, which will prevent unwanted rolling of the car forward or backward. You must always remember safety precautions before removing the crosspiece from the VAZ-2107 cardan or performing any other work under the car.
Removal of worn parts
Replacing them does not present any particular difficulties, and it is not at all necessary to take your “seven” to a service station in order to perform such a simple operation.
Replacing crosspieces on a VAZ-2107 is impossible without dismantling the driveshaft.
This does not require any special training, great skills or special tools - everything is very simply done in a garage. Operating procedure:
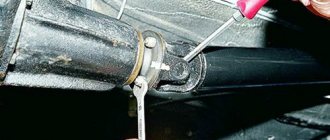
- Unscrew the mounting of the suspension device - 2 bolts using a key No. 13. Before unscrewing, it is advisable to treat the threaded connections with WD-40 or kerosene, and after two minutes, unscrew them. This will make the disassembly process easier, and will also preserve the threads on the bolts and nuts.
- Unscrew the bolts and nuts (4 pairs) of the flange connection, first using a rust remover. Here it is preferable to use a spanner due to the small gaps between the flange and the nut (bolt).
- The side that goes into the coupling can be easily removed - just pull the already unscrewed cardan towards you - there is a splined connection without any other type of fastener.
- The already removed driveshaft must be cleaned of dirt and dust - it is better and more correct to work clean. In addition, dirt can get into the bearings, which obviously will not improve their performance.
- You should make sure that the coupling is intact and the splines are in working condition - it would be wrong to change the crosspiece on a VAZ-2107 without making sure that the assembly as a whole is in good working order. This is done by visual inspection and preliminary check of the connection of the coupling hub with the splined part of the shaft. By rocking the driveshaft in different directions, you need to make sure that there is no too much play.
- Before replacement, marks should be made on the universal joint. This is necessary in order to avoid imbalance after replacing parts - the shaft is carefully balanced by welding plates at the manufacturer, and changing the position will force you to re-assemble the connection, which, of course, is not part of the car owner’s plans.
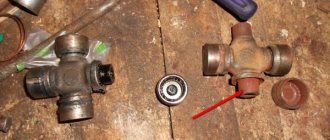
- Before replacing the crosspiece on a VAZ-2107, you need to remove the retaining rings that secure the bearing caps - there are four of them. On each neck of the cross there is an annular groove into which a locking ring snaps into place. They are best removed using special pliers with pointed ends, which must be inserted into the holes of the locking ring - there are two of them in each stopper. If the stopper is difficult to remove, then you also need to use a thin screwdriver with a flat blade.
Such a tool can be either universal (working for both compression and expansion) or single-acting. However, many craftsmen manage to do this with a simple screwdriver or an awl, which is undesirable for safety reasons.
After all the rings have been removed, you can remove the crosspiece on the VAZ-2107. This is done like this:
- Holding the universal joint with one hand, you need to knock out the cross cap with a hammer, striking it lightly. You need to beat until it drops to the point where it comes out of the universal joint completely.
- Having turned the driveshaft over, you now need to apply light blows to its body as close as possible to the crosspiece, which will allow you to remove the other, opposite cap.
- Thus, the hinge is disconnected, and all that remains is to remove the cross after knocking off the last two caps. To do this, you need to use two fingers, holding the cross with the shaft suspended, and apply light blows to it, first knocking out one cap. After removing the cross, the remaining cap is knocked out with a punch.
This is interesting: Instructions and 7 useful tips for replacing low beam lamps in headlights
Replacement
Now you can proceed directly to replacing the crosspiece on the VAZ 2107. Repair work includes a mandatory preparatory stage, during which it is necessary to prepare spare parts and tools.
Spare parts
To ensure that the crosspiece is replaced efficiently and reliably, that is, after a short period of time you do not have to do the work again, buy high-quality parts.
Spare parts
Today there is a large volume of cheap Chinese spare parts on the market. Their quality leaves much to be desired. By purchasing such items, you will incur even greater financial losses. And that's why:
- When replacing the driveshaft crosspiece on a VAZ 2107, you must simultaneously change the bearing. When purchasing, check how smooth its movement is;
- Check the rubber for elasticity. The bearing must not have any obstructions when moving. Feeling that it is clinging, put such a part away and take another one;
- Rubber must have the required level of elasticity. This is because when moving through it, vibrations are transmitted to the body. If the tires turn out to be hard, you will notice this in the behavior of the car and the roughness of the movement;
- It is recommended to replace the old crosspiece with a new one using standard VAZ components. Just before purchasing, make sure that they are made with high quality and are not defective;
- When purchasing crosspieces and bearings, at the same time buy new snap rings. Old elements cannot withstand long-term use, become deformed, and stop working properly. Trying to save money on something like this is a big mistake of many VAZ 2107 owners. Don’t repeat them.
Tools
If you often do car repairs and maintenance on your own, then the tool necessary to replace the crosspiece will definitely be found in your garage:
- Open-end wrenches for 12 and 13;
- Set of socket wrenches. The most important ones are on 13 and 27;
- Hammer with a handle made of aluminum or copper;
- Pliers (needed when removing circlips);
- Puller and flange.
Installing new items
Now that the hinge is disassembled, you can begin installing the new part. To do this, you need to remove the new cross from the packaging and carefully remove the caps from it, so that its needle bearings do not fall apart. Further:
- Check the presence of grease in the bearings.
- The new part must be inserted into the hinge and the first cap must be placed on one of the axles (necks). Carefully press it into place, holding the two axes located at an angle of 90° relative to the cap with two fingers of the other hand. Then snap the retaining ring into the groove on the axle. For this purpose, it is better to use new rings - they are included with the new part.
- Turning the cardan 180°, insert the second cap, slightly lifting it and pushing it out a little from the first cap. Using a drift (if you don’t have one, you can use a socket wrench head of the appropriate size) the bearing is put in place and locked with a ring.
- Now you can put the flange (mating part) in place and install the third bearing, proceeding in exactly the same way as in the previous cases, not forgetting to install the retaining ring. In order to correctly install the next bearing, you need to support the cap located opposite it with something, for example, the same head.
- The last thing to install is the bearing with a grease nipple. Here you need to be especially careful not to damage the oiler when pressing. First of all, you need to unscrew it yourself to allow excess grease to exit the bearing through the hole. The oiler can be unscrewed with any available wrench No. 7 or 8. If the retaining ring does not fit all the way, the bearing should be seated by first placing the same head on the opposite side, driving it in using the same equipment. Screw the grease nipple into place.
All these operations must be repeated with the second cross - there are no differences as such.
Installation of the cardan shaft is carried out in the reverse order of dismantling. To do this you need to do:
- insert the splined part into place, holding the driveshaft with your shoulder (it will be better if someone else helps you do this);
- screw the hanging device into its regular place;
- attach the flange to the gearbox.
Don’t forget about the retaining rings to avoid early failure of the propeller shaft joints! And you also need to carefully, but without fanaticism, tighten all the bolts and nuts. In addition, we must not forget about aligning the marks on the hinge joint.
Now you need to check the car while driving for the absence of vibrations and noise under it.
Features of the mechanism
The driveshaft transmits the torque generated by the car's engine to the rear axle, causing the wheels to rotate. It is located under the bottom of the VAZ-2107 car, which is why you can find a raised floor in the cabin.
The cardan on the VAZ 2107 consists of two main parts, which are connected to each other using a cross. This design of the device is necessary because the rear suspension constantly “plays” when driving due to shock absorption. The device is a hollow tube, which is the “arm” connecting the engine to the wheels. Despite the simplicity of the product, the shaft, like other car parts, fails and requires repair or replacement.
Main cardan malfunctions
The main malfunction of the driveshaft is that elements such as the spider and the outboard bearing fail. It is these parts that are the most loaded. The crosspiece and bearing fail for a simple reason - lack of lubrication. Over time, it is necessary to periodically diagnose these elements with the obligatory addition of lubricants. In rare cases, a cardan malfunction may be associated with a defective crosspiece, which requires its replacement.
The malfunctions of the mechanism in question are as follows:
- failure of crosspieces;
- destruction of the outboard bearing;
- violation of the configuration (imbalance) of the shaft;
- breakage of flanges, splines and couplings, which happens under heavy loads;
- excess moisture and dirt inside the crosspieces.
At the slightest sign of malfunction, it is necessary to diagnose the mechanism and eliminate all resulting damage. The malfunction can be identified by the following signs:
- the appearance of a knocking sound when the clutch is engaged, which may indicate wear of the splines or damage to the elastic coupling;
- the occurrence of a grinding noise when the car is moving indicates a lack of lubrication;
- the appearance of vibration when the car is moving, which indicates a violation of the alignment of the product;
- knocking noise during sudden acceleration or braking, which indicates wear of the crosspieces.
We will discuss how to replace the VAZ 2107 driveshaft in the next paragraph.
The process of removing and replacing the cardan
The mechanism is removed for the purpose of carrying out repair work or replacing it with a new product.
Often the driveshaft itself is an unpretentious device, but it is important to periodically check the condition of the bearing, splines and crosses. These are the weak points that need to be periodically looked at and monitored for their condition.
Work on dismantling the cardan is carried out in the following order:
First, you need to secure the car by placing stops under the front wheels, and place the gearshift lever in the “neutral” position. Next, jack up the rear of the car, while suspending one of the drive wheels. We proceed to disconnect the device from the mount to the differential. To do this, you need to unscrew the 4 fastening nuts and then remove the bolts. After unscrewing the fastener, you can separate the product from the differential flange.
It remains to unscrew the two nuts securing the cross member on which the suspension bearing is mounted. After unscrewing, you can dismantle the cardan from the VAZ 2107. Using a wooden hammer, you need to knock out (if necessary) the shaft from the engagement of the splines with the elastic coupling. After the shaft is repaired or replaced, you can install it in place. The installation process is inversely proportional to removal
When installing the product, it is important to ensure that the shaft is positioned correctly.
The driveshaft on cars of the VAZ family is a fairly reliable unit. However, it also needs periodic maintenance. All driveline faults should be repaired as soon as possible. Otherwise, more serious and costly problems may arise.
Conclusion
It must be remembered that work done correctly, as well as high-quality spare parts, will help the car owner forget about this unit for a long time. And don’t forget about timely lubrication of the bearings through a grease nipple - then the next repair will not have to be done soon.
Of course, taking on this work yourself or entrusting it to service station mechanics is the job of every car owner. But, taking into account that the owners of VAZs (especially “classics”), as a rule, are not rich people, there is a reason to do this work yourself, thus saving a decent amount.
Good luck on the roads and safe driving!