Device and features
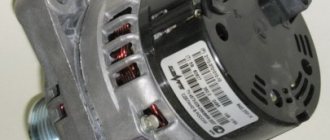
UAZ Patriot is equipped with a generator of the Iskra 120A type, which has a voltage relay and a silicon rectifier that maintains the required voltage. Using a belt drive, the rotor (shaft) of the generator is driven. The device has a diode bridge that converts alternating current to direct current. Due to the fact that it consists of diode rectifiers, the current flows in one direction. This device has a one-piece sealed design, this is made specifically so that dirt, dust or moisture does not get into it, and this design is also more reliable.
The resulting current, which is converted from alternating to direct due to the diode bridge, powers all electrical appliances in the car, and also thanks to it the battery is recharged.
Car owners of this SUV may be faced with the fact that there is not enough voltage to charge the battery, and instead of 14.2 Volts, less is supplied. This problem is solved in the following way:
- The generator is being changed;
- The diode bridge is changed;
- The contacts that power the device are checked;
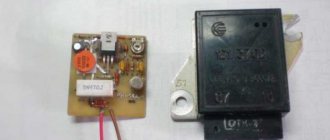
- A three-level regulator is installed.
Installing a three-level generator is a reliable solution to the problem.
To install it, you do not need to completely remove the generator, just remove the generator cover, take out the original brushes and insert the brushes of the three-level regulator, you can do all this yourself. After that, we put the cover back, screw the regulator itself to the engine itself to ground, so that it is convenient to switch it. The regulator itself has three switching positions, the highest position is when the car is operated in cold weather, then the generator needs the highest charging power. The optimal position is in the middle, for any everyday weather with low beams on. Minimum position without the lights on, during hot rides, so that the battery does not boil. With the Prama Electra generator number 5122377110, after installation the engine runs reliably.
This device has one feature: the voltage that comes from it is regulated depending on the temperature of the environment.
Removal and installation
In case of failure or replacement, repair of the UAZ Patriot generator is required, for this you need to do the following:
- The negative terminal is disconnected from the battery;
- The block with wires is disconnected from the product;
- The negative terminal nut of the device is unscrewed and the cable is disconnected;
- The belt at the device drive is removed;
- The tension at the top fastening nuts and at the counter bolt is weakened;
- The mounting bolt is unscrewed from the bottom of the generator;
- A pair of bolts that secure the upper bracket and cylinder head are unscrewed;
- The generator will be removed.
After removal, you can carry out the necessary repairs or replacement of the generator. Everything is installed in reverse order. After this, the UAZ 469 generator is connected.
If you install a three-level regulator in place of a standard relay, you need to do the following:
- The back cover of the generator is removed;
- The brushes and standard relay are removed; for this, a pair of nuts and one connecting screw are unscrewed;
- A new regulator is installed, it is screwed with pant nuts and connected to the diode bridge using a screw;
- A box with a regulator is screwed to the car body in a convenient place;
- The mass is attached to the body.
This device will help extend the battery life.
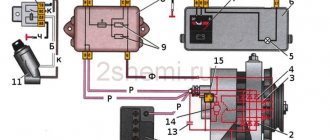
To connect the UAZ generator, or in common parlance a loaf, there is a special circuit that looks like this, this circuit includes the following main components:
How to check the voltage of the electric generator on the battery
Electromotive force or potential difference can be determined by the following methods - using generating equipment and through a battery. The electric generator is directly connected to the power source with a thick cable, so to check the level of potential difference, you can measure the voltage at the power source. When using this method, you will need special measuring instruments - a voltmeter, multimeter or load fork.
The device wires are connected to the battery in any order. The plug must be connected to the battery terminals, and the polarity must be strictly observed. The permissible voltage in the network should not be less than 12.5 volts. At idle speed with the electrical devices of the machine turned off, this figure should be about 13.5-14 V. Reducing the voltage values to 13.3-13.8 volts is acceptable.
Based on the above, the main types of failures of the UAZ Patriot electric generator can be problems with the poly V-belt, bearing failure, or failure of the diode silicon bridge. You can also solve the problem of voltage drop on the UAZ Patriot generator by installing a three-way regulator, but this will not solve all the existing problems. If problems are detected in the operation of the electric generator, it is necessary to immediately begin diagnosing it to identify the causes of the breakdown.
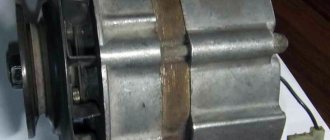
Diode bridge of the UAZ Patriot generator
The problem with the UAZ 469 generator is low voltage. It is 13-13.2 V, but during consumer use the voltage drops to 12V, which is not at all good for car operation.
We completely disassemble the generator, take out a part from it called a diode bridge.
You need to ring it to understand whether the bridge is good or not.
To do this, connect the tester and turn it on to ringing mode. Our diode bridge has six diodes that ring in one direction.
When ringing, we get the resistance value. At the same time, the difference in this resistance between diodes should not differ by more than 5 Ohms, if more, it’s already bad.
A large difference in resistance will affect the passage of current through the diode bridge, so it is necessary to change it. When buying a new bridge, you need to ring it in the store and choose it according to resistance tolerances, otherwise problems with the operation of the generator will not disappear.
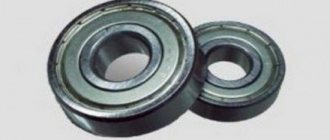
Bearing
In order for the device to rotate, there is a generator bearing in the design, and if it is faulty, it must be replaced, otherwise the generator may stop working. The device has two bearings, but special attention is paid to the rear one. You can understand the condition of the bearing as follows:
- Check rotation speed;
- Rock the outer ring from side to side;
- Turn the product sharply clockwise.
If during the test, jamming occurs, a cracking sound is heard, or there are vibrations, this indicates that the part needs to be replaced. Also, during engine operation, an extraneous creaking or whistling noise may be heard, in this case:
- you need to turn off the engine,
- remove the UAZ Patriot alternator belt
- and turn the pulley by hand, this way you can understand whether the part is working or not.
Bearing replacement
Bearing replacement usually occurs together with the generator cover, but many craftsmen do it separately.
To spin up the generator:
- take an old alternator belt
- fold in half
- clamp it in a vice.
- Take a 24mm head
- unscrew the generator bearing
- Then, using a 8-mm socket, unscrew the generator cover
- After that, remove the cover to remove the bearing,
- unscrew four more bolts
- Then use a rubber hammer to knock out the bearing itself.
Then, in reverse order, take a new bearing marked 6303-2RS and install it in reverse order.
Also, using the head of the wrench, carefully place the new bearing into the socket of the generator head. Screw the cap back onto the bearing and install the generator head in its place.
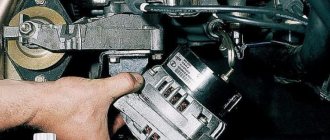
Installation of a three-level regulator
To install a three-level regulator you must:
- Dismantle the generator and remove the protective housing located on the back cover.
- Disconnect the standard voltage regulator, check the condition of the collector plates on the rotor of the electric generator.
- Install the three-level regulator: secure with standard nuts and wires.
- Make an output of an additional cable with corrugated protection through an auxiliary hole in the protective housing.
- Mount the control controller and set the necessary operating parameters.
- Replace the electric generator.
The regulator body is installed on the car body, the plug with the letter Ш is used to connect to the modernized brush assembly. The other output from the brushes is connected to the 3rd contact of the B-regulator. Block B is connected to the positive terminal of the battery via a relay, which is powered from the ignition switch.
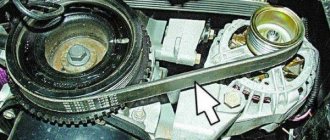
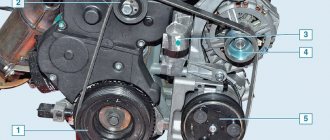
Belt replacement
During use in a car, sooner or later the belt may need to be replaced. To change the drive belt you need to prepare several keys for 10, 12 and 15 then:
- The drive belt of the power steering pump, as well as the fan and crankshaft pulley are removed;
- The fastening bolts at the tension roller are loosened;
- The adjusting bolt is unscrewed, loosened and the pump and generator belt is removed;
- A new belt is installed; to do this, the roller adjustment bolt is screwed in, the belt is tensioned under a deflection of 15 mm, and the fastening bolt is tightened at the tension roller.
It's time to change the alternator belt. In order to do this, we lift the hood, remove the air filter, loosen the tension roller using a 15 mm spanner. Then we easily replace the old belt with a new one, the best choice for us is a 6RK2100 brand belt, the price in the store is 1300. We install the belt in the reverse order. Here is the installation diagram:
After installing the belt, tighten the tension roller back for smooth operation. If you have never changed the alternator belt yourself, then it is better to contact an authorized dealer so that there are no problems later on the road. As a rule, replacing the alternator belt occurs after 15-20 thousand kilometers, but in practice it is better not to wait until these figures, since the quality of the product leaves much to be desired, so we already change the belt at the first maintenance, i.e. after 10 thousand km.
This completes the replacement of the UAZ Patriot alternator belt.
Why does the generator fail?
One of the reasons for generator failure is careless operation of the vehicle. An unpleasant sound that will come from the generator during a trip can warn of a breakdown.
Also, it is not the generator itself that may fail, but its constituent elements, and in this case, repairs alone can be sufficient. But if the situation is not corrected in time, the generator will break down and will need to be replaced.
To replace the generator, it is recommended to contact specialized service stations, where real professionals are ready to take on the work. They will conduct high-quality diagnostics, determine the cause and quickly repair the generator or install a new one. If necessary, you can replace it yourself. But for this you will need to familiarize yourself with how the UAZ Patriot works and the generator connection diagram. In addition, you can watch various photos or videos of similar processes.
Do-it-yourself replacement involves performing several steps.
Preparatory stage
In this case, the car owner needs to prepare the required tools, as well as buy a new generator - this can be the original model or its analogue. The tools you will need are:
- screwdrivers;
- wrenches for various diameters;
- extension;
- hammer.
After this, you can proceed to the next stage.
Main stage
The main stage of replacing a generator involves removing it and installing a new unit. The removal process is divided into several steps:
- First, you will need to install the car in the repair site and take care of fixing its wheels. You will also need to turn off the engine and remove the terminals from the battery. This is necessary to ensure the safety of the work being carried out.
- Next, you need to disconnect the connectors with wires from the generator. This must be done as carefully as possible so as not to damage the wiring and the holes where the wires are attached.
- After this, you need to unscrew the nut from the negative terminal and remove the main cable connected to the generator.
- The fourth step is to remove the drive belt. To do this, you will first need to loosen the rollers to which the belt is attached, and then proceed directly to removing it.
- The next step is to loosen the tension of the counter-bolt and nuts of the upper fastening. It is important to hold the generator at this time to make it easier to unscrew the fastening element.
- The same is done with the bolts and nuts at the bottom of the generator.
Finally, the Patriot owner will only have to unscrew the two bolts securing the upper bracket and remove the generator. After this, you can either repair the failed unit, if during the inspection it turns out that this is possible, or install a new one.
Reinstalling the generator is done in exactly the same way as disassembling the structure, but you need to proceed in the reverse order. Therefore, it is important to mark bolts, nuts and other fasteners during work so that you can understand which element they are responsible for fixing.
Functionality check
When the assembly of the structure is completed, all that remains is to check the functionality of the new generator. To do this, you need to connect the terminals to the battery and start the engine.
The absence of any sound from the generator will indicate that the work was completed successfully and you can continue to operate the vehicle. The same work is carried out for UAZ "Patriot" with air conditioning.
To prevent such problems from arising too often in the future, and to avoid having to spend a lot of money on purchasing a new generator, it is recommended to regularly inspect the condition of the entire vehicle and carry out timely repairs of failed elements.
This is interesting: Hyundai Accent fuses: where they are and how to replace them