Description of the Chevrolet Niva handbrake
The parking brake in a Chevrolet Niva, as in other cars, is an important component of the braking system. Frequent use of the handbrake leads to wear on the cable and brake pads. Therefore, over time, it is necessary to carry out repairs and replacements of worn-out parts of Chevrolet Niva parking brakes.
Why do you need a handbrake on a Chevrolet Niva?
The parking brake serves for:
- Parking a car on slopes or slippery terrain.
- Temporary parking of a car, without turning off the engine.
- Additional braking.
- In case of failure of the main braking system.
The Chevrolet Niva parking brake has the same design as on all other car models. The design consists of the following parts that make up a single integral braking system for the rear wheels of the car:
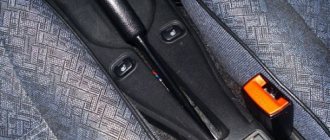
- The handbrake is a lever that is activated by the efforts of a person’s hand, thereby bringing the rear wheels into a locked state. The handbrake consists of a lever, which is about 15 cm long, and covered mainly with decorative materials. The handbrake is located in the Chevrolet Niva (as in all cars) between the driver and passenger seats. It is activated by smoothly pulling the lever towards you. Return to the reverse position by pressing the button and smoothly move it down until it stops. The handbrake has from 3 to 7 squeeze (click) positions, it depends on the tension of the cable. The handbrake operates on the principle of a ratchet mechanism. If the brake cable is loose, the lever is tensioned up to 7 clicks.
- The tension cable is a special steel wire made from a special carbide material that operates the brake pads. The length of the cable on Niva is approximately 2 meters. And it is located under the bottom of the car, sometimes hidden in a rubber or plastic shell.
- Brake pads are an arc (backing) with a special layer (friction plate) that is pressed against the wheel rim, thereby blocking the wheel. Such pads are placed under the wheel rim and are hermetically sealed to prevent the entry of dust, dirt or moisture, which will lead to disruption of the handbrake and damage to its elements. Brake pads wear out quickly when the handbrake is used frequently while driving and require subsequent replacement.
Parking brake adjustment
Adjustment is carried out periodically or if a weakening of the tension cable is detected. It is not difficult to find out that the cable is loose; you will feel that the handbrake does not hold the car in various inclined planes. You can adjust the tension cable and, accordingly, the brake system itself by performing simple sequential steps. It is necessary to drive the car into the inspection hole, or you can do without it, but it will not be very convenient.
To do this, set the handbrake lever to its extreme position towards the floor. In this position of the handbrake, the rear wheels should rotate freely. After this, we lower ourselves into the inspection hole and begin adjusting the cable tension. It is necessary to first unscrew the lock nut with a thirteen wrench, and then begin to tighten the main adjusting nut, while counting the number of turns made.
Tighten the cable three to four turns of the nut, after which you need to squeeze the lever and check at what click the handbrake keeps the wheels stationary. The handbrake is considered normal when the wheels lock at the fifth click. Wheel locking is checked by trying to move the car. After the cable is adjusted, it is necessary to tighten the lock nut all the way to the main nut, and after this the hand parking brake can be considered working.
To be completely convincing, you need to drive up a 25-degree slope and put the car on the handbrake. On the fifth click, the handbrake performs its function - it keeps the car stationary.
Stages of dismantling the hand brake and replacing it
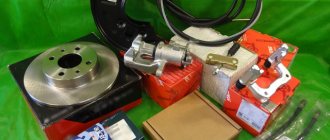
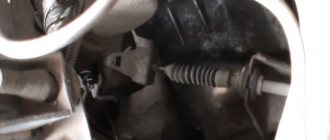
To do this, you need to place the car on a level surface, put it in gear and place chocks under the wheels. The rear wheels must be removed to get to the brake pads. Having reached the pads, it is necessary to disconnect both cables that are connected to the brake pad drive levers. Figure 1 shows the main components of the Chevrolet Niva parking brake.
Figure 1. Parts of the Chevrolet Niva parking brake.
- The handbrake or lever that operates the brake system.
- A button on the end of the handbrake that helps release the car from the brake.
- Traction spring.
- Latch pull.
- The case in which the cable is located.
- Cable.
- A cable guide that goes directly to the brake pad.
- Spacer sleeve.
- Spring.
- Spacer bar.
- A lever that moves the pads into working position.
- Rear cable in a case.
To remove the handbrake elements and subsequently replace them, it is necessary to remove the ends of the cables, and the cables themselves 12, which fit directly to the pads. The lever is removed along with the front cable and all elements. The front cable is pulled out of the lever and replaced with a new one. In the reverse order of removal, all elements of the parking brake are assembled. Replacement is made only of elements or parts that have failed.
During assembly, it is recommended to lubricate the cables and guides together with the bushing with Litol-type lubricants. This is necessary to reduce the likelihood of corrosion.
Replacing pads
Rear brake pads need to be changed when adjustment does not help, and there is no place on the bushing where to tighten the nut. Replacing the pads does not require any special skills, so it can be easily replaced by a young master. To do this, remove the disk, inside of which there are two pads. After which they are inspected; if the top layer is worn off or has a critical thickness, then they need to be replaced. The pads cannot be repaired.
Disconnect one end of the tension spring using a screwdriver and remove it, after which the clearance adjuster earring is removed. Disconnect the cable ends and remove the tension spring. We remove the worn pads and replace them. Before reassembling, it is necessary to measure the diameter of the wheel rim; it must be at least 201 mm. If it is less, it must be replaced. Before installation, lubricate everything with Lithol, except the surface of the pad and disc, and assemble all the parts into place.
Replacing the rear parking brake cable
Replace the rear cable if it is excessively stretched (impossibility of adjusting the parking brake), mechanical damage and loss of mobility in the sheath.
You will need: keys “8”, “13” (two), cobra pliers, pliers.
Loosen the locknut on the front cable end.
Also interesting: What you need to know about the VAZ 21214 engine before buying a Niva | Weak engine
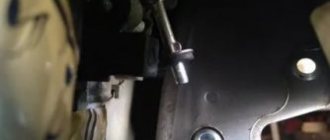
While holding the tip from turning with pliers, unscrew the lock nut and the adjusting nut to the end of the tip.
While holding the tip from turning, remove the lock nut, adjusting nut and spacer from the tip
Remove the guide from the tip and disconnect it from the cable
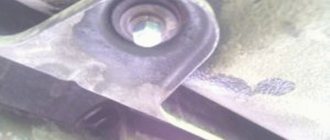
Remove the cable from the rear axle beam bracket and.
. from the body bracket hole.
Remove the two bolts securing the cable sheath holder to the brake shield.
Disconnect the end of the parking brake cable from the drive lever
Pull the cable out of the hole in the brake shield
Similarly, remove the right branch of the cable and remove the rear cable from the car.
Install the new cable on the vehicle in the reverse order of removal.
Replacing parking brake cables
All models under consideration are equipped with an airbag. The airbag is constantly in an “alert” state and can operate (inflate) at any time when the battery is connected. To prevent accidental airbag deployment (and resulting injury), turn the ignition key to the LOCK position and disconnect the negative cable from the battery whenever performing any work on any safety system components.
Replace the rear parking brake cable if it is excessively stretched (impossibility of adjusting the parking brake), or if there is mechanical damage to the cable strands or its sheath.
You will need: a wrench and a 10mm socket head, a flat blade screwdriver, and pliers. 1. Loosen the tension of the drive cables by unscrewing the adjusting nut to the very end of the threaded end of the front cable (see paragraphs 1 and 2 “Replacing the front parking brake cable”), but without removing the nut completely. 2. Disconnect the end of the rear drive cable from the equalizer by moving it out of the equalizer slot. 3. After unscrewing the fastening nuts, remove the cable support bracket on the fuel tank shield... 4. ...then the front one... https://www.youtube.com/watch?v=ZDgQo2otkpk 5. ...and rear holders on the body... 6. ...as well as a holder on the rear suspension arm. 7. Using a screwdriver, remove the installation sleeve of the cable sheath from the bracket on the base of the body... 8. ...and remove the cable from the bracket hole. 9. Remove the brake drum (see “Removing and installing the brake drum”). 10. Use a screwdriver to press the release lever forward... 11. ...and use pliers to disconnect the cable tip from the release lever. 12. On the back side of the brake shield, remove the spring clamp of the cable sheath... 13. ...and, pulling the cable through the hole in the shield, remove it from the car. 14. Install the rear parking brake cable in the reverse order of removal. 15. Adjust the parking brake system (see “Adjusting the parking brake drive”). Rice. 8.9. Parts of the parking brake drive: 1 – lever; 2 – button; 3 – thrust spring; 4 – latch rod; 5 – cover; 6 – front cable; 7 – rear cable guide; 8 – spacer sleeve; 9 – tension spring; 10 – spacer bar; 11 – lever for manual drive of the pads; 12 – rear cable The parking brake is mechanically driven from lever 1 (Fig. 8.9). The middle part of the rear cable passes through the groove of guide 7, the tension of which is adjusted with a nut screwed onto the threaded end of the front cable. A spacer sleeve 8 is installed between the guide 7 and the adjusting nut. At the rear ends of the cable there are tips, each of which is connected to the hook of the lever 11 for the manual drive of the shoes. This lever is pivotally attached to the brake shoe with a finger and its upper part rests against the groove of the spacer bar 10. The rib of the brake shoe is installed in the opposite groove of the bar. Also interesting: Replacing the driven and driven clutch discs. VAZ 21213, 21214 (Niva) 1. Remove the brake drum (see “Removing and installing the brake drum”). 2. Loosen the locknut on the front cable end. 3. While holding the tip from turning with pliers, unscrew the locknut and adjusting nut to the end of the tip. 4. Remove the spring. 5. While holding the tip from turning, remove the lock nut, adjusting nut, and spacer from the tip. 6. Remove the guide from the end and disconnect it from the cable. 7. Remove the cable from the rear axle beam bracket and. 8. . from the body bracket hole. 9. Remove the two bolts securing the cable sheath holder to the brake shield. 10. Disconnect the end of the parking brake cable from the drive lever. 11. Pull the cable out of the hole in the brake shield. 12. Similarly, remove the right branch of the cable and remove the rear cable from the car. 13. Install the new cable on the vehicle in the reverse order of removal. 14. Adjust the parking brake system (see “Checking and adjusting the parking brake”). Replacing the parking brake lever and front cable Replace the lever assembly if the gear sector or pawl is worn or damaged. Replace the front cable if it is excessively stretched (impossibility of adjusting the parking brake) or has mechanical damage.
1. Disconnect the rear cable with guide from the end of the front cable (see “Replacing the rear parking brake cable”). 2. Remove the floor tunnel lining (see “Removing and installing the floor tunnel lining”). 3. Remove the two bolts securing the lever bracket to the floor and remove the lever. 4. Remove the lever axle retaining ring. 5. Remove the lever shaft. 6. Pull the cable inside the cabin. 7. Install the new cable and lever in the reverse order of removal. 8. Adjust the parking brake system (see “Checking and adjusting the parking brake”). Now the cable will not freeze if water gets inside, or even rot. I also cut the springs on the cables, an old technique worked on the nine and six, why not do it on the field. Full size Pull the cable out of the groove in the holder. Next, remove the wheel, unscrew the screw with a 12mm wrench; on old cars there are two screws on the drum and remove the drum. I did this in less than a minute, because when I changed the rear pads at thousands of miles, I lubricated the adjacent plane of the hub with lithol. I decided to write down interesting points. If you have any questions, write in the comments - post Replacement of rear brake pads NIVA sp. We change the Niva brake pads ourselves http: How to change the handbrake lever on a Chevrolet Niva rear brake pads.
|
How to tighten or replace the handbrake on a Chevrolet Niva
By pressing against the brake drum or disc, they immobilize the wheel.
I tighten the handbrake of Chevrolet Niva 4x4 Chevrolet Niva 2016
This type of repair is simple, performed relatively quickly and does not require the use of special equipment. Release the handbrake and check that the rear wheels rotate freely.
Replacing the fuel filter on a Chevrolet Niva - Duration: Garage. Niva. Here's the handbrake! -...
By rotating the adjusting nuts equally, ensure that the pads barely touch the drums and that the wheels rotate with the same resistance. The handbrake consists of a lever, which is about 15 cm long, and covered mainly with decorative materials.
In such a situation, adjustment of the Chevrolet Niva hand brake is required. After dismantling, install a new Niva rear hand brake cable.
If the lever can be raised above eight, then adjust the handbrake cable as described below.
Remove the handbrake boot. On some vehicles, access to the handbrake mechanism may require removing the center section of the tray.
Loosen one bolt on each rear wheel. Raise the car and place it on stands. Remove each loosened bolt.
Using a flashlight, turn the wheel until you see the adjuster gear in the bolt hole.
Rotate the adjuster wheel clockwise or counterclockwise to spread the brake shoes until they touch the brake drum. Move the pads back so that the wheels rotate freely 3 or 4 teeth on the adjuster.
Warning If the adjuster gear is difficult to turn, remove the wheels and brake disc, then lubricate the adjuster and repeat the adjustment. In the case when you pull the handbrake lever towards you for seven clicks of the ratchet mechanism or more, but the car still rolls, the conclusion is as follows: In such a situation, adjustment of the Chevrolet Niva handbrake is required.
This type of repair is simple, performed relatively quickly and does not require the use of special equipment. If you were still not familiar with the structure of the brake system and have never encountered the need to repair the Niva hand brake, this is not a reason to contact service station specialists. Being careful and patient, you can do everything yourself, and the instructions below will provide information on how to tighten the handbrake on a Chevrolet Niva: To do this, place the vehicle on an overpass or find a suitable section of the road.
10.11. Adjusting the hand brake
If the problem occurs, then we proceed to adjustment. Setting the optimal parking brake cable tension is done under the car, so it is better to place it above the inspection hole.
Chevrolet Niva replacing rear brake pads
If this is not possible, use a lift or jack. In any case, the rear of the car must be raised. When the vehicle is ready for use, secure it and release the handbrake lever.
Next, using a wrench, loosen the lock nut on the handbrake adjusting rod, then use a second identical wrench to tighten the adjusting nut until the cable is properly tensioned.
By the way, pliers are needed to keep the rod from turning during the adjustment process. Now tighten the locknut and make a full stroke first to the working position, and then lower it. After this, spin each rear wheel by hand. The rotation must be uniform, jerking is not allowed. The length of the cable on Niva is approximately 2 meters. And it is located under the bottom of the car, sometimes hidden in a rubber or plastic shell.
Brake pads are an arc backing with a special layer of friction plate that is pressed against the wheel rim, thereby blocking the wheel. Such pads are placed under the wheel rim and are hermetically sealed to prevent the entry of dust, dirt or moisture, which will lead to disruption of the handbrake and damage to its elements.
Brake pads wear out quickly when the handbrake is used frequently while driving and require subsequent replacement. Adjusting the parking brake Adjustment is carried out periodically or if a weakening of the tension cable is detected. It is not difficult to find out that the cable is loose; you will feel that the handbrake does not hold the car in various inclined planes.
You can adjust the tension cable and, accordingly, the brake system itself by performing simple sequential steps.
It is necessary to drive the car into the inspection hole, or you can do without it, but it will not be very convenient. To do this, set the handbrake lever to its extreme position towards the floor.
In this position of the handbrake, the rear wheels should rotate freely. After this, we lower ourselves into the inspection hole and begin adjusting the cable tension.
It is necessary to first unscrew the lock nut with a thirteen wrench, and then begin to tighten the main adjusting nut, while counting the number of turns made. Tighten the cable three to four turns of the nut, after which you need to squeeze the lever and check at what click the handbrake keeps the wheels stationary.
Source: https://iaarus.ru/niva-shevrole/kak-podtyanut-ruchnik-na-niva-shevrol.html
Adjusting the NIVA hand brake. We tighten the Niva hand brake cable ourselves
To do this, set the handbrake lever to its extreme position towards the floor. In case of failure of the main braking system. Now tighten the locknut and make a full stroke first to the working position, and then lower it.
The handbrake is located in the Chevrolet Niva (as in all cars) between the driver and passenger seats. ...
You can adjust the tension cable and, accordingly, the brake system itself by performing simple sequential steps.
If during an external inspection the Chevrolet Niva does not hold the handbrake, you notice that the cable is damaged, replace it immediately - do not risk your own safety. Tighten the cable three to four turns of the nut, after which you need to squeeze the lever and check at what click the handbrake keeps the wheels stationary. To do this, place the vehicle on an overpass or find a suitable section of road.
In any case, the rear of the car must be raised. When the vehicle is ready for use, secure it and release the handbrake lever. Next, using a wrench, loosen the lock nut on the handbrake adjusting rod, then use a second identical wrench to tighten the adjusting nut until the cable is properly tensioned.
Brake problems: hard or soft pedal - diagnosis and repair
In my article today I want to talk about the brake pedal, namely what it should ideally be, tight or, on the contrary, soft, how to find this golden mean?
By and large, the brake pedal can have several positions and states.
The first state is the one provided by the manufacturer, when when you press the brake pedal there are no dips or jerks, and no special effort is required. There are also two other unpleasant pedal conditions that can cause driver anxiety.
This refers to the state of the pedal when it is excessively tight or, on the contrary, very soft. Both one and the second phenomenon are equally unacceptable and indicate malfunctions and the need for urgent repairs of the brake system.
A stiff brake pedal can become stiff for several reasons, and they may not necessarily be associated with the traditional “sores” that are typical for all brake models. However, I still propose to consider the most common of them, and I will also try to give practical advice on how to eliminate them.
Most problems that cause the brake pedal to become soft are related to either the vacuum booster or the brake master cylinder.
1. Clogged air filter of the vacuum booster. Treated by replacing the air filter;
2. Sticking of the valve body in the vacuum booster. The vacuum booster needs to be replaced;
3. The vacuum booster diaphragm is damaged. Solved by replacing the vacuum booster;
4. Faulty vacuum booster tip. The tip should be replaced;
5. Sticking or failure of the check valve in the vacuum booster. To eliminate, it is necessary to replace the check valve;
6. The check valve of the vacuum booster is faulty or the seal is broken, resulting in fuel entering the chamber of the vacuum booster. The vacuum booster with check valve should be replaced;
7. Damage to the hose that connects the vacuum booster and the intake manifold, or the hose fastening on the fitting is loose. It can be treated by replacing the hose, or, if possible, by tightening the fastening clamp. The condition of the hose should be regularly monitored, this is especially true in the cold season.
As long as the hose is cold, it retains the necessary rigidity - the brakes function normally. However, after several tens of minutes of motor operation, the hose heats up and becomes more elastic. If, for example, during inspection you do not find delamination, the capacity of the hose will decrease, which in turn can cause problems with the brake pedal.
8. The sealing rings in the working wheel cylinders are swollen; this often occurs as a result of fuel and lubricants getting on their surface, or as a result of using low-quality brake fluid. To correct this situation, it is necessary to repair the working brake cylinders and replace the brake fluid
Here are several ways to independently check the performance of the vacuum booster.
First of all, start the engine to allow a vacuum to occur in the system. After this, press the brake pedal; if the pedal is hard, this is a clear sign of a faulty hose or amplifier. Then turn off the engine and wait 5-7 minutes, do not press the brakes.
It is necessary to specify the malfunction; to do this, press the pedal. If it is still hard, most likely the fault lies in the vacuum booster valve.
There is also another test. When the engine is not running, it is necessary to depress the brake pedal several times in order to remove the vacuum in the brake system. After this, without releasing the pedal, you need to start the engine; if the pedal begins to move down a little, the amplifier is in order.
Also interesting: How to bleed the brakes of a Niva Chevrolet
Cause of soft brakes
A soft brake pedal, as a rule, simultaneously indicates several breakdowns in the brake system. More precisely, there are many reasons why the brake pedal can become soft. Sometimes this phenomenon is also called brake pedal failure.
https://www.youtube.com/watch?v=06Jj1Cy_KxQ
Air brake system. Troubleshooting occurs by bleeding the brakes and removing air from the brake system.
1. Low level of brake fluid in the expansion tank, depressurization of the brake system;
2. The main brake cylinder is faulty. A malfunction of the working cylinder occurs as a result of boiling brake fluid or when the piston jams. This malfunction can be eliminated by repairing the brake cylinders, or replacing the brake fluid.
I wish you success in carrying out independent diagnostics and repairs of the brake system. Don’t delay this, no matter how you twist it, working brakes are the key to your safety, as well as other road users.
How to tighten or replace the handbrake on a Chevrolet Niva
The parking brake in a Chevrolet Niva, as in other cars, is an important component of the braking system. Frequent use of the handbrake leads to wear on the cable and brake pads. Therefore, over time, it is necessary to carry out repairs and replacements of worn-out parts of Chevrolet Niva parking brakes.
How to tighten the handbrake on a Chevrolet Niva. instructions
Check the operation of the automatic slack adjuster mechanism by pressing the brake pedal. Ask to tighten the Chevrolet Niva handbrake, go to the drums and listen for clicks, indicating the correct operation of the mechanism. Install the wheels, then lower the car to the ground and tighten the wheel bolts to the torque specified in the Specifications.
Handbrake adjustment Models with rear drum brakes Location of the adjusting nut with the handbrake cable adjuster attachment on models with a SOHC engine The optimal clearance between the brake pads and the brake drum is maintained by an automatic adjustment mechanism, however, with prolonged use of the vehicle, the handbrake cable stretches, resulting in increased tightening Handbrake Niva Chevrolet handbrake lever.
Raise the rear of the car and secure it on stands. In this position of the handbrake, the rear wheels should rotate freely.
tighten the handbrake Niva Chevrolet After this, we lower ourselves into the inspection hole and begin adjusting the cable tension. It is necessary to first unscrew the lock nut with a thirteen-size wrench, and then begin to tighten the main adjustment and tighten the Chevrolet Niva handbrake, while counting the number of revolutions made.
Tighten the cable three to four turns of the nut, after which you need to squeeze the lever and check at what click the handbrake keeps the wheels stationary.
The handbrake is considered normal when the wheels lock at the fifth click.
Wheel locking is checked by trying to move the car. After the cable is adjusted, it is necessary to tighten the lock nut all the way to the main nut, and after this the hand parking brake can be considered working.