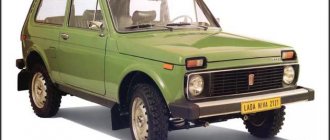
What does the electrical circuit of a VAZ-21213 or, in other words, Niva (carburetor) look like? This question worries mainly those owners who are trying to independently repair any element that has become unusable.
In reality, the circuit contains almost a hundred components and devices, so in this article we will only talk about individual electrical circuits that most often fail.
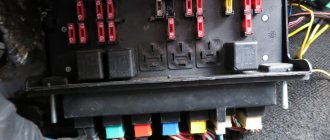
Circuit breakers
The block of protective devices in Niva is a board on which disposable fuses are installed, containing a fuse inside. Each of them protects one or more electrical circuits from overvoltage.
The unit is located in the cabin on the left side. Protective equipment is numbered. So, 1 is responsible for the work:
- windshield washer;
- stove fan;
- cleaners for all headlights;
- heating, wiper and washer for tailgate glass.
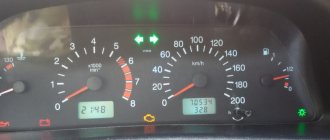
Pinout of the dashboard VAZ 21214 injector
©Ivan Skrydlov (aka Aktuator) 2005
To begin with, the standard instrument cluster was removed, the colors of the wires in the WHITE and RED connectors were rewritten and their purpose was established (see the corresponding tables). The next step was to compile a table of reconnection of wires in the connectors for the new instrument cluster. It is located below in the text.
It was very difficult to pull the wires out of the white and red blocks. The fact is that in addition to the clamps on the terminals of the wires crimped at the ends, the blocks also had plastic clamps molded during their production. Therefore, in order to pull out the terminals, it was necessary to simultaneously press both latches and also pull the wire. In general, a third hand was really missing.
There were no problems with fastening, since, structurally, the mounting locations for both instrument combinations are absolutely identical.
The disadvantages of the work done include a slightly wider visible part of the “VDOsh” combination than that of the standard overlay. Because of this, in order to see the outer lamps in the bottom row, you need to move your head slightly forward as the car moves. In addition, small gaps have formed between the trim and the upper corners of the instrument cluster. However, mechanical modification was not part of the task, the client was satisfied, and the last drawback - the discrepancy between the readings of the “fuel level sensor” and the actual remaining fuel in the tank due to the different geometric shape of the latter, will hopefully be eliminated in the near future.
The work was carried out over several days, as windows appeared between clients, and took about three to four hours.
Instrument panel connector pinout 21214
| White block (X 1) | Red block (X 2) | ||
| 1 | Empty | 1 | Empty |
| 2 | High beam warning lamp | 2 | To terminal “15” of the ignition switch |
| 3 | To the gab. lighting (control lamp) | 3 | Low voltage tachometer input |
| 4 | To terminal “15” of the ignition switch | 4 | To the instrument lighting control |
| 5 | To hazard warning switch | 5 | High voltage tachometer input |
| 6 | To output "D" of the generator | 6 | Housing (weight) |
| 7 | Empty | 7 | To terminal “50” of the ignition switch (starter) |
| 8 | PTF warning lamp | 8 | To the parking brake switch |
| 9 | Warning lamp for heated glass | 9 | Empty |
| 10 | Check Engine | 10 | To the fuel reserve lamp |
| 11 | To fuel level sensor | 11 | To differential lock sensor |
| 12 | Check Engine | 12 | To oil pressure sensor |
| 13 | To the coolant temperature gauge sensor | 13 | To brake fluid level sensor |
Dashboard
All control devices are interconnected. This combination consists in particular of:
- speedometer;
- tachometer;
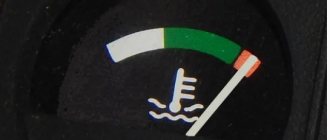
- coolant temperature indicator;
- 12 indicator lamps;
- battery charge sensor;
- fuel level indicator.
All of them are located on the panel.
The schematic diagram shows the combinations available on the instrument panel:
- tachometer (1);
- stabilizer (2);
- panel illumination (3);
- coolant heating indicator (4);
- gasoline level (5);
Warning lamps:
- toxicity reduction systems (6);
- heated luggage door glass (7);
- fog lights (8);
- high beam (9);
- outdoor lighting (10);
- turn signals (11);
- TG level (13);
- oil pressure (14);
- differential locks (15);
- fuel reserve (16);
- seat belts (17);
- parking brake (18).
D1, D2 are diodes (type IN4002).
Cars manufactured before 1996 also have a voltmeter (12 in the diagram).
Finally, there are two resistors:
- R1 – at 470 Ohm (0.25 W);
- R2 –51 Ohm, (5 W).
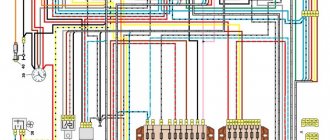
Electrical diagram of VAZ 21214 with central fuel injection
| 1. “CHECK ENGINE” indicator light; 2. Instrument cluster (fragments); 3. Electric fans of the engine cooling system * ; 4. Electric heater for the intake pipe; 5. Air temperature sensor; 6. Absolute pressure sensor; 7. Coolant temperature sensor; 8. Block connected to the throttle position sensor; 9. Central fuel injection unit; 10. Block connected to the idle speed regulator; 11. Block attached to the nozzle; 12. Diagnostic block; 13. Controller; 14. Knock sensor; 15. Speed sensor; 16. Oxygen concentration sensor; 17. Adsorber; 18. Battery; 19. Main relay; 20. Engine control system fuse block; | 21. Relay for turning on the electric fuel pump; 22. Relay for turning on the electric fan * ; 23. Relay for turning on the electric heater of the inlet pipe; 24. Electric heater protection fuse; 25. Starter activation relay; 26. Ignition relay; 27. Main car fuse box (fragment); 28. Spark plugs; 29. Tachometer; 30. Electric fuel pump with fuel level sensor; 31. Ignition module; 32. Crankshaft position sensor; 33. Courtesy light switch located on the driver's door pillar; 34. Control unit of the automobile anti-theft system **; 35. Automotive anti-theft system status indicator ** ; |
Description
The electrical equipment of the Niva 2121 is made according to a single-wire circuit: the negative terminals of the sources and consumers of electricity are connected to the “ground” - the body and main components of the car, which act as the second wire. The on-board network of the Niva 2121 is DC with a rated voltage of 12 V. When the engine is not running, all consumers are powered by the battery, and after the engine starts, by an alternating current generator with a built-in rectifier and electronic voltage regulator. When the generator is running, the battery is charged.
Most electrical circuits are protected by fuses . The electric motors of the VAZ 2121 gearmotors (windshield wipers, tailgate glass, headlights - if installed) are protected by automatic reusable bimetallic fuses. The power supply circuit of the injection system is protected by a fuse-link made of wire with a conductor of reduced cross-section (1 mm2). The battery charging, ignition, engine starting, and “generator – ignition switch – fuse box” circuits are not protected. Powerful consumers (starter, headlights, electric motors Niva 2131 cooling system fans, electric fuel pump, etc.) are connected via a relay.
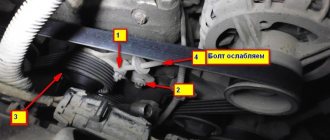
Chevrolet Niva hub - replacement
Do-it-yourself improvements to Niva 2121
To replace the wheel bearing in the field, you need to pull out the hub. This is carried out according to the following plan.
1. Dismounting the conical bushing.
2. Unlocking the nuts. The problem may lie in the fact that they often lick off or turn sour. In this case, you can use a chisel and a light hammer.
3. Use the nineteenth socket or wrench to remove the lever clamps. They are located both front and back.
4. The locking plates are removed. These are metal perforated strips that are often overlooked.
5. The seventeenth and tenth keys require removing the circuit pipes.
6. A stop is installed under the lever. Using two twelfths keys, unscrew the nut fixed on the upper arm retainer bolt.
7. The lower block is also unscrewed in the same way.
8. When there are no fasteners left, it is possible to pull out the entire system at once.
9. By fixing the steering knuckle with a clamp, you can knock out the hub.
10. After this, the screws securing the knuckle to the lever mechanism are removed.
Knowing the structure of the front wheel hub of Niva 21213, you can carry out repairs yourself, without contacting a service center.
Installation of a dashboard (panel) from a foreign car on a VAZ 2110
| Over time, the interior of the car becomes boring and you want to update it somehow. More often, a feeling of satisfaction comes after minor changes to the interior, for example, painting plastic, replacing the steering wheel or radio. If you are not satisfied with this tuning, try replacing the VAZ dashboard with a panel from a foreign car. |
There are many topics on the Internet about installing dashboards from foreign cars on VAZ 2101-07, 2109-99 and even Moskvich 2141. As a rule, the panels are borrowed from old BMW models (E36) or Opel Vectra, and they fit Russian cars with virtually no modifications. Installing a dashboard on a VAZ 2110 from a foreign car will not be easy; you will have to redo it, adjust it, trim it, so many say that it is easier to buy a new car. “The eyes are afraid, but the hands are doing”, here is one good example of such an installation, when a panel from a Volkswagen Passat (B5), which was produced from 1996 to 2005, was installed on the “ten”. The panel was received without covers, a glove compartment, plastic sides, a light control module and other things that had to be purchased later. It’s worth noting right away that the process of replacing the dashboard itself will take a lot of time. If you can remove the original panel of the “tens” in a working day (instructions), then installing a panel from a foreign car will take several times more time and effort, and this is primarily due to adjustment, local modifications, etc. So, the Volkswagen torpedo underwent a little trimming and adjustment, after which it was in the right place. The next stage is finishing the stove. Here it was decided to use the Finnish dignity. a unit that served as air ducts to the left and right parts of the dashboard. xn--2111-43da1a8c.xn--p1ai
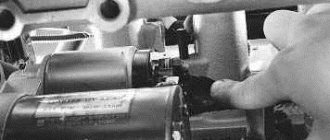
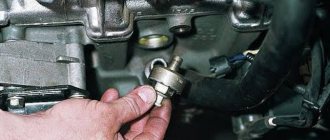
Replacement.
To remove the DS, you need to place the car on a level surface. After this, it is best to disconnect the battery terminals to avoid errors in the BC.
Disconnect the wire terminals; to do this, press the plastic lock on the block. After this, use a wrench to unscrew the sensor from its seat. If you cannot unscrew it immediately, it is not recommended to use excessive force. You need to treat the threaded connection with WD-40, wait a few minutes and continue dismantling.
Installation of a new DS is carried out in the reverse order. When purchasing a new part, you need to pay attention to the external condition: the contacts must be treated with a sufficient amount of varnish, as this protects them from moisture. After completing the work, it is necessary to reset the on-board computer errors in order to remove the CHECK ENGINE error.
Also interesting: Chevrolet Niva fan does not turn on
As for its location, look for the DS in the engine compartment in close proximity to the exhaust manifold. To be honest, the place where it is installed cannot be called ideal. While the car is running, the manifold heats up. The sensor wires rub against it, which over time leads to malfunctions and short circuits.
It doesn’t matter whether you have an injection car or a carburetor with a Europanel - the connection of the speed sensor to the instrument cluster is identical.
Replacing the VAZ speed sensor: step-by-step instructions:
- Drive into the pit - it will be more convenient to work from below - and wait until the engine cools down.
- Turn off the vehicle's power by removing the cable from the negative terminal of the battery. Do not close the hood after this, this will provide you with lighting.
- Locate the speed sensor on the transmission. Clean it and everything near it with a rag to remove any dirt.
- By pressing the spring clip, disconnect the wire block from the sensor.
- Dismantle the sensor itself by unscrewing it counterclockwise - with your fingers or an open-end wrench to “22”.
- Carefully, so as not to break anything, install a new part in place of the removed part. Connect the wire block to it and the procedure for replacing the speed sensor can be considered complete.
How to properly connect a new DS? It is important here that the device rod fits correctly into the fixing sleeve, otherwise rotation will not be transmitted to the sensor. If the sensor fits into the socket the first time, then everything is in its place, and if something prevents it from moving, then the rod did not fit into the bushing.
Which torpedo is suitable for the VAZ 2107? When you want comfort
Many owners wonder which torpedo is suitable for the VAZ 2107. This is not an idle question. After all, the driver spends most of the time on the road looking at the dashboard. The “seven” torpedo was developed more than 30 years ago. In this regard, its angular shape hurts the eye. Also, the devices are quite faintly visible. After all, their scales are simply painted on plastic with white and sometimes red paint. This reduces the ability to see instrument readings in the dark. Also, this appearance has no attractiveness. Therefore, many drivers replace dashboards. Panel or torpedo? Which torpedo is suitable for a VAZ 2107? The issue is complex, but completely solvable. Just to begin with, you should determine how radical the alterations will need to be made. Such tuning can be done in two ways:
- Replacing the dashboard;
- Replacement of the entire torpedo.
The first option will allow you to get by with little expense and replace the panel with another one that suits you more. You just have to adjust the socket a little in size. It is somewhat more difficult to install a new panel. At the same time, it must be suitable in size and provide the ability to connect all vehicle systems. The final choice depends on your final goals and capabilities. Dashboard Let's start with the simplest tuning option. A donor will have to be found for a replacement. The simplest option would be to install a panel from a VAZ 2110. There will be a minimum of problems with this work, and the resulting design will look much more advantageous. You will have almost no problems connecting wires. Here they are almost identical. All main devices are also connected in the same way. Tools you will need are a soldering iron and scissors. In order for the devices to work better, you need to install fluid reservoirs from 2110 under the hood. Another equally common option is to install a dashboard from GAZ 3110. It also looks much better. The installation itself is practically no different from similar work with a panel from a VAZ 2110; it can also be adjusted to size using a soldering iron and scissors. But here you will have to tinker with connecting devices. For example, you purchase a tee from a “six”, and use it to connect an econometer and an oil pressure sensor. It is recommended to install a speed measurement sensor used in the tenth family of VAZs. These are the easiest panels to install. But you can use this part from other foreign cars. Just be sure to take into account the compliance of the VAZ 2107 devices with the chosen foreign car. The easiest way is to find a similar set of sensor readings displayed on the panel in foreign-made cars produced in the late 80s and early 90s. Changing the torpedo Some drivers are not satisfied with the appearance of the torpedo on the VAZ 2107. Sometimes this element from the “five” may be installed on the car. In this case, a purely practical inconvenience is added to the unpleasant appearance. You have to close the glove compartment with a universal “lock”, or rather, seal it with tape. Otherwise it will constantly open. Therefore, you can change the torpedo. Of our models, the best fit is a spare part from a VAZ 2115. You just have to use polyurethane foam to seal small non-joints. Of the foreign cars, the best fit here is a torpedo from a BMW E30. She will look much more advantageous. There is another option, to install a torpedo from a Toyota Camry. It is slightly wider than the standard part. Therefore, for a more accurate installation, you will have to trim the torpedo a little from the bottom on the sides. But even in this case, it will interfere with the window regulators. So get ready to install electric lifts right away. This will be the best option. You will also have to struggle with installing the steering wheel cover. The standard cover will not fit into the steering wheel opening on the BMW dashboard. Therefore, craftsmen usually perform adjustments. Some people cut the panel, but it is much easier to cut off the excess from the casing. It is better to use standard mounts from the original torpedo, only they are slightly bent. Often the torpedo can sag downwards, so it is advisable to immediately provide support. Connecting the stove. Many drivers cannot connect the stove. The problem is that the air ducts do not match. Therefore, you will have to make special adapters. To do this, you can use air ducts from the Gazelle. All that remains is to adjust them a little and secure them. It is best to use a cable from the heater from BMW. It is much easier to connect it to the stove than the original Zhiguli one to a new torpedo. By the way, according to