Published:
06.12.2016
Adjustment of VAZ-2108 Solex carburetors can be carried out independently by motorists. After successfully installing the carburetor on the engine, you need to configure it for the power unit to guarantee stable operation of the device. Despite the fact that initially numerous doubts arise regarding how to correctly carry out the setup procedure, you can successfully cope with the task.
Owners of a VAZ 2108 will sooner or later be faced with the need to adjust the carburetor
Level determination in float chambers
In each case, the adjustment begins with setting the appropriate level in the float chambers. Not everything is configured from the factory, so you need to take care of completing the task yourself.
The driver must set the gasoline level correctly:
- At the first stage, it is recommended to start the engine and let it run. Most often it takes about five minutes. At this time, you are allowed to gently throttle, because otherwise the extra effort will lead to shooting at the carburetor or exhaust pipe.
- After the engine starts running, it is recommended to carefully turn it off.
- The next step is to carefully remove the fuel supply hose. You need to act carefully, as gasoline may splash out of the structure. If this task is not completed, correct readings will not be achieved. Only if you successfully remove the carburetor cap will fuel flow under pressure into the chamber. Otherwise, no changes will be recorded and the help of specialists will be required.
- The next task is to unscrew the 5 screws that attach the carburetor cover. Now you can remove the choke cable.
- The carburetor cover may be removed. It must be kept in a horizontal position. Whether the floats can be kept intact and operational largely depends on the correctness of these actions.
- It is recommended to measure the distance. For correct measurements, use a caliper. If it is missing, a ruler is recommended. The distance should be between 23 and 25 millimeters in both chambers. In any case, the indicators in the chambers used will differ slightly from each other, because the collector is not located horizontally. In order to assess the correctness of the indicator, it is recommended to find out the average value. If deviations are detected, the tongue is carefully bent in the desired direction, after which the gasoline is partially poured out. Only after all indicators meet the established standards is it possible to assemble the camera in the reverse order.
- The final stage of the test is starting the engine. At this time, it is important to look into the carburetor chambers. In order to see everything, you will need a powerful flashlight. It is advisable to watch for at least 30 seconds. During this time, not a single drop of used fuel should fall. If gasoline drips from the diffusers, an overflow may be suspected. After everything, the gasoline level in the chamber is re-measured.
The engine cannot be fully started. Otherwise, there is a risk of overflow when the engine is running. It is important to understand that adjusting the floats of the VAZ-2108 Solex carburetor is only the first and important stage of engine tuning.
Recommended Method
Level control technology includes a number of stages:
- We dismantle the housing of the air filter element. To do this, unscrew the fastening nut of the housing cover, unclip the latches, remove the cover, take out the filter and tighten the 4 nuts that secure the housing to the carburetor.
- Raise the body and disconnect the rubber pipes. We move the body to the side.
- Loosen the clamps securing the fuel pipes going to the carburetor and disconnect them.
- Remove the wire suitable for the idle speed solenoid valve;
- Disconnect the drive cable of the air damper (the “choke” handle);
- Unscrew the 5 screws securing the carburetor cover;
- Having removed the cover, we immediately determine the fuel level in the chambers by lowering a ruler or caliper into one of them until it stops (using its depth gauge). If the measurement shows a level of 25-26 mm, it corresponds to the norm and no adjustment is required;
If the amount of fuel in the chamber is lower or higher than normal, we perform a visual inspection and a series of measurements on the floats, and if necessary, we correct their position.
To carry out adjustment work, place the removed carburetor cover on a flat horizontal surface with the floats facing up.
First, we look at the position of the elements from above. The outer side surfaces of the floats are parallel to the special imprints on the gasket. Deviations can cause the floats to touch adjacent elements and surfaces, causing the fuel level to be incorrect. If necessary, adjust the position of the floats by bending their mounting arms.
The next step is to measure the gap between the floats and the gasket. A rod with a diameter of 2 mm is useful here - this is how much the specified gap should be.
If it does not correspond, we bend the tongue of the floats, with which they act on the locking needle. After this adjustment, we check the total height of the floats, which is normally 34 mm. If this is not the case, check the gap again, adjust it if necessary and measure the height again.
The last stage of setup is determining the working stroke of the floats. To do this, place a caliper near the float, mark the distance from its lower corner to the surface of the cover, then lift the float with your hand and mark where the lower corner is.
A working stroke of 15 mm is considered normal; if it differs, it is adjusted by bending the tongue.
Idle speed setting
After correctly setting the gasoline level, it is recommended to warm up the engine to operating temperature. Then the engine is turned off and the idle speed is set. A properly tuned engine should successfully exhibit its optimal performance characteristics.
Instructions:
- Using a flat-shaped screwdriver, you need to feel the mixture quality screw located in the carburetor base.
- The screw is turned clockwise until it stops. You cannot use force. Otherwise, the thread will be torn off.
- From the achieved position you need to make 5-6 revolutions back.
- The engine needs to be started, after which the suction is eliminated. The screw sets the minimum speed, taking into account the fact that the motor must operate stably. The minimum vacuum must be set in the fitting. Optimal speed indicators are 500–1200. If the indicator fits within the specified limits, the carburetor has been corrected and adjusted, making it ready for full operation.
- Now you need to tighten the screw. The main indicator of the achieved result is the beginning of unstable operation of the motor. For stable operation of the engine you will have to make 1–1.5 revolutions back. It is advisable to perform such actions slowly. If you rush, you will not be able to achieve good results.
- You need to set the speed with the screw to about 850–900. Most often, these characteristics are successfully perceived by the VAZ, allowing you to count on a decent ride in the car. If any deviations are noted, you need to unscrew the screw a little and ensure that the standard indicators are corrected.
- Points 5 and 6 are repeated until the optimal ratio for stable engine operation and minimum vacuum in the car tube can be found.
Important points
- Before adjusting the carburetor, it is recommended to self-clean it. To do this, a special liquid for cleaning carburetors is poured into the gas tank, the engine starts and runs (the volume of liquid poured and the engine operating time are always indicated on the container with the cleaning liquid and depend on the specific brand). Sometimes this measure is enough to get rid of the above signs of carburetor malfunction and do without fine adjustments.
- If self-cleaning does not help, there is only one way out: you need to remove and wash the carburetor. For washing, both special liquids and ordinary kerosene are used. It is strictly not recommended to use brushes or fluffy rags to remove dirt. Hairs and lint remaining in the small holes of the carburetor can negate all efforts to clean it. The best option: thorough rinsing in a special liquid, and then blowing out all small holes with compressed air.
- Before removing the carburetor and cleaning the inside, it is recommended that the outside be thoroughly cleaned. Moreover, it is necessary to clean not only the carburetor itself, but also all the parts located next to it. Please be aware that any dirt left on adjacent parts may find its way into the clean carburetor when it is installed back into the engine. And if this happens, the entire cleaning procedure will have to start again.
In order for the carburetor to work correctly, attention should be paid not only to its adjustment, but also to cleaning. If any of these procedures are neglected, the carburetor will soon fail again. In addition, attention should be paid not only to the quality of gasoline, but also to the condition of the car’s air filter, since in some cases it is a worn filter that causes rapid contamination of the carburetor.
Copywriter with five years of experience. (1 vote, average: 5 out of 5)
Setting up jets
The jets may only be adjusted based on how they are supposed to work. Otherwise, actions will not bring the desired result. The engine jet is required for the successful passage of air flow through the diffuser opening. The large volume of the power unit will lead to successful air intake by the motor. In carburetors that are designed for large engines, it is customary to install small jets. The conformity of all installed jets is a mandatory requirement. Correctly installed jets guarantee successful operation of the VAZ-2108 Solex engine.
How does Solex differ from ozone and Weber?
- Solex carburetors have a number of advantages over Ozone and Weber models:
- Reliability. The number of parts included in the design is minimized, which reduces the risk of breakdown.
- The Solex carburetor is used in transverse installations of power units.
- The design of the float chamber and its location at the front prevent the mixture from becoming lean during sudden accelerations of the vehicle, in rolls and on steep inclines. This eliminates power loss while driving.
- The Solex double chamber helps improve mixture formation and more efficient use of fuel. The use of a two-chamber arrangement allows increasing the engine power at high speeds.
- The presence of diffusers in the lower part of the housing improves the filling of the combustion chambers with the fuel mixture.
Acceleration pump
The accelerator pump determines how much gasoline will be consumed when driving the car. In addition, the optimal acceleration parameters of the vehicle are determined.
To start its operation, use a cam, which is part of the accelerator pump. For the UZAM engine, the accelerator pump cam must have the largest dimensions.
The flow of fuel used must be smooth. Otherwise, you may suspect serious problems with the working accelerator pump. The appearance of a tiny trickle or small drops casts doubt on the stable operation of the equipment.
A mandatory requirement is correct adjustment of the position of the spout. Gasoline must go through the following path:
- opening between the diffuser and the installed throttle valve;
- direction to the collector.
If gasoline spills onto the damper or diffuser, there is a risk that the car will not be able to show its optimal parameters when starting the engine.
The correct operation of the accelerator nozzle must be monitored, since it determines whether the Solex carburetor can operate successfully.
Basic Solex malfunctions
The Solex carburetor, despite its high operational reliability, may not work well due to the following malfunctions:
- Increased gasoline consumption, smoke, poor starting when hot due to a faulty fuel valve and, as a result, fuel overflow.
- Clogged jets. The engine “doesn’t pull”, it doesn’t start well, you can hear popping noises in the carburetor.
- The car accelerates poorly and stalls at idle. Violation of the tightness of gaskets and diaphragms of the device. The Solex carburetor accelerator pump needs repair.
- Unstable operation in all modes due to low-quality gasoline or water ingress.
- Floating idle speeds and failures in operation are possible due to wear of the dampers.
- Insufficient motor power may be a result of air leaks due to deformation of the flanges. This happens as a result of overtightening the nuts. In addition, air enters the device through the cracks, bypassing the air filter. This can both deplete the mixture in the carburetor and lead to clogging of the air jets with dust.
- A cold engine will not start. The reason is that the starting device is not configured correctly. The air damper does not sufficiently block the air intake, which leans the combustible mixture. In another case, the valve does not open correctly, and the engine is filled with too rich a mixture.
- A heated engine does not start well due to an over-rich combustible mixture. This is often caused by gasoline overflowing in the float chamber due to improper float adjustment. The fuel valve may lose its seal.
Most problems in the operation of the carburetor are associated with clogging of the conductive channels and nozzle holes with dust, dirt and water, so repairing a Solex carburetor mainly involves disassembling it and cleaning it from contaminants. The main thing is to know how to properly adjust the carburetor after disassembling, cleaning and reassembling.
Transition mode
Opening the throttle valves is not allowed even at idle engine speed. A significant vacuum is always created under them for the successful release of gasoline and starting the engine. A sharp opening leads to a sharp drop in vacuum, but it turns out to be too weak for the main system of the first chamber to work successfully. The idle system and the functionality of the accelerator pump are no longer sufficient for the successful and stable operation of the carburetor. This leads to failure. A transition system is required to eliminate the resulting failure. When you press the gas, the hole can go into an area of strong vacuum, as a result of which gasoline consumption increases. This hole can also receive fuel through a jet.
Before understanding how to adjust the transition mode for successful riding, it is recommended to understand potential problems. Motorists often complain about the following problems:
- engine failure at start;
- dullness of the engine when starting to drive the car;
- the engine may simply sneeze, shoot and even stall.
The transition regime leads to similar violations. To eliminate various troubles, it is recommended to choose the most suitable location for the accelerator pump spout and nozzle. The engine must receive the optimal volume of high-quality mixture. Otherwise, he may choke.
Successful start-up of the engine is only possible if the correct transient settings are made. From the very beginning, the engine should pick up speed without delay and reach the desired value.
Broken ratios of indicators lead to disruption of engine operation. In this case, you need to adjust until the acceleration occurs according to the correct pattern.
If, despite all the actions taken, there are serious problems with speed gain and the engine can only run jerkily, shake and hum, the jets of the first chamber are not configured correctly.
The most tedious situation is to sort through the carburetor jets and the accelerator pump nozzle. This is done before setting the car to start correctly. Additionally, the motorist adjusts the idle speed, since the jet affects the idle speed.
Setting up the carburetor 2108, 21081, 21083 Solex
If any problems arise in the operation of the carburetor, when replacing your carburetor with another with unknown and untested parameters, when carrying out maintenance (every 15,000 km), etc., it is necessary to fully configure the operation of its systems and mechanisms.
There are two options for setting up the carburetor.
The first is the “without removing the carburetor from the car engine” setting.
The second is the “removed carburetor” setting.
Let's take a closer look at the second option since it is the most complete and allows you to configure the operation of those systems and mechanisms that are not directly accessible.
Required Tools
To set up the carburetor, we will need almost the entire set of tools used for its repair and maintenance. A detailed list can be found on the “Carburetor Repair Tools” page. And also, it will not be superfluous to purchase in advance and have in stock a repair kit for your carburetor model.
The procedure for performing work on setting up the Solex 2108, 21081, 21083 carburetor
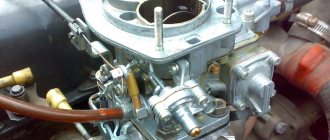
— Remove the carburetor from the car engine
Remove the air filter housing. Disconnect all hoses and tubes leading to the carburetor. We disconnect the drive rods (throttle valve, air damper), remove the wire tips from the output of the solenoid valve and the sensor on the “quantity” screw. We unscrew the four nuts securing the carburetor to the intake manifold and lift it. We unscrew the screw securing the idle zone heating unit and remove the carburetor completely. The removal procedure is described in more detail on the page “Removing the Solex carburetor from the engine.”
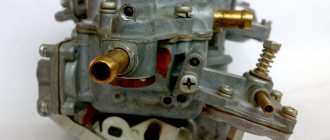
— We completely disassemble the carburetor
Carburetors 2108, 21081, 21083 Solex and their modifications are quite simple, so there should be no difficulties in disassembling them. The fact that they consist of only two parts (lid and body) also simplifies the work. For a detailed list of actions when disassembling a carburetor and their sequence, see the page “Complete disassembly and subsequent reassembly of carburetor 2108, 21081, 21083... Solex”.
Completely disassembled upper part (“cover”) of the Solex carburetor 2108, 21081, 21083
— We wash and clean the carburetor parts
They should be divided into two parts - metallic and non-metallic. We wash the metal ones with acetone (or a similar cleaning liquid), clean them, blow them with compressed air, but do not need to wash the non-metallic ones (membranes, gaskets, O-rings...). We inspect and reject defective parts (torn membranes, gaskets, O-rings, etc.). We check the markings of the jets with the parameters specified for each modification. For everything related to cleaning and cleaning the carburetor, see here “Cleaning and cleaning Solex and Ozone carburetors.”
— Assembling the carburetor
We carry out the assembly guided by the algorithm proposed in the articles: “Assembling the carburetor body 2108, 21081, 21083 Solex” and “Assembling the carburetor cover Solex 2108, 21081, 21083”. We replace the parts rejected at the previous stage with new ones. If you forgot where, how and what it was, look at the pictures in the article.
— Adjust the fuel level in the float chamber
Before making adjustments, check the serviceability of the needle valve and the integrity of the floats and their correct installation. Adjusting the fuel level on Solex carburetors consists of setting the required position of the floats relative to the top part (cover) of the carburetor. According to factory technology, the installation of floats is carried out using a special caliber. But you can do without it. All details of adjusting the fuel level are described on the page “Adjusting the level in the float chamber of the Solex carburetor.”
Setting the correct position of the floats on the carburetor 2108, 21081, 21083 Solex
— We set gaps in the starting system
We set the starting gaps between the edge of the air damper, the edge of the throttle valve and the wall of the first chamber. We check the ease of opening and closing them. We make sure that the air damper opener mechanism works smoothly and without jamming. Read more about setting up the carburetor starting system on the page “Adjusting the starting device of the Solex 2108, 21081, 21083 carburetor” or “Adjusting the starting device of the Solex 21083 carburetor (removed from the engine)”.
Checking and adjusting the starting gap “A” at the edge of the air damper of the Solex 21083 carburetor
— We check the correct operation of the throttle valve drive of the second chamber and the mechanism for blocking its opening
It should begin to open slightly when the throttle valve of the first chamber is already one third open. “Adjusting the throttle valve drive of the second chamber of the Solex carburetor.”
— Checking the operation of the accelerator pump
While the carburetor is removed from the engine, it is possible to fine-tune the flow of fuel jets from the accelerator pump nozzle. Ideally, the jets should not touch the damper, chamber walls, etc., and should fall clearly downwards. Pour water into the float chamber and sharply press the throttle valve drive lever of the first chamber, holding the carburetor in front of you. If the drop of the jets does not correspond to the required one, bend the spray tubes. By performing this operation several times, you can achieve almost perfect operation of the accelerator pump. Other important points for checking the accelerator pump are outlined on the page “Checking and repairing the accelerator pump of the Solex carburetor.”
Solex accelerator pump nozzle
— We check the operation of the power mode economizer and econostat
The main malfunction of the economizer is damage to its diaphragm. For this reason, fuel consumption increases, idle speed is no longer adjustable. What else should be checked in this device, see the page “Repair of the economizer of power modes of the Solex carburetor.”
Replacing the economizer diaphragm of the power modes of the Solex 21083 carburetor
The normal operation of the econostat can only be affected by blockages in its channels, so we pay special attention to their cleanliness.
"Solex carburetor ecostat."
Solex carburetor econostat parts that need to be checked and repaired
— Install the carburetor on the engine
It is advisable to replace the gaskets under the carburetor with new ones.
Gaskets for Solex carburetor
And also check the lower plane of the carburetor for deformation. We place it on a obviously flat surface (for example, a sheet of thick glass) and make sure that the lower surface of the carburetor fits tightly and without gaps. The maximum permissible gap is 1 mm. Deformation can be eliminated by grinding or adding extra gasket.
Checking the mating plane of the Solex carburetor flange for deformation
— We adjust the air and throttle valve actuators
“Adjusting the throttle valve drive of the Solex carburetor”,
“Adjusting the Solex carburetor air damper drive.”
— Start the engine and adjust the idle speed
If the setting is carried out correctly, the idle speed should be adjusted without difficulty.
“Adjusting the idle speed of Solex 2108, 21081, 21083.”
Reinstall the air filter housing.
We check the dynamics and fuel consumption of the car while driving.
That's it, the setup is complete.
Twokarburators VK - More information on the topic in our VKontakte group, on Facebook Twokarburators FB and on Odnoklassniki - Twokarburators OK
More articles on setting up carburetors 2108, 21081, 21083 Solex
— Carburetor needle valve 2108, 21081, 21083 Solex
— Checking the serviceability (tightness) of the needle valve of the carburetor 2108, 21081, 21083 Solex
— Econostat carburetor 2108, 21081, 21083 Solex
— Modification of the air damper drive of the carburetor 2108, 21081, 21083 Solex
— Calibration data and parameters of Solex carburetors
— Blocking the opening of the throttle valve of the second chamber of the Solex carburetor
Things to remember
The second chamber should not change its characteristics in any way when adjusting the carburetor. Most often, it is enough to correctly configure the factory jets. To compensate for the lack of jets and the first chamber, an econostat is used. What is its essence? The econostat allows you to guarantee complete vacuum when additional gasoline is successfully sucked out. This scheme is required at high speeds to improve the fuel composition. If you want perfect characteristics, you need to install improved jets with selection according to the first scheme.
Motorists should remember: adjusting the VAZ-2108 carburetor determines the functionality of the car.
If the article was useful, write to us.
Device
The carburetor of the VAZ 2108 car consists of two main parts - upper and lower. In each of them, there are some parts and mechanisms that are directly connected to each other. Let's look at the design of the standard Solex carburetor in more detail:
- Float chamber. It houses the jets, float and throttle valve;
- The first and second chambers, with a dosing device;
- Vehicle idle system;
- Transition system located in the second chamber;
- Econostat;
- Pneumatic economizer;
- Accelerator pump;
- Gasoline starting mechanism;
- EPHH;
- System providing crankcase ventilation;
- The mechanism that controls the dampers.
The purpose of the Solex carburetor is to accurately dose gasoline, mixing it with oxygen. Distribute the resulting mixture evenly among the cylinders. The flaps move alternately.
Replacement or cleaning
Practice shows that in a fairly large number of cases, simply cleaning the idle air regulator allows you to restore its functionality. Therefore, we advise you to try this method first. And if it does not give results, then it will not be difficult to replace the device.
- Buy a container of carburetor cleaner. In this case, your engine may well be fuel-injected. It’s just that this composition is excellent for cleaning IACs and more.
- Disconnect the connector with wires from the sensor, unscrew the two fasteners and remove the affected regulator itself.
- Clean the regulator from accumulated debris and contaminants, and be sure to clean the needle and spring itself. This should be done with carburetor cleaner. Use available tools to tidy up a fairly compact device.
- Be sure to clean the idle air control housing on the throttle assembly. This is where the cone-shaped needle of the XX sensor enters.
- After completing the cleaning of the device, return it to its place and check its operation.
- If cleaning does not bring the desired result, the engine continues to behave inadequately, you will have to purchase a new regulator and install it in place of the old sensor.
- Before replacing, be sure to turn off the power to the car by disconnecting the negative terminal from the battery, then disconnect the block with the power wires, unscrew the mounting screws and remove the device.
- Reassemble in reverse order.
Disassembling the unit for cleaning or replacement The main thing here is to act carefully and not to overdo it with the carburetor cleaner if you first decide to try cleaning the device. Otherwise, replacing the IAC does not cause problems even for beginners.